As seasoned developers, we are all familiar with the temptation to use JavaScript as our go-to solution for every web development challenge. However, the “Rule of Least Power” (RoLP) reminds us that there are simpler ways to do so. This principle, created by Tim Berners-Lee, the inventor of the World Wide Web, suggests that one should use the least powerful language capable of solving a problem.

So, in the spirit of Berners-Lee’s philosophy, we will look at practical implementations of the RoLP, focusing on how we can use HTML and CSS to build high-performance solutions for components that we would have otherwise used JavaScript for. We’ll look at real-world scenarios where we often default to JavaScript, and then we’ll see how to use HTML and CSS as a simpler alternatives to them.
The Replay is a weekly newsletter for dev and engineering leaders.
Delivered once a week, it's your curated guide to the most important conversations around frontend dev, emerging AI tools, and the state of modern software.
Let’s look at some common web components and compare their JavaScript implementations to their HTML/CSS counterparts. We’ll focus on the difference between these approaches and how they affect performance and maintainability.
While a JavaScript approach might offer fine-grained control, an HTML/CSS version like using the <details> and <summary> elements can give us built-in accessibility and keyboard navigation while using less code.
The code sample below shows how it’s possible to customize the look, making it a simpler solution:
JavaScript implementation:
document.querySelectorAll('.accordion-header').forEach(header => {
  header.addEventListener('click', () => {
    const content = header.nextElementSibling;
    content.style.display = content.style.display === 'none' ? 'block' : 'none';
  });
});
HTML/CSS implementation:
<details>
  <summary>Accordion Header</summary>
  <p>Accordion content goes here.</p>
</details>
See the Pen
Accordion Showdown: HTML/CSS vs. JavaScript Implementation by Timonwa (@timonwa)
on CodePen.
While an HTML/CSS approach to creating an accordion may not offer you the same level of control as its JavaScript version (for example, closing the modal when a user clicks outside the modal content), it is more than sufficient for most scenarios, including modals.
JavaScript implementation:
const modal = document.getElementById('modal');
const btn = document.getElementById('openModal');
const close = modal.querySelector('.close');

btn.onclick = function() {
  modal.style.display = "block";
}

close.onclick = function() {
  modal.style.display = "none";
}

window.onclick = function(event) {
  if (event.target == modal) {
    modal.style.display = "none";
  }
}
HTML/CSS implementation:
<a href="#modal" class="modal-trigger">Open Modal</a>
<div id="modal" class="modal">
<div class="modal-content">
<a href="#" class="close">×</a>
<p>Modal content goes here.</p>
</div>
</div>
.modal {
  display: none;
  position: fixed;
  z-index: 1;
  left: 0;
  top: 0;
  width: 100%;
  height: 100%;
  background-color: rgba(0, 0, 0, 0.4);
}

.modal-content {
  background-color: #fefefe;
  margin: 15% auto;
  padding: 20px;
  border: 1px solid #888;
  width: 80%;
}

.modal-trigger {
  display: inline-block;
  padding: 10px 20px;
  font-size: 16px;
  font-weight: bold;
  color: white;
  background-color: #434141;
  border: none;
  border-radius: 5px;
  text-decoration: none;
  cursor: pointer;
  text-align: center;
}

.close {
  color: #aaa;
  float: right;
  font-size: 28px;
  font-weight: bold;
  text-decoration: none;
}

/* HTML/CSS-only modal styles */
#modal:target {
  display: block;
}
See the Pen
Modals Showdown: HTML/CSS vs. JavaScript Implementation by Timonwa (@timonwa)
on CodePen.
Here, the HTML/CSS version uses the :target pseudo-class to toggle the modal’s visibility. The anchor tags serve as triggers, linking directly to the modal’s id, which provides modal functionality without using JavaScript. By clicking the close icon, the modal window returns the URL fragment to #, hiding the modal again by removing the :target state.
HTML provides us with a number of built-in form attributes we can use to validate our forms without using Javascript. Some of them are required, minlength, maxlength, pattern, and type (e.g., email, number) for specifying the rules of the inputs, ensuring that our users provide us with correct information.
With CSS, we can also style form elements based on their validation state with pseudo-classes such as :valid and :invalid, highlighting the fields with errors or successful styling or messages.
This approach simplifies form validation, keeping it efficient and user-friendly without the need for JavaScript.
JavaScript implementation:
<form>
  <input id="email" placeholder="Email">
  <input id="password" placeholder="Password">
  <button id="submit-btn">Submit</button>
</form>
document.getElementById("submit-btn").addEventListener("click", () => {
  const email = document.getElementById("email").value;
  const password = document.getElementById("password").value;
  let valid = true;

  if (!email.includes("@")) {
    alert("Please enter a valid email");
    valid = false;
  }

  if (password.length < 8) {
    alert("Password must be at least 8 characters long");
    valid = false;
  }

  if (valid) {
    alert("Form submitted successfully!");
  }
});
HTML/CSS implementation:
<form>
  <input type="email" id="email" required placeholder="Email">
  <input type="password" id="password" minlength="8" required placeholder="Password">
  <button type="submit">Submit</button>
</form>
See the Pen
Form Validations Showdown: HTML vs. JavaScript Implementation by Timonwa (@timonwa)
on CodePen.
Using the HTML/CSS approach not only reduces code complexity but takes advantage of the native browser features, potentially improving performance and user experience.
With the introduction of @keyframes alongside CSS transitions, it is now easier to create animations that are more accessible without using JavaScript. With @keyframes, we can define smooth, multi-step animations by specifying different stages of an element’s appearance over time, while transitions allow us to enable simple effects like hover states or state changes in our elements:
<div class="box"></div>
JavaScript implementation:
function animate(element, property, start, end, duration) {
  let startTime = null;

  function step(timestamp) {
    if (!startTime) startTime = timestamp;
    const progress = Math.min((timestamp - startTime) / duration, 1);
    const current = start + (end - start) * progress;
    element.style[property] = current + "px";
    if (progress < 1) {
      window.requestAnimationFrame(step);
    } else {
      // Reset position to start for infinite effect
      element.style[property] = "0px";
      startTime = null; // Reset startTime for the next cycle
      window.requestAnimationFrame(() =>
        animate(element, property, 0, end, duration)
      );
    }
  }

  window.requestAnimationFrame(step);
}

const box = document.querySelector(".box");
animate(box, "left", 0, 300, 3000);
CSS implementation:
.box {
  width: 50px;
  height: 50px;
  background-color: blue;
  position: relative;
  animation: moveRight 3s ease-in-out infinite;
}

@keyframes moveRight {
  from {
    left: 0;
  }
  to {
    left: 300px;
  }
}
See the Pen
Animations Showdown: HTML/CSS vs. JavaScript Implementation by Timonwa (@timonwa)
on CodePen.
Using CSS animations and transitions keeps our animations lightweight, responsive, and easy to manage.
With the HTML attribute title, we can effectively create tooltips for any element without the need for CSS or JavaScript. Combine the CSS :hover pseudo-class with the attr() function and ::after or ::before pseudo-elements, and we can create custom tooltip designs to match the look and feel of our site.
These offer lightweight solutions to maintaining accessibility and performance while enhancing the user experience with helpful, non-intrusive information.
JavaScript implementation:
<span class="tooltip-target" data-tooltip="This is a tooltip">Hover over me</span>
const tooltip = document.createElement("div");
tooltip.classList.add("tooltip");
document.body.appendChild(tooltip);

document.querySelectorAll(".tooltip-target").forEach((element) => {
  element.addEventListener("mouseover", (e) => {
    tooltip.textContent = e.target.dataset.tooltip;
    tooltip.style.display = "block";
    tooltip.style.left = e.pageX + "px";
    tooltip.style.top = e.pageY + "px";
  });

  element.addEventListener("mouseout", () => {
    tooltip.style.display = "none";
  });
});
HTML implementation:
<span title="This is a tooltip">Hover over me</span>
See the Pen
Tooltip Showdown: HTML/CSS vs. JavaScript Implementation. by Timonwa (@timonwa)
on CodePen.
While we can’t directly compare CSS functions to JavaScript, we can often use them to replace JavaScript for specific calculations and dynamic styling. Here’s an example using CSS custom properties with the calc() function. The first code block you’ll use in either implementation, then you can see the JavaScript vs. CSS renditions:
<div class="container">
  <div class="column">Column 1</div>
  <div class="column">Column 2</div>
  <div class="column">Column 3</div>
</div>
.container {
  display: flex;
}
JavaScript implementation:
function updateColumnWidth() {
  const container = document.querySelector(".js-only");
  const columns = container.querySelectorAll(".column");
  const gap = 20;
  const width =
    (container.offsetWidth - gap * (columns.length - 1)) / columns.length;

  columns.forEach((column) => {
    column.style.width = `${width}px`;
    column.style.marginRight = `${gap}px`;
  });
}

window.addEventListener("resize", updateColumnWidth);
updateColumnWidth();
CSS implementation:
.container {
  --column-count: 3;
  --gap: 20px;
  display: flex;
  gap: var(--gap);
}

.column {
  width: calc(
    (100% - (var(--column-count) - 1) * var(--gap)) / var(--column-count)
  );
}
The CSS solution uses calc() and custom properties to create a flexible layout that adapts to the container’s width without using JavaScript.
See the Pen
CSS Functions vs. JavaScript Implementation. by Timonwa (@timonwa)
on CodePen.
Custom cursors can be created using HTML and CSS by using the cursor property with a url() that points to an image. This method is efficient for static designs and can enhance visual effects without JavaScript. Using the JavaScript approach allows you to mimic the browser cursor by creating a hover effect that follows the mouse movements, allowing for dynamic changes. However, using JavaScript could come with performance overhead and may not move as smoothly as a CSS cursor, so whether or not it’s worth implementing should be weighed against other factors in your project.
JavaScript implementation:
<section class="js-only">
  <h2>Custom Cursor with JavaScript</h2>
  <div class="custom-cursor-example">
    <div class="custom-cursor">Move your cursor over the page</div>
  </div>
</section>
.js-only {
  position: relative;
  cursor: none;
}

.js-only .custom-cursor {
  width: 20px;
  height: 20px;
  border: 1px solid black;
  background-color: #fff;
  border-radius: 50%;
  position: fixed;
  pointer-events: none;
  left: -100px;
  top: 50%;
  transform: translateY(-50%);
  transition: all 0.1s ease;
  transition-property: width, height, border;
  z-index: 9999;
}

.js-only:hover .custom-cursor {
  width: 30px;
  height: 30px;
  border: 4px solid blue;
}
document.addEventListener("mousemove", (e) => {
  const cursor = document.querySelector(".js-only .custom-cursor");
  cursor.style.left = e.clientX + "px";
  cursor.style.top = e.clientY + "px";
});
CSS implementation:
html {
  cursor: url('data:image/svg+xml,<svg xmlns="http://www.w3.org/2000/svg" width="48" height="48" viewBox="0 0 24 24"><circle cx="12" cy="12" r="9" fill="%23FFF" stroke="blue" stroke-width="2"></circle></svg>'),
    auto;
}
See the Pen
Custom Cursor Showdown: HTML/CSS vs. JavaScript Implementation. by Timonwa (@timonwa)
on CodePen.
To quantify the performance differences between JavaScript and HTML/CSS implementations, we can use tools like Lighthouse, Chrome DevTools, and WebPageTest.
Lighthouse gives us an overall performance audit of our pages, and also checks for web development best practices. With it, we can gain insights into the First Contentful Paint (FCP), Largest Contentful Paint (LCP), and Time to Interactive (TTI) of our pages, amongst others.
With Chrome DevTools’ Performance Tab, we can get a detailed analysis of the runtime performance of our pages. Some of the data we can get are the JavaScript execution time breakdown of our scripts, layout and style recalculation timings, paint and composite events, and memory usage over time.
WebPageTest is used for real-world performance testing across different devices and network conditions. Its key features are waterfall charts of asset loading, film strip view of page load, and comparison of first view vs. repeat view.
However, for simple components like the ones used in this article, it would be difficult to spot any difference between JavaScript and any Rules of Least Power implementations.
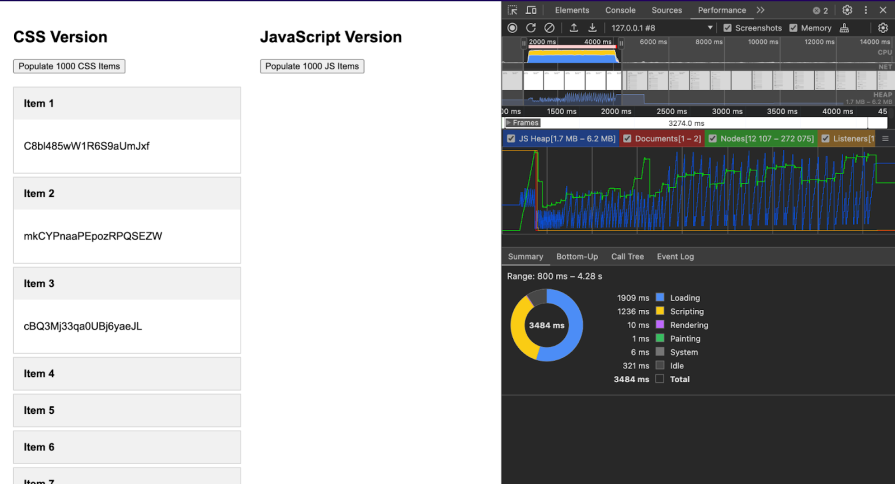
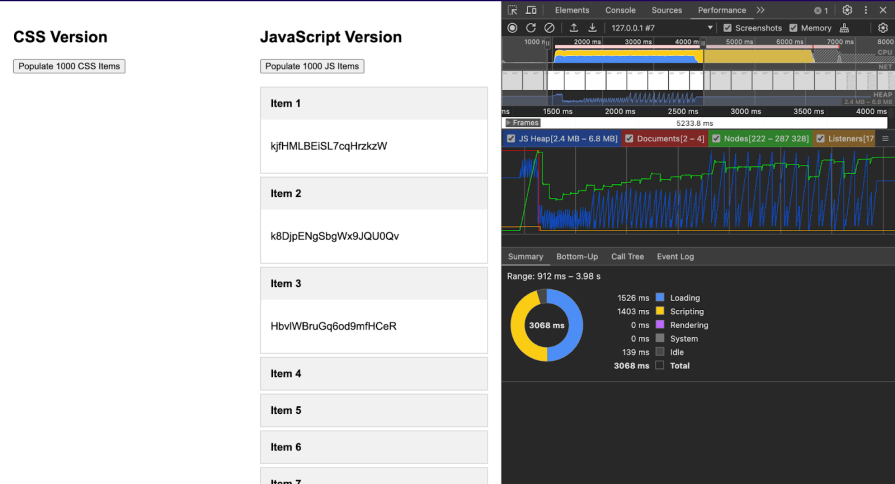
For a more noticeable difference, let’s consider a complex scenario where we render 1,000 accordions on the page. Using both approaches to create them and analyze them with Chrome Dev Tools, we have the following results where: the HTML/CSS version takes approximately 1236ms for the scripts to load, while the JavaScript version takes approximately 1403ms. You can view the code here.

HTML/CSS version takes approximately 1236ms for the scripts to load

JavaScript version takes approximately 1403ms for the scripts to load
Although this difference seems small, in large-scale applications or on less powerful devices, the difference can be significant. This example shows how, even in modern browsers and fast devices, choosing to use JavaScript or HTML/CSS can have measurable performance implications.
By consistently using these tools and keeping an eye on key performance metrics, we can identify areas where the Rule of Least Power can be applied to yield significant improvements in our application’s performance.
While JavaScript is still essential in web development, there are many scenarios where HTML and CSS can provide more efficient solutions. Here are some best practices to consider:
As advanced developers, it’s important that we continuously reassess our toolset and approach to building in web development. Following the Rule of Least Power principle doesn’t mean that we should avoid JavaScript altogether, but that we should choose the right tool for each job.
By leveraging the power of HTML and CSS, we can create more performant, accessible, and maintainable solutions.
Now, I challenge you to go through your current projects and look at them through the lens of RoLP. You might be surprised at the number of JavaScript-based solutions you can replace with HTML and CSS, simplifying your codebase and enhancing its performance.
Not only will this lead you to have better-performing websites, but it will also result in code that’s easier to maintain and debug in the long run.
Remember, being an expert developer isn’t about using the most complex approach to solve a problem; it’s about knowing when to use a simpler approach. By shrewdly implementing HTML and CSS alongside JavaScript, you’ll become better equipped to make these decisions and create truly optimal web experiences.
As web frontends get increasingly complex, resource-greedy features demand more and more from the browser. If you’re interested in monitoring and tracking client-side CPU usage, memory usage, and more for all of your users in production, try LogRocket.

LogRocket lets you replay user sessions, eliminating guesswork around why bugs happen by showing exactly what users experienced. It captures console logs, errors, network requests, and pixel-perfect DOM recordings — compatible with all frameworks.
LogRocket's Galileo AI watches sessions for you, instantly identifying and explaining user struggles with automated monitoring of your entire product experience.
Modernize how you debug web and mobile apps — start monitoring for free.

@container scroll-state: Replace JS scroll listeners nowCSS @container scroll-state lets you build sticky headers, snapping carousels, and scroll indicators without JavaScript. Here’s how to replace scroll listeners with clean, declarative state queries.

Explore 10 Web APIs that replace common JavaScript libraries and reduce npm dependencies, bundle size, and performance overhead.

Russ Miles, a software development expert and educator, joins the show to unpack why “developer productivity” platforms so often disappoint.

Discover what’s new in The Replay, LogRocket’s newsletter for dev and engineering leaders, in the February 18th issue.
Would you be interested in joining LogRocket's developer community?
Join LogRocket’s Content Advisory Board. You’ll help inform the type of content we create and get access to exclusive meetups, social accreditation, and swag.
Sign up now