BLoC is an extremely powerful solution for state management in the Flutter ecosystem. The acronym BloC simply means a business logic component. In computer sciences, this is referred to as the logic layer or business logic part of a program that encapsulates rules dictating how data can be created, stored, or modified.

The BLoC library was created to cater to state management, making it simple, powerful to use (even with large-scale business logic), and also testable at the same time.
BLoC is made up of events and states. It takes in events, and based on predefined rules, yields a different state once data has been processed to meet certain criteria.
Hydrated BLoC, on the other hand, is an extension of the bloc package which provides out-of-the-box persistence for our blocs or cubits.
There are lots of benefits associated with properly persisting the state of our applications. It makes our applications easier for users to make use of, especially when they do not have to re-enter certain data every time they launch our application.
This situation occurs mainly because of how our operating system tends to clear or destroy our activities and states that are contained in it, whenever we close our application.
For instance, most users would prefer using a weather application that by default, shows the weather situation of your recent location or the last location you checked, rather than having to manually search your location anytime they open it.
Another good example of situations where state persistence is of utmost importance can be experienced when using a browser application. Rather than always having to browse the internet afresh, most people would love to continue from the last page they were on while using their browser application, and this is where saving the state of your application should be a huge consideration for you.
If you are using the BLoC library for state management in Flutter, then you do not need to write a lot of code to save and restore your state. You can simply make use of the hydrated BLoC from the BLoC library, and this is similar to onSaveInstanceState() for those that come from a native Android development background.
In this tutorial, we are going to build a simple random number generator. In order to demonstrate how to use persist the state of our application, we will make use of our Hydrated BLoC to ensure that whenever the app is restarted, it displays the last random number that was generated.
In order to use Hydrated BLoC for State persistence, this article assumes you have a basic understanding of using the BLoC library for state management.
During the course of this project, we will need to persist our blocs, and we‘ll start by adding the necessary dependencies to help us do that.
One of these is the latest version of the hydrated bloc library, and we add other dependencies as shown in our pubspec.yaml file below:
dependencies:
 hydrated_bloc: ^8.1.0
 flutter_bloc: ^8.0.0
 equatable: ^0.5.1
 json_annotation: ^3.0.0
 path: ^1.8.0
 path_provider: ^2.0.9
The next step you need to do is point the Hydrated BLoC library to a path where it should persist data on our local storage
The code snippet inside of our main method below helps us achieve this task:
Future<void> main() async {
  WidgetsFlutterBinding.ensureInitialized();
 final storage = await HydratedStorage.build(
  storageDirectory: kIsWeb
      ? HydratedStorage.webStorageDirectory
      : await getTemporaryDirectory(),
);

HydratedBlocOverrides.runZoned(
  () => runApp(AppView()),
  storage: storage,
);
}
The reason we call WidgetsFlutterBinding.ensureInitialized() before runApp is that Hydrated BLoC has to communicate with native code, and to ensure that we do this seamlessly, we check that everything is natively initialized.
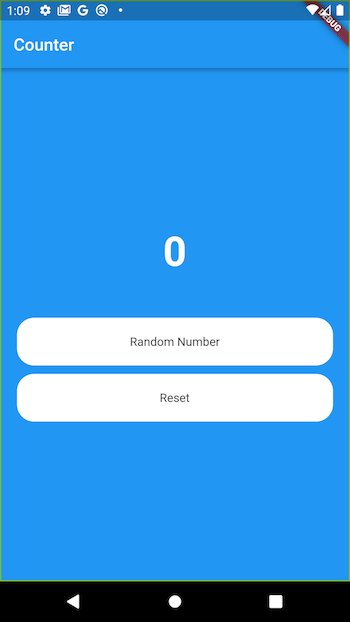
HydratedStorage.build() function is then used to create a storage for our application. The storageDirectory parameter is set to that of the webStorageDirectory depending on the platform, else it would by default be set to the device’s temporary storageHydratedStorage.build() also checks if any previously saved data exists and tries to restore that data by deserializing it and emitting the state that was last saved on our application. This is possible because Hydrated BLoC uses Hive under the hood to store datarunApp with HydratedBlocOverrides.runZoned()For our view, we have a simple UI consisting of a text view and two buttons. One of our buttons is for generating a random number and the other is for resetting the generated random number to zero:
class RandomNumberView extends StatelessWidget {
  @override
  Widget build(BuildContext context) {
    final textTheme = Theme.of(context).textTheme;
    return Scaffold(
      appBar: AppBar(title: const Text('Counter')),
      body: Container(
        decoration: BoxDecoration(color: ThemeData().primaryColor),
        child: Center(
          child: BlocBuilder<RandomNumberBloc, int>(
            builder: (context, state) {
              return Column(
                mainAxisAlignment: MainAxisAlignment.center,
                children: [
                  Text('$state',
                      style: textTheme.headline2?.copyWith(
                          fontSize: 48,
                          fontWeight: FontWeight.bold,
                          color: Colors.white)),
                  const SizedBox(
                    height: 50,
                  ),
                  Button(
                    title: "Random Number",
                    action: () {
                      context
                          .read<RandomNumberBloc>()
                          .add(GenerateRandomNumber(max: 20, min: 1));
                    },
                  ),
                  const SizedBox(
                    height: 10,
                  ),
                  Button(
                    title: "Reset",
                    action: () {
                      context.read<RandomNumberBloc>().add(ResetRandomNumber());
                      HydratedBlocOverrides.current?.storage.clear();
                    },
                  )
                ],
              );
            },
          ),
        ),
      ),
    );
  }
}
In order to make our bloc available to the rest of our widget tree, we are going to pass it down to the widget tree using the BlocProvider.
BlocProvider is used to provide a widget with access to a bloc, and it uses dependency injection (DI) to ensure that a single instance of the bloc is available to multiple widgets within the widget tree:
class RandomNumberGeneratorPage extends StatelessWidget {
  @override
  Widget build(BuildContext context) {
    return BlocProvider<RandomNumberBloc>(
      create: (_) => RandomNumberBloc(),
      child: RandomNumberView(),
    );
  }
}
In order to use Hydrated BLoC, we have to replace our regular Bloc with HydratedBloc or use the mixin HydratedMixin, and this is what our RandomNumberBloc looks like:
class RandomNumberBloc extends HydratedBloc<RandomNumberEvent, int> {
  RandomNumberBloc() : super(0) {
  on<GenerateRandomNumber>((event, emit) =>
        emit(_fetchRandomNumber(maxNumber: event.max, minNumber: event.min)));
    on<ResetRandomNumber>((event, emit) => emit(0));
  }

  @override
  int fromJson(Map<String, dynamic> json) => json['value'] as int;

  @override
  Map<String, int> toJson(int state) => {'value': state};

  int _fetchRandomNumber({required int maxNumber, required int minNumber}) {
    return minNumber + Random().nextInt(maxNumber - minNumber + 1);
  }
}
And for our event class, we have just two events. One for generating a random number and the other for resetting the generated random number:
abstract class RandomNumberEvent {}

class GenerateRandomNumber extends RandomNumberEvent {
  final int max;
  final int min;

  GenerateRandomNumber({required this.max, required this.min});
}


class ResetRandomNumber extends RandomNumberEvent {}
Here we do not have a state class, and this is because our state is simply an integer. Hence, this is less complexity, which would demand writing a full class for it.
In order to store our data, we need to serialize it for more complex models. By this, I mean we have to convert it to JSON format. To achieve this, we have to override the fromJson and toJson methods in our bloc class, which extends HydratedBloc or uses the HydratedMixin.
When our state goes through our bloc class, it gets saved by default because Hydrated BLoC uses Hive under the hood to persist data. And whenever our app is restarted, it listens to our states and data ,which has been saved to our previous states so it won’t be lost.

State persistence can be a necessity and provide a seamless and user friendly experience to users of our application.
Achieving this can be in order, and simple as possible using the hydratedBloc pattern as demonstrated above.
You can find the codebase of this application here.
Install LogRocket via npm or script tag. LogRocket.init() must be called client-side, not
server-side
$ npm i --save logrocket

// Code:

import LogRocket from 'logrocket';
LogRocket.init('app/id');
// Add to your HTML:

<script src="https://cdn.lr-ingest.com/LogRocket.min.js"></script>
<script>window.LogRocket && window.LogRocket.init('app/id');</script>
Hey there, want to help make our blog better?
Join LogRocket’s Content Advisory Board. You’ll help inform the type of content we create and get access to exclusive meetups, social accreditation, and swag.
Sign up now
This guide walks you through creating a web UI for an AI agent that browses, clicks, and extracts info from websites powered by Stagehand and Gemini.

This guide explores how to use Anthropic’s Claude 4 models, including Opus 4 and Sonnet 4, to build AI-powered applications.

Which AI frontend dev tool reigns supreme in July 2025? Check out our power rankings and use our interactive comparison tool to find out.

Learn how OpenAPI can automate API client generation to save time, reduce bugs, and streamline how your frontend app talks to backend APIs.