When building web applications, performance and optimization are key features to keep in mind. The first impression you offer your users can make a significant difference. If a user visits your website and encounters a slow-loading page, it gives them a bad impression because they won’t be able to engage with the contents of your website.

An optimized, fast website page load with seamless interactions creates a positive user experience and low user drop-off. It also improves search engine optimization (SEO) rankings.
In this article, we’ll explore optimizing static pages in Next.js using Prisma. Next.js provides a robust framework for static site generation, while Prisma is a modern database toolkit that simplifies database operations and data consistency. Together, they enhance the speed and efficiency of static pages in Next.js applications.
Jump ahead:
getStaticProps to fetch data during build timegetStaticProps function
Next.js simplifies the development process of frontend web applications and also optimizes your web applications through features like server-side rendering. Server-side rendering involves pre-rendering a webpage on the server before sending it to the client for use to enable immediate display and improve SEO. Next.js also offers client-side rendering based on your use case.
Another great feature of Next.js is its file-based routing system, i.e., when you start up a Next project and create a folder called contacts, then create an index.js file inside this folder, the name of the folder immediately becomes the route path.
This means you can go to the URL localhost:3000/contact and your contact page will be loaded, unlike in React where you will have to set up complex configurations for routing.
Lastly, Next.js blurs the intersection of frontend and backend by providing developers the ability to write serverless functions directly in the Next.js project. Since the release of Next.js version 9, developers have been able to create full-stack applications using Next.js and serverless functions via its API routes.
Static site generation refers to the process where your HTML file is generated at build time and reused on every request that is made.
For example, say that we’re building a single-page, production-ready application using next-build. An HTML file for that page is generated at the build time. When a client accesses the deployed website, this pre-generated HTML file is served for every request, making it cacheable by a content delivery network. In Next.js, you can statically generate a page with or without data.
For static generation without data, pages are generated without fetching any external data at build time.
Say we have a simple React component, and you run the command next build. The HTML file is pre-rendered using static generation without data when there’s no need for external data fetching. This approach is especially beneficial for index or marketing pages that feature static markup without requiring external data.
Let’s take a look at the code below:
const Services = () => {
return (
   <div>
     <h1>Here is an overview of our services</h1>
   </div>
  )
 }

export default Services;
Here, we are only pre-rendering a simple React component (Services) – no external data is being fetched. By default, Next.js will pre-render this page using static generation without data. It will generate it as a single HTML file per page during build time.
In static generation with data, the pages are generated only after fetching the external data at build time. What does this mean? Say you have a users page in your Next.js application. When a client makes a request to this page, you want to fetch and display some user data on the page. You can use static generation with data to fetch the external data, after which the HTML can be generated.
Let’s take a look at the example below:
import React from "react";
const Users = ({ users }) => {
return (
<div>
<h1>Here is a List of our Users</h1>
{users.map((user) => (
<div key={user.id}>
<h2>{user.name}</h2>
</div>
))}
</div>
);
};

export default Users;

export const getStaticProps = async () => {
const response = await fetch("https://jsonplaceholder.typicode.com/users");
const users = await response.json();
console.log("users", users);

return {
props: { users },
};
};
Here, the data is being fetched using a function called getStaticProps. This function is called during build time to fetch the needed data, allowing us to pass the fetched data to the page’s props (Users, in this case) on pre-render. We’ll talk more about getStaticProps in a later section.
As previously mentioned, SSG pre-renders webpages during build time, thereby generating static HTML files that are served to the client directly from a content delivery network.
SSG improves SEO by allowing search engines to crawl and index your website effectively because the content is readily available in the HTML, which will lead to better search engine visibility and ranking.
Prisma is a next-generation Node.js and TypeScript ORM that helps streamline database access and management. It offers a type-safe, schema-first approach to database interaction.
The first step in setting up Prisma with Next.js is to initialize Next.js using the command that was mentioned earlier: npx create-next-app your-app-name.
If you have not previously installed Prisma, do so with the command npm install -g prisma. Then, install Prisma as a dev dependency in your Next.js app using npm i prisma -D. Finally, install Prisma Client with the command npm i @prisma/client. This creates an instance of Prisma to use in our application.
Once these dependencies are installed, run the command prisma init, which will generate a Prisma folder that contains the schema and an env file.
For this project, we will use MySQL as our database. Feel free to use any other database for the database connection. From the MySQL workbench, click on Create a new connection, add a connection name, and click on OK to set up a new connection:
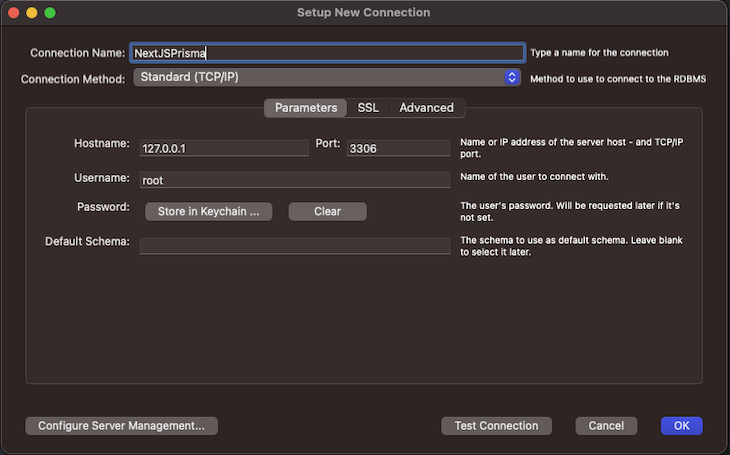
In the .env file, replace the default DATABASE_URL value with the MySQL connections string in this format: mysql://user:password@host:port/dbName. In this case, it will look like this:
.env
DATABASE_URL="mysql://root:[email protected]:3306/NextJSPrisma"
Then, open the schema.prisma file and create a model call user like so:
model User {
id Int @id @default(autoincrement())
email String @unique
name String?
password String
createdAt DateTime @default(now())
updatedAt DateTime @updatedAt

@@map(name: "users")
}
Then, run the npx prisma db push command to push the changes to the MySQL database. Once it’s successfully connected, you should see a message like this:

Now let’s open our connection on the MySQL workbench to see the users schema that has been created:
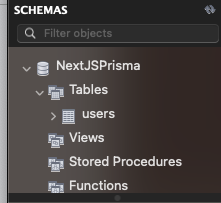
We have successfully connected our MySQL database with the Prisma schema. Now we can interact with our database in the Next.js app using Prisma.
In the pages folder, create a new route with the filename users.js. Then, in the src/pages/users/index.js file, run the following code:
import React from "react";

const Users = () => {
return (
<div>
<h1>This is the Users Page</h1>
</div>
);
};

export default Users;
This creates a new user route. Now, when you go to localhost:3000/users, you will see this simple component being rendered on the route:

Now, we need to create a serverless API endpoint for creating new users and sending a POST request inside the onSubmit function. The onSubmit function is attached to the form element so when a user clicks it, it sends a POST request to that API endpoint to create a new user from the client side.
In the src/pages/users/index.js file, run the following code:
const Users = () => {
const [formData, setFormData] = useState({
name: "",
email: "",
password: "",
});

const onChange = (e) => {
setFormData({ ...formData, [e.target.name]: e.target.value });
};

const onSubmit = async (e) => {
e.preventDefault();

try {
await fetch("/api/create-users", {
method: "POST",
headers: {
"Content-Type": "application/json",
},
body: JSON.stringify(formData),
});

setFormData({
name: "",
email: "",
password: "",
});
} catch (error) {
console.log(error);
}
};
return (
<div>
<h1>Here is a List of our Users</h1>
<form action="" onSubmit={onSubmit}>
<input
type="text"
name="name"
value={formData.name}
placeholder="name"
onChange={onChange}
/>
<input
type="email"
name="email"
value={formData.email}
placeholder="email"
onChange={onChange}
/>
<input
type="password"
name="password"
placeholder="password"
value={formData.password}
onChange={onChange}
/>

<button type="submit">Submit</button>
</form>
</div>
);
};

export default Users;
The code above has a simple page component with three inputs (name, email, and password) and whose value is managed by state. The onSubmit function is where we send a POST request to the create-users serverless API endpoints that we will create later.
Essentially, what is happening in this component is that the user enters the details of the user to be created and when the Submit button is clicked, the onSubmit function is triggered and a POST request is sent to the create-users serverless endpoint with the details the user entered, i.e., their name, email, and password.
Inside the API folder in the pages route, create a new file called create-users.js and include the code below:
const { PrismaClient } = require("@prisma/client");

const prisma = new PrismaClient();

export default async function handler(req, res) {
const { name, email, password } = req.body;
const user = await prisma.user.create({
data: {
name,
email,
password,
},
});
res.json(user);
}
Here, the Prisma Client API is used to instantiate a new instance of Prisma for our use. Then, we create the handler function, where the request body that is being sent from the frontend (users/index.js) is being destructured.
As seen above, name, email, and password are being destructured. Then the Prisma API is used to create a new user using the request body data sent from the client side. We are using prisma.user because that is the name of our table from the schema created earlier, then the create method is used to create a new user.
Let’s try to create a new user and see how it works. Enter the required information and hit the Submit button:

When the request is successful, check the MySQL database to see if the user has been created:
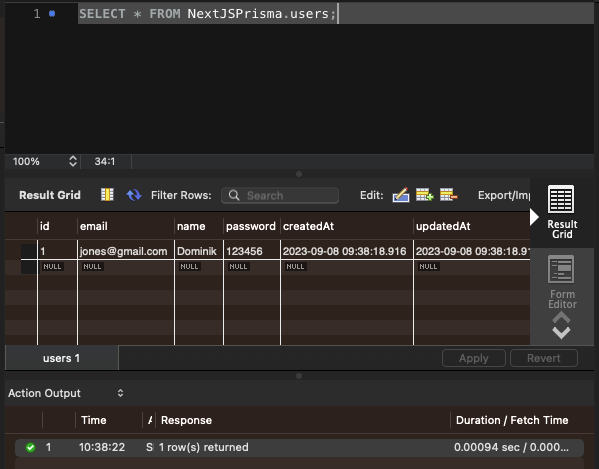
Now, we can see the user that we just tried to create in our database, and we have successfully interacted with our MySQL database from the frontend without creating any external backend server.
To finish off this section, we will create another serverless API endpoint to get all the users and send a GET request to this endpoint. In the src/pages/api/get-users file, run the following:
const { PrismaClient } = require("@prisma/client");

const prisma = new PrismaClient();

export default async function handler(req, res) {
const users = await prisma.user.findMany();
res.json(users);
}
A new handler function is created to get all the users that have been created and stored in the database. The prisma.users method is used to access the users’ data stored in the database, while the findMany() method is used to query the database and retrieve multiple records.
On the frontend side, SWR (a data fetching library) will be used for data fetching and caching. You can install it using npm i swr.
In src/pages/users/index.js , run the following code:
import useSWR from "swr";

const Users = () => {
const fetcher = (url) => fetch(url).then((res) => res.json());
const { data, error } = useSWR("/api/get-users", fetcher, {
refreshInterval: 1000,
});

}

return (
<div>
<h1>Here is a List of our Users:</h1>
{data &&
data.map((user) => (
<div key={user.id}>
<h2>{user.name}</h2>
<p>{user.email}</p>
</div>
))}
A fetcher function is defined, which takes in a URL as an argument to fetch data from that URL. The useSWR Hook comes from the SWR library. It takes in the URL endpoint as the first argument and passes it to the fetcher function as the URL to retrieve data from.
Finally, the refreshInterval function is an option to specify the webpage refresh interval time. This means that SWR auto-refreshes the data from the api/get-users endpoint after every second so we can see the data, i.e., the user that is created in real time without having to refresh the page. The data from the useSWR Hook is then mapped over to render the name and email of the users on the UI.
Let’s test this out:

When this user is created, it is stored in the database and the UI is updated in real time.
getStaticProps to fetch data during build timeAs discussed in the earlier sections, getStaticProps can be used to fetch external data during build time and send it as a prop to the component that will use the data.
Inside the pages folder, create a new folder called users. Inside this folder, create an index.js file and initiate a basic React component inside. Let’s see how we can do that with the code below:
import React from "react";

const Users = () => {
return (
<div>
<h1>List of our Users</h1>
</div>
);
};

export default Users;
Next, run yarn dev in your terminal to preview what the page looks like in the browser:

Now let’s use getStaticProps to fetch external data and pass it as a prop to the Users component:
import React from "react";

const Users = ({ users }) => {
return (
<div>
<h1>List of our Users</h1>

{users.map((user) => (
<div key={user.id}>
<h2 style={{ color: "#A76F6F" }}>{user.name}</h2>
</div>
))}
</div>
);
};

export default Users;

export const getStaticProps = async () => {
const res = await fetch("https://jsonplaceholder.typicode.com/users");
const users = await res.json();

return {
props: { users },
};
};
In the code above, the getStaticProps function was used to fetch external data from the endpoint. The function returns an object prop that has all the users’ data. The user data from the getStaticProps is an array that is passed to the Users component, which is then mapped over and the name of each user is rendered on the UI.
What this means is that when you build your app using next build, it runs the function to get the external data and then generates the HTML file alongside for pre-rendering.
getStaticProps functionPrisma can be used to query data directly inside the getStaticProps function to fetch data at build time and pass it to a component/page at a prop. Because getStaticProps runs only on the server side, it will never run on the client side. With this, we can write database queries directly inside this function without it being sent to the browsers.
In this section, we will go over how to create a page using Prisma to fetch data statically. We already have an integration example in the previous section, but the user data was not fetched inside the getStaticProps function using Prisma.
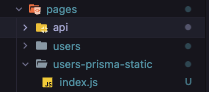
To get started, create a new folder in the page directory called users-prisma-static with an index.js file. Now we automatically have the route /users-prisma-static, which renders the component inside the index.js file:
Inside the index.js file, create a simple component:
import React from "react";

const GetAllUsersWithPrismaStaticProps = ({ users }) => {
return (
<div>
<h1>GetAllUsersWithPrismaStaticProps</h1>
</div>
);
};

export default GetAllUsersWithPrismaStaticProps;
When you access the route, you should see this:

Now we can query our database data directly using Prisma in the getStaticProps function, still in the same index.js file:
export const getStaticProps = async () => {
const res = await prisma.user.findMany();
const users = res.map((user) => {
return {
...user,
createdAt: user.createdAt.toString(),
updatedAt: user.updatedAt.toString(),
};
});

return {
props: { users },
};
};
Here, we’ve defined the getStaticProps function. We employed the Prisma client instance to retrieve a list of all users from the database. Afterward, we mapped over the returned response to convert the createdAt and updatedAt values to strings. This processed user object is then passed as props.
This is done because when you use getStaticProps in Next.js to fetch data, the data you are returning to be passed as a prop must be JSON-serializable, meaning that it must be in JSON format. The returned value of createdAt and updatedAt from the database is a date object that is not JSON-serializable. So, to make the date object values returned for both fields JSON-serializable, we convert them to a string to return the date in a standardized format that is JSON-serializable.
Let’s pass the users object returned as a prop in the GetAllUsersWithPrismaStaticProps component and render the list of the users on the UI:
import React from "react";
const { PrismaClient } = require("@prisma/client");

const prisma = new PrismaClient();

const GetAllUsersWithPrismaStaticProps = ({ users }) => {
return (
<div>
<h1>GetAllUsersWithPrismaStaticProps</h1>

<h2> List of fetched users </>

{users.map((user) => (
<div key={user.id}>
<h2>{user.name}</h2>
<p>{user.email}</p>
</div>
))}
</div>
);
};

export default GetAllUsersWithPrismaStaticProps;

export const getStaticProps = async () => {
const res = await prisma.user.findMany();
const users = res.map((user) => {
return {
...user,
createdAt: user.createdAt.toString(),
updatedAt: user.updatedAt.toString(),
};
});

return {
props: { users },
};
};
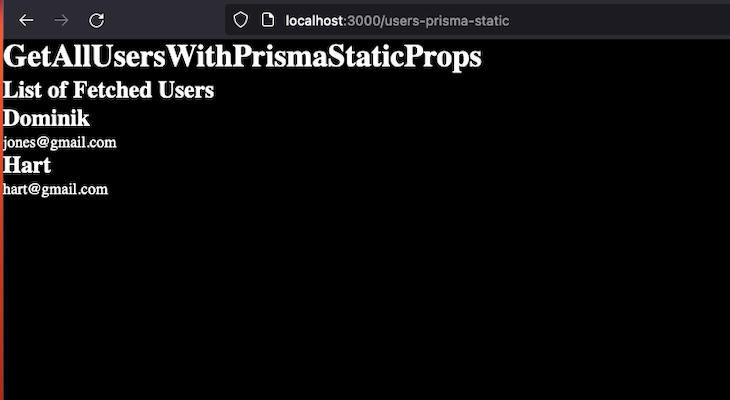
This is the result in our app:
It is good practice to always factor in scaling and optimization when building web applications. When a user makes a request to our webpage, it triggers a serverless function that opens up a new connection to the database. In the context of the app we just built, whenever a user submits the form to create a new user, it will create a new connection to the MySQL database.
Say 10 users submit the form. That means 10 serverless functions are called and 10 connections are made to our database. Typically, there’s a connection limit on a MySQL database and it is important to be aware of this parameter when setting up and managing a MySQL database server.
If you’re using a MySQL database, you can connect to the database and check the maximum connection limit with this command:
SHOW VARIABLES LIKE "max_connections";
Here, we can see that the maximum number of connections is 151. If this connection limit gets exhausted, requests made to the database will start to fail. This is where connection pooling occurs.
Connection pooling is a technique used to optimize database connection usage and prevent running into connection limits. It allows us to reuse existing database connections, which reduces the overhead of creating and closing connections for each database connection.
Prisma provides a connection pooler called Prisma Data Proxy. The Data Proxy is found in between our serverless functions and database to avoid connection pooling issues, which helps reduce latency in our application and improve scaling.
In this article, we explored a range of Next.js features. We began with an introduction to Next.js and Prisma, then dove into static site generation and its benefits. We also provided a detailed guide on setting up Prisma with Next.js, along with a demonstration of fetching data using SSG. We also discussed creating serverless functions using the Next.js API paired with Prisma. To conclude, we covered the Data Proxy and techniques to optimize database queries using Prisma Client. For reference, you can access the source code from this tutorial in this GitHub repository.
Debugging Next applications can be difficult, especially when users experience issues that are difficult to reproduce. If you’re interested in monitoring and tracking state, automatically surfacing JavaScript errors, and tracking slow network requests and component load time, try LogRocket.
LogRocket captures console logs, errors, network requests, and pixel-perfect DOM recordings from user sessions and lets you replay them as users saw it, eliminating guesswork around why bugs happen — compatible with all frameworks.
LogRocket's Galileo AI watches sessions for you, instantly identifying and explaining user struggles with automated monitoring of your entire product experience.
The LogRocket Redux middleware package adds an extra layer of visibility into your user sessions. LogRocket logs all actions and state from your Redux stores.


Modernize how you debug your Next.js apps — start monitoring for free.
Would you be interested in joining LogRocket's developer community?
Join LogRocket’s Content Advisory Board. You’ll help inform the type of content we create and get access to exclusive meetups, social accreditation, and swag.
Sign up now
<selectedcontent> element improves dropdowns

Learn how to implement an advanced caching layer in a Node.js app using Valkey, a high-performance, Redis-compatible in-memory datastore.

Learn how to properly handle rejected promises in TypeScript using Angular, with tips for retry logic, typed results, and avoiding unhandled exceptions.

AI’s not just following orders anymore. If you’re building the frontend, here’s how to design interfaces that actually understand your agent’s smarts.
