
Editor’s note: This article was last updated by Ikeh Akinyemi on 21 October 2024 to cover advanced MySQL query techniques like multi-table joins, full-text search, and transaction management.
To use MySQL with Node.js, you need to integrate a MySQL driver into your Node.js application. The most popular and robust option is the mysql2 package, which provides both callback-based and Promise-based interfaces for executing MySQL queries. Here’s a quick example of how to connect and query a MySQL database in Node.js:
const mysql = require('mysql2/promise');
async function connectToDatabase() {
  try {
    const connection = await mysql.createConnection({
      host: 'localhost',
      user: 'your_username',
      password: 'your_password',
      database: 'your_database'
    });

    // Execute a simple query
    const [rows, fields] = await connection.execute('SELECT * FROM users');
    console.log('Query results:', rows);

    await connection.end();
  } catch (error) {
    console.error('Database connection failed:', error);
  }
}
When choosing a database for your Node.js application, you have several excellent options. While MongoDB is often associated with Node.js in the MEAN/MERN stack, relational databases like MySQL, PostgreSQL, and SQLite are equally powerful choices. MySQL stands out for its feature set, extensive community support, and excellent performance with Node.js monolithic and microservice applications — especially when working with structured data or building on existing MySQL infrastructure.
In this tutorial, we’ll learn how to build a complete REST API using MySQL as our database and Node.js with the Express.js framework. Our example API will track popular programming languages, demonstrating key concepts like data modeling, CRUD operations, and proper API design.
The Replay is a weekly newsletter for dev and engineering leaders.
Delivered once a week, it's your curated guide to the most important conversations around frontend dev, emerging AI tools, and the state of modern software.
To follow along with this article, you should have the following:
GET, POST, PUT, and DELETE methodsThe code in this tutorial is performed on a Mac with Node 14 LTS installed. You can use Node.js, Docker, and Docker Compose to improve your developer experience. You can also access the full code at this GitHub repository. Now, let’s get started!
MySQL is a feature-packed relational database first released in 1995. It runs on all major operating systems, like Linux, Windows, and macOS.
MySQL is one of the most popular databases worldwide. Per the 2023 Stack Overflow survey, MySQL was the most-loved database, with more than 41 percent of respondents using it. The community edition is available for free, and it is supported by a large and active community.
Because of its features and its cost-effectiveness, MySQL is used by big enterprises and new startups alike. For our example REST API, we’ll use a free MySQL service instead of setting up a local MySQL server.
To host our testing MySQL 8.0 database, we’ll use db4free.net. First, go to the db4free signup page, then fill out the required details by choosing your database name and username:
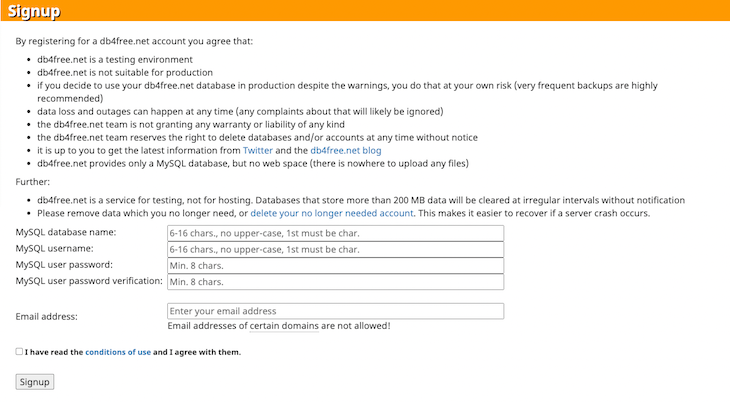
Click on Signup, and you should receive a confirmation email. Confirm your account via the email. Next, on the sidebar, click on phpMyAdmin. In the phpMyAdmin login, enter the username and password you chose and click Go:

Now, we have an empty database. Let’s add the programming_languages table. First, click on the database name on the left; for me, it was restapitest123. Then, click SQL on the top menu, and put the following code for CREATE TABLE in the text area:
CREATE TABLE `programming_languages`
(
  `id`            INT(11) NOT NULL auto_increment ,
  `name`          VARCHAR(255) NOT NULL ,
  `released_year` INT NOT NULL ,
  `githut_rank`   INT NULL ,
  `pypl_rank`     INT NULL ,
  `tiobe_rank`    INT NULL ,
  `created_at`    DATETIME NOT NULL DEFAULT CURRENT_TIMESTAMP ,
  `updated_at`    DATETIME on UPDATE CURRENT_TIMESTAMP NOT NULL DEFAULT CURRENT_TIMESTAMP ,
  PRIMARY KEY (`id`),
  UNIQUE `idx_name_unique` (`name`(255))
)
engine = innodb charset=utf8mb4 COLLATE utf8mb4_general_ci;
Click the Go button, as shown below:
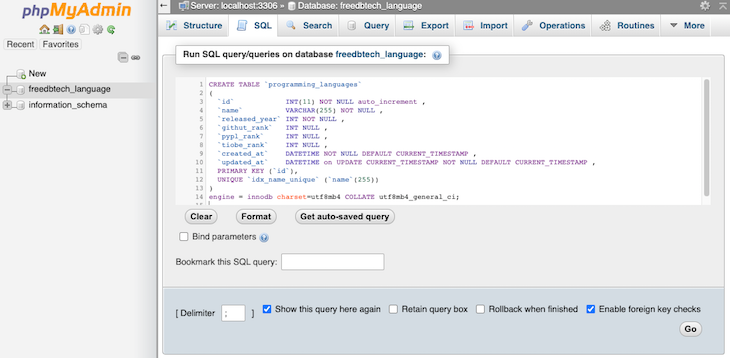
The code will return with a green check box and a message along the lines of MySQL returned an empty result set (i.e. zero rows). With that, we’ve created a table called programming_languages with eight columns and a primary key called id, which is an internet and auto-incremented.
The name column is unique, and we also added released_year for the programming language. We have three columns to input the rank of the programming language, sourced from the following resources:
The created_at and updated_at columns store dates to keep track of when the rows were created and updated.
Next, we’ll add 16 popular programming languages to our programming_languages table. Click the same SQL link on the top of the page and copy and paste the code below:
INSERT INTO programming_languages(id,name,released_year,githut_rank,pypl_rank,tiobe_rank)
VALUES
(1,'JavaScript',1995,1,3,7),
(2,'Python',1991,2,1,3),
(3,'Java',1995,3,2,2),
(4,'TypeScript',2012,7,10,42),
(5,'C#',2000,9,4,5),
(6,'PHP',1995,8,6,8),
(7,'C++',1985,5,5,4),
(8,'C',1972,10,5,1),
(9,'Ruby',1995,6,15,15),
(10,'R',1993,33,7,9),
(11,'Objective-C',1984,18,8,18),
(12,'Swift',2015,16,9,13),
(13,'Kotlin',2011,15,12,40),
(14,'Go',2009,4,13,14),
(15,'Rust',2010,14,16,26),
(16,'Scala',2004,11,17,34);
You should receive a message like “16 rows inserted.” Then, the data from our three sources is collected and added to the table in bulk by the INSERT statement, creating 16 rows, one for each programming language. We’ll return to this when we fetch data for the GET API endpoint.
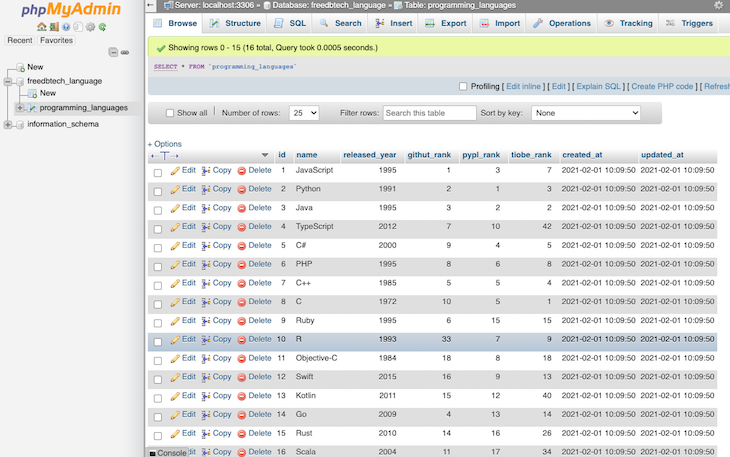
If we click on the programming_languages table, visible on the left, we’ll see the rows that we just added:
Next, we’ll set up Express.js for our REST API with Node.js and MySQL.
REST API, short for Representational State Transfer API, is a popular architectural style for designing web services and APIs. REST API allows communication between the client and server through standard HTTP methods like GET, POST, PUT, and DELETE, using the principles of statelessness and resource-based interactions.
Some of the important guidelines of REST API include:
To set up a Node.js app with an Express.js server, we’ll first create a directory for our project to reside in:
mkdir programming-languages-api && cd programming-languages-api
Then, we can create a package.json file with npm init -y as follows:
{
  "name": "programming-languages-api",
  "version": "1.0.0",
  "description": "",
  "main": "index.js",
  "scripts": {
    "test": "echo \"Error: no test specified\" && exit 1"
  },
  "keywords": [],
  "author": "",
  "license": "ISC"
}
To install Express, we’ll run npm i express, adding Express as a dependency in the package.json file. Next, we’ll create a slim server in the index.js file. It will print an ok message on the main path /:
const express = require("express");
const app = express();
const port = 3000;
app.use(express.json());
app.use(
  express.urlencoded({
    extended: true,
  })
);
app.get("/", (req, res) => {
  res.json({ message: "ok" });
});
app.listen(port, () => {
  console.log(`Example app listening at http://localhost:${port}`);
});
There are a few important things to note in the code above. For one, we’ll use the built-in Express JSON parser middleware to parse JSON in the next steps. We’ll also use the express.urlencoded() middleware to parse the URL-encoded body.
If PORT is not provided as an environment variable, our app will run on port number 3000. We can run the server with node index.js and hit http://localhost:3000 to see {message: "ok"} as the output.
We’ll structure our project in the following manner to arrange our files logically in folders:
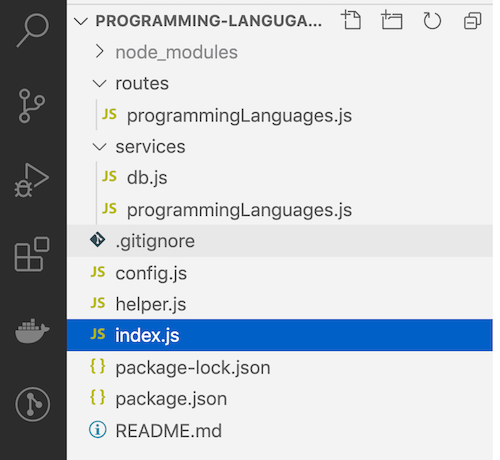
config.js will contain configuration for information like the database credentials and the rows we want to show per page when we paginate results. helper.js is the home for any helper functions, like calculating offset for pagination.
The routes/programmingLanguages.js file will be the glue between the URI and the corresponding function in the services/programmingLanguages.js service. The services folder will house all our services. One of them is db.js, which we use to talk with the MySQL database.
Another service is programmingLanguages.js, which will have methods like getMultiple, create, etc., to get and create the programming language resource. Basic mapping of the URI and the related service function will look like the code below:
GET /programming-languages → getMultiple()
POST /programming-languages → create()
PUT /programming-languages/:id → update()
DELETE /programming-languages/:id → remove()
Now, let’s code our GET programming languages API with pagination.
GET popular programming languagesWe will need to link our Node.js server with MySQL to create our GET programming languages API. We’ll use the mysql2 package to interact with the MySQL database.
First, we need to install mysql2 using the command below at the project root directory:
npm i mysql2
Next, we’ll create the config file on the root of the project with the following contents:
const config = {
  db: {
    /* don't expose password or any sensitive info, done only for demo */
    host: "db4free.net",
    user: "restapitest123",
    password: "restapitest123",
    database: "restapitest123",
    connectTimeout: 60000
  },
  listPerPage: 10,
};
module.exports = config;
It is worth noting that we set the connectTimeout to 60 seconds. The default is ten seconds, which may not be enough. Consequently, we’ll create the helper.js file with the code below:
function getOffset(currentPage = 1, listPerPage) {
  return (currentPage - 1) * [listPerPage];
}

function emptyOrRows(rows) {
  if (!rows) {
    return [];
  }
  return rows;
}

module.exports = {
  getOffset,
  emptyOrRows
}
For the fun part, we’ll add the route and link it to the services. First, we’ll connect to the database and enable running queries on the database in the services/db.js file:
const mysql = require('mysql2/promise');
const config = require('../config');

async function query(sql, params) {
  const connection = await mysql.createConnection(config.db);
  const [results, ] = await connection.execute(sql, params);

  return results;
}

module.exports = {
  query
}
Now, we’ll write up the services/programmingLanguages.js file that acts as the bridge between the route and the database:
const db = require('./db');
const helper = require('../helper');
const config = require('../config');

async function getMultiple(page = 1){
  const offset = helper.getOffset(page, config.listPerPage);
  const rows = await db.query(
    `SELECT id, name, released_year, githut_rank, pypl_rank, tiobe_rank
    FROM programming_languages LIMIT ${offset},${config.listPerPage}`
  );
  const data = helper.emptyOrRows(rows);
  const meta = {page};

  return {
    data,
    meta
  }
}

module.exports = {
  getMultiple
}
After that, we’ll create the routes file in routes/programmingLanguages.js, which looks like the following:
const express = require('express');
const router = express.Router();
const programmingLanguages = require('../services/programmingLanguages');

/* GET programming languages. */
router.get('/', async function(req, res, next) {
  try {
    res.json(await programmingLanguages.getMultiple(req.query.page));
  } catch (err) {
    console.error(`Error while getting programming languages `, err.message);
    next(err);
  }
});

module.exports = router;
For the final piece of our GET endpoint, we need to wire up the route in the index.js file as follows:
const express = require("express");
const app = express();
const port = 3000;
const programmingLanguagesRouter = require("./routes/programmingLanguages");
app.use(express.json());
app.use(
  express.urlencoded({
    extended: true,
  })
);
app.get("/", (req, res) => {
  res.json({ message: "ok" });
});
app.use("/programming-languages", programmingLanguagesRouter);
/* Error handler middleware */
app.use((err, req, res, next) => {
  const statusCode = err.statusCode || 500;
  console.error(err.message, err.stack);
  res.status(statusCode).json({ message: err.message });
  return;
});
app.listen(port, () => {
  console.log(`Example app listening at http://localhost:${port}`);
});
We made two important changes to our entry point index.js file. First, we added the code below:
const programmingLanguagesRouter = require('./routes/programmingLanguages');
Then, we linked up the /programming-languages route to the router we just created:
app.use('/programming-languages', programmingLanguagesRouter);
We also added an error handler middleware to handle errors and provide a proper status code and message. After adding the GET endpoint, when we run our app again with node index.js and hit the browser with http://localhost:3000/programming-languages, we’ll see an output like this:
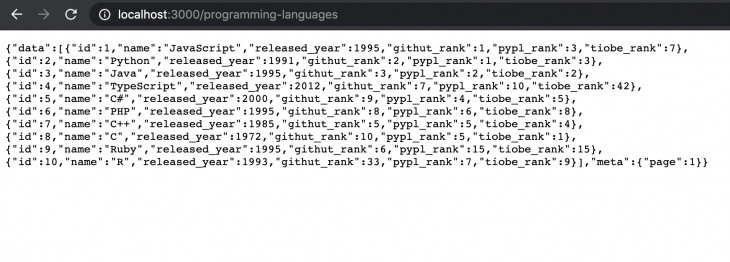
Depending on the extensions you have installed on your browser, your output might look a bit different. Note that we’ve already implemented pagination for our GET API, which is possible because of the getOffset function in helper.js and how we run the SELECT query in services/programmingLanguage.js. Try http://localhost:3000/programming-languages?page=2 to see languages 11–16.
POST a new programming languageOur POST API will allow us to create a new programming language in our table. To create a POST programming language API in the /programming-languages endpoint, we’ll add code to the service and the routes files. In the service method, we’ll get the name, the release year, and other ranks from the request body, then insert them into the programming_languages table.
Append the following code to the services/programmingLanguages.js file:
async function create(programmingLanguage){
  const result = await db.query(
    `INSERT INTO programming_languages
    (name, released_year, githut_rank, pypl_rank, tiobe_rank)
    VALUES
    ('${programmingLanguage.name}', ${programmingLanguage.released_year}, ${programmingLanguage.githut_rank}, ${programmingLanguage.pypl_rank}, ${programmingLanguage.tiobe_rank})`
  );

  let message = 'Error in creating programming language';

  if (result.affectedRows) {
    message = 'Programming language created successfully';
  }

  return {message};
}
Make sure you also export the following function:
module.exports = {
  getMultiple,
  create
}
For the function above to be accessible, we need to add a route to link it up in the routes/programmingLanguages.js file:
/* POST programming language */
router.post('/', async function(req, res, next) {
  try {
    res.json(await programmingLanguages.create(req.body));
  } catch (err) {
    console.error(`Error while creating programming language`, err.message);
    next(err);
  }
});
PUT to update an existing programming languageWe’ll use the /programming-languages/:id endpoint to update an existing programming language, where we’ll get the data to update the language. To update a programming language, we’ll run the UPDATE query based on the data we got in the request.
PUT is an idempotent action, meaning that if the same call is made again and again, it will produce the same results. To enable updating existing records, we’ll add the following code to the programming language service:
async function update(id, programmingLanguage){
  const result = await db.query(
    `UPDATE programming_languages
    SET name="${programmingLanguage.name}", released_year=${programmingLanguage.released_year}, githut_rank=${programmingLanguage.githut_rank},
    pypl_rank=${programmingLanguage.pypl_rank}, tiobe_rank=${programmingLanguage.tiobe_rank}
    WHERE id=${id}`
  );

  let message = 'Error in updating programming language';

  if (result.affectedRows) {
    message = 'Programming language updated successfully';
  }

  return {message};
}
Make sure you also export this function, as we did before:
module.exports = {
  getMultiple,
  create,
  update,
};
To wire up the code with the PUT endpoint, we’ll add the code below to the programming languages route file, just above module.exports = router;:
/* PUT programming language */
router.put('/:id', async function(req, res, next) {
  try {
    res.json(await programmingLanguages.update(req.params.id, req.body));
  } catch (err) {
    console.error(`Error while updating programming language`, err.message);
    next(err);
  }
});
Now, we can update any existing programming language. For instance, we can update a language’s name if we see a typo.
DELETE a programming languageWe’ll use the /programming-languages/:id path with the HTTP DELETE method to add the functionality to delete a programming language. Go ahead and run the code below:
async function remove(id){
  const result = await db.query(
    `DELETE FROM programming_languages WHERE id=${id}`
  );

  let message = 'Error in deleting programming language';

  if (result.affectedRows) {
    message = 'Programming language deleted successfully';
  }

  return {message};
}
Don’t forget to export this function as well. Once again, to link up the service with the route, we’ll add the following code to the routes/programmingLanguages.js file:
/* DELETE programming language */
router.delete('/:id', async function(req, res, next) {
  try {
    res.json(await programmingLanguages.remove(req.params.id));
  } catch (err) {
    console.error(`Error while deleting programming language`, err.message);
    next(err);
  }
});
After running the Node.js Express server with node index.js, you can test all the API endpoints. To create a new programming language, let’s go with Dart, and run the following cURL command. Alternatively, you can use Postman or any other HTTP client:
curl -i -X POST -H 'Accept: application/json' \
    -H 'Content-type: application/json' http://localhost:3000/programming-languages \
    --data '{"name":"dart", "released_year": 2011, "githut_rank": 13, "pypl_rank": 20, "tiobe_rank": 25}'
The code above will result in the following output:
HTTP/1.1 200 OK
X-Powered-By: Express
Content-Type: application/json; charset=utf-8
Content-Length: 55
ETag: W/"37-3mETlnRrtfrms6wlAjdgAXKq9GE"
Date: Mon, 01 Feb 2021 11:20:07 GMT
Connection: keep-alive

{"message":"Programming language created successfully"}
You can remove the X-Powered-By header and add other security response headers using Express.js Helmet, which will greatly improve the API’s security. For now, let’s update the GitHut rank of Dart from 13 to 12:
curl -i -X PUT -H 'Accept: application/json' \
    -H 'Content-type: application/json' http://localhost:3000/programming-languages/17 \
    --data '{"name":"dart", "released_year": 2011, "githut_rank": 12, "pypl_rank": 20, "tiobe_rank": 25}'
The code above will generate an output like the one below:
HTTP/1.1 200 OK
X-Powered-By: Express
Content-Type: application/json; charset=utf-8
Content-Length: 55
ETag: W/"37-0QPAQsRHsm23S9CNV3rPa+AFuXo"
Date: Mon, 01 Feb 2021 11:40:03 GMT
Connection: keep-alive

{"message":"Programming language updated successfully"}
To test out the DELETE API, you can use the following cURL to delete Dart with ID 17:
curl -i -X DELETE -H 'Accept: application/json' \
    -H 'Content-type: application/json' http://localhost:3000/programming-languages/17
The code above will result in the following output:
HTTP/1.1 200 OK
X-Powered-By: Express
Content-Type: application/json; charset=utf-8
Content-Length: 55
ETag: W/"37-aMzd+8NpWQ09igvHbNLorsXxGFo"
Date: Mon, 01 Feb 2021 11:50:17 GMT
Connection: keep-alive

{"message":"Programming language deleted successfully"}
If you’re more used to a visual interface for testing, such as Postman, you can import the cURL commands into Postman.
In this tutorial, we kept our example fairly simple. However, if this were a real-life API and not a demo, I’d highly recommend the following:
In this tutorial, we use inline SQL statements for simplicity. We should consider using store procedures in real-world projects. Using store procedures instead of inline SQL has several advantages: improved performance, easier maintainability, and, more importantly, better security.
Let’s add a new route GET /programming-languages/:id in our app to use a store procedure. First, we need to create it in the database. Run the following SQL script to create a store procedure for searching the programming language by ID:
DELIMITER $$
CREATE PROCEDURE `sp_search_programming_languages_by_id`(in langid int)
BEGIN
    SELECT name, githut_rank, pypl_rank, tiobe_rank, created_at
    FROM programming_languages
    where id = langid;
END $$
To use the newly created store procedure, we need to add this setting to the config.js:
const config = {
    db: {
      ...
      multipleStatements: true
    },
Then, we can add a new helper function to db.js:
async function callSpSearch(id) {
    const connection = await mysql.createConnection(config.db);
    const [results, ] = await connection.query('CALL sp_search_programming_languages_by_id(' + id + ')');

    return results;
  }
The new function needs to be exported as well:
module.exports = {
  query,
  callSpSearch
}
Next, add this function to the services/programmingLanguages.js and add it to the exports:
async function search(id){
  const rows = await db.callSpSearch(id);
  const data = helper.emptyOrRows(rows);
  return {
    data
  }
}

module.exports = {
  getMultiple,
  create,
  update,
  remove,
  search
}
The last step is to add a new route into routes/programmingLanguages.js:
  router.get('/:id', async function(req, res, next) {
    try {
      res.json(await programmingLanguages.search(req.params.id));
    } catch (err) {
      console.error(`Error while searching programming languages `, err.message);
      next(err);
    }
  });
That’s it! Now, we can restart the server and give it a go. Enter the browser with http://localhost:3000/programming-languages/1, and we should see an output similar to the one below:

Check out the full source code in this CodeSandbox editor.
Let’s discuss more advanced MySQL query techniques you should consider when expanding your Node.js application.
Let’s say we want to track programming language frameworks. We could create a related table and use JOIN operations:
async function getLanguageWithFrameworks(languageId) {
  const result = await db.query(`
    SELECT l.name as language, l.released_year,
           f.name as framework, f.release_date
    FROM programming_languages l
    LEFT JOIN frameworks f ON l.id = f.language_id
    WHERE l.id = ?*,
    [languageId]
  );
  return result;
}
Full-text search is essential when implementing search functionality that goes beyond simple WHERE clauses. While basic LIKE queries might work for small datasets, full-text search provides better performance and more relevant results for text-based searches. MySQL’s full-text search supports natural language mode and Boolean mode, allowing for sophisticated search patterns including phrase matching and word exclusion:
// First, add a FULLTEXT index
// ALTER TABLE programming_languages ADD FULLTEXT(name, description);

async function searchLanguages(searchTerm) {
  const result = await db.query(`
    SELECT name, description,
           MATCH(name, description) AGAINST(?) as relevance
    FROM programming_languages
    WHERE MATCH(name, description) AGAINST(?)
    ORDER BY relevance DESC`,
    [searchTerm, searchTerm]
  );
  return result;
}
Transactions are crucial for maintaining data integrity when performing multiple related database operations. They ensure that a series of queries either all succeed or all fail together, preventing partial updates that could leave your database in an inconsistent state. This is particularly important when you’re dealing with related tables or when implementing operations that require multiple steps to complete.
For example, when adding a new programming language along with its associated frameworks, we want to ensure that either 1) both the language and its frameworks are added successfully, or 2) neither is added at all. Here’s how we can implement this using transactions:
async function addLanguageWithFrameworks(language, frameworks) {
  const connection = await mysql.createConnection(config.db);
  try {
    await connection.beginTransaction();

    const [languageResult] = await connection.execute(
      'INSERT INTO programming_languages (name, released_year) VALUES (?, ?)',
      [language.name, language.released_year]
    );

    const languageId = languageResult.insertId;
    for (const framework of frameworks) {
      await connection.execute(
        'INSERT INTO frameworks (language_id, name, release_date) VALUES (?, ?, ?)',
        [languageId, framework.name, framework.release_date]
      );
    }

    await connection.commit();
    return { success: true, languageId };
  } catch (error) {
    await connection.rollback();
    throw error;
  } finally {
    connection.end();
  }
}
An ORM (Object-Relational Mapping) is a library connecting object-oriented code with relational databases. It lets developers interact with the database using programming language concepts instead of writing raw SQL queries.
While using an ORM has its advantages, it also has limitations and disadvantages compared to the vanilla approach:
In summary, whether to use an ORM depends on many factors, including application requirements, performance considerations, project size, complexity, and team skillset.
We’ve built a fully functional REST API that demonstrates the powerful combination of Node.js and MySQL. Starting from basic database setup and CRUD operations, we’ve progressed through advanced concepts like store procedures, transaction management, and sophisticated querying techniques. This integration showcases why MySQL remains a robust choice for Node.js applications, particularly when working with structured data and complex relationships.
While our example API focused on programming languages, the patterns and practices demonstrated here form a solid foundation for building production-ready REST APIs. Whether you’re working with simple CRUD operations or implementing advanced features like full-text search and multi-table transactions, the principles remain the same.
Remember that the choice between raw SQL queries, stored procedures, and ORMs should be based on your specific use case, team expertise, and performance requirements. The flexibility of Node.js with MySQL allows you to choose the approach that best fits your needs.
I hope you enjoyed this article. Happy coding!
 Monitor failed and slow network requests in production
Deploying a Node-based web app or website is the easy part. Making sure your Node instance continues to serve resources to your app is where things get tougher. If you’re interested in ensuring requests to the backend or third-party services are successful, try LogRocket.

LogRocket lets you replay user sessions, eliminating guesswork around why bugs happen by showing exactly what users experienced. It captures console logs, errors, network requests, and pixel-perfect DOM recordings — compatible with all frameworks.
LogRocket's Galileo AI watches sessions for you, instantly identifying and explaining user struggles with automated monitoring of your entire product experience.
LogRocket instruments your app to record baseline performance timings such as page load time, time to first byte, slow network requests, and also logs Redux, NgRx, and Vuex actions/state. Start monitoring for free.

React Server Components and the Next.js App Router enable streaming and smaller client bundles, but only when used correctly. This article explores six common mistakes that block streaming, bloat hydration, and create stale UI in production.

Gil Fink (SparXis CEO) joins PodRocket to break down today’s most common web rendering patterns: SSR, CSR, static rednering, and islands/resumability.

@container scroll-state: Replace JS scroll listeners nowCSS @container scroll-state lets you build sticky headers, snapping carousels, and scroll indicators without JavaScript. Here’s how to replace scroll listeners with clean, declarative state queries.

Explore 10 Web APIs that replace common JavaScript libraries and reduce npm dependencies, bundle size, and performance overhead.
Hey there, want to help make our blog better?
Join LogRocket’s Content Advisory Board. You’ll help inform the type of content we create and get access to exclusive meetups, social accreditation, and swag.
Sign up now
23 Replies to "Build a REST API with Node.js, Express, and MySQL"
thank you good tutorial !!!
You are welcome. I hope it helped you.
Simple and easiest. Thank you very much for your nice tutorial.
Thanks for the positive comment!
“INSERT INTO newsession (req_datettime) VALUES (“+newSession.req_datettime +”)”);
gives undefined value, can you please guide
async function create(newwSession){
const result = await db.query(
`INSERT INTO newsession
(req_datettime )
VALUES
(? )`,
[
newwSession.req_datettime
]
);
can you please guide what i am missing i have created a new router and its says “message”: “Bind parameters must not contain undefined. To pass SQL NULL specify JS null”
Why am I getting this error?
Error: Incorrect arguments to mysqld_stmt_execute
Found out that with MySQL 8.0.22+ the args need to be passed as a string. Changing the line in programmingLanguages.js from:
`SELECT id, name, released_year, githut_rank, pypl_rank, tiobe_rank
FROM programming_languages LIMIT ?,?`,
[offset, config.listPerPage]
to:
`SELECT id, name, released_year, githut_rank, pypl_rank, tiobe_rank
FROM programming_languages LIMIT ?,?`,
[offset + “”, config.listPerPage + “”]
Corrected this error.
THANK YOU!! this was killing me
very nice! save my hours
thanks so much, I hope you have a nice day sir 🙂
Great to know it helped you.
Hi, I am calling the API using axios in my react project but its showing 500 internal server error, I can’t figure why. Please Help
Hello, Thank you so much for this perfect Tutorial ! I just have a question on get parts. I make a query to have some post with comments. But in the result I have one object for each comments (for all informations post +comment) . I would like to have the result like a tree. So 1 object per post which includes the 1 list of comments. Do you know how can I do ?
One of the amaizing way to deliver the knowledge, keep rocking. Thank you
For POST create function. I am getting error as “Cannot read properties of undefined (reading ‘id’)”
Hello, I’m getting the same issue, do you have any tips to sole this problem ?
When you are trying to do a POST request then the parameters that are strings needs to be wrapped with “”.
So ${programmingLanguage.name} should be “${programmingLanguage.name}” 😊
Thank you, I was getting an error while doing the POST request because of that: “Unknown column ‘dart’ in ‘field list'”. If anyone else encounters the same error, this is the reason why.
Thank you for the tutorial. When creating the connection to de db, you commented “don’t expose password or any sensitive info”. Does that mean that there is another way to set the password for this connection? Could you please share how else to do it? Thanks very much.
This tutorial is awesome, really assisted me to piece together something I needed to train on and I have never created my own API setup before, I always use mysql and nodejs for my own projects so this is the cherry for me, thanks a bunch, appreciated.
don’t you have to destroy your session in the end?!
Can I use the same technic to load the dat in to react app and next js app
Re the syntax ?*,[] in the WHERE clause of this statement
const result = await db.query(`
SELECT …
FROM programming_languages l
WHERE l.id = ?*, [languageId]
I have not seen this syntax (?*, []) in the WHERE clause before. Can someone explain it to me please?