Editor’s note: This article was last updated 16 June 2022 to reflect changes made in Node v18.
Node.js and Docker are both popular tools. In this step-by-step guide, we’ll detail how to improve the developer experience by efficiently using docker build and leveraging Docker Compose, achieving a seamless local development environment. We’ll use a demo Express application as an example.
To follow along with this tutorial, you should be familiar with the basics of Node.js and npm. We’ll use Node.js v18, the latest version at the time of writing. To follow along with this article, you should be familiar with the basics of the Express framework, and you should have some working knowledge of Docker.
This tutorial will use commands that run on Unix-like systems like Linux or macOS with a shell. You can dissect the way I have built the app in the public GitHub repository as a sequence of multiple pull requests. Let’s get started!
To generate our demo application, we’ll use the Express application generator. To do so, we’ll run the npx script below:
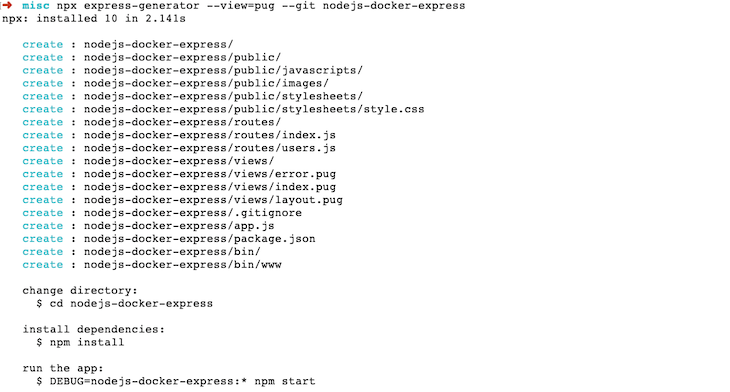
npx express-generator --view=pug --git <app-name>
To analyze the command we ran, we asked the Express generator to generate an Express app. The --view=pug command tells the generator to use the Pug view engine, and the --git parameter asks it to add a .gitignore file. Our demo version will use the latest version of Express, v4.18.1.
Of course, you’ll need to replace <app-name> with your application name. As an example, I’m using nodejs-docker-express.
The command above will render something like the image below:
To test the app, first run npm install to install all the necessary npm modules. After that, start the app by running the command below:
DEBUG=nodejs-docker-express:* npm start
You should see a message reading something like nodejs-docker-express:server Listening on port 3000. The command above is pretty simple; it ran npm start with an environment variable called DEBUG with a value of nodejs-docker-express:*, instructing the server to perform a verbose debug.
If you are on Windows, you should use set DEBUG=nodejs-docker-express:* & npm start. You can read more about Express debugging to learn about the other available options.
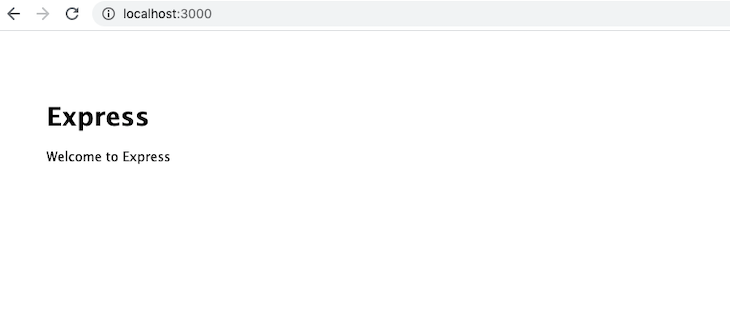
Now, open your browser and type in http://localhost:3000 to see an output like the one below:
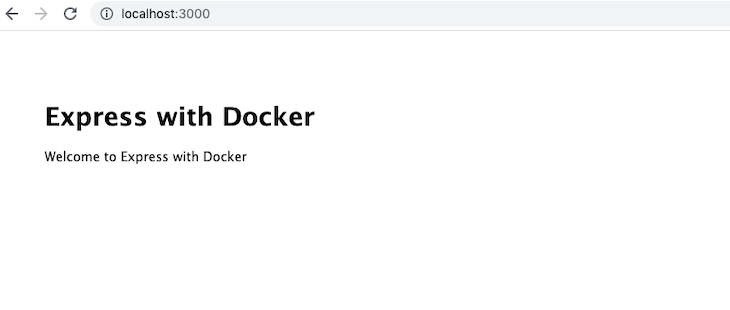
With that, your basic Express app is already running. Now, you can stop the server with Ctrl+c on that command line window. Next, we’ll dockerize our Node.js and Express application.
Containerizing our application has numerous upsides. For one, it will behave the same regardless of the platform on which it is run. With Docker containers, you can easily deploy the app to platforms like AWS Fargate, Google Cloud Run, or even your own Kubernetes cluster.
We’ll start with a Dockerfile. A Dockerfile is a blueprint on which the Docker image is built. When the built image is running, it is called a container. Essentially, the container starts as a Dockerfile that has the instructions on how to build the Docker image.
The same image can be used to spin up one or even hundreds of containers, which is why Docker is so useful for software scalability:
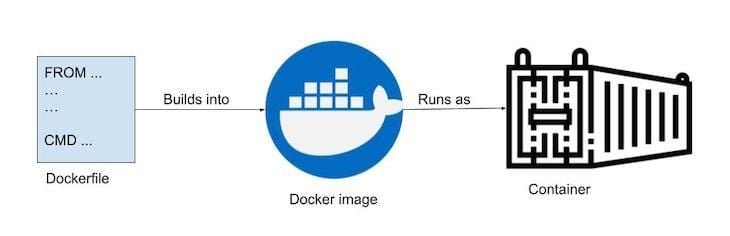
The process is pretty straightforward; we build a Docker image from a Dockerfile, and a running Docker image is called a Docker container.
Let’s see how our Dockerfile looks. As a bonus, we will utilize multi-stage builds to make our builds faster and more efficient:
FROM node:18-alpine as base

WORKDIR /src
COPY package*.json /
EXPOSE 3000

FROM base as production
ENV NODE_ENV=production
RUN npm ci
COPY . /
CMD ["node", "bin/www"]

FROM base as dev
ENV NODE_ENV=development
RUN npm install -g nodemon && npm install
COPY . /
CMD ["nodemon", "bin/www"]
In the Dockerfile above, we use multi-stage builds. Our build has three stages: base, production, and dev. The base stage has commonalities in both development and production. Graphically, it can be portrayed as follows:
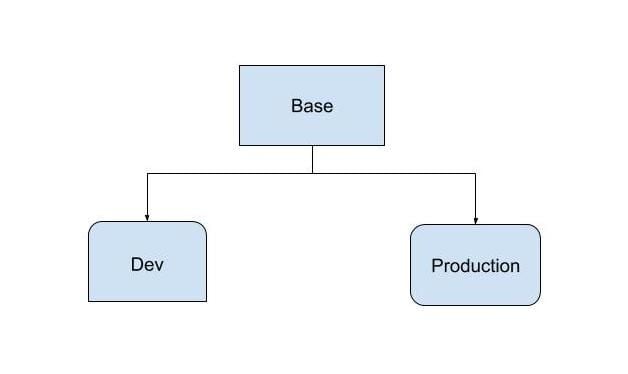
This might remind you of inheritance. In a way, a multi-stage inheritance is a kind of inheritance for Docker images. We are using a slim production stage and a more feature-rich, development-focused dev stage.
Let’s go through it line by line:
FROM node:18-alpine as base
First, we tell Docker to use the official Docker Node Alpine image version 18, the latest LTS version at the time of writing, which is available publicly on DockerHub. We are using the Alpine variant of the official Node.js Docker image because it is just under 40MB, as compared to 352MB for the main one.
We also specify Alpine as base because this Dockerfile uses the Docker multi-stage build. Naming is up to you; we are using the base because it will be extended later in the build process:
WORKDIR /src
COPY package*.json /
EXPOSE 3000
The WORKDIR sets the context for subsequent RUN commands that execute after setting it. We copy the package.json and package-lock.json files to the container to get faster builds with better Docker build caching.
On the next line, we EXPOSE port 3000 on the container. The Node.js Express web server runs on port 3000 by default. The steps above are common to both the development and production stages.
Now, we can take a look at how the production target stage is built.
FROM base as production
ENV NODE_ENV=production
RUN npm ci
COPY . /
CMD ["node", "bin/www"]
In the production stage, we continue where we left off for the base stage because the line here instructs Docker to start from the base. As a result, we ask Docker to set the environment variable called NODE_ENV to production.
Setting this variable to production is said to make the app perform three times better. It has other benefits too, like cached views. Running npm install will install only the main dependencies, leaving out the dev dependencies. These settings are perfect for a production environment.
Next, we run npm ci instead of npm install. npm ci is targeted for continuous integration and deployment. It is also much faster than npm install because it bypasses some user-oriented features. Note that npm ci needs a package-lock.json file to work.
After that, we copy the code to /src, which is our workdir. workdir will copy the custom code we have into the container. Consequently, to run the web server, we run the bin/www command with the Node.js command.
Because we are leveraging the multi-stage build, we can add the components necessary for development only in the development stage. Let’s see how that is done:
FROM base as dev
ENV NODE_ENV=development
RUN npm install -g nodemon && npm install
COPY . /
CMD ["nodemon", "bin/www"]
Similar to production, dev is also extending from the base stage. We set the NODE_ENV environment variable to development. After that, we install nodemon. Whenever a file changes, nodemon will restart the server, making our development experience much smoother.
Then, we do the regular npm install, which will install dev dependencies, too, if there are any. In our current package.json, there are no dev dependencies. If we were testing our app with Jest, for example, that would be one of the dev dependencies. Notice the two commands are put together with an &&, creating fewer Docker layers, which is good for build caching.
Just like the earlier stage, we copy our code to the container at /src. This time, however, we run the web server with nodemon to restart it on each file change because this is the development environment.
.dockerignoreJust like we wouldn’t use Git without .gitignore, it is highly advisable to add a .dockerignore file when using Docker. .dockerignore is used to ignore files that you don’t want to land in your Docker image. It helps to keep the Docker image small and keep the build cache more efficient by ignoring irrelevant file changes. Our .dockerignore file looks like the following:
.git
node_modules
We are instructing Docker not to copy the .git folder and the node_modules from the host to the Docker container. Doing so will help to keep things consistent as we run npm ci or npm install inside the container.
Now, we have most of what we’ll need to run our Node.js Express app with Docker. To glue it all together, we’ll need Docker Compose.
With Docker Compose, we don’t need to remember very long commands to build or run containers, making it easier to run applications. As long as you can run docker-compose build and docker-compose up, your application will run effortlessly.
Docker Compose comes pre-installed with your Docker installation. It is mostly used in the development environment.
Below is our docker-compose.yml file, which lives on the root of the project:
version: '3.8'
services:
  web:
    build:
      context: ./
      target: dev
    volumes:
      - .:/src
    command: npm run start:dev
    ports:
      - "3000:3000"
    environment:
      NODE_ENV: development
      DEBUG: nodejs-docker-express:*
First, we specify the version of Docker Compose we’ll use. At the time of writing, Docker Compose v3.8 is the latest version supported by Docker Engine ≥v19.0.3. It also lets us use multi-stage Docker builds.
Next, we specify the services we are using. For this tutorial, we only have one service called web. It has a build context of the current directory and an important build parameter of target set to dev. This tells Docker that we want to build the Docker image with the dev stage. Of course, for the container that will run in the production environment, we will set the target to be production.
After that, we specify the Docker volume, which instructs Docker to copy and sync changes from the local directory ./ of the host with /src on the Docker container. This will be useful when we change our file in the host machine, and it will be reflected instantly inside the container, too.
Consequently, we use the command npm run start:dev, which is added to the package.json file as follows:
"start:dev": "nodemon ./bin/www"
Next, we want to start the web server with nodemon. Because it is our development environment, it will restart the server on each file save.
Then, we map the host machine’s port 3000 with the container port 3000. We exposed port 3000 when we built the container, and our web server runs on 3000, too.
Finally, we set a couple of environment variables. First, we set the NODE_ENV to development because we want to see verbose errors and not do any view caching. Then, we set the debug to *, which tells the Express web server to print out verbose debug messages about everything.
We have set up all the required parts, so now, let’s carry on with building the Docker image. We’ll optimize our Docker builds with BuildKit. Docker images are much faster with BuildKit enabled. Time to see it in action! Run the following command:
COMPOSE_DOCKER_CLI_BUILD=1 DOCKER_BUILDKIT=1 docker-compose build
In the code above, we are telling Compose to build the Docker image with BuildKit on. It should run and build the Docker image like below:
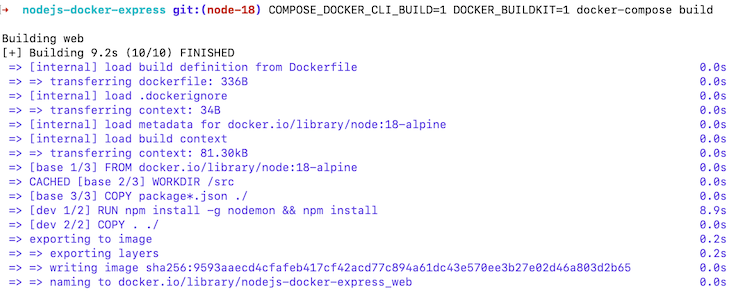
Our Docker image was built in around ten seconds, which is much faster with BuildKit. Let’s run the image:
docker-compose up
The command above should result in something like the code below:
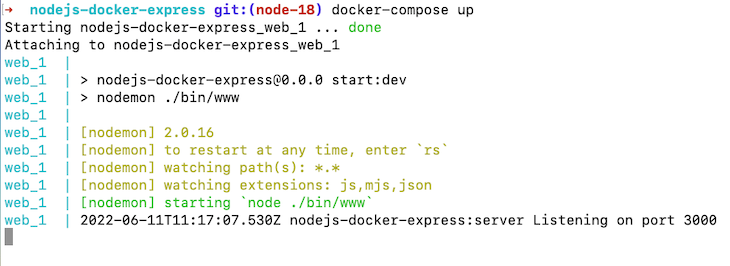
After that, if you hit http://localhost:3000 on your browser, you should see the following:
Great! Our app is running well with Docker. Now, let’s make a file change and see if it reflects correctly.
Our aim is to change the text from “Welcome to Express” to “Welcome to Express with Docker” as a test. To do so, we’ll need to change the routes/index.js file at line 6 to look like the code below:
res.render('index', { title: 'Express with Docker' });
As soon as we save the file, we can see that the web server restarts. This clearly shows that our Docker volumes and nodemon are functioning properly as expected:

At this juncture, if you refresh your browser tab running http://localhost:3000, you’ll see the following image:

You’ve successfully run an Express app with Docker in your local environment with Docker Compose configured. Give yourself a pat on the back!
Docker Compose is very useful to start multiple containers. If you want to add MongoDB, MySQL, or Postgres as a data source for the application, you can do so easily as another service in the docker-compose file.
In this tutorial, we focused only on Node.js with Docker having a single container running. Keep in mind that when running the container in a production environment, it has be built with the right stage of production since we used a multi-stage docker build.
Node.js and Docker play along very well. With the use of Docker Compose, the development experience is much smoother. You can use this tutorial as a building base to try out more advanced things with Docker and Node.js. Happy coding!
 Monitor failed and slow network requests in production
Deploying a Node-based web app or website is the easy part. Making sure your Node instance continues to serve resources to your app is where things get tougher. If you’re interested in ensuring requests to the backend or third-party services are successful, try LogRocket.

LogRocket lets you replay user sessions, eliminating guesswork around why bugs happen by showing exactly what users experienced. It captures console logs, errors, network requests, and pixel-perfect DOM recordings — compatible with all frameworks.
LogRocket's Galileo AI watches sessions for you, instantly identifying and explaining user struggles with automated monitoring of your entire product experience.
LogRocket instruments your app to record baseline performance timings such as page load time, time to first byte, slow network requests, and also logs Redux, NgRx, and Vuex actions/state. Start monitoring for free.

Discover how React Fiber works under the hood. Learn how React builds the DOM, handles concurrent rendering, and works alongside React 19 features and the new React Compiler.

Learn how to use Skybridge, an open-source React framework, to build and deploy cross-platform AI apps and interactive UI widgets for ChatGPT, Claude, and MCP clients from a single codebase.

Learn how to set up Meilisearch, index documents, and build keyword, semantic, and hybrid search with AI-powered retrieval.

Compare pnpm and npm across security defaults, disk usage, dependency strictness, and workspace policy to decide which package manager fits your project.
Would you be interested in joining LogRocket's developer community?
Join LogRocket’s Content Advisory Board. You’ll help inform the type of content we create and get access to exclusive meetups, social accreditation, and swag.
Sign up now

