Editor’s note: This article was last updated by Chimezie Innocent on 18 January 2024 to offer a comparison for using React Native’s Stack Navigator and Native Stack Navigator libraries, and dives into the use of React’s useNavigation Hook, which allows functional components to trigger navigation actions programmatically.

Mobile apps are made up of multiple screens. When building mobile apps, a primary concern is handling a user’s navigation through the app — e.g., the presentation of the screens and the transitions between them.
React Navigation is one of the most well-known navigation libraries available for React Native. In this tutorial, we’ll explore the basics of navigation in React Native, cover how to get started using React Navigation, and walk through some React Native navigation examples.
The Replay is a weekly newsletter for dev and engineering leaders.
Delivered once a week, it's your curated guide to the most important conversations around frontend dev, emerging AI tools, and the state of modern software.
React Navigation is a standalone library that enables you to implement navigation functionality in a React application.
React Navigation is written in JavaScript and does not directly use the native navigation APIs on iOS and Android. Instead, it recreates some subset of those APIs. This allows for the integration of third-party JS plugins, maximum customization, and easier debugging, with no need to learn Objective-C, Swift, Java, Kotlin, etc.
React Native Navigation is a popular alternative to React Navigation. It is a module that is dependent on and designed to be used with React Native. React Native Navigation differs slightly in that it directly uses native navigation APIs on iOS and Android, which allows for a more native look and feel. The current stable version of React Native Navigation at the time of writing is React Navigation 6.1.
For a more detailed exploration of the differences between React Navigation and React Native Navigation, check out “React Navigation vs. React Native Navigation: Which is right for you?”
React Router Native is another solution for implementing navigation functionality in a React Native app. It was developed by the Remix team.
React Router Native shares most of its API code with the React Router framework. This means that web developers who have worked with React Router will find it easy to use its Native counterpart.
In terms of ease of use, React Navigation and React Router Native are identical. For example, look at the following Router Native code:
import { NativeRouter, Route, Link } from "react-router-native";

const Home = () => <Text>Home</Text>;
const About = () => <Text>About</Text>;

const App = () => (
  <NativeRouter>
    <View>
      <View>
        {/* Define our links. They are like anchor tags */}
        <Link to="/">
          <Text>Home</Text>
        </Link>
        <Link to="/about">
          <Text>About</Text>
        </Link>
      </View>
      {/*Define our routes for this project*/}
      <Route exact path="/" component={Home} />
      <Route path="/about" component={About} />
    </View>
    {/*The NativeRouter*/}
  </NativeRouter>
);
When compared to Navigation, we can see that the code is similar:
import { NavigationContainer } from "@react-navigation/native";
import { createNativeStackNavigator } from "@react-navigation/native-stack";

function HomeScreen() {
  return (
    <View>
      <Text>Home Screen</Text>
    </View>
  );
}

function AboutScreen() {
  return (
    <View>
      <Text>About Screen</Text>
    </View>
  );
}

const Stack = createNativeStackNavigator();
export default function App() {
  return (
    <NavigationContainer>
     <Stack.Navigator>
        {/*Define our routes*/}
        <Stack.Screen name="Home" component={HomeScreen} />
        <Stack.Screen name="About" component={AboutScreen} />
      </Stack.Navigator>
    </NavigationContainer>
  );
}
The code used to implement routing in both libraries is identical to each other. This is a major plus as it means that there is a minor learning curve with both frameworks.
If you’re coming from a web development background, I would recommend React Router Native because its usage is the same as that of React Router. Otherwise, React Navigation should be the way to go because it has a larger community, hence more development support.
Now that we have seen what React Navigation is and how it relates to React Router Native, let’s see how we can use it in our app.
Note: For the sake of this article, we will be using Expo for our React Native application.
First, we will create a new application with the command below:
npx create-expo-app ReactNavigationDemo
This will create a new project called ReactNavigationDemo:

Next, cd into the project folder and open your code editor:
cd ReactNavigationDemo
If you are using VS Code, you can open the current folder in the editor using this:
code .
Start the app with this:
npx expo start
Next, install the React Navigation library in your React Native project using either of the commands below:
/* npm */
npm install @react-navigation/native

/* yarn */
yarn add @react-navigation/native
We also have to install some dependencies, namely react-native-screens and react-native-safe-area-context:
npx expo install react-native-screens react-native-safe-area-context
If you noticed, we didn’t install these dependencies using npm or yarn. Instead, we used npx expo install because it installs the dependency versions that are compatible with our project packages.
I recommend you always use this command to install dependency packages because npm and yarn will always install the latest version, which might not be compatible with your project. The downside is you can run into production-level errors.
React Navigation is built with JavaScript and lets you create components and navigation patterns that look and feel like truly native ones.
React Navigation provides a stack-based navigation model, allowing screens to be pushed onto and popped out of a navigation stack. With stack navigation, you can define the navigation structure of your application using a Stack Navigator, which maintains a stack of screens. Only one screen is presented to a user at a given time and each screen is displayed when it is pushed onto the stack, i.e. when a user navigates to the screen, it gets pushed to the top of the stack.
Imagine a stack of paper. Navigating to a new screen places it on top of the stack, and navigating back removes it from the stack. The Stack Navigator also provides transitions and gestures that feel like those of native iOS and Android.
Note that an app can have more than one Stack Navigator.
In React Native, we have two stack navigation libraries: @react-navigation/stack and @react-navigation/native-stack. Both of these libraries provide a stack-based navigation model and facilitate transitions between screens, placing each new screen on top of the stack.
However, by default, while @react-navigation/stack is configured to have the familiar iOS and Android look and feel with customizable animations, @react-navigation/native-stack utilizes the native APIs; UINavigationController on IOS and Fragment on Android so that navigation will behave the same as apps built natively.
To understand the difference between the two libraries, let’s look at them from these key factors:
@react-navigation/native-stack may not be as customizable as @react-navigation/stack depending on your needs so if you need to customize your navigation animations to your feel, @react-navigation/stack should be your go-to@react-navigation/native-stack offers better performance. As compared to @react-navigation/stack, it uses a native stack View component to render its screens, making transition animations both faster, better, and smoother@react-navigation/native-stack also offers basic support for the web using react-native-web.@react-navigation/stack , on the other hand, does not. You also have to install react-native-gesture-handler and import it at the top of your entry or root file (index.js or App.js. Skipping it tends to cause production-level crashes even though it works fine in development. Also, for animating your header using the UIkit style, you will have to install an additional package: @react-native-masked-view/masked-viewIn this section, we’ll explore the different navigators in React Native navigation and how to achieve them using the React Navigation library.
Let’s begin by first creating two files, Homescreen and Aboutscreen:
/* components/Homescreen.js */

import React from "react";
import { Button, View, Text } from "react-native";

export default function HomeScreen({ navigation }) {
  return (
    <View style={{ flex: 1, alignItems: "center", justifyContent: "center" }}>
      <Text>Home Screen</Text>
      <Button
        title="Go to About"
        onPress={() => navigation.navigate("About")}
      />
    </View>
  );
}
Note the onPress prop of the button above — we’ll explain what it does later:
/* components/Aboutscreen.js */

import React, { Component } from "react";
import { Button, View, Text } from "react-native";
export default function AboutScreen() {
  return (
    <View style={{ flex: 1, alignItems: "center", justifyContent: "center" }}>
      <Text>About Screen</Text>
    </View>
  );
}
Your project folder should look like this:
Let’s also make some changes to App.js. Here, we’ll have to make the following imports:
//tell React that we will implement a navigator
import { NavigationContainer } from "@react-navigation/native";
//create a stack navigator
import { createNativeStackNavigator } from "@react-navigation/native-stack";
Implementing our navigation in the root App.js file is useful because the component exported from App.js is the entry point (or root component) for a React Native app, and every other component is a descendant.
As you will see, we will encapsulate every other component inside the navigation functions:
/* App.js */

import { NavigationContainer } from '@react-navigation/native';
import { createNativeStackNavigator } from '@react-navigation/native-stack';
import HomeScreen from './components/HomeScreen';
import AboutScreen from './components/AboutScreen';

const Stack = createNativeStackNavigator();

export default function App() {
    return (
        <NavigationContainer>
            <Stack.Navigator>
                <Stack.Screen
                    name="Home"
                    component={HomeScreen}
                />
                <Stack.Screen
                    name="About"
                    component={AboutScreen}
                />
            </Stack.Navigator>
        </NavigationContainer>
    );
}
In the code above, createNativeStackNavigator provides a way for our app to transition between screens, where each new screen is placed on top of a stack. It is configured to have the familiar iOS and Android look and feel: new screens slide in from the right on iOS and fade in from the bottom on Android.
Here, we’ve executed the createNativeStackNavigator function and stored its instance in the Stack variable. Later on, we will pass our routes using Stack.Screen tags. The Home route corresponds to the HomeScreen, and the About route corresponds to AboutScreen.
Additionally, Stacks are displayed in order i.e., HomeScreen is displayed first by default because it is at the very top of the Stack. To override this default option, you can specify what the initial route will be. See the code below:
/* App.js */

// imports....
const Stack = createNativeStackNavigator();

export default function App() {
    return (
        <NavigationContainer>
            <Stack.Navigator initialRouteName='About'>
                <Stack.Screen
                    name="Home"
                    component={HomeScreen}
                />
                <Stack.Screen
                    name="About"
                    component={AboutScreen}
                />
            </Stack.Navigator>
        </NavigationContainer>
    );
}
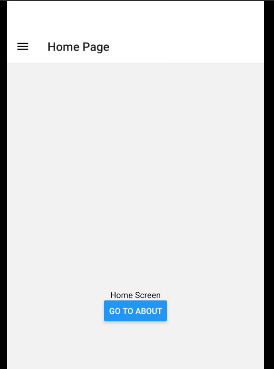
Behind the scenes, the createStackNavigator function provides a navigate prop to the HomeScreen and AboutScreen components.
This prop allows for navigation to a specified screen component. This is why we can use it on a button at HomeScreen.js, which, when pressed, leads to the AboutScreen page, as shown below:
<Button title="Go to About" onPress={() => navigation.navigate("About")} />;
In the App.js code, we finally created an app container by wrapping our components within the NavigationContainer component. This component manages the navigation tree and contains the navigation state.
Finally, run your application:
npx expo start
Your application should look like this:
TabNavigatorMost mobile apps have more than one screen. A common style of navigation in such mobile apps is tab-based navigation. React Navigation has a component called createBottomTabNavigator that helps us achieve this.
Before implementing tab-based navigation, install the bottom-tabs module using any of the commands below:
/* npm */
npm install @react-navigation/bottom-tabs

/* yarn */
yarn add @react-navigation/bottom-tabs
Let’s add another screen in our app by creating a ContactScreen file:
/* components/ContactScreen.js */

import React, { Component } from "react";
import { Button, View, Text } from "react-native";

export default function ContactScreen() {
  return (
    <View style={{ flex: 1, alignItems: "center", justifyContent: "center" }}>
      <Text>Contact Screen</Text>
    </View>
  );
}
Next, we import it into our App.js file:
import ContactScreen from './components/ContactScreen';
We will also be implementing our tab navigation in our App.js file. This is because it is recommended we implement all our navigation configurations in our root file as these configurations wrap all navigation structures and render our screens as children.
Let’s replace the createNativeStackNavigator line with this line of code:
import { createBottomTabNavigator } from '@react-navigation/bottom-tabs';
Our Stack Navigator will also change. Your App.js should look like this:
/* App.js */

import { NavigationContainer } from '@react-navigation/native';
import { createBottomTabNavigator } from '@react-navigation/bottom-tabs';
import ContactScreen from './components/ContactScreen';
import HomeScreen from './components/HomeScreen';
import AboutScreen from './components/AboutScreen';

const Tab = createBottomTabNavigator();

export default function App() {
    return (
        <NavigationContainer>
            <Tab.Navigator initialRouteName="Home">
                <Tab.Screen
                    name="Home"
                    component={HomeScreen}
                />
                <Tab.Screen
                    name="About"
                    component={AboutScreen}
                />
                <Tab.Screen
                    name="Contact"
                    component={ContactScreen}
                />
            </Tab.Navigator>
        </NavigationContainer>
    );
}
Run your application and it will look like this:
To use the drawer navigation, first install the @react-navigation/drawer package with any of the commands below:
/* npm */
npm install @react-navigation/drawer

/* yarn */
yarn add @react-navigation/drawer
Next, using npx expo install, we will install the dependencies:
npx expo install react-native-gesture-handler react-native-reanimated
Next, head over to the Reanimated documentation to set up gesture control in your project. After this step, import the gesture handler package at the top of your App.js:
import "react-native-gesture-handler"; //this should be at the top
Let’s also update our navigators with the drawer navigation. Copy and replace your App.js code with the code below:
/* App.js */

import 'react-native-gesture-handler';
import { NavigationContainer } from '@react-navigation/native';
import { createDrawerNavigator } from '@react-navigation/drawer';
import ContactScreen from './components/ContactScreen';
import HomeScreen from './components/HomeScreen';
import AboutScreen from './components/AboutScreen';
const Drawer = createDrawerNavigator();
export default function App() {
    return (
        <NavigationContainer>
            <Drawer.Navigator initialRouteName="Home">
                <Drawer.Screen
                    name="Home"
                    component={HomeScreen}
                />
                <Drawer.Screen
                    name="About"
                    component={AboutScreen}
                />
                <Drawer.Screen
                    name="Contact"
                    component={ContactScreen}
                />
            </Drawer.Navigator>
        </NavigationContainer>
    );
}
Run your application to see the result:
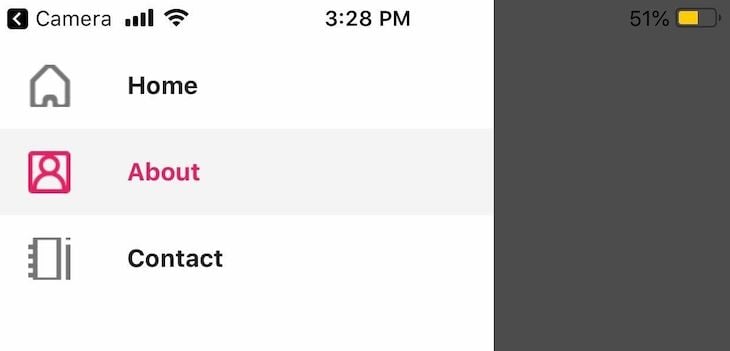
You can customize your drawer navigation by adding icons beside the route names. Our icons are placed inside our assets folder:
![]()
We can customize by adding navigationOptions to the following screen component files:
<NavigationContainer>
  <Drawer.Navigator initialRouteName="Home">
    <Drawer.Screen
      name="Home"
      component={HomeScreen}
      options={{ //change the configuration of our screen
        drawerIcon: ({ color, number, focused }) => { //set the icon:
          return ( //the icon will be an image
            <Image
              source={require("../assets/home-icon.png")}
              style={{ height: 30, width: 30 }}
            />
          );
        },
      }}
    />
    <Drawer.Screen
      name="About"
      component={AboutScreen}
      options={{
        drawerIcon: ({ color, number, focused }) => { //set the icon for all screens
          return (
            <Image
              source={require("../assets/about-icon.png")}
              style={{ height: 30, width: 30 }}
            />
          );
        },
      }}
    />
    <Drawer.Screen
      name="Contact"
      component={ContactScreen}
      options={{
        drawerIcon: ({ color, number, focused }) => {
          return (
            <Image
              source={require("../assets/contact-icon.png")}
              style={{ height: 30, width: 30 }}
            />
          );
        },
      }}
    />
  </Drawer.Navigator>
</NavigationContainer>
![]()
The drawerActiveTintColor prop lets you apply any color based on active or inactive states of navigation tabs and labels. For example, we can change the active state color for our nav drawer labels. Go to the Drawer.Navigator variable and add to the options object:
<Drawer.Navigator
  initialRouteName="Home"
  screenOptions={{ drawerActiveTintColor: "#e91e63" }}
>
//... further code.
This results in a change of color:
useNavigation() HookReact Navigation also provides a Hook called useNavigation. This Hook gives functional components access to the navigation object and allows them to trigger navigation actions programmatically. It is useful when you cannot pass the navigation props into the component directly.
To be honest, I use this Hook more often because it is easier to manage within my functional components and it is also very easy to use.
In your HomeScreen file, replace your code with the code below:
/* components/HomeScreen.js */

import React from 'react';
import { Button, View, Text } from 'react-native';
import { useNavigation } from '@react-navigation/native';

export default function HomeScreen() {
    const navigation = useNavigation();

    return (
        <View
            style={{ flex: 1, alignItems: 'center', justifyContent: 'center' }}
        >
            <Text>Home Screen</Text>
            <Button
                title="Go to About"
                onPress={() => navigation.navigate('About')}
            />
        </View>
    );
}
The useNavigation Hook is imported from the @react-navigation/native module and it returns a navigation object with programmatic actions.
In your About page, the same method can be implemented for the go-back button. See the following code:
/* components/About.js */

import React, { Component } from 'react';
import { Button, View, Text } from 'react-native';
import { useNavigation } from '@react-navigation/native';
export default function AboutScreen() {
    const navigation = useNavigation();
    return (
        <View
            style={{ flex: 1, alignItems: 'center', justifyContent: 'center' }}
        >
            <Text>About Screen</Text>
            <Button
                title="Go Back"
                onPress={() => {
                    navigation.goBack();
                }}
            />
        </View>
    );
}
There are two simple steps to pass params/parameters to routes: pass the params and then read the params in the child route or screen.
First, pass params to a route by putting them in an object as a second parameter to the navigation.navigate function:
navigation.navigate('RouteName', { /* params go here */ })
Then, read the params in your screen component. The params can be found in route.params:
export default function HomeScreen({ route, navigation }) {

//the 'route' variable gives us information on the page.
//It also stores the parameters and their values

const { paramName } = route.params; //our parameter 'paramName' is stored here.
//..further code..

}
Finally, to set the header title, we can use the title property of the options prop like so:
<Drawer.Screen
  name="Home"
  component={HomeScreen}
  options={{
    title: "Home Page", //set the title of the page to 'Home page'
  }}
/>
I hope that this article will jumpstart your use of the React Navigation package in your existing or future React Native projects.
There’s a lot more that can be done, and React Navigation will meet most of your needs. To learn more, check out the React Navigation documentation, and feel free to grab the final code from my GitHub repo.

LogRocket's Galileo AI watches sessions for you and and surfaces the technical and usability issues holding back your React Native apps.
LogRocket also helps you increase conversion rates and product usage by showing you exactly how users are interacting with your app. LogRocket's product analytics features surface the reasons why users don't complete a particular flow or don't adopt a new feature.
Start proactively monitoring your React Native apps — try LogRocket for free.

Claude Code vs. OpenCode in a real Next.js refactor: benchmark results, mistakes, prompts, and when to use each CLI agent.

Every time you explain your team’s coding standards to Claude, you are doing work that should be reusable. The same […]

Learn how to move beyond one-shot prompting in Claude with structured workflows for AI-assisted coding, debugging, PR reviews, documentation, testing, and automation.

Learn how to build advanced Next.js forms with rule engines, client-side previews, Server Actions, and server-validated form logic.
Hey there, want to help make our blog better?
Join LogRocket’s Content Advisory Board. You’ll help inform the type of content we create and get access to exclusive meetups, social accreditation, and swag.
Sign up now

