
Nowadays, during a pandemic, most people prefer online payments not just because it of no-contact safety precautions, but also because it is quick, easy, and reliable. A lot of mobile apps incorporate online payments such as Amazon, Uber, and many more.

Speaking of online payments, many app developers are using Stripe in their React Native Android and iOS projects, because Stripe provides an easy way of integrating a payment system into this framework. We have two options to integrate Stripe into React Native: PaymentSheet, or Elements.
PaymentSheet is a checkout panel pre-built by Stripe in which the user can enter card details and proceed with the payment. Elements is a little more complicated; you are more in control of the process, so you place the card elements and are responsible for proceeding with the payment.
In this article, I will discuss my preference for PaymentSheet before diving into a tutorial for an example donation app built with React Native, Expo, and PaymentSheet.
The Replay is a weekly newsletter for dev and engineering leaders.
Delivered once a week, it's your curated guide to the most important conversations around frontend dev, emerging AI tools, and the state of modern software.
Here are some reasons why I think PaymentSheet is better than Elements.
First, Elements requires a lot of configuration. Because you’re responsible for the payment, you need to manage the payment form. This can be complex, because different countries have different card configurations; for example, cards in India do not require a ZIP code whereas it is required in United States. You need to consider all of these conditions and manage them in Elements accordingly.
In PaymentSheet, however, Stripe has already configured most of these things for you. So, if a card number requires a ZIP code, the user will automatically be prompted to add a ZIP code. Plus, if enabled, PaymentSheet supports for Apple Pay and Google Pay.
Second, there’s a lot of error handling required with Elements. PaymentSheet, on the other hand, takes care of error handling for you, and will alert users to what’s wrong with their payment method, meaning you worry less about collecting funds.
For example, if the card has insufficient funds, Elements requires you to read the error and display it to users. But when you’re using PaymentSheet, the user will be warned automatically by Stripe. You just need to handle post-payment processes.
Finally, there are some privacy or legal requirements with payment processing that you might miss while using Elements. For example, you could be unknowingly storing data that you should not be, like users’ payment details.
Different countries have different laws regarding data privacy, and it can be frustrating to know and follow every one of them. PaymentSheet ensures that you don’t need to save any data to your servers, because all the communication required for payment is done with Stripe directly. This protects you from accidentally breaching data privacy laws.
Today we will be building a donation app using Expo and React Native with PaymentSheet for the payment processing. We will also require a Node.js server to handle Stripe operations, such as initiating a payment, and detecting any payments on the server.
Here’s what you should have in order to follow along with project we are going to make today:
Here’s the link to the GitHub repository just in case you get stuck and want to refer to the code.
Let’s get started with the fun! Create a folder of your choice (in my case I named it expo-stripe) to use as our project folder.
The first step is to build a Node server, which will help us initiate payments.
In the expo-stripe folder we just created, create a new folder called backend. This is where our Node backend project will reside.
Initialize a Node project using the following command and you will have a package.json file ready:
npm init -y
Run the following command in the terminal in the backend folder to install a few dependencies that will help us with the server:
npm install express cors stripe dotenv
Express is used to easily make a REST API with Node. It supports the use of middleware and has a lot of different features; plus, it’s easy to use.
The cors package is used with Express in order to make communication with our server easier and ensure no CORS error is thrown while sending requests to our server.
The stripe package helps us communicate with Stripe services, such as our Stripe account, to initialize payment, or to check payment status.
Finally, the dotenv package sets up environment variables in our project so we don’t have to store sensitive data such as the Stripe secret key in our code. We can keep it in a separate .env file.
You can now start the server using the following command in the terminal:
nodemon index
If you do not have nodemon installed, install it using the following command:
npm install -g nodemon
Before we actually handle Stripe operations, let’s get our secret key from Stripe.
Open your Stripe dashboard, and make sure Viewing test data is checked in the sidebar. Then, click on Developers, then API Keys to be presented with your API keys.
Remember to keep the secret key a secret, and do not share it with anyone else, because it will give them access to your Stripe account. We don’t need the publishable key for now, but we will use it later in our React Native app.
Copy the secret key and go back to your backend folder to create a new file named .env. Mention your secret key in the format shown below:
STRIPE_SECRET_KEY=(secret key here)
Create a new file in the backend folder named index.js. This will be the file where the main logic of the server will be stored.
First, let’s create a basic server boilerplate:
require("dotenv").config();
const express = require("express");
const app = express();
const Stripe = require("stripe");
const stripe = Stripe(process.env.STRIPE_SECRET_KEY);
const cors = require("cors");
const PORT = process.env.PORT || 5000;

app.use(express.json());
app.use(cors());

app.listen(PORT, () => console.log(`Server running on port ${PORT}`));
In the above code, we initialized dotenv, which initializes the environment variables for us. In our case, it is the Stripe secret key.
Then we initialized an Express app so that we can create a REST API, and initialized stripe to pass in the secret key from the environment variables. We also imported CORS so that we can use it with Express.
Next, we created a variable called PORT. This checks if a port is provided in environment variables, and if not, runs on port 5000. This is usually used with Heroku because Heroku uses its own ports.
We also implemented app.use(express.json()); so that our server can accept JSON data as a payload in requests.
Let’s create a POST route (/donate) because we are going to need some data from the user and we are creating a PaymentIntent:
app.post("/donate", async (req, res) => {
  try {
    // Getting data from client
    let { amount, name } = req.body;
    // Simple validation
    if (!amount || !name)
      return res.status(400).json({ message: "All fields are required" });
    amount = parseInt(amount);
    // Initiate payment
    const paymentIntent = await stripe.paymentIntents.create({
      amount: Math.round(amount * 100),
      currency: "INR",
      payment_method_types: ["card"],
      metadata: { name },
    });
    // Extracting the client secret
    const clientSecret = paymentIntent.client_secret;
    // Sending the client secret as response
    res.json({ message: "Payment initiated", clientSecret });
  } catch (err) {
    // Catch any error and send error 500 to client
    console.error(err);
    res.status(500).json({ message: "Internal Server Error" });
  }
});
In the code above, we are getting the amount and name from our app, and validating it. If the data is not sent, we will return a 400 error.
Then we are converting the amount to integer, just in case a number in the form of string is sent to the server. This is because we can only pass integer values to Stripe.
Next, we create a PaymentIntent and pass in the amount to be paid (in the lowest denomination), currency (I live in India, so for me it’s INR; use the currency you have set in your Stripe account), payment method, and the metadata with the user’s name in it.
When we check the transaction on the Stripe dashboard, you can see the user’s name in the metadata section. This is really helpful if you want to include some information with the payment so that you can find it later.
We are then extracting the client secret from the PaymentIntent, which helps the Stripe instance on our React Native app recognize the payment and proceed with the confirmation.
Finally, we are sending this client secret back to our app which will be now able to confirm the payment.
To test Stripe webhooks locally, we need to use the Stripe extension in Visual Studio code to make things easier. Remember, you should have the Stripe CLI installed before moving on to this section!
Open the Stripe extension from the sidebar and you should see the following options on the top:
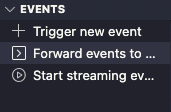
Click on Forward Events to local machine. Enter the webhook URL as http://localhost:5000/stripe; we will handle the route in just a bit. If you are prompted to log in to Stripe and authorize the CLI, do so and repeat the process.
If you have a look at the terminal, you will get a test webhook secret key. Copy and paste it in the following format in the .env file:
STRIPE_WEBHOOK_SECRET=(stripe webhook secret)
Now let’s create a route to handle the Stripe webhook requests. First of all, add the following line before the JSON parser we made before (Stripe needs to use raw body):
app.use("/stripe", express.raw({ type: "*/*" }));
Now we can proceed to handle the route:
app.post("/stripe", async (req, res) => {
  // Get the signature from the headers
  const sig = req.headers["stripe-signature"];
  let event;
  try {
    // Check if the event is sent from Stripe or a third party
    // And parse the event
    event = await stripe.webhooks.constructEvent(
      req.body,
      sig,
      process.env.STRIPE_WEBHOOK_SECRET
    );
  } catch (err) {
    // Handle what happens if the event is not from Stripe
    console.log(err);
    return res.status(400).json({ message: err.message });
  }
  // Event when a payment is initiated
  if (event.type === "payment_intent.created") {
    console.log(`${event.data.object.metadata.name} initated payment!`);
  }
  // Event when a payment is succeeded
  if (event.type === "payment_intent.succeeded") {
    console.log(`${event.data.object.metadata.name} succeeded payment!`);
    // fulfilment
  }
  res.json({ ok: true });
});
Here, we are getting the Stripe signature from the headers, because we need to first verify if the request is made by Stripe or some third party pretending to be Stripe.
We will use the constructEvent to check the signature against the webhook secret we stored in the environment variables. If the request is from a third party, an error is thrown with status code 400.
Now, if the request is from Stripe itself, the event will be stored in the event. And now we can check event.type and the payment status of a user using the metadata of the PaymentIntent we made before. If you have any post-payment actions, you can perform them here.
Finally, we add a response so that Stripe knows we have received their request.
Now that our server is set up, we can finally move onto our Expo and React Native app.
Go back to your project folder (for me it’s expo-stripe). If you don’t already have the Expo CLI installed, install it using the following command:
npm install -g expo-cli
Now you can create React Native apps with Expo. Type the following command in the terminal:
expo init rn-app
When prompted with options, select the first one, which is a blank Expo app with managed workflow. This will create a new folder named rn-app that contains our React Native files.
Go to the rn-app folder and type the following command to fire up the developer tools in your web browser:
npm start
This should automatically start your browser, and you should see a screen like this:
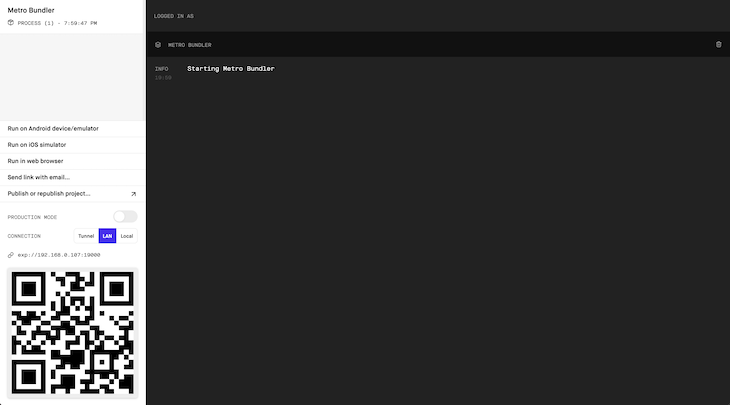
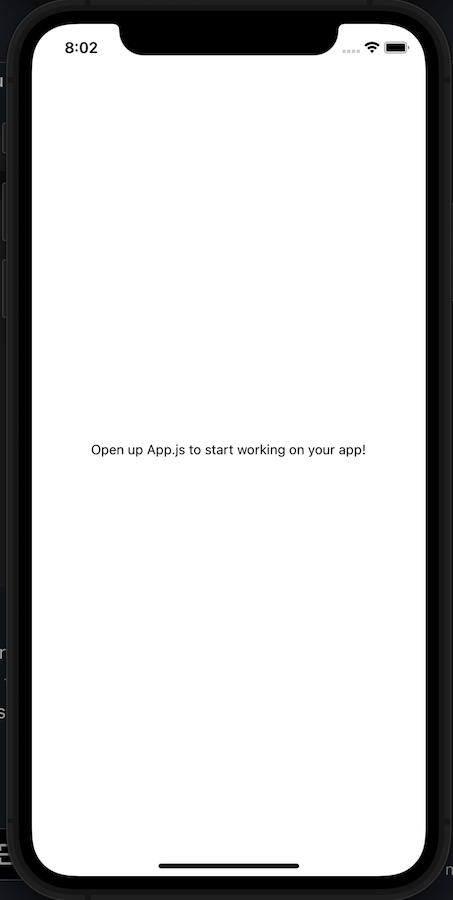
Run the app using any of the options on the left sidebar. In my case, I’ll use an iPhone simulator. If you’re on a Windows machine, you might need to use an Android emulator or a real physical device.
After running, your simulator should fire up and you should see the app:
Now, let’s install the Stripe package for Expo. Expo has made it easy to integrate Stripe into React Native without touching the native project files.
Type the following command in the terminal to install Stripe React Native package:
expo install @stripe/stripe-react-native
Remember we are using expo install and not npm install, because Expo handles the installation for us.
Before configuring Stripe, I highly recommend installing the ES7 Snippets extension for Visual Studio Code because it generates blank component boilerplates.
Create a new folder named components and a new file called Checkout.js. Start typing rnfe, choose the snippet, and you will have a component ready. Save the file; we will use it in just a bit.
Go to App.js and import the Checkout component and StripeProvider:
import { StripeProvider } from "@stripe/stripe-react-native";
import Checkout from "./components/Checkout";
Now, your JSX should look like this:
<View style={styles.container}>
  <StatusBar style="dark" />
  <StripeProvider publishableKey="(stripe publishable key here)">
    <Checkout />
  </StripeProvider>
</View>
Remember to place your Stripe publishable key found in the Stripe dashboard. We are wrapping the Checkout component inside the StripeProvider so that we can access Stripe services.
Go to Checkout.js and create the state for name and amount. We’re also going to use the Stripe hook to communicate with Stripe:
const [name, setName] = useState("");
const [amount, setAmount] = useState("1");
const stripe = useStripe();
The default name will be empty, and the default amount will be INR.
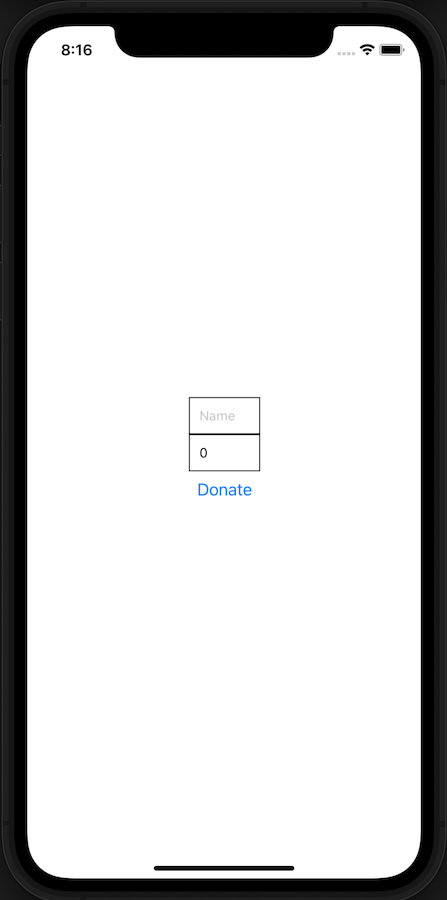
Now, let’s create a basic layout and map the states with the text boxes. Your JSX should look like this:
<View>
  <TextInput
    placeholder="Name"
    style={{ padding: 10, borderColor: "black", borderWidth: 1 }}
    value={name}
    onChangeText={(e) => setName(e)}
  />
  <TextInput
    placeholder="Amount"
    keyboardType="numeric"
    style={{ padding: 10, borderColor: "black", borderWidth: 1 }}
    value={amount}
    onChangeText={(e) => setAmount(e)}
  />
  <Button title="Donate" onPress={donate} />
</View>
Create a function called donate(), which we will work on in just a bit:
const donate = async () => {};
The generated layout should look like the following:
Next, we’ll handle the donate function:
const donate = async () => {
  try {
    const finalAmount = parseInt(amount);
    if (finalAmount < 1) return Alert.alert("You cannot donate below 1 INR");
    const response = await fetch("http://localhost:5000/donate", {
      method: "POST",
      headers: {
        "Content-Type": "application/json",
      },
      body: JSON.stringify({ amount: finalAmount, name }),
    });
    const data = await response.json();
    if (!response.ok) {
      return Alert.alert(data.message);
    }
    const initSheet = await stripe.initPaymentSheet({
      paymentIntentClientSecret: data.clientSecret,
    });
    if (initSheet.error) {
      console.error(initSheet.error);
      return Alert.alert(initSheet.error.message);
    }
    const presentSheet = await stripe.presentPaymentSheet({
      clientSecret: data.clientSecret,
    });
    if (presentSheet.error) {
      console.error(presentSheet.error);
      return Alert.alert(presentSheet.error.message);
    }
    Alert.alert("Donated successfully! Thank you for the donation.");
  } catch (err) {
    console.error(err);
    Alert.alert("Payment failed!");
  }
};
First, we are converting the values to integers from strings. Then, we check if the amount is less than ₹1 INR. If so, the app throws an alert and the transaction is halted.
Next, we make an HTTP POST request to our Node backend in order to get the client secret. If there are any errors, we handle them by checking response.ok.
Then, we initialize the PaymentSheet using the initPaymentSheet() function and pass in the client secret we got from the back end. We present the PaymentSheet using presentPaymentSheet() again, providing it with the client secret, and check if there are any errors. If we find any, an alert is sent to the user.
If there are no errors, you should get a “donation success” alert. When you click on the donate button, here’s what you’ll see:
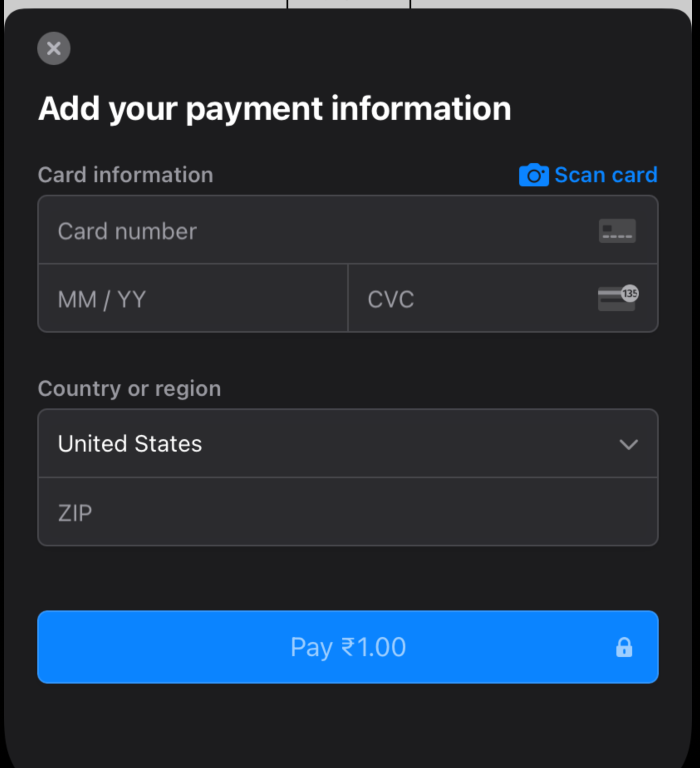
This is the PaymentSheet, made by Stripe. From here, everything is handled by Stripe and you don’t need to worry about error handling.
Once the payment succeeds, you can see it clearly with the user’s name on the console running the Node server. In production environments, you will need to manually create a webhook from the Stripe dashboard and use the live keys instead of test keys.
Congratulations! You’ve successfully integrated PaymentSheet into your Expo app. I want you to play around with this as much as you can. Maybe try and use Apple Pay and Google Pay along with the PaymentSheet, I think that would be a good exercise!
If you face any challenges, you can always refer to the Github repository linked earlier in this article.

LogRocket's Galileo AI watches sessions for you and and surfaces the technical and usability issues holding back your React Native apps.
LogRocket also helps you increase conversion rates and product usage by showing you exactly how users are interacting with your app. LogRocket's product analytics features surface the reasons why users don't complete a particular flow or don't adopt a new feature.
Start proactively monitoring your React Native apps — try LogRocket for free.

LogRocket lets you replay user sessions, eliminating guesswork around why users don't convert by showing exactly what users experienced. It captures console logs, errors, network requests, and pixel-perfect DOM recordings — compatible with all frameworks.
LogRocket's Galileo AI watches sessions for you, instantly identifying and explaining user struggles with automated monitoring of your entire product experience.
Start proactively monitoring your ecommerce apps — try LogRocket for free.

React Server Components and the Next.js App Router enable streaming and smaller client bundles, but only when used correctly. This article explores six common mistakes that block streaming, bloat hydration, and create stale UI in production.

Gil Fink (SparXis CEO) joins PodRocket to break down today’s most common web rendering patterns: SSR, CSR, static rednering, and islands/resumability.

@container scroll-state: Replace JS scroll listeners nowCSS @container scroll-state lets you build sticky headers, snapping carousels, and scroll indicators without JavaScript. Here’s how to replace scroll listeners with clean, declarative state queries.

Explore 10 Web APIs that replace common JavaScript libraries and reduce npm dependencies, bundle size, and performance overhead.
Would you be interested in joining LogRocket's developer community?
Join LogRocket’s Content Advisory Board. You’ll help inform the type of content we create and get access to exclusive meetups, social accreditation, and swag.
Sign up now
2 Replies to "Mastering Stripe PaymentSheet in React Native with Expo"
Hi, I’m testing it from my device and when I try to donate I get this error:
“Network request failed
at node_modules\whatwg-fetch\dist\fetch.umd.js:535:17 in setTimeout$argument_0…”
Is there any fix for this?
Hello, if your server is running on HTTP, ensure you’re not trying to connect with HTTPS. Make sure to use http:// in your fetch request.