pnpm. What’s all the fuss about?

The “p” in pnpm stands for “performant” — and wow, it really does deliver performance!
I became very frustrated working with npm. It seemed to be getting slower and slower. Working with more and more code repos meant doing more frequent npm installs. I spent so much time sitting and waiting for it to finish and thinking, there must be a better way!
Then, at my colleagues’ insistence, I started using pnpm and I haven’t gone back. For most new (and even some old) projects, I’ve replaced npm with pnpm and my working life is so much better for it.
Though I started using pnpm for its renowned performance (and I wasn’t disappointed), I quickly discovered that pnpm has many special features for workspaces that make it great for managing a multipackage monorepo (or even a multipackage meta repo).
In this blog post, we’ll explore how to use pnpm to manage our full-stack, multipackage monorepo through the following sections:
If you only care about how pnpm compares to npm, please jump directly to section 5.
The Replay is a weekly newsletter for dev and engineering leaders.
Delivered once a week, it's your curated guide to the most important conversations around frontend dev, emerging AI tools, and the state of modern software.
So what on earth are we talking about here? Let me break it down.
It’s a repo because it’s a code repository. In this case, we are talking about a Git code repository, with Git being the preeminent, mainstream version control software.
It’s a monorepo because we have packed multiple (sub-)projects into a single code repository, usually because they belong together for some reason, and we work on them at the same time.
Instead of a monorepo, it could also be a meta repo, which is a great next step for your monorepo once it’s grown too large and complicated — or, for example, you want to split it up and have separate CI/CD pipelines for each project.
We can go from monorepo to meta repo by splitting each sub-project into its own repository, then tying them all back together using the meta tool. A meta repo has the convenience of a monorepo, but allows us to have separate code repos for each sub project.
It’s multipackage because we have one or more packages in the repo. A Node.js package is a project with a package.json metadata file in its root directory. Normally, to share a package between multiple projects, we’d have to publish it to npm, but this would be overkill if the package were only going to be shared between a small number of projects, especially for proprietary or closed-source projects.
It’s full-stack because our repo contains a full-stack project. The monorepo contains both frontend and backend components, a browser-based UI, and a REST API. I thought this was the best way to show the benefits of pnpm workspaces because I can show you how to share a package in the monorepo between both the frontend and backend projects.
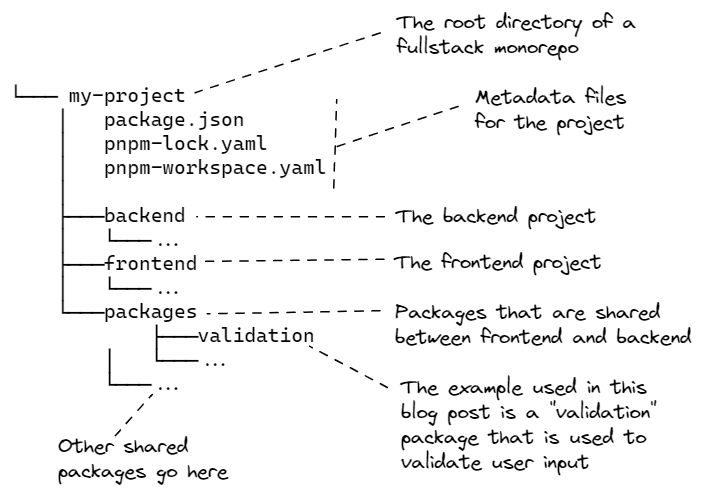
The diagram below shows the layout of a typical full-stack, multipackage monorepo:
 Of course, pnpm is very flexible and these workspaces can be used in many different ways.
Some other examples:
This blog post comes with working code that you can try out for yourself on GitHub. You can also download the zip file here, or use Git to clone the code repository:
git clone [email protected]:ashleydavis/pnpm-workspace-examples.git
Now, open a terminal and navigate to the directory:
cd pnpm-workspace-examples
Let’s start by walking through the creation of a simple multipackage monorepo with pnpm, just to learn the basics.
If this seems too basic, skip straight to section 3 to see a more realistic full-stack monorepo.
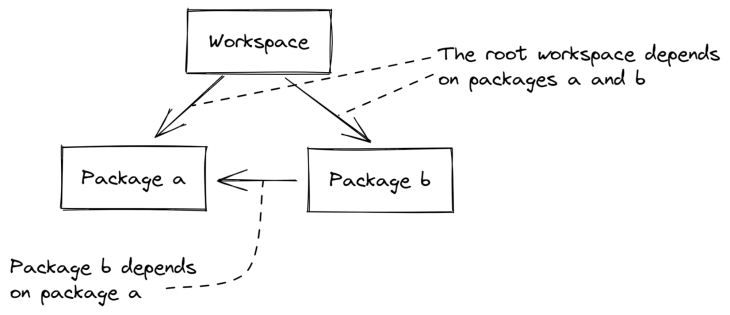
Here is the simple structure we’ll create:

We have a workspace with a root package and sub-packages A and B. To demonstrate dependencies within the monorepo:
Let’s learn how to create this structure for our project.
To try any of this code, you first need to install Node.js. If you don’t already have Node.js, please follow the instructions on their webpage.
Before we can do anything with pnpm, we must also install it:
npm install -g pnpm
There are a number of other ways you can install pnpm depending on your operating system.
Now let’s create our root project. We’ll call our project basic, which lines up with code that you can find in GitHub. The first step is to create a directory for the project:
mkdir basic
Or on Windows:
md basic
I’ll just use mkdir from now on; if you are on Windows, please remember to use md instead.
Now, change into that directory and create the package.json file for our root project:
cd basic
pnpm init
In many cases, pnpm is used just like regular old npm. For example we add packages to our project:
pnpm install dayjs
Note that this generates a pnpm-lock.yaml file as opposed to npm’s package-lock.json file. You need to commit this generated file to version control.
We can then use these packages in our code:
const dayjs = require("dayjs");

console.log(dayjs().format());
Then we can run our code using Node.js:
node index.js
So far, pnpm isn’t any different from npm, except (and you probably won’t notice it in this trivial case) that it is much faster than npm. That’s something that’ll become more obvious as the size of our project grows and the number of dependencies increases.
pnpm has a “workspaces” facility that we can use to create dependencies between packages in our monorepo. To demonstrate with the basic example, we’ll create a subpackage called A and create a dependency to it from the root package.
To let pnpm know that it is managing sub-packages, we add a pnpm-workspace.yaml file to our root project:
packages:
- "packages/*"
This indicates to pnpm that any sub-directory under the packages directory can contain sub-packages.
Let’s now create the packages directory and a subdirectory for package A:
cd packages
mkdir a
cd a
Now we can create the package.json file for package A:
pnpm init
We’ll create a simple code file for package a with an exported function, something that we can call from the root package:
function getMessage() {
    return "Hello from package A";
}

module.exports = {
    getMessage,
};
Next, update the package.json for the root package to add the dependency on package A. Add this line to your package.json:
"a": "workspace:*",
The updated package.json file looks like this:
{
  "name": "basic",
    ...
  "dependencies": {
    "a": "workspace:*",
    "dayjs": "^1.11.2"
  }
}
Now that we have linked our root package to the sub-package A, we can use the code from package A in our root package:
const dayjs = require("dayjs");
const a = require("a");

console.log(`Today's date: ${dayjs().format()}`);
console.log(`From package a: ${a.getMessage()}`);
Note how we referenced package A. Without workspaces, we probably would have used a relative path like this:
const a = require("./packages/a");
Instead, we referenced it by name as if it were installed under node_modules from the Node package repository:
const a = require("a");
Ordinarily, to achieve this, we would have to publish our package to the Node package repository (either publicly or privately). Being forced to publish a package in order to reuse it conveniently makes for a painful workflow, especially if you are only reusing the package within a single monorepo. In section 5, we’ll talk about the magic that makes it possible to share these packages without publishing them.
In our terminal again, we navigate back to the directory for the root project and invoke pnpm install to link the root package to the sub-package:
cd ...
pnpm install
Now we can run our code and see the effect:
node index.js
Note how the message is retrieved from package A and displayed in the output:
From package a: Hello from package A
This shows how the root project is using the function from the sub-package.
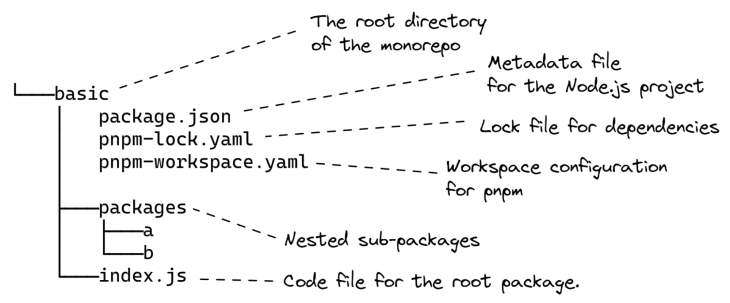
We can add package B to our monorepo in the same way as package A. You can see the end result under the basic directory in the example code.
This diagram shows the layout of the basic project with packages A and B:
 We have learned how to create a basic pnpm workspace! Let’s move on and examine the more advanced full-stack monorepo.
Using a monorepo for a full-stack project can be very useful because it allows us to co-locate the code for both the backend and the frontend components in a single repository. This is convenient because the backend and frontend will often be tightly coupled and should change together. With a monorepo, we can make code changes to both and commit to a single code repository, updating both components at the same. Pushing our commits then triggers our continuous delivery pipeline, which simultaneously deploys both frontend and backend to our production environment.
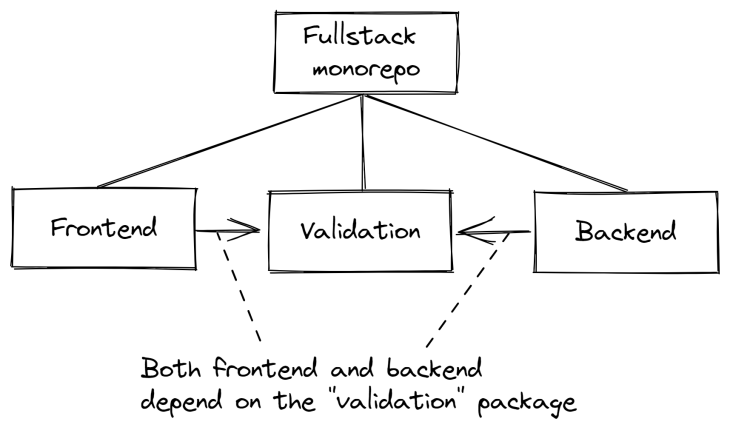
Using a pnpm workspace helps because we can create nested packages that we can share between frontend and backend. The example shared package we’ll discuss here is a validation code library that both frontend and backend use to validate the user’s input.
You can see in this diagram that the frontend and backend are both packages themselves, and both depend on the validation package:

Please try out the full-stack repo for yourself:
cd fullstack
pnpm install
pnpm start
Open the frontend by navigating your browser to http://localhost:1234/.
You should see some items in the to-do list. Try entering some text and click Add todo item to add items to your to-do list.
See what happens if you enter no text and click Add todo item. Trying to add an empty to-do item to the list shows an alert in the browser; the validation library in the frontend has prevented you from adding an invalid to-do item.
If you like, you can bypass the frontend and hit the REST API directly, using the VS Code REST Client script in the backend, to add an invalid to-do item. Then, the validation library in the backend does the same thing: it rejects the invalid to-do item.
In the full-stack project, the pnpm-workspace.yaml file includes both the backend and frontend projects as sub-packages:
packages:
  - backend
  - frontend
  - packages/*
Underneath the packages subdirectory, you can find the validation package that is shared between frontend and backend. As an example, here’s the package.json from the backend showing its dependency on the validation package:
{
    "name": "backend",
    ...
    "dependencies": {
        "body-parser": "^1.20.0",
        "cors": "^2.8.5",
        "express": "^4.18.1",
        "validation": "workspace:*"
    }
}
The frontend uses the validation package to verify that the new to-do item is valid before sending it to the backend:
const validation = require("validation");
// ...

async function onAddNewTodoItem() {
    const newTodoItem = { text: newTodoItemText };
    const result = validation.validateTodo(newTodoItem);
    if (!result.valid) {
        alert(`Validation failed: ${result.message}`);
        return;
    }

    await axios.post(`${BASE_URL}/todo`, { todoItem: newTodoItem });
    setTodoList(todoList.concat([ newTodoItem ]));
    setNewTodoItemText("");
}
The backend also makes use of the validation package. It’s always a good idea to validate user input in both the frontend and the backend because you never know when a user might bypass your frontend and hit your REST API directly.
You can try this yourself if you like. Look in the example code repository under fullstack/backend/test/backend.http for a VS Code REST Client script, which allows you to trigger the REST API with an invalid to-do item. Use that script to directly trigger the HTTP POST route that adds an item to the to-do list.
You can see in the backend code how it uses the validation package to reject invalid to-do items:
// ...

app.post("/todo", (req, res) => {

    const todoItem = req.body.todoItem;
    const result = validation.validateTodo(todoItem)
    if (!result.valid) {
        res.status(400).json(result);
        return;
    }

    //
    // The todo item is valid, add it to the todo list.
    //
    todoList.push(todoItem);
    res.sendStatus(200);
});

// ...
One thing that makes pnpm so useful for managing a multipackage monorepo is that you can use it to run scripts recursively in nested packages.
To see how this is set up, take a look at the scripts section in the root workspace’s package.json file:
{
    "name": "fullstack",
    ...
    "scripts": {
      "start": "pnpm --stream -r start",
      "start:dev": "pnpm --stream -r run start:dev",
      "clean": "rm -rf .parcel-cache && pnpm -r run clean"
    },
    ...
}
Let’s look at the script start:dev, which is used to start the application in development mode. Here’s the full command from the package.json:
pnpm --stream -r run start:dev
The -r flag causes pnpm to run the start:dev script on all packages in the workspace — well, at least all packages that have a start:dev script! It doesn’t run it on packages that don’t implement it, like the validation package, which isn’t a startable package, so it doesn’t need that script.
The frontend and backend packages do implement start:dev, so when you run this command they will both be started. We can issue this one command and start both our frontend and backend at the same time!
--stream flag do?--stream enables streaming output mode. This simply causes pnpm to continuously display the full and interleaved output of the scripts for each package in your terminal. This is optional, but I think it’s the best way to easily see all the output from both the frontend and backend at the same time.
We don’t have to run that full command, though, because that’s what start:dev does in the workspace’s package.json. So, at the root of our workspace, we can simply invoke this command to start both our backend and frontend in development mode:
pnpm run start:dev
It’s also useful sometimes to be able to run one script on a particular sub-package. You can do this with pnpm’s --filter flag, which targets the script to the requested package.
For example, in the root workspace, we can invoke start:dev just for the frontend, like this:
pnpm --filter frontend run start:dev
We can target any script to any sub-package using the --filter flag.
One of the best examples of sharing code libraries within our monorepo is to share types within a TypeScript project.
The full-stack TypeScript example project has the same structure as the full-stack JavaScript project from earlier, I just converted it from JavaScript to TypeScript. The TypeScript project also shares a validation library between the frontend and the backend projects.
The difference, though, is that the TypeScript project also has type definitions. In this case particularly, we are using interfaces, and we’d like to share these types between our frontend and backend. Then, we can be sure they are both on the same page regarding the data structures being passed between them.
Please try out the full-stack TypeScript project for yourself:
cd typescript
pnpm install
pnpm start
Open the frontend by navigating your browser to http://localhost:1234/.
Now, same as the full-stack JavaScript example, you should see a to-do list and be able to add to-do items to it.
The TypeScript version of the validation library contains interfaces that define a common data structure shared between frontend and backend:
//
// Represents an item in the todo list.
//
export interface ITodoItem {
    //
    // The text of the todo item.
    //
    text: string;
}

//
// Payload to the REST API HTTP POST /todo.
//
export interface IAddTodoPayload {
    //
    // The todo item to be added to the list.
    //
    todoItem: ITodoItem;
}

//
// Response from the REST API GET /todos.
//
export interface IGetTodosResponse {
    //
    // The todo list that was retrieved.
    //
    todoList: ITodoItem[];
}

// ... validation code goes here ...
These types are defined in the index.ts file from the validation library and are used in the frontend to validate the structure of the data we are sending to the backend at compile time, via HTTP POST:
async function onAddNewTodoItem() {
    const newTodoItem: ITodoItem = { text: newTodoItemText };
    const result = validateTodo(newTodoItem);
    if (!result.valid) {
        alert(`Validation failed: ${result.message}`);
        return;
    }

    await axios.post<IAddTodoPayload>(
          `${BASE_URL}/todo`,
          { todoItem: newTodoItem }
      );
    setTodoList(todoList.concat([ newTodoItem ]));
    setNewTodoItemText("");
}
The types are also used in the backend to validate (again, at compile time) the structure of the data we are receiving from the frontend via HTTP POST:
app.post("/todo", (req, res) => {

    const payload = req.body as IAddTodoPayload;
    const todoItem = payload.todoItem;
    const result = validateTodo(todoItem)
    if (!result.valid) {
        res.status(400).json(result);
        return;
    }

    //
    // The todo item is valid, add it to the todo list.
    //
    todoList.push(todoItem);
    res.sendStatus(200);
});
We now have some compile-time validation for the data structures we are sharing between frontend and backend. Of course, this is the reason we are using TypeScript. The compile-time validation helps prevent programming mistakes — it gives us some protection from ourselves.
However, we still need runtime protection from misuse, whether accidental or malicious, by our users, and you can see that the call to validateTodo is still there in both previous code snippets.
The full-stack TypeScript project contains another good example of running a script on all sub-packages.
When working with TypeScript, we often need to build our code. It’s a useful check during development to find errors, and it’s a necessary step for releasing our code to production.
In this example, we can build all TypeScript projects (we have three separate TS projects!) in our monorepo like this:
pnpm run build
If you look at the package.json file for the TypeScript project, you’ll see the build script implemented like this:
pnpm --stream -r run build
This runs the build script on each of the nested TypeScript projects, compiling the code for each.
Again, the --stream flag produces streaming interleaved output from each of the sub-scripts. I prefer this to the default option, which shows the output from each script separately, but sometimes it collapses the output, which can cause us to miss important information.
Another good example here is the clean script:
pnpm run clean
There’s nothing like trying it out for yourself to build understanding. You should try running these build and clean commands in your own copy of the full-stack TypeScript project.
Before we finish up, here’s a concise summary of how pnpm works vs. npm. If you’re looking for a fuller picture, check out this post.
pnpm is much faster than npm. How fast? Apparently, according to the benchmark, it’s 3x faster. I don’t know about that; to me, pnpm feels 10x faster. That’s how much of a difference it’s made for me.
pnpm has a very efficient method of storing downloaded packages. Typically, npm will have a separate copy of the packages for every project you have installed on your computer. That’s a lot of wasted disk space when many of your projects will share dependencies.
pnpm also has a radically different approach to storage. It stores all downloaded packages under a single .pnpm-store subdirectory in your home directory. From there, it symlinks packages into the projects where they are needed, thus sharing packages among all your projects. It’s deceptively simple the way they made this work, but it makes a huge difference.
pnpm’s support for sharing packages in workspaces and running scripts against sub-packages, as we’ve seen, is also great. npm also offers workspaces now, and they are usable, but it doesn’t seem as easy to run scripts against sub-packages with npm as it does with pnpm. Please tell me if I’m missing something!
pnpm supports sharing packages within a project, too, again using symlinks. It creates symlinks under the node_modules for each shared package. npm does a similar thing, so it’s not really that exciting, but I think pnpm wins here because it provides more convenient ways to run your scripts across your sub-packages.
I’m always looking for ways to be a more effective developer. Adopting tools that support me and avoiding tools that hinder me is a key part of being a rapid developer, and is a key theme in my new book, Rapid Fullstack Development. That’s why I’m choosing pnpm over npm — it’s so much faster that it makes an important difference in my productivity.
Thanks for reading, I hope you have some fun with pnpm. Follow me on Twitter for more content like this!
There’s no doubt that frontends are getting more complex. As you add new JavaScript libraries and other dependencies to your app, you’ll need more visibility to ensure your users don’t run into unknown issues.
LogRocket is a frontend application monitoring solution that lets you replay JavaScript errors as if they happened in your own browser so you can react to bugs more effectively.

LogRocket works perfectly with any app, regardless of framework, and has plugins to log additional context from Redux, Vuex, and @ngrx/store. Instead of guessing why problems happen, you can aggregate and report on what state your application was in when an issue occurred. LogRocket also monitors your app’s performance, reporting metrics like client CPU load, client memory usage, and more.
Build confidently — start monitoring for free.

Russ Miles, a software development expert and educator, joins the show to unpack why “developer productivity” platforms so often disappoint.

Discover what’s new in The Replay, LogRocket’s newsletter for dev and engineering leaders, in the February 18th issue.

Learn how to recreate Claude Skills–style workflows in GitHub Copilot using custom instruction files and smarter context management.

Claude Code is deceptively capable. Point it at a codebase, describe what you need, and it’ll autonomously navigate files, write […]
Hey there, want to help make our blog better?
Join LogRocket’s Content Advisory Board. You’ll help inform the type of content we create and get access to exclusive meetups, social accreditation, and swag.
Sign up now
3 Replies to "pnpm tutorial: How to manage a full-stack, multipackage monorepo"
Hey big thanks for such good resource, now everything makes sense 🤣
I think they should keep a reference of this one in the pnpm docs, workspaces are so vaguely described there.
Thanks so much, I’m glad you found it useful.
One of the things I never see mentioned in these kind of articles is that every time you change shared code, you have to recompile. Sometimes you even have to completely re-install all dependencies.
Are you really just sharing the shared library as sourcecode without compilation?