
The Replay is a weekly newsletter for dev and engineering leaders.
Delivered once a week, it's your curated guide to the most important conversations around frontend dev, emerging AI tools, and the state of modern software.
Distributed Application Runtime(Dapr) is an open-source project by Microsoft. It is an event-driven, portable runtime that aims to simplify building microservice applications for developers. Dapr is composed of several building blocks accessed by standard HTTP or gRPC APIs and can be called from various programming languages.

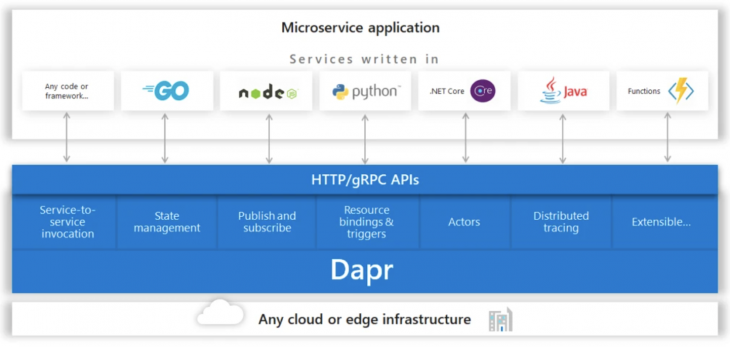
The main building blocks of Dapr are:
In this article, we will be exploring how to make a chat app using some of the building blocks.
Our chat app will be built using Node.js and React. This article assumes that you are familiar with both and have a working knowledge of both. Before we begin building the chat app, ensure that you have Node, Yarn, or npm, and Docker installed on your machine. You can follow instructions in the provided links to install them if you haven’t already. We will use create-react-app to create the UI for our chat app.
The first thing we will need to do is install the Dapr CLI on our local machines. We will use the specific install script for our OS:
$ wget -q https://raw.githubusercontent.com/dapr/cli/master/install/install.sh -O - | /bin/bash
$ powershell -Command "iwr -useb https://raw.githubusercontent.com/dapr/cli/master/install/install.ps1 | iex"
$ curl -fsSL https://raw.githubusercontent.com/dapr/cli/master/install/install.sh | /bin/bash
Once you have installed the CLI, you will need to set up Dapr in your machine with the following command:
$ dapr init

You can now run Dapr locally with dapr run.
Our chat app will be composed of two microservices. The first microservice will be a Node application that will subscribe to published messages (sent messages) from the client UI(second microservice).
Create the following folder structure for our server:
node-subscriber
├── README.md
├── .gitignore
├── routes.js
└── app.js
Alternatively, this can be done through the terminal the following way:
$ mkdir node-subscriber
$ cd node-subscriber
$ touch README.md app.js routes.js .gitignore
You can add a description of what your project is about to the README.md. You should also add the node_modules folder to the .gitignore file like so:
node_modules/
To generate the package.json file without prompts, run the following command:
$ npm init -y
The contents of the package.json file will look like this:
{
  "name": "node-subscriber",
  "version": "1.0.0",
  "description": "",
  "main": "app.js",
  "scripts": {
    "test": "echo \"Error: no test specified\" && exit 1"
  },
  "keywords": [],
  "author": "",
  "license": "ISC"
}
$ yarn add express body-parser ws
In app.js we will create a simple express application that exposes a few routes and handlers and initializes a WebSocket server instance to send messages connected to clients. Add the following code to your app.js file:
const express = require("express");
const bodyParser = require('body-parser');
const WebSocket = require("ws");
const { createServer } = require("http");

const app = express();
app.use(bodyParser.json());
app.use("/", require("./routes"));

const port = process.env.PORT || 9000;

//initialize a http server
const server = createServer(app);
server.listen(port, () => {
  console.log(`Node subscriber server running on port: ${port}`);
});
//initialize the WebSocket server instance
const wss = new WebSocket.Server({ server });
wss.on("connection", (ws) => {
  console.info(`Total connected clients: ${wss.clients.size}`);
  app.locals.clients = wss.clients;
  //send immediate a feedback to the incoming connection
  ws.send(
    JSON.stringify({
      type: "connect",
      message: "Welcome to Dapr Chat App",
    })
  );
});
We start by creating a simple HTTP server using express before adding a WebSocket server that uses the express server. The connection event handler of the WebSocket server handles incoming connection requests from clients. We then assign the clients property of the WebSocket server to app.locals. This enables us to broadcast messages to all connected clients from any of the routed endpoints. Finally, we send a message to the client indicating a successful connection.
We expose a route /message that subscribes to messages from the client. The route handler will be defined in routes.js . Let’s add some code to send a simple message to connected clients:
const router = require("express").Router();
const WebSocket = require("ws");
const broadcast = (clients, message) => {
  clients.forEach((client) => {
    if (client.readyState === WebSocket.OPEN) {
      client.send(message);
    }
  });
};
router.post("/message", (req, res) => {
  broadcast(req.app.locals.clients, "Bark!");
  return res.sendStatus(200);
});
module.exports = router;
We are ready to test our node-subscriber server now. Make sure that you are inside the node-subscriber directory. Run the node-subscriber app with Dapr dapr run --app-id node-subscriber --app-port 9000 --port 3500 node app.js.
The options app-id and app-port will be any unique identifier of our choice and the port that our Node application is running on. The port option indicates what port Dapr will run on. We also pass the command to run our app node app.js.
You can use the wscat utility or the Smart Websocket Client Chrome extension to test the WebSocket functionality of our server. If you have wscat installed, open a new terminal tab and run:
$ wscat -c ws://localhost:9000

Once we have connected to the WebSocket, we can use the Dapr CLI post messages for testing and see if the connected clients receive a message:
dapr invoke --app-id nodeapp --method message --payload '{"message": "This is a test" }'


After invoking the message method, the connected client receives a message from the app. Since the route should relay the message published from any client to other connected clients, let us make a few adjustments to the method for this:
const router = require("express").Router();
const WebSocket = require("ws");
const broadcast = (clients, text) => {
  clients.forEach((client) => {
    if (client.readyState === WebSocket.OPEN) {
      client.send(JSON.stringify({
        type: "message",
        text
      }));
    }
  });
};
router.post("/message", (req, res) => {
  const message = req.body.message;
  if(message) {
    broadcast(req.app.locals.clients, message);
  }
  return res.sendStatus(200);
});
module.exports = router;
Invoking the method with the sample message we used before produces the following result:
The server can now receive messages from a client and send it to other connected clients.
Our frontend client will be composed of a server and app. The server will invoke the message method through Dapr. Let us create the folder structure for our client:
$ mkdir dapr-chat-app-client
$ cd dapr-chat-app-client
$ touch README.md server.js .gitignore
Add a short description of the client to the README.md file and add the node_modules folder to the .gitignore file.
Next, generate the package.json file using the following command:
The contents of the package.json file will look like this:
{
  "name": "dapr-chat-app-client",
  "version": "1.0.0",
  "description": "",
  "main": "index.js",
  "scripts": {
    "test": "echo \"Error: no test specified\" && exit 1"
  },
  "keywords": [],
  "author": "",
  "license": "ISC"
}
$ yarn add express body-parser request
Go into the dapr-chat-app-client directory and bootstrap the frontend app using any of the following commands.
$ npx create-react-app client
$ npm init react-app client
$ yarn create react-app client
The frontend server will invoke the message method of the node subscriber when a message is sent from the frontend app. Add the following code to the server.js file in the dapr-chat-app-client directory:
const express = require('express');
const path = require('path');
const request = require('request');
const bodyParser = require('body-parser');

const app = express();
app.use(bodyParser.json());

const daprPort = process.env.DAPR_HTTP_PORT || 3500;
const daprUrl = `http://localhost:${daprPort}/v1.0`;
const port = 8080;

app.post('/publish', (req, res) => {
  console.log("Publishing: ", req.body);
  const publishUrl = `${daprUrl}/invoke/node-subscriber/method/message`;
  request( { uri: publishUrl, method: 'POST', json: req.body } );
  res.sendStatus(200);
});

// Serve static files
app.use(express.static(path.join(__dirname, 'client/build')));
// For all other requests, route to React client
app.get('*', function (_req, res) {
  res.sendFile(path.join(__dirname, 'client/build', 'index.html'));
});
app.listen(process.env.PORT || port, () => console.log(`Listening on port ${port}!`));
The server file creates an express server that exposes a publish endpoint which invokes the message method on the node subscriber using Dapr. It also serves the static files for the frontend app.
For the client to run, we will need to build and start the frontend app we bootstrapped inside the client folder under dapr-chat-app-client directory.
We will need to add a few scripts to the package.json file of the main folder for this:
"scripts": {
    "client": "cd client && yarn start",
    "start": "node server.js",
    "buildclient": "cd client && npm install && npm run build",
    "buildandstart": "npm run buildclient && npm install && npm run start"
},
Run the app using Dapr:
dapr run --app-id dapt-chat-app-client --app-port 8080 npm run buildandstart
This will run the app in development mode and you can view it in the browser using the link http://localhost:8080/.
We are ready to work on the frontend app. Navigate to the client folder:
cd client
We will user Semantic UI React for styling.
To install it, run the following command:
$ yarn add semantic-ui-react
To theme the Semantic UI components, we will need the semantic ui stylesheets. The quickest way to get started is by using a CDN. Just add this link to the <head> of your index.html file in the public folder:
<link rel="stylesheet" href="//cdn.jsdelivr.net/npm/[email protected]/dist/semantic.min.css" />
Our application will be housed in the app.js file which will be the main component:
# Navigate to source directory
$ cd src/
When the main component mounts, we will create a WebSocket connection and store it using Refs. The connection will listen to messages from our node-subscriber server. The received messages will then be added to the state and processed for display. The initial setup will look something like this:
import React, { Fragment, useState, useEffect, useRef } from "react";
import {
  Header
} from "semantic-ui-react";
import "./App.css";

const App = () => {
  const webSocket = useRef(null);
  const [socketMessages, setSocketMessages] = useState([]);

  useEffect(() => {
    webSocket.current = new WebSocket("ws://localhost:9000");
    webSocket.current.onmessage = message => {
      const data = JSON.parse(message.data);
      setSocketMessages(prev => [...prev, data]);
    };
    webSocket.current.onclose = () => {
      webSocket.current.close();
    };
    return () => webSocket.current.close();
  }, []);
  return (
    <div className="App">
      <Header as="h2" icon>
        <Icon name="users" />
        Dapr Chat App
      </Header>
      <Grid>
      </Grid>
    </div>
  );
};
export default App;

To handle messages we receive from the node-subscriber server, we will use a useEffect that will fire whenever the socketMessages changes. It will take the last message and process it:
useEffect(() => {
    let data = socketMessages.pop();
    if (data) {
      switch (data.type) {
        case "message":
          handleMessageReceived(data.text);
          break;
        default:
          break;
      }
    }
  }, [socketMessages]);
The message will be processed and if the type of the message is message it will call the handleMessageReceived handler. This handler will update the state messages variable with new messages that will then be displayed to the user:
const Chat = ({ connection, updateConnection, channel, updateChannel }) => {
  ...
  const messagesRef = useRef([]);
  const [messages, setMessages] = useState({});
  ...
  const handleMessageReceived = (text) => {
    let messages = messagesRef.current;
    let newMessages = [...messages, text];
    messagesRef.current = newMessages;
    setMessages(newMessages);
  };
  ...
}
The handler retrieves the currently stored messages and adds the newly received message before updating the value.
Now that we have handled receiving messages from the node-subscriber server, we need to display the chat messages. Additionally, we will have an input for the user to send a message to other users on the chat. If there are no messages to display, we will have a banner showing that no messages have been received yet.
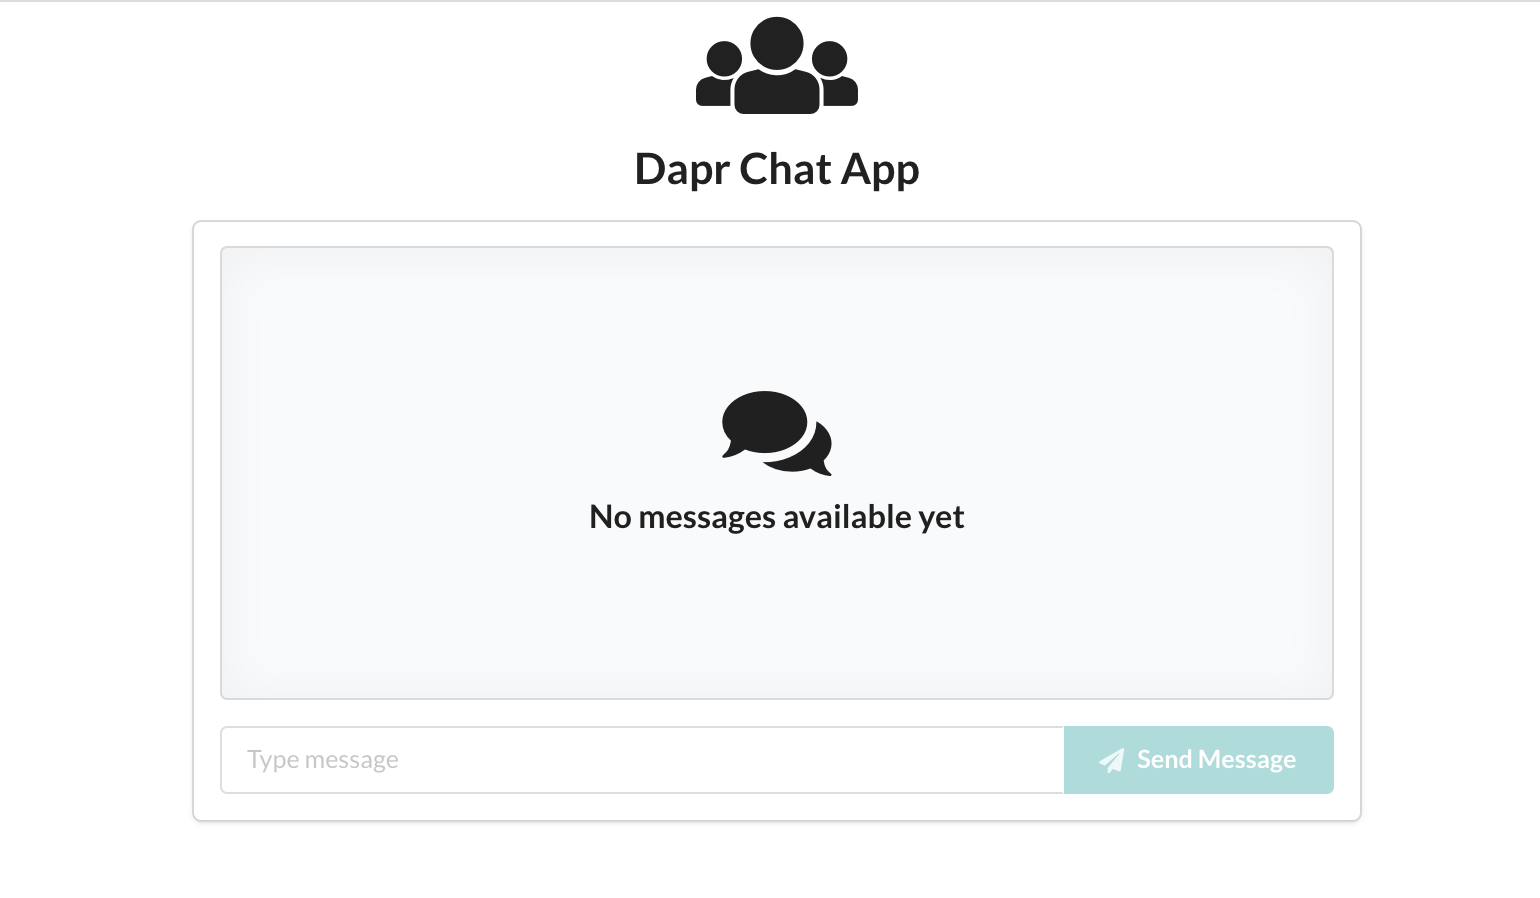
Update the app component with the message box code like this:
...
import {
  Icon,
  Input,
  Grid,
  Segment,
  Card,
  Comment,
  Button,
} from "semantic-ui-react";

const App = () => {
  ...
  const [message, setMessage] = useState("");
  ...
  const handleSubmit = (e) => {
    fetch('/publish', {
        headers: {
            'Accept': 'application/json',
            'Content-Type': 'application/json'
        },
        method:"POST",
        body: JSON.stringify({ message }),
    });
    e.preventDefault();
    setMessage('');
  }
  ...
  return (
    <div className="App">
      <Header as="h2" icon>
        <Icon name="users" />
        Dapr Chat App
      </Header>
      <Grid centered>
        <Grid.Column width={9}>
          <Card fluid>
            <Card.Content>
              {messages.length ? (
                  <Fragment>
                    {messages.map((text,id) => (
                      <Comment key={`msg-${id}`}>
                        <Comment.Content>
                          <Comment.Text>{text}</Comment.Text>
                        </Comment.Content>
                      </Comment>
                    ))}
                  </Fragment>
              ) : (
                <Segment placeholder>
                  <Header icon>
                    <Icon name="discussions" />
                    No messages available yet
                  </Header>
                </Segment>
              )}
              <Input
                fluid
                type="text"
                value={message}
                onChange={e => setMessage(e.target.value)}
                placeholder="Type message"
                action
              >
                <input />
                <Button color="teal" disabled={!message} onClick={handleSubmit}>
                  <Icon name="send" />
                  Send Message
                </Button>
              </Input>
            </Card.Content>
          </Card>
        </Grid.Column>
      </Grid>
    </div>
  );
}
As the user types a message, the submit button will become enabled and the state message value will be set. When the user clicks on the Send Message button, we will call the handleSubmit event handler which will make a call to the frontend server with the message the user has typed.
The complete code for the app component of the frontend app will now look like this:
import React, { useState, useEffect, useRef, Fragment } from "react";
import {
  Header,
  Icon,
  Input,
  Grid,
  Segment,
  Card,
  Comment,
  Button,
} from "semantic-ui-react";
import "./App.css";

const App = () => {
  const [socketMessages, setSocketMessages] = useState([]);
  const webSocket = useRef(null);
  const [message, setMessage] = useState("");
  const messagesRef = useRef([]);
  const [messages, setMessages] = useState({});

  useEffect(() => {
    webSocket.current = new WebSocket("ws://localhost:9000");
    webSocket.current.onmessage = message => {
      const data = JSON.parse(message.data);
      setSocketMessages(prev => [...prev, data]);
    };
    webSocket.current.onclose = () => {
      webSocket.current.close();
    };
    return () => webSocket.current.close();
  }, []);

  useEffect(() => {
    let data = socketMessages.pop();
    if (data) {
      switch (data.type) {
        case "message":
          handleMessageReceived(data.text);
          break;
        default:
          break;
      }
    }
  }, [socketMessages]);

  const handleMessageReceived = (text) => {
    let messages = messagesRef.current;
    let newMessages = [...messages, text];
    messagesRef.current = newMessages;
    setMessages(newMessages);
  };

  const handleSubmit = (e) => {
    fetch('/publish', {
        headers: {
            'Accept': 'application/json',
            'Content-Type': 'application/json'
        },
        method:"POST",
        body: JSON.stringify({ message }),
    });
    e.preventDefault();
    setMessage('');
  }

  return (
    <div className="App">
      <Header as="h2" icon>
        <Icon name="users" />
        Dapr Chat App
      </Header>
      <Grid centered>
        <Grid.Column width={9}>
          <Card fluid>
            <Card.Content>
              {messages.length ? (
                  <Fragment>
                    {messages.map((text,id) => (
                      <Comment key={`msg-${id}`}>
                        <Comment.Content>
                          <Comment.Text>{text}</Comment.Text>
                        </Comment.Content>
                      </Comment>
                    ))}
                  </Fragment>
              ) : (
                <Segment placeholder>
                  <Header icon>
                    <Icon name="discussions" />
                    No messages available yet
                  </Header>
                </Segment>
              )}
              <Input
                fluid
                type="text"
                value={message}
                onChange={e => setMessage(e.target.value)}
                placeholder="Type message"
                action
              >
                <input />
                <Button color="teal" disabled={!message} onClick={handleSubmit}>
                  <Icon name="send" />
                  Send Message
                </Button>
              </Input>
            </Card.Content>
          </Card>
        </Grid.Column>
      </Grid>
    </div>
  );
};
export default App;
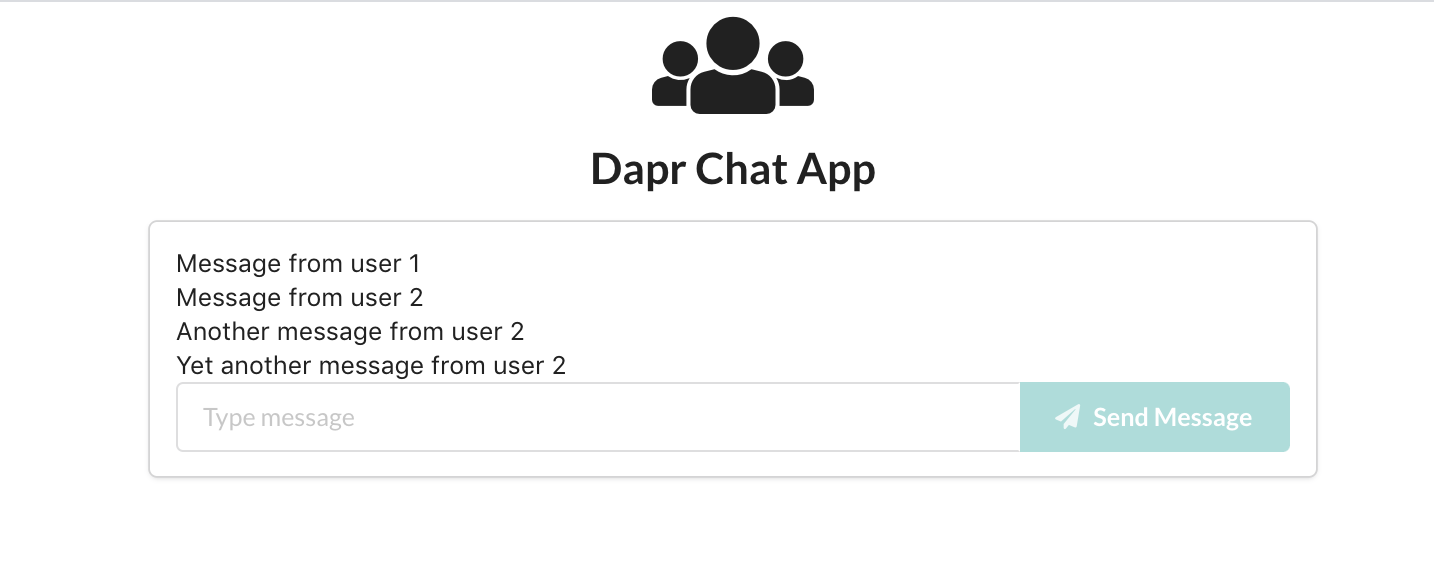
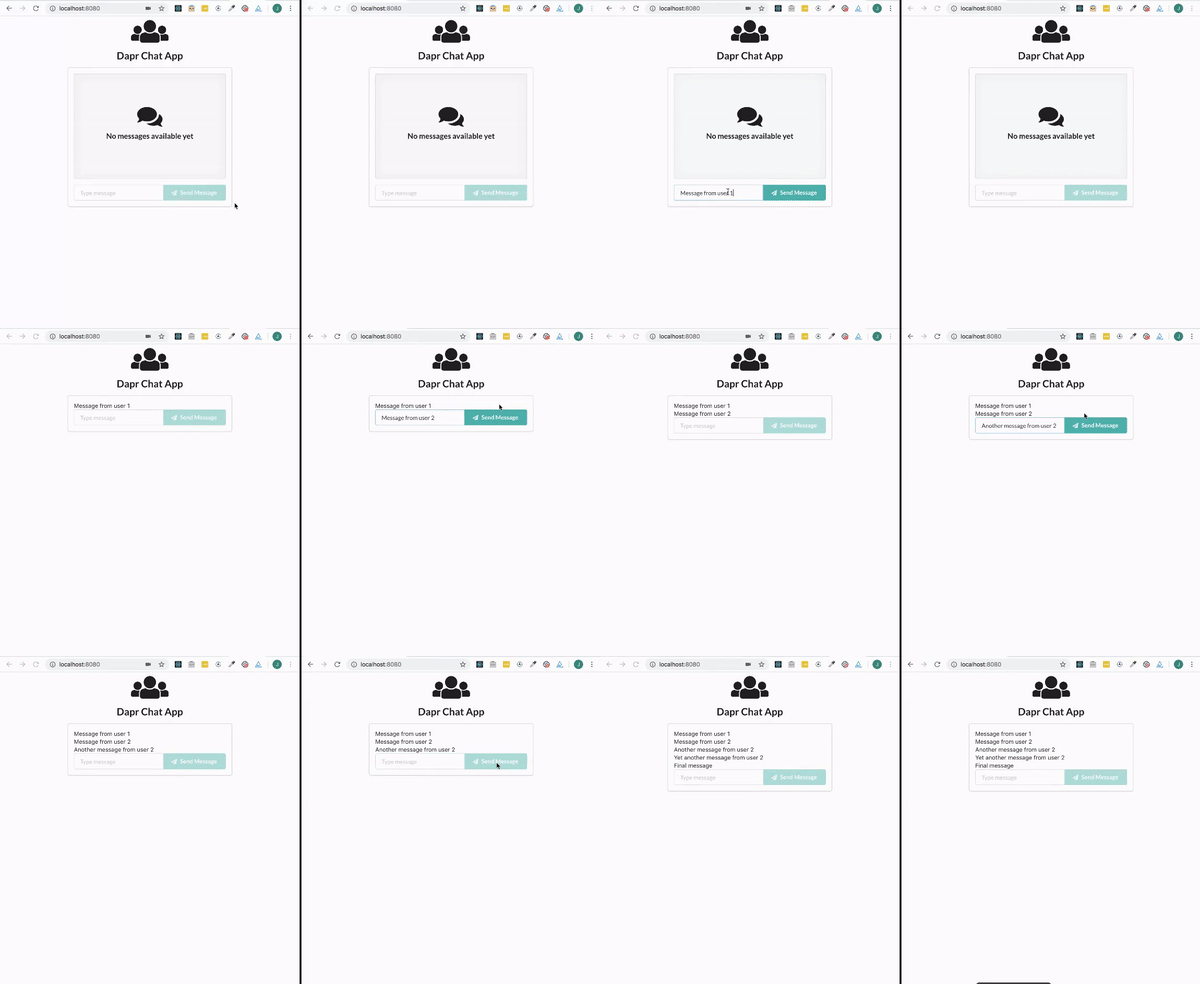
And just like that, we’ve built a simple chat application using Dapr. This version of the chat application runs locally and is great for familiarizing yourself with the Dapr CLI. If you want to deploy your chat application to production you can do so using Kubernetes clusters. You can find instructions on how to setup the environment in the Dapr documentation.
The example chat app that we built has very limited functionality. You can add features such as the ability for a user to select a user name and start a session. In addition, you can broadcast users that have joined to other connected clients. Messages in the chatbox can also be improved to show the sender’s information and the time the message was sent. From this example, we can see that it is quite easy to write resilient scalable microservices using Dapr. You can find more information and examples in the Dapr GitHub repo. If you would like to look at the complete code for this example you can find it on the node-subscriber and the chat client repos on GitHub.
Install LogRocket via npm or script tag. LogRocket.init() must be called client-side, not
server-side
$ npm i --save logrocket

// Code:

import LogRocket from 'logrocket';
LogRocket.init('app/id');
// Add to your HTML:

<script src="https://cdn.lr-ingest.com/LogRocket.min.js"></script>
<script>window.LogRocket && window.LogRocket.init('app/id');</script>

Compare the top AI development tools and models of February 2026. View updated rankings, feature breakdowns, and find the best fit for you.

Broken npm packages often fail due to small packaging mistakes. This guide shows how to use Publint to validate exports, entry points, and module formats before publishing.

Discover what’s new in The Replay, LogRocket’s newsletter for dev and engineering leaders, in the February 11th issue.

Cut React LCP from 28s to ~1s with a four-phase framework covering bundle analysis, React optimizations, SSR, and asset/image tuning.
Would you be interested in joining LogRocket's developer community?
Join LogRocket’s Content Advisory Board. You’ll help inform the type of content we create and get access to exclusive meetups, social accreditation, and swag.
Sign up now
2 Replies to "Making a chat app with Dapr"
Great post, thank you! I’m wondering, what about security, how we can secure our end to end in this case, for example, can we use a bearer token to secure that sockets? thanks!
Maybe Im missing something but, I did not see any Dapr features that is used except running your application through it.