If you’ve ever used a site like Vercel or Medium you’ve likely experienced a passwordless login before.

The flow typically goes like this: enter your email -> submit form -> email gets sent to you -> you click the link inside -> you’re logged in.
It’s a pretty convenient flow for everyone. The users don’t have to remember a password with the website’s arbitrary ruleset, and the webmasters (do people still use that term?) don’t have to worry about password leaks or if their encryption is good enough.
In this article we’re going to explore how one might implement this flow using a standard Laravel installation.
We’re going to assume that you have a working understanding of Laravel’s MVC structure and that your environment has both composer and php set up already.
Please note that the codeblocks in this article may not include the whole file for brevity.
The Replay is a weekly newsletter for dev and engineering leaders.
Delivered once a week, it's your curated guide to the most important conversations around frontend dev, emerging AI tools, and the state of modern software.
Let’s start off by creating a new Laravel 8 application:
$ composer create-project laravel/laravel magic-links
Then we need to cd into our project and ensure we enter our database credentials. Make sure to create the database beforehand as well.
In my case, I’m using PostgreSQL and I do all of my configuration through TablePlus. Open up the .env file:
# .env
DB_CONNECTION=pgsql
DB_HOST=127.0.0.1
DB_PORT=5432
DB_DATABASE=magic_link
DB_USERNAME=postgres
DB_PASSWORD=postgres
Now our database is configured, but don’t run the migrations yet! Let’s take a look at the default user migration that Laravel created for us in database/migrations/2014_10_12_000000_create_users_table.php.
You’ll see that the default user table contains a column for the password. Since we’re doing passwordless auth, we can get rid of it:
public function up()
{
  Schema::create('users', function (Blueprint $table) {
    $table->id();
    $table->string('name');
    $table->string('email')->unique();
    $table->timestamp('email_verified_at')->nullable();
    $table->rememberToken();
    $table->timestamps();
  });
}
Go ahead and save the file after you delete that line. While we’re cleaning things up, let’s go ahead and delete the migration for the password reset table since it will be no use to us:
$ rm database/migrations/2014_10_12_100000_create_password_resets_table.php
Our initial database schema is ready, so let’s run our migrations:
$ php artisan migrate
Let’s also remove the password attribute from the user model’s $fillable array in app/Models/User.php since it no longer exists:
protected $fillable = [
  'name',
  'email',
];
We’ll also want to configure our mail driver so that we can preview our login emails. I like to use Mailtrap which is a free SMTP catcher (you can send emails to any address and they’ll only show up in Mailtrap, not get delivered to the actual user), but you can use any you like.
If you don’t want to set anything up, you can use the log mailer and the emails will show up in storage/logs/laravel.log as raw text.
Back in that same .env file from before:
# .env
MAIL_MAILER=smtp
MAIL_HOST=smtp.mailtrap.io
MAIL_PORT=2525
MAIL_USERNAME=redacted
MAIL_PASSWORD=redacted
MAIL_ENCRYPTION=tls
[email protected]
We’re now ready to get building!
We talked about what the flow looks like from the user’s perspective at the beginning of this article, but how does this work from a technical perspective?
Well, given a user, we need to be able to send them a unique link that when they click it, logs them into their own account.
This tells us that we’ll need to probably generate a unique token of some sort, associate it with the user trying to log in, build a route that looks at that token and determines if it’s valid, and then logs the user in. We’ll also want to only allow these tokens to be used once, and only be valid for a certain amount of time once it has been generated.
Since we need to keep track of whether or not the token has been used already, we’re going to store them in the database. It will also be handy to keep track of which token belongs to which user, as well as if the token has been used or not, and if it has expired already.
We’re only going to focus on the login flow in this article. It will be up to you to create a registration page, though it will follow all the same steps.
Because of this, we’ll need a user in the database to test logging in. Let’s create one using tinker:
$ php artisan tinker
> User::create(['name' => 'Jane Doe', 'email' => '[email protected]'])
We’ll start out by creating a controller, AuthController, that we’ll use to handle the login, verification, and logout functionality:
$ php artisan make:controller AuthController
Now let’s register the login routes in our app’s routes/web.php file. Underneath the welcome route, let’s define a route group that will protect our authentication routes using the guest middleware, stopping people already logged in from viewing them.
Inside that group, we’ll create two routes. One for showing the login page, the other for handling the form’s submission. We’ll also give them names so that we can easily reference them later:
Route::group(['middleware' => ['guest']], function() {
  Route::get('login', [AuthController::class, 'showLogin'])->name('login.show');
  Route::post('login', [AuthController::class, 'login'])->name('login');
});
Now the routes are registered but we need to create the actions that will respond to those routes. Let’s create those methods in the controller we created app/Http/Controllers/AuthController.php.
For now we’ll have our login page return a view located at auth.login (which we’ll create next), and create a placeholder login method that we’ll come back to once we build our form:
<?php
namespace App\Http\Controllers;

use Illuminate\Http\Request;

class AuthController extends Controller
{
  public function showLogin()
  {
    return view('auth.login');
  }

  public function login(Request $request)
  {
    // TODO
  }
}
We’re going to use Laravel’s templating system Blade and TailwindCSS for our views.
Since the main focus of this article is on the backend logic, we’re not going to go into detail on the styling. I don’t want to spend time setting up a proper CSS config so we’ll use this TailwindCSS JIT CDN that we can drop into our layout that will handle pulling the right styles.
You may notice a flash of styles when you first load the page. This is because the styles don’t exist until after the page loads. In a production environment you would not want this, but for the sake of the tutorial it is fine.
Let’s start off by creating a general layout that we can use for all of our pages. This file will live in resources/views/layouts/app.blade.php:
<!DOCTYPE html>
<html lang="en">
<head>
  <meta charset="UTF-8">
  <meta http-equiv="X-UA-Compatible" content="IE=edge">
  <meta name="viewport" content="width=device-width, initial-scale=1.0">
  <title>{{ $title }}</title>
</head>
<body>
  @yield('content')
  <script src="https://unpkg.com/tailwindcss-jit-cdn"></script>
</body>
</html>
There’s a few things I’ll point out here
$title variable we will pass into the layout when we extend from it@yield('content') Blade directive – when we extend from this layout, we’ll use a named section called “content” to place our page-specific contentNow that we have the layout, we can create the registration page in resources/views/auth/login.blade.php:
@extends('layouts.app', ['title' => 'Login'])
@section('content')
  <div class="h-screen bg-gray-50 flex items-center justify-center">
    <div class="w-full max-w-lg bg-white shadow-lg rounded-md p-8 space-y-4">
      <h1 class="text-xl font-semibold">Login</h1>
      <form action="{{ route('login') }}" method="post" class="space-y-4">
        @csrf
        <div class="space-y-1">
          <label for="email" class="block">Email</label>
          <input type="email" name="email" id="email" class="block w-full border-gray-400 rounded-md px-4 py-2" />
          @error('email')
            <p class="text-sm text-red-600">{{ $message }}</p>
          @enderror
        </div>
        <button class="rounded-md px-4 py-2 bg-indigo-600 text-white">Login</button>
      </form>
    </div>
  </div>
@endsection
There’s a bit going on here, let’s point some stuff out:
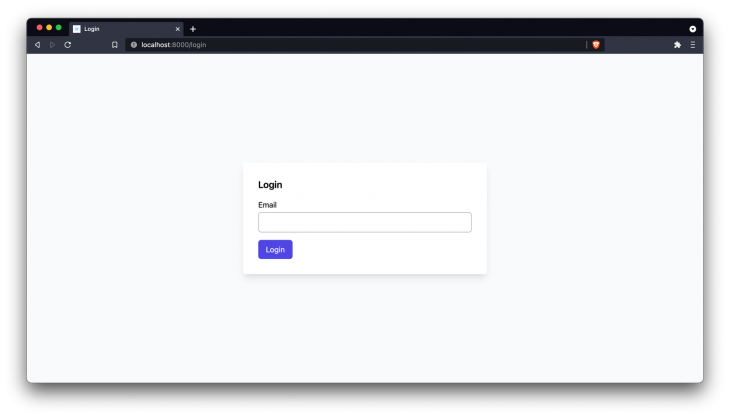
content (remember the @yield earlier?) and put our page content inside, which will get rendered into the layoutroute('login') which, if we remember from the routes/web.php file, is the name we gave to the login POST request in our controller@csrf directive (read more here)@error directiveIf you load the page it should look like this:

Pretty basic, we just ask for the user’s email. If we submit the form right now you’ll just see a blank white screen because our login method we defined earlier is empty. Let’s implement the login method in our AuthController to send them a link to finish logging in.
The flow will look something like this: validate form data -> send login link -> show a message to the user back on the page telling them to check their email.
// app/Http/Controllers/AuthController.php
// near other use statements
use App\Models\User;

// inside class
public function login(Request $request)
{
  $data = $request->validate([
    'email' => ['required', 'email', 'exists:users,email'],
  ]);
  User::whereEmail($data['email'])->first()->sendLoginLink();
  session()->flash('success', true);
  return redirect()->back();
}
There’s a few things we’re doing here:
sendLoginLink which we will need to implementThere are a couple of incomplete tasks in the above steps so we’ll need to implement those now.
We’ll start with updating our login view to check for that success boolean, hiding our form, and showing the user a message if it’s present. Back in resources/views/auth/login.blade.php:
@extends('layouts.app', ['title' => 'Login'])
@section('content')
  <div class="h-screen bg-gray-50 flex items-center justify-center">
    <div class="w-full max-w-lg bg-white shadow-lg rounded-md p-8 space-y-4">
      @if(!session()->has('success'))
        <h1 class="text-xl font-semibold">Login</h1>
        <form action="{{ route('login') }}" method="post" class="space-y-4">
          @csrf
          <div class="space-y-1">
            <label for="email" class="block">Email</label>
            <input type="email" name="email" id="email" class="block w-full border-gray-400 rounded-md px-4 py-2" />
            @error('email')
              <p class="text-sm text-red-600">{{ $message }}</p>
            @enderror
          </div>
          <button class="rounded-md px-4 py-2 bg-indigo-600 text-white">Login</button>
        </form>
      @else
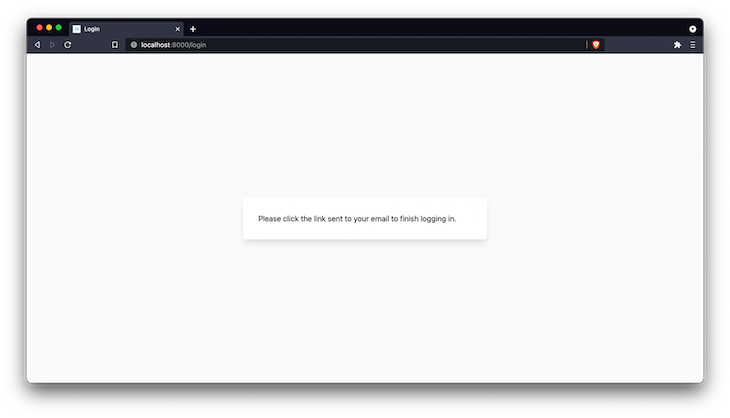
        <p>Please click the link sent to your email to finish logging in.</p>
      @endif
    </div>
  </div>
@endsection
Here we simply wrapped the form in a conditional.
It’s saying:
Now if you were to submit that form again, you’ll see an error saying we need to implement that sendLoginLink function on the User model. I like to store logic like that on the model itself so that we can reuse it in our application later.
Open up app/Models/User.php and create an empty method to fill its place:
public function sendLoginLink()
{
  // TODO
}
Now submit the form again and ensure that you see your success message like below:

Of course you won’t have received an email just yet, but now we can move on to that step.
sendLoginLink functionReflecting on the approach for tokens we discussed above, here’s what we need to do now:
We’re going to keep these in a table called login_tokens. Let’s create the model and the migration (-m):
$ php artisan make:model -m LoginToken
For the migration we need:
Open up the migration that was generated and add the necessary columns:
Schema::create('login_tokens', function (Blueprint $table) {
  $table->id();
  $table->unsignedBigInteger('user_id');
  $table->foreign('user_id')->references('id')->on('users')->cascadeOnDelete();
  $table->string('token')->unique();
  $table->timestamp('consumed_at')->nullable();
  $table->timestamp('expires_at');
  $table->timestamps();
});
Make sure to run the migration afterwards:
$ php artisan migrate
Next update our new app/Models/LoginToken model to account for a few things:
$guarded property to an empty array, meaning that we aren’t restricting what columns can be filled$dates property that will cast our expires_at and consumed_at fields to Carbon\Carbon instances when we reference them in php code for convenience later onuser() method that lets us reference the user associated to the tokenclass LoginToken extends Model
{
use HasFactory;
protected $guarded = [];
protected $dates = [
'expires_at', 'consumed_at',
];
public function user()
{
return $this->belongsTo(User::class);
}
}
It’s also a good idea to place the inverse association on the User model:
// inside app/Models/User.php
public function loginTokens()
{
  return $this->hasMany(LoginToken::class);
}
Now that we have the model set up we can do the first step of our sendLoginLink() function, which is creating the token.
Back inside app/Models/User.php we’re going to create the token for the user using the new loginTokens() association we just created and give it a random string using the Str helper from Laravel and an expiry of 15 minutes from now.
Because we set the expires_at and consumed_at as dates on the LoginToken model, we can simply pass a fluent date and it will be converted appropriately. We’ll also hash the token before we insert it into the database so that if this table were to be compromised no one could see the raw token values.
We’re using a hash that is reproducible so that we can look it up again later when needed:
use Illuminate\Support\Str;

public function sendLoginLink()
{
    $plaintext = Str::random(32);
    $token = $this->loginTokens()->create([
      'token' => hash('sha256', $plaintext),
      'expires_at' => now()->addMinutes(15),
    ]);
    // todo send email
}
Now that we have a token, we can send the user an email that contains a link with the (plaintext) token in the url that will validate their session. The token needs to be in the URL so we can look up what user it is for.
We don’t just want to use the ID of the LoginToken because then a user could potentially go one-by-one to find a valid URL. We’ll go over another way of protecting against this later on.
Start by creating the mailer class that will represent the email:
$ php artisan make:mail MagicLoginLink
Open up the mailer generated at app/Mail/MagicLoginLink.php and enter the following:
<?php
namespace App\Mail;

use Illuminate\Bus\Queueable;
use Illuminate\Mail\Mailable;
use Illuminate\Queue\SerializesModels;
use Illuminate\Support\Facades\URL;

class MagicLoginLink extends Mailable
{
  use Queueable, SerializesModels;

  public $plaintextToken;
  public $expiresAt;

  public function __construct($plaintextToken, $expiresAt)
  {
    $this->plaintextToken = $plaintextToken;
    $this->expiresAt = $expiresAt;
  }

  public function build()
  {
    return $this->subject(
      config('app.name') . ' Login Verification'
    )->markdown('emails.magic-login-link', [
      'url' => URL::temporarySignedRoute('verify-login', $this->expiresAt, [
        'token' => $this->plaintextToken,
      ]),
    ]);
  }
}
Here’s what’s happening – the mailer will take in the plaintext token and the expiry date and store it in public properties. This will allow us to use it later in the build() method when it is being composed.
Inside the build() method we are setting the subject of the email, and telling it to look for a markdown formatted view inside resources/views/emails/magic-login-link.blade.php. Laravel provides some default styling for markdown emails that we will take advantage of in a moment.
We also pass a url variable to the view that is going to be the link the user clicks on.
That url property is a temporary signed url. It takes in a named route, an expiration date (which we want to be our tokens expiration), and any parameters (in this case token being the unhashed random string we generated). A signed URL ensures that the URL has not been modified at all by hashing the URL with a secret only Laravel knows.
Even though we are going to add checks in our verify-login route to ensure our token is still valid (based on the expires_at and consumed_at properties), signing the URL gives us extra security at the framework level since no one will be able to brute force the verify-login route with random tokens to see if they can find one that logs them in.
Now we need to implement that markdown view at resources/views/emails/magic-login-link.blade.php. You might be wondering why the extension is .blade.php. This is because even though we are writing markdown in this file, we can use Blade directives inside to build reusable components we can use in our emails.
Laravel provides us with pre-styled components out of the box to get started right away. We’re using mail::message which gives us a layout and a call-to-action via mail::button:
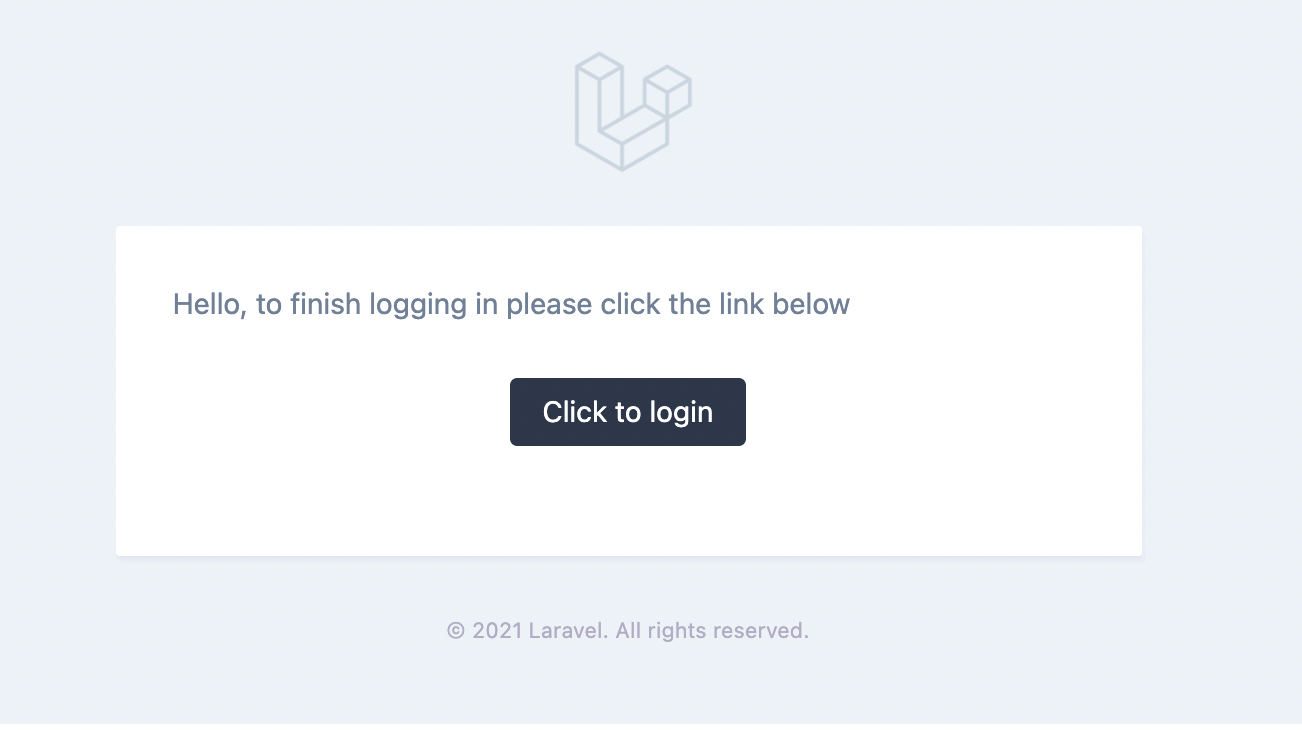
@component('mail::message')
  Hello, to finish logging in please click the link below
  @component('mail::button', ['url' => $url])
    Click to login
  @endcomponent
@endcomponent
Now that we have the email content built out, we can finish the sendLoginLink() method by actually sending the email. We’re going to use the Mail façade provided by Laravel to specify the users email that we’re sending it to, and that the content of the email should be built from the MagicLoginLink class we just finished setting up.
We also use queue() instead of send() so that the email is sent in the background instead of during the current request. Make sure you have your queue driver set up appropriately or that you are using the sync driver (this is the default) if you want it to just happen immediately.
Back in app/Models/User.php:
use Illuminate\Support\Facades\Mail;
use App\Mail\MagicLoginLink;

public function sendLoginLink()
{
  $plaintext = Str::random(32);
  $token = $this->loginTokens()->create([
    'token' => hash('sha256', $plaintext),
    'expires_at' => now()->addMinutes(15),
  ]);
  Mail::to($this->email)->queue(new MagicLoginLink($plaintext, $token->expires_at));
}
If you were to submit our login form, you would now see an email that looks like this:

If you tried click the link, you probably received a 404 error. That’s because in our email we sent the user a link to the verify-login named route, but we haven’t created that yet!
Register the route in the route group inside routes/web.php:
Route::group(['middleware' => ['guest']], function() {
  Route::get('login', [AuthController::class, 'showLogin'])->name('login.show');
  Route::post('login', [AuthController::class, 'login'])->name('login');
  Route::get('verify-login/{token}', [AuthController::class, 'verifyLogin'])->name('verify-login');
});
And we’ll then create the implementation inside our AuthController class via a verifyLogin method:
public function verifyLogin(Request $request, $token)
{
  $token = \App\Models\LoginToken::whereToken(hash('sha256', $token))->firstOrFail();
  abort_unless($request->hasValidSignature() && $token->isValid(), 401);
  $token->consume();
  Auth::login($token->user);
  return redirect('/');
}
Here we are doing the following:
firstOrFail())We call a couple of methods on the token that don’t actually exist yet, so let’s create them:
isValid() is going to be true if the token has not been consumed yet (consumed_at === null) and if it hasn’t expired (expires_at <= now)consume() is going to set the consumed_at property to the current timestampI like to encapsulate this logic on the model directly so that it is easy to read and reuse. Open up app/Models/LoginToken.php:
public function isValid()
{
  return !$this->isExpired() && !$this->isConsumed();
}

public function isExpired()
{
  return $this->expires_at->isBefore(now());
}

public function isConsumed()
{
  return $this->consumed_at !== null;
}

public function consume()
{
  $this->consumed_at = now();
  $this->save();
}
If you were to click that login link from your email now, you should be redirected to the / route!
You’ll also notice that if you click the link again, you will be shown the error screen because it is now invalid.
Now that our authentication flow is working, let’s guard our root route to only be viewable by those who are logged in, and add a way to log out so we can do the flow again.
To start, edit the default root route in app/web.php to add the auth middleware:
Route::get('/', function () {
    return view('welcome');
})->middleware('auth');
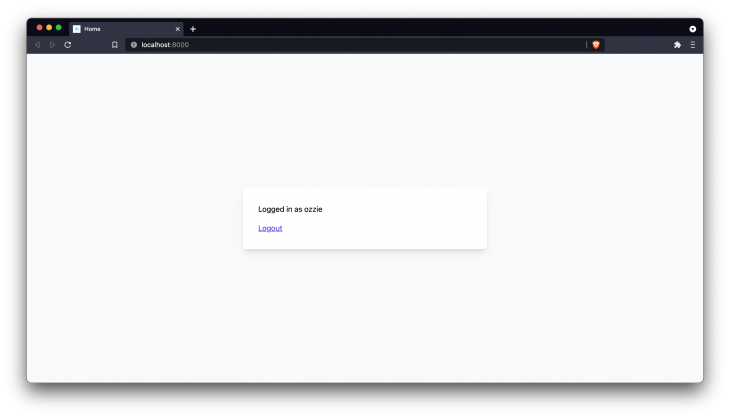
Let’s also adjust that default welcome view to show a bit of info about our logged in user as well as provide a link to log out. Replace the contents of resources/views/welcome.blade.php with the following:
@extends('layouts.app', ['title' => 'Home'])
@section('content')
  <div class="h-screen bg-gray-50 flex items-center justify-center">
    <div class="w-full max-w-lg bg-white shadow-lg rounded-md p-8 space-y-4">
      <h1>Logged in as {{ Auth::user()->name }}</h1>
      <a href="{{ route('logout') }}" class="text-indigo-600 inline-block underline mt-4">Logout</a>
    </div>
  </div>
@endsection
And finally the logout route that will forget our session and return us to the login screen. Open up routes/web.php again and add this route to the bottom of the file:
Route::get('logout', [AuthController::class, 'logout'])->name('logout');
And finally we need to implement the logout action in our AuthController:
public function logout()
{
  Auth::logout();
  return redirect(route('login'));
}
Now your home page should look like this and only be viewable by those who are logged in:

That’s a wrap! We covered a lot of ground but you’ll notice the overall code we wrote is pretty low for a feature like this. I hope you learned a trick or two along the way.
Full source code can be viewed here.
Install LogRocket via npm or script tag. LogRocket.init() must be called client-side, not
server-side
$ npm i --save logrocket

// Code:

import LogRocket from 'logrocket';
LogRocket.init('app/id');
// Add to your HTML:

<script src="https://cdn.lr-ingest.com/LogRocket.min.js"></script>
<script>window.LogRocket && window.LogRocket.init('app/id');</script>

Compare key features of popular meta-frameworks Remix, Next.js, and SvelteKit, from project setup to styling.

Discover what’s new in The Replay, LogRocket’s newsletter for dev and engineering leaders, in the February 4th issue.

AI-first isn’t about tools; it’s about how teams think, build, and decide. Ken Pickering, CTO at Scripta Insights, shares how engineering leaders can adapt.

Build context-aware, agentic frontend applications by connecting React state and actions to LLMs with CopilotKit.
Would you be interested in joining LogRocket's developer community?
Join LogRocket’s Content Advisory Board. You’ll help inform the type of content we create and get access to exclusive meetups, social accreditation, and swag.
Sign up now
One Reply to "Magic login links with Laravel"
Thank you!
I was trying to do something along these lines and this article helped me a lot along the way.