Lighthouse is a tremendous tool for auditing the performance and usability of websites. Rather than having to perform these audits manually, it’s helpful to be able to plug it into your CI pipeline. This post illustrates how to integrate Lighthouse into a GitHub Actions workflow and report findings directly in pull requests that are raised.

This post isn’t a walkthrough of how to use Lighthouse effectively. There is already great guidance out there on that topic.
Instead, we’re going build a simple web application in the context of a GitHub repo. We’ll wire it up to deploy via GitHub Actions to Azure Static Web Apps.
Static Web Apps is a free hosting option for static websites. It comes with staging environments or deployment previews built in. This feature deploys a fully functional version of a site each time a pull request is raised, built upon the changes implemented in that pull request.
The staging environment is a perfect place to implement our Lighthouse checks. If a pull request impacts usability or performance, seeing those details in the context of our pull request is exactly where we’d like to learn this. This kind of check gives us the opportunity to ensure we only merge when we’re happy that the changes do not negatively impact our Lighthouse scores.
In this tutorial, we’ll start from the point of an empty GitHub repo and build up from there.
The Replay is a weekly newsletter for dev and engineering leaders.
Delivered once a week, it's your curated guide to the most important conversations around frontend dev, emerging AI tools, and the state of modern software.
Inside the root of our repository, we’re going to create a Docusaurus site. Docusaurus is a good example of a static site, the kind that is a natural fit for Jamstack. You could use something else, such as Hugo, if you prefer.
At the command line, we’ll enter:
npx create-docusaurus@latest website classic
Docusaurus will create a new site in the website directory. Let’s commit and push this and turn our attention to Azure.
There’s a number of ways to create a static web app in Azure. It’s possible to use infrastructure as code with a language such as Bicep. But for this tutorial, we’ll use the Azure Portal instead. If you don’t have an account already, you can set one up for free very quickly.
Once you’ve logged in, click Create a resource and look up Static Web App:
Click Create and you’ll be taken to the creation dialog:
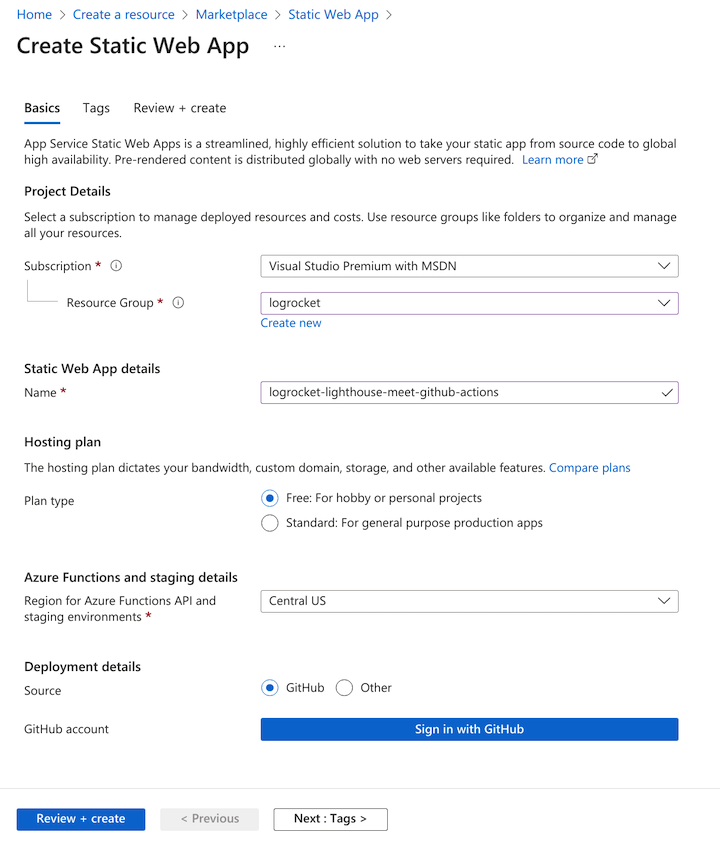
You’ll need to create a resource group for your SWA to live in. Give the app a name, choose the free plan, and specify GitHub as the deployment source.
Click the Sign in with GitHub button and authorize Azure to access your GitHub account for Static Web Apps.
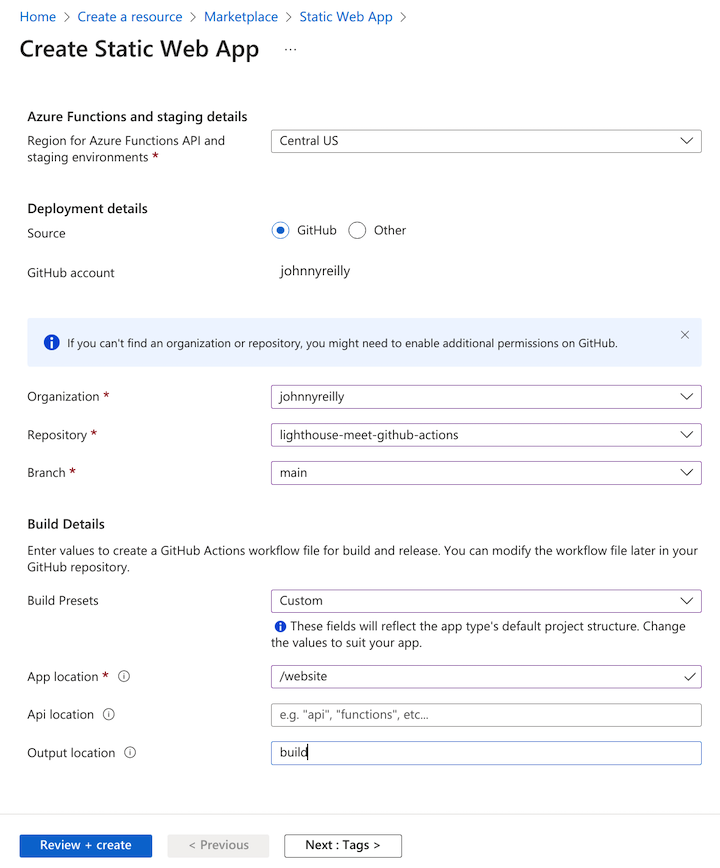
At this point, Azure will query GitHub on your behalf and look up the organizations and repositories you have access to. Select the repository you’d like to deploy to your static web app and select the branch you’d like to deploy.
You also need to provide Azure with some build details to help it understand how your app is built. We’ll provide a preset of Custom. We’ll set the App location (the root of our front end app) to be "/website" to tally up with the application we just created. We’ll leave Api location blank and set the output location to be "build". This is the directory under website where Docusaurus will create our site.
Finally, click Review + create and then Create.
Azure will now:
Pretty amazing, right?
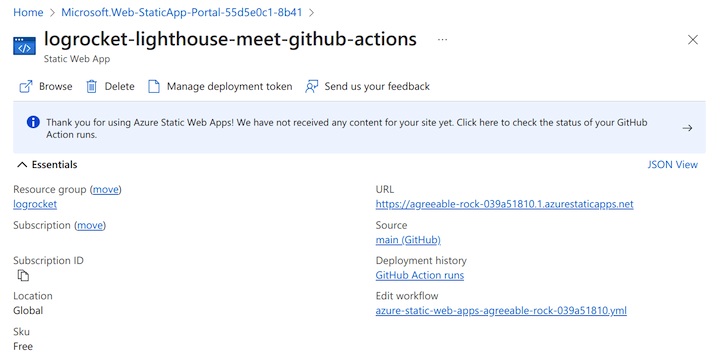
When you look at the resource in Azure, it will look something like this:
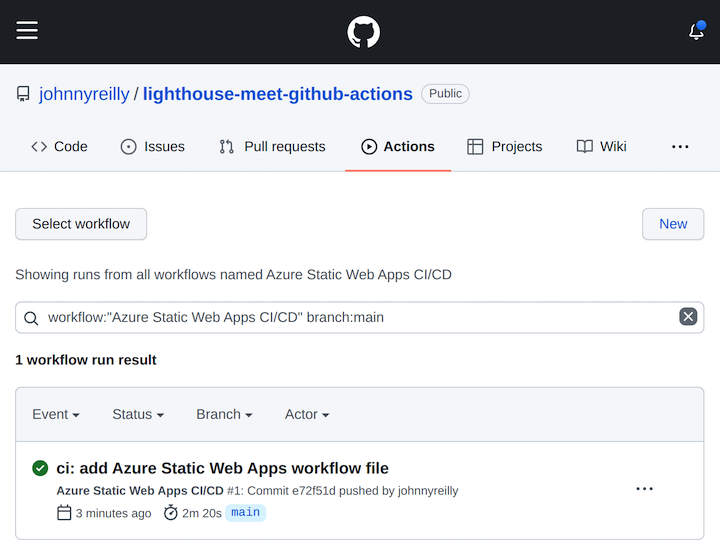
If you click on the GitHub Action runs, you’ll be presented with your GitHub Action:
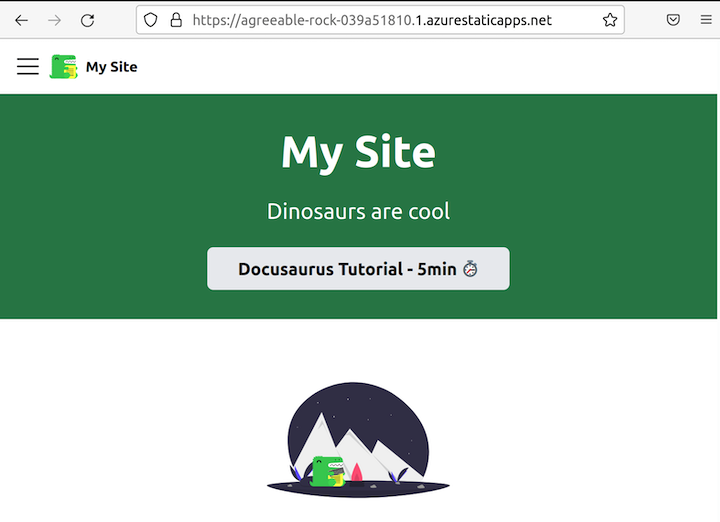
When that finishes running, you’ll be able to see your deployed static web app by clicking on the URL in the Azure Portal:
We now have:
With this groundwork in place, we’re ready to add Lighthouse to the mix.
If you look in the /.github/workflows folder of your repo, you’ll find a workflow file containing something like this:
name: Azure Static Web Apps CI/CD

on:
  push:
    branches:
      - main
  pull_request:
    types: [opened, synchronize, reopened, closed]
    branches:
      - main

jobs:
  build_and_deploy_job:
    if: github.event_name == 'push' || (github.event_name == 'pull_request' && github.event.action != 'closed')
    runs-on: ubuntu-latest
    name: Build and Deploy Job
    steps:
      - uses: actions/checkout@v2
        with:
          submodules: true
      - name: Build And Deploy
        id: builddeploy
        uses: Azure/static-web-apps-deploy@v1
        with:
          azure_static_web_apps_api_token: ${{ secrets.AZURE_STATIC_WEB_APPS_API_TOKEN_AGREEABLE_ROCK_039A51810 }}
          repo_token: ${{ secrets.GITHUB_TOKEN }} # Used for Github integrations (i.e. PR comments)
          action: 'upload'
          ###### Repository/Build Configurations - These values can be configured to match your app requirements. ######
          # For more information regarding Static Web App workflow configurations, please visit: https://aka.ms/swaworkflowconfig
          app_location: '/website' # App source code path
          api_location: '' # Api source code path - optional
          output_location: 'build' # Built app content directory - optional
          ###### End of Repository/Build Configurations ######

  close_pull_request_job:
    if: github.event_name == 'pull_request' && github.event.action == 'closed'
    runs-on: ubuntu-latest
    name: Close Pull Request Job
    steps:
      - name: Close Pull Request
        id: closepullrequest
        uses: Azure/static-web-apps-deploy@v1
        with:
          azure_static_web_apps_api_token: ${{ secrets.AZURE_STATIC_WEB_APPS_API_TOKEN_AGREEABLE_ROCK_039A51810 }}
          action: 'close'
This was created for us when we set up our SWA in Azure. Now we’re going to update the contents to add some Lighthouse jobs.
Before we do that, we need to acquire two things:
These two pieces of information are required such that we can determine the URL of our staging environments.
We acquire the custom domain of our static web app in the Custom Domains screen of the Azure Portal:
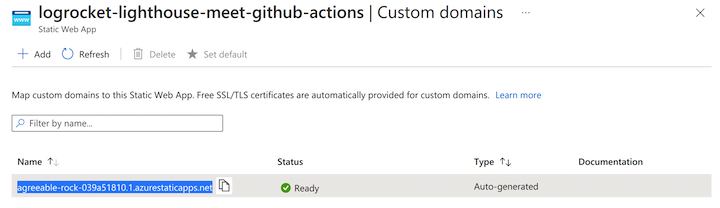
The custom domain is the auto-generated custom domain (highlighted in the screenshot above). For the SWA we’re building here, the custom domain is agreeable-rock-039a51810.1.azurestaticapps.net.
We acquire the location by looking at the resource group in the Azure Portal. For the SWA we’ve been building, the location is “Central US.” However, rather than the “display name” variant of the location, what we want is the “code,” which will be used in the URL. You can see what this is by clicking on the JSON view in the Azure Portal:

As the screenshot above demonstrates, the code we need is centralus.
We now have all we need to plug in Lighthouse. Let’s create a branch:
git checkout -b lighthouse
We’re going to add a new Lighthouse report job to our GitHub Actions workflow file:
lighthouse_report_job:
  name: Lighthouse report
  if: github.event_name == 'pull_request' && github.event.action != 'closed'
  runs-on: ubuntu-latest
  steps:
    - uses: actions/checkout@v2

    - name: Static Web App - get preview URL
      id: static_web_app_preview_url
      uses: azure/CLI@v1
      with:
        inlineScript: |
          CUSTOM_DOMAIN='agreeable-rock-039a51810.1.azurestaticapps.net'
          LOCATION='centralus'

          PREVIEW_URL="https://${CUSTOM_DOMAIN/.[1-9]./-${{github.event.pull_request.number }}.$LOCATION.1.}"

          echo "::set-output name=PREVIEW_URL::$PREVIEW_URL"

    - name: Static Web App - wait for preview
      id: static_web_app_wait_for_preview
      uses: nev7n/wait_for_response@v1
      with:
        url: '${{ steps.static_web_app_preview_url.outputs.PREVIEW_URL }}'
        responseCode: 200
        timeout: 600000
        interval: 1000

    - name: Audit URLs using Lighthouse
      id: lighthouse_audit
      uses: treosh/lighthouse-ci-action@v8
      with:
        urls: |
          ${{ steps.static_web_app_preview_url.outputs.PREVIEW_URL }}
        configPath: ./.github/workflows/lighthousesrc.json
        uploadArtifacts: true
        temporaryPublicStorage: true
        runs: 5

    - name: Format lighthouse score
      id: format_lighthouse_score
      uses: actions/github-script@v5
      with:
        script: |
          const lighthouseCommentMaker = require('./.github/workflows/lighthouseCommentMaker.js');

          const lighthouseOutputs = {
            manifest: ${{ steps.lighthouse_audit.outputs.manifest }},
            links: ${{ steps.lighthouse_audit.outputs.links }}
          };

          const comment = lighthouseCommentMaker({ lighthouseOutputs });
          core.setOutput("comment", comment);

    - name: Add Lighthouse stats as comment
      id: comment_to_pr
      uses: marocchino/[email protected]
      with:
        GITHUB_TOKEN: ${{ secrets.GITHUB_TOKEN }}
        number: ${{ github.event.pull_request.number }}
        header: lighthouse
        message: ${{ steps.format_lighthouse_score.outputs.comment }}
There’s a number of things happening in this workflow. Let’s walk through them.
Here, we construct the preview URL of our static web app using the:
Given a custom domain of agreeable-rock-039a51810.1.azurestaticapps.net, a location of centralus, and a pull request number of 123, the preview URL would be agreeable-rock-039a51810-123.centralus.1.azurestaticapps.net. Using a little Bash magic, we create an output variable named PREVIEW_URL containing that value. We’ll reuse it later in the workflow.
We don’t want to run our test until the static web app is up and running, so we’re going to pull in the wait_for_response GitHub Action. This polls until a website returns a 200. We’re going to point it at our SWA.
The big moment has arrived! We’re going to plug Lighthouse into our workflow using the lighthouse-ci-action GitHub Action.
We provide a configPath: ./.github/workflows/lighthousesrc.json, which points to the file that configures our Lighthouse configuration. We’ll create that file as well and populate it with the following:
{
  "ci": {
    "collect": {
      "settings": {
        "configPath": "./.github/workflows/lighthouse-config.js"
      }
    }
  }
}
This, in turn, hands off the specific configuration to a lighthouse-config.js file that we also need to create:
// see https://github.com/GoogleChrome/lighthouse/blob/master/docs/configuration.md
module.exports = {
  extends: 'lighthouse:default',
  settings: {
    // audits can be found here:
    // https://github.com/GoogleChrome/lighthouse/blob/eba2a4d19c5786dc37e993858ff4b663181f81e5/lighthouse-core/config/default-config.js#L174
    skipAudits: [
      'canonical', // for staging sites this will always be incorrect
      'maskable-icon',
      'valid-source-maps',
      'unsized-images',
      'offline-start-url',
    ],
  },
};
The configuration above can be amended based on the various links in the comments. Generally, it’s a good idea to roll with the defaults. However, skipping the canonical audit is sensible because it will reliably be incorrect for staging sites.
Along side the Lighthouse configuration, there’s config for the GitHub Action itself:
uploadArtifacts: true – will save results as an action artifactstemporaryPublicStorage: true – will upload lighthouse report to the temporary storageruns: 5 – will run Lighthouse 5 times to get more reliable performance resultsWe’ve run Lighthouse at this point. Next, we want to take the results of the run and build up some text that we can add to our pull request as a comment.
For this, we’re going to use the github-script GitHub Action, grab the outputs of the previous step and call out to a lighthouseCommentMaker.js file we’re going to write to make the comment we’d like to publish to our PR:
// @ts-check

/**
 * @typedef {Object} Summary
 * @prop {number} performance
 * @prop {number} accessibility
 * @prop {number} best-practices
 * @prop {number} seo
 * @prop {number} pwa
 */

/**
 * @typedef {Object} Manifest
 * @prop {string} url
 * @prop {boolean} isRepresentativeRun
 * @prop {string} htmlPath
 * @prop {string} jsonPath
 * @prop {Summary} summary
 */

/**
 * @typedef {Object} LighthouseOutputs
 * @prop {Record<string, string>} links
 * @prop {Manifest[]} manifest
 */

const formatScore = (/** @type { number } */ score) => Math.round(score * 100);
const emojiScore = (/** @type { number } */ score) =>
  score >= 0.9 ? '🟢' : score >= 0.5 ? '🟠' : '🔴';

const scoreRow = (
  /** @type { string } */ label,
  /** @type { number } */ score
) => `| ${emojiScore(score)} ${label} | ${formatScore(score)} |`;

/**
 * @param {LighthouseOutputs} lighthouseOutputs
 */
function makeComment(lighthouseOutputs) {
  const { summary } = lighthouseOutputs.manifest[0];
  const [[testedUrl, reportUrl]] = Object.entries(lighthouseOutputs.links);

  const comment = `## ⚡️🏠 Lighthouse report

We ran Lighthouse against the changes and produced this [report](${reportUrl}). Here's the summary:

| Category | Score |
| -------- | ----- |
${scoreRow('Performance', summary.performance)}
${scoreRow('Accessibility', summary.accessibility)}
${scoreRow('Best practices', summary['best-practices'])}
${scoreRow('SEO', summary.seo)}
${scoreRow('PWA', summary.pwa)}

*Lighthouse ran against [${testedUrl}](${testedUrl})*
`;

  return comment;
}

module.exports = ({ lighthouseOutputs }) => {
  return makeComment(lighthouseOutputs);
};
The above code takes the Lighthouse outputs and creates some Markdown to represent the results. It uses some nice emojis as well.
Wonderfully, we’re entirely free to customize this as much as we’d like; it’s just code! All that matters is that a string is pumped out at the end.
Finally, we’re ready to add the comment to the PR. We’ll do this using the sticky-pull-request-comment GitHub Action. We pass in the comment we just made in the previous step, as well as some other parameters, and this will write the comment to the PR.
When we commit our changes and raise a pull request, we see our GitHub Action run. Once it has, we see a Lighthouse report being attached to our pull request:
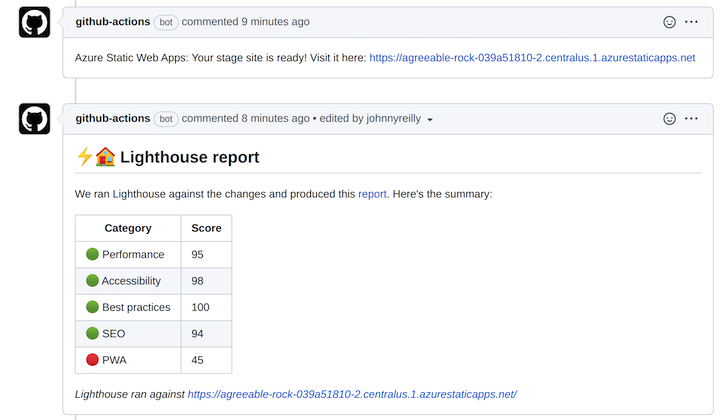
You can also click on a link in the comment to go directly to the full report.
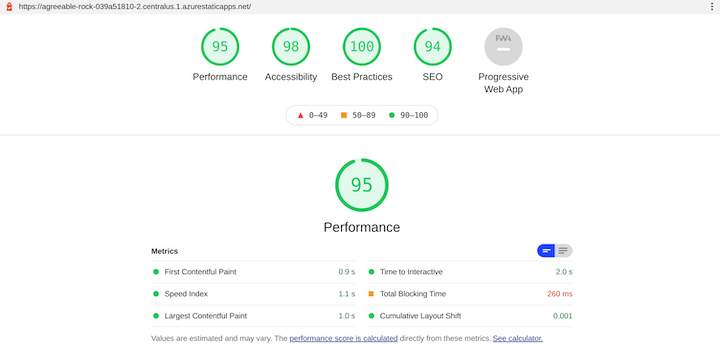
Now, with each PR that is raised, any regressions in performance can be observed and resolved before customers experience them.
Install LogRocket via npm or script tag. LogRocket.init() must be called client-side, not
server-side
$ npm i --save logrocket

// Code:

import LogRocket from 'logrocket';
LogRocket.init('app/id');
// Add to your HTML:

<script src="https://cdn.lr-ingest.com/LogRocket.min.js"></script>
<script>window.LogRocket && window.LogRocket.init('app/id');</script>

When should you move API logic out of Next.js? Learn when Route Handlers stop scaling and how ElysiaJS helps.

Explore how Dokploy streamlines app deployment with Docker, automated builds, and simpler infrastructure compared to traditional CI/CD workflows.

A side-by-side look at Astro and Next.js for content-heavy sites, breaking down performance, JavaScript payload, and when each framework actually makes sense.

AI-generated tests can speed up React testing, but they also create hidden risks. Here’s what broke in a real app.re
Would you be interested in joining LogRocket's developer community?
Join LogRocket’s Content Advisory Board. You’ll help inform the type of content we create and get access to exclusive meetups, social accreditation, and swag.
Sign up now