Editor’s note: This article was last updated on 23 March 2022 to correct bugs in the sample code and include up-to-date packages.

JWT, an acronym for JSON Web Token, is an open standard that allows developers to verify the authenticity of a type of information known as a claim via a signature. The signature can either be a secret or a public/private key pair. Together with the header and the payload, a signature can be used to generate or construct a JWT.
JWTs are commonly used for either authentication or to safely transmit information across different parties. Once a user has logged into an app, a JWT is created on the server and returned back to the calling client, which is a common flow for JWT-based authentication systems.
Each subsequent request will include the JWT as an authorization header, allowing access to protected routes and resources. Once the backend server verifies that the signature is valid, it extracts the user data from the token as required. To ensure that a JWT is valid, only the party holding the key or secret is responsible for signing the information.
In this article, we’ll learn how to perform authentication requests on a Vue client app with a Node.js backend. But first, let’s review how JWT works in detail.
In JWT authentication-based systems, when a user successfully logs in using their credentials, a JSON Web Token will be returned back to the calling client. Whenever the user wants to access a protected route or resource, the user agent sends the same JWT, typically in the Authorization header using the Bearer schema.
The content of the header should look like the syntax below:
Authorization: Bearer <token>
The server routes will have to check for the presence of a valid JWT in the Authorization header to grant a user access to a protected resource. As a bonus, sending JWTs in the Authorization header also solves some issues related to CORS, which applies even if the app is served from an entirely different domain.
Even if JWTs are signed, the information is still exposed to users or other parties because the data is unencrypted. Therefore, users are encouraged to not include sensitive information like credentials within a JWT payload. Additionally, tokens should always have an expiry.
To set up our Vue application with JWT as a means of authenticating to a backend Node.js server, first, we’ll build out the backend part of the application, which handles both generating and subsequently verifying the JWT. The full code for this tutorial can be found in this GitHub repo.
First, let’s open our terminal and install all the necessary dependencies for our app, including the jsonwebtoken package from npm, Express for our server, and babel-polyfill, which provides the required polyfills for a full ES2015+ environment.
For a complete list of the dependencies required for our application, check out the package.json file; the entire contents are shown below:
{
  "name": "jwt-vue-node-backend",
  "version": "1.0.0",
  "description": "Backend server for the JWT-Vue-Node-App",
  "main": "server.js",
  "scripts": {
    "create-dev-tables": "babel-node ./app/db/dbConnection createUserTable",
    "drop-dev-tables": "babel-node ./app/db/dbConnection dropUserTable",
    "dev": "nodemon --watch . --exec babel-node -- server/server",
    "start-dev": "babel-node server/server.js",
    "build-server": "babel server -d dist",
    "build": "rm -rf dist && mkdir dist && npm run build-server",
    "start-prod": "node dist/server.js",
    "start": "npm-run-all -p start-prod",
    "revamp": "npm-run-all -p dev drop-dev-tables"
  },
  "esModuleInterop": true,
  "keywords": [
    "Node",
    "Postgres"
  ],
  "author": "Alexander Nnakwue",
  "license": "MIT",
  "devDependencies": {
    "@babel/cli": "^7.12.1",
    "@babel/core": "^7.12.3",
    "@babel/node": "^7.12.10",
    "@babel/preset-env": "^7.12.1",
    "@babel/register": "^7.12.10",
    "babel-preset-es2015": "^6.24.1",
    "babel-watch": "^7.0.0",
    "eslint": "^7.11.0",
    "eslint-config-airbnb-base": "^14.2.0",
    "eslint-plugin-import": "^2.22.1",
    "nodemon": "^2.0.5"
  },
  "dependencies": {
    "@hapi/joi": "^17.1.1",
    "babel-plugin-add-module-exports": "^1.0.4",
    "babel-polyfill": "^6.26.0",
    "bcryptjs": "^2.4.3",
    "body-parser": "^1.19.0",
    "cors": "^2.8.5",
    "dotenv": "^8.2.0",
    "express": "^4.17.1",
    "jsonwebtoken": "^8.5.1",
    "make-runnable": "^1.3.8",
    "moment": "^2.29.1",
    "npm-run-all": "^4.1.5",
    "pg": "^8.4.1"
  },
  "engines": {
    "node": "13.7.0",
    "npm": "6.13.6"
  }
}
As seen in the file above, we’ve installed the necessary packages to make Babel work as a development dependency. We began by making sure we installed the Babel CLI globally, then we checked for other dependencies like eslint, nodemon, pg, etc.
Pay special attention to the scripts section of the package.json file, which shows us how to create and drop the user table, build the server file of our app, and run the app on our development environment. The scripts section also shows us how to run our app in production.
Our final folder structure should look like the following:
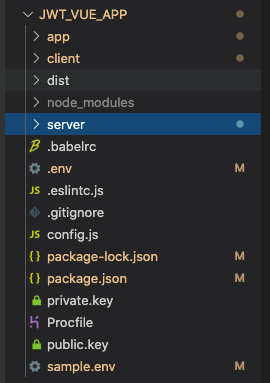
As you can see, our app is a monorepo, which will easily allow us to add the client folder, build, and output the build to a dist directory. Lastly, we’ll add the build path to our server.js file.
The app folder contains all the extra components needed for our backend to run successfully, including the controllers, the database handlers, helpers, the middleware folders, and more. After cloning the repo, be sure to remove the following two lines from ./app/db/dbconnection.js:
import { createRequire } from 'module';
const require = createRequire(import.meta.url);
As we mentioned earlier, the client folder contains everything that has to do with the user-facing part of the app. The server folder contains the server.js file, a basic Express server that powers our application:
import express from 'express'
import 'babel-polyfill'
import cors from 'cors'
import usersRoute from '../app/route/user.js'
import path from 'path'

const __dirname = path.resolve();
const app = express()

// Add  cors middleware
app.use(cors())

// Add middleware for parsing JSON and urlencoded data
app.use(express.urlencoded({ extended: false }))
app.use(express.json())

// Serve static files from the Vue app
app.use(express.static(path.join(`${__dirname}/client/dist`)))

// The "catchall" handler: for any request that doesn't
// match one above, send back Vue's index.html file.
app.get('/*', (req, res) => {
    res.sendFile(path.join(`${__dirname}/client/dist/index.html`))
})

app.use('/api/v1', usersRoute)

app.get('/', (req, res) => {
    res.status(200).send('Welcome to the JWT authentication with Node and Vue.js tutorial')
})

// catch 404 and forward to error handler
app.use((req, res, next) => {
    const err = new Error('Not Found')
    console.log(err)
    err.status = 404
    res.send('Route not found')
    next(err)
})

const server = app.listen(process.env.PORT || 3000).on('listening', () => {
    console.log(`App live and listening on port: ${process.env.PORT}` || 3000)
})

export default app
Before we review everything happening in the server file above, we need to set up the Babel config for our application. The .babelrc file is shown below:
{
    "presets": ["@babel/preset-env"],
    "plugins": ["add-module-exports"]
}
The preset we’re using above lets us write the latest JavaScript syntax, eliminating the need to check which syntax transforms and, optionally, which browser polyfills are needed by the OS target environment. The plugin allows Babel to understand and interpret our module.exports statements and transforms.
In the server.js file above, we’re serving static files and assets from our client build path. We also import our routes from the route path. Lastly, we import the babel-polyfill package, which we explained above. Check out the repo for the eslint and other setups.
Now, we’ll quickly set up our config file, which picks variables from our .env file:
require('dotenv').config()
const { env } = process

module.exports = {
    name: env.APP_NAME,
    baseUrl: env.APP_BASE_URL,
    port: env.APP_PORT,
    databases: {
        postgres: {
            user: env.PG_USERNAME,
            password: env.PG_PASSWORD,
            host: env.PG_HOST,
            port: env.PG_PORT,
            db_name: env.PG_DATABASE,
            url: env.PG_URL,
        },
    },
}
Postgres is our choice database for this tutorial, meaning we need to provide the necessary details to connect to a live Postgres DB. Now, let’s look at the most important part of the codebase, which is under the app folder. Basically, all the files located here are required to make our server respond to HTTP requests.
Let’s start with the user.js file in the routes folder:
const express = require('express')
const { registerUser, loginUser, me } = require('../controller/users.js')
const  {
 createUser,
} = require( '../helpers/validation.js')
const {
  decodeHeader,
 } = require( '../middleware/verifyAuth.js')

const router = express.Router()

// user Routes

router.post('/auth/signup', createUser, registerUser)
router.post('/auth/login', loginUser)
router.get('/me', decodeHeader, me)

module.exports = router
We need just three endpoints to demonstrate how JWT works with Vue and Node.js. We import the controller file and the middleware file .../middleware/verifyAuth.js, which is used to decode the Authorization header sent from the client. We’ll explore that in a moment.
For now, let’s look at the controller found in the user.js file via the ~/controller/users.js path. Let’s explore the login.js method as an example:
/**
   * login User
   * @param {object} req
   * @param {object} res
   * @returns {object} user object
   */

const loginUser = async (req, res) => {
    const { email, password } = req.body

    if (isEmpty(email) || isEmpty(password)) {
        return Response.sendErrorResponse({
            res,
            message: 'Email or Password detail is missing',
            statusCode: 400,
        })
    }

    if (!isValidEmail(email) || !validatePassword(password)) {
        return Response.sendErrorResponse({
            res,
            message: 'Please enter a valid Email or Password',
            statusCode: 400,
        })
    }

    const loginUserQuery = 'SELECT * FROM users WHERE email = $1'

    try {

        const { rows } = await dbQuery.query(loginUserQuery, [email])
        const dbResponse = rows[0]

        if (!dbResponse) {
            return Response.sendErrorResponse({
                res,
                message: 'User with this email does not exist',
                statusCode: 400,
            })
        }

        if (!comparePassword(dbResponse.password, password)) {
            return Response.sendErrorResponse({
                res,
                message: 'The password you provided is incorrect',
                statusCode: 400,
            })
        }

        const token = Utils.generateJWT(dbResponse)
        const refreshExpiry = moment().utc().add(3, 'days').endOf('day')
            .format('X')
        const refreshtoken = Utils.generateJWT({ exp: parseInt(refreshExpiry), data: dbResponse._id })
        delete dbResponse.password
        return Response.sendResponse({
            res,
            responseBody: { user: dbResponse, token, refresh: refreshtoken },
            message: 'login successful',
        })
    } catch (error) {
        console.log(error)
        return Response.sendErrorResponse({
            res,
            message: error,
            statusCode: 500,
        })
    }
}
After we finish with the usual password comparison, we generate a JWT with the details of the user returned from querying our pg database. Next, we generate a refresh token with refreshExpiry. Finally, we return the token and the refresh token as part of the response:
const token = Utils.generateJWT(dbResponse)
const refreshExpiry = moment().utc().add(3, 'days').endOf('day')
            .format('X')
const refreshtoken = Utils.generateJWT({ exp: parseInt(refreshExpiry), data: dbResponse._id })
I’ve already set up a Postgres database with the Heroku Postgres add-on. We’ll discuss the details later when we deploy our app to the Heroku environment.
Now, let’s look at the Utils folder where the generateJWT method is defined. We import the Utils module at the top of the controller file on line 10. Navigating to the helpers/utils.js path, we’ll learn firsthand how to verify and sign tokens:
const bcrypt = require('bcryptjs')
const jwt = require('jsonwebtoken')
const fs = require('fs')

const privateKEY = fs.readFileSync('./private.key', 'utf8')
const publicKEY = fs.readFileSync('./public.key', 'utf8')

const i = 'jwt-node'
const s = 'jwt-node'
const a = 'jwt-node'

const verifyOptions = {
    issuer: i,
    subject: s,
    audience: a,
    expiresIn: '8784h',
    algorithm: ['RS256'],
}

const saltRounds = 10

const salt = bcrypt.genSaltSync(saltRounds)

    const generateJWT = (payload) => {
        const signOptions = {
            issuer: i,
            subject: s,
            audience: a,
            expiresIn: '8784h',
            algorithm: 'RS256',
        }

        const options = signOptions
        if (payload && payload.exp) {
            delete options.expiresIn
        }
        return jwt.sign(payload, privateKEY, options)
    }

    const verifyJWT = (payload) => {
        return jwt.verify(payload, publicKEY, verifyOptions)
    }

    const hashPassword = (password) => {
        const hash = bcrypt.hashSync(password, salt)
        return hash
    }

module.exports = {
    hashPassword, verifyJWT, generateJWT
}
The generateJWT method synchronously signs the given payload into a JSON Web Token string by using a privateKEY and an options argument.
As we can see from the code snippet above, there are two major methods we’re interested in, verifyJWT and generateJWT. Let’s explore the latter method, which follows the JWT creation approach and is constructed from three different elements, the header, the payload, and the signature/encryption data, separated by dots ..
As we just mentioned, JWTs are constructed from three different elements, including the header, the payload, and the signature.
The header is a JSON object that contains claims about itself, including the type of token. It also contains the signing algorithm being used, like HMAC, SHA-256 with RSA, or ES256. We’re using the RS256 algorithm. It also defines whether the JWT is signed or encrypted:
const signOptions = {
            issuer: i,
            subject: s,
            audience: a,
            expiresIn: '8784h',
            algorithm: 'RS256',
            "typ": "JWT"
        }
The second part of the token is the payload, which usually contains details about the user. It may also contain some claims that are statements about that user. There are three types of claims, include registered, public, and private claims. Some of these claims are iss, issuer, exp, expiration time, sub, subject, and aud, audience.
The structure of a sample payload is shown below:
{
  id: 2,
  email: '[email protected]',
  firstname: 'Kelechi',
  lastname: 'Oti',
  password: '$2a$10$yK1bInjD2KieruxwFE9UV.ZuYiwZHu8ciX2vMZmLSvbrOdZ4/Maju',
  createdon: 2020-10-31T23:00:00.000Z
}
Note: For signed tokens, this information, though protected against tampering, can be read by anyone. Ensure that you don’t put secret information in the payload or header elements of a JWT unless it is encrypted.
The third part is the signature, which is used to verify that the message wasn’t changed along the way. In the case of tokens signed with a private key, it can also verify that the sender of the JWT is who they say they are. The signature is largely dependent on the algorithm used for signing or encryption. In the case of unencrypted JWTs, there is none. In essence, for unencrypted JWTs, the header is shown below:
{
    "alg": "none"
}
Our JWT is encrypted and signed by a private/public key pair available in the root path of our repo. Let’s look at a sample JWT below. Notice the dots separating the three elements of the JWT, the header, the payload, and the signature, respectively, which are base64url-encoded:
eyJhbGciOiJSUzI1NiIsInR5cCI6IkpXVCJ9.eyJpZCI6MiwiZW1haWwiOiJhbGV4Lm5uYWt3dWVAZ21haWwuY29tIiwiZmlyc3RuYW1lIjoiS2VsZWNoaSIsImxhc3RuYW1lIjoiT3RpIiwicGFzc3dvcmQiOiIkMmEkMTAkeUsxYkluakQyS2llcnV4d0ZFOVVWLlp1WWl3Wkh1OGNpWDJ2TVptTFN2YnJPZFo0L01hanUiLCJjcmVhdGVkb24iOiIyMDIwLTExLTAxVDAwOjAwOjAwLjAwMFoiLCJpYXQiOjE2MDgyNjY5MDYsImV4cCI6MTYzOTg4OTMwNiwiYXVkIjoicXVlc3Rpb25zLWdhbWUiLCJpc3MiOiJxdWVzdGlvbnMtZ2FtZSIsInN1YiI6InF1ZXN0aW9ucy1nYW1lIn0.FLXTabVVpZ_zuPEspoQe8U5kr8CwKNFKgXBwgQN6yKkW2RXmQGXyuML3dLy4XOEVEgaNoAjSI8De65CKlAq_dA
JWT.io is an interactive playground for learning more about JWTs. For example, we can go ahead and copy the token from above and see what happens when we edit it.
Next, let’s look at the verifyJWT method, which basically allows us to use the publicKEY to verify that the privateKEY was responsible for signing the header and the payload. A snippet of the verifyJWT method is shown below:
const verifyJWT = (payload) => {
        return jwt.verify(payload, publicKEY, verifyOptions)
}
JWT has a verify method that synchronously verifies a given token using a secret or a public key and options for the verification. Once the token is verified, a decoded value of that token is returned.
Now, when we log into the app, we can see the user object, the token, and the refresh token, as shown below:
{
    "data": {
        "user": {
            "id": 2,
            "email": "[email protected]",
            "firstname": "Kelechi",
            "lastname": "Oti",
            "createdon": "2020-10-31T23:00:00.000Z"
        },
        "token": "eyJhbGciOiJSUzI1NiIsInR5cCI6IkpXVCJ9.eyJpZCI6MiwiZW1haWwiOiJhbGV4Lm5uYWt3dWVAZ21haWwuY29tIiwiZmlyc3RuYW1lIjoiS2VsZWNoaSIsImxhc3RuYW1lIjoiT3RpIiwicGFzc3dvcmQiOiIkMmEkMTAkeUsxYkluakQyS2llcnV4d0ZFOVVWLlp1WWl3Wkh1OGNpWDJ2TVptTFN2YnJPZFo0L01hanUiLCJjcmVhdGVkb24iOiIyMDIwLTEwLTMxVDIzOjAwOjAwLjAwMFoiLCJpYXQiOjE2MDgyNzMxNTgsImV4cCI6MTYzOTg5NTU1OCwiYXVkIjoiand0LW5vZGUiLCJpc3MiOiJqd3Qtbm9kZSIsInN1YiI6Imp3dC1ub2RlIn0.ky4EYUP3t10qaH1aCc0g_jxX5zt8U03l7lrwfpVjViYGqufxRcLoYNV8rw8SygxouXOqSPiF_LxLGv3fi4MQyQ",
        "refresh": "eyJhbGciOiJSUzI1NiIsInR5cCI6IkpXVCJ9.eyJleHAiOjE2MDg1OTUxOTksImlhdCI6MTYwODI3MzE1OCwiYXVkIjoiand0LW5vZGUiLCJpc3MiOiJqd3Qtbm9kZSIsInN1YiI6Imp3dC1ub2RlIn0.VvWQ17Wzyw-tJdRiIxsVzXNhl-nQSPf6Wo1iFOtC3BeueywB1lLaqOK4rmO0UAxKovx6sjZufu2mXEubKsiLOg"
    },
    "status": true,
    "message": "login successful"
}
Tokens give users access to protected resources. They are usually short-lived and may have an expiration date attached to their headers. They may also contain additional information about the user.
Refresh tokens, on the other hand, allow users to request new tokens. For example, after a token has expired, a client may perform a request for a new token to be generated by the backend server, which requires a refresh token. In contrast to access tokens, refresh tokens are usually long-lived.
The verifyAuth file, located in the middleware folder, contains middleware methods responsible for decoding the Authorization sent from the client and validating the token. We’re interested in the decodeHeader method in verifyAuth, shown below:
const decodeHeader = (req, res, next) => {
    let token = req.headers['x-access-token'] || req.headers.authorization || req.body.token
    if (!token) {
        return Response.sendErrorResponse({ res, message: 'No token provided', statusCode: 401 })
    }
    if (token.startsWith('Bearer ')) {
        // Remove Bearer from string
        token = token.slice(7, token.length)
        if (!token || token === '') Response.sendErrorResponse({ res, message: 'No token provided', statusCode: 401 })
    }
    // call the verifyJWT method to verify the token is valid
    const decoded = Utils.verifyJWT(token)
    if (!decoded) Response.sendErrorResponse({ res, message: 'invalid signature', statusCode: 403 })
    // attach the decoded token to the res.user object
    if (decoded) res.user = decoded
    res.token = token
    return next()
}
As we can see from the decodeHeader method above, we accept the token from the client in the form of authorization headers or in the req.body. If no token is provided, we return an error. We also check whether the token comes with the Bearer schema; if it does, we call the verifyJWT method from the Utils module.
This method, as we previously discussed, verifies the token sent from the client using the public key and returns the decoded value of the token. Note that if the decoded value is not returned, it means the token initially signed is invalid. Lastly, we append the decoded value to the response object.
Since we’re majorly focused on JWT authentication, we won’t cover some parts of the app. For example, for details about the database connections, you can check the db folder, located in the app directory.
Now, let’s focus on the client-side part of the application. To bootstrap a Vue app, we can navigate to our terminal or command prompt and run the following command in the root folder:
vue create <folder-name>
If you haven’t already, go ahead and install the Vue CLI globally on your machine with either of the commands below:
npm install -g @vue/cli
#or
yarn global add @vue/cli
To get a feel for the dependencies we might need for the client app, take look at the package.json file:
{
  "name": "vue-jwt-app",
  "version": "0.1.0",
  "private": true,
  "scripts": {
    "serve": "vue-cli-service serve",
    "build": "vue-cli-service build",
    "lint": "vue-cli-service lint",
    "heroku-postinstall": "npm install && npm run build"
  },
  "proxy": "http://localhost:3000",
  "dependencies": {
    "@babel/preset-env": "7.3.4",
    "axios": "^0.20.0",
    "bootstrap": "^4.5.3",
    "bootstrap-vue": "^2.18.0",
    "core-js": "^3.6.5",
    "vue": "^2.6.11",
    "vue-jwt-decode": "^0.1.0",
    "vue-router": "^3.4.7"
  },
  "devDependencies": {
    "@vue/babel-preset-app": "^4.5.8",
    "@vue/cli-plugin-babel": "^4.5.8",
    "@vue/cli-plugin-eslint": "^4.5.0",
    "@vue/cli-service": "^4.5.0",
    "babel-eslint": "^10.1.0",
    "eslint": "^6.7.2",
    "eslint-config-prettier": "^6.14.0",
    "eslint-plugin-prettier": "^3.1.4",
    "eslint-plugin-vue": "^6.2.2",
    "less": "^3.12.2",
    "less-loader": "^7.0.2",
    "vue-template-compiler": "^2.6.11"
  },
  "eslintConfig": {
    "root": true,
    "env": {
      "node": true
    },
    "extends": [
      "plugin:vue/essential",
      "plugin:prettier/recommended",
      "eslint:recommended"
    ],
    "parserOptions": {
      "parser": "babel-eslint"
    },
    "rules": {}
  },
  "browserslist": [
    "> 1%",
    "last 2 versions",
    "not dead"
  ],
  "Author": "Alexander Nnakwue"
}
As we can see from the package.json file above, we’ve installed a couple of dependencies needed for our client app to run. Most importantly, we installed vue-jwt-decode, a JWT decoder for Vue.js applications.
We can see that we are using Axios to make API calls to our backend server. Other important dependencies needed for our client app to run can be found in the package.json file above.
Navigate to the src/components/auth folder. There, you’ll find all the necessary components for our client app. Let’s look at the login component first. When a user logs into our app, we save the generated JWT to local storage. Lets see what the login component looks like:
<template>
  <div class="container">
    <b-card
      bg-variant="dark"
      header="Vue_JWT_APP"
      text-variant="white"
      class="text-center"
    >
      <b-card-text>Already have an account? Login Here!</b-card-text>
      <div class="row">
        <div class="col-lg-6 offset-lg-3 col-sm-10 offset-sm-1">
          <form
            class="text-center border border-primary p-5"
            style="margin-top:70px;height:auto;padding-top:100px !important;"
            @submit.prevent="loginUser"
          >
            <input
              type="text"
              id="email"
              class="form-control mb-5"
              placeholder="Email"
              v-model="login.email"
            />
            <!-- Password -->
            <input
              type="password"
              id="password"
              class="form-control mb-5"
              placeholder="Password"
              v-model="login.password"
            />
            <p>
              Dont have an account? Click
              <router-link to="/register"> here </router-link> to sign up
            </p>
            <!-- Sign in button -->
            <center>
              <button class="btn btn-primary btn-block w-75 my-4" type="submit">
                Sign in
              </button>
            </center>
          </form>
        </div>
      </div>
    </b-card>
  </div>
</template>
<script>
export default {
  data() {
    return {
      login: {
        email: "",
        password: ""
      }
    };
  },
  methods: {
    async loginUser() {
      try {
        let response = await this.$http.post("/auth/login", this.login);
        let token = response.data.data.token;
        localStorage.setItem("user", token);
        // navigate to a protected resource
        this.$router.push("/me");
      } catch (err) {
        console.log(err.response);
      }
    }
  }
};
</script>
We use BootstrapVue to style our components. Once we log into our app via the backend API, we set the returned token to localStorage. Once that happens, we navigate to the Home component using the router push API.
To demonstrate the entire flow, we retrieve the token from local storage, decode the token using the vue-jwt-decode package, then finally append that to the user object, which we can then display in our Home component:
<template>
  <div>
    <b-navbar id="navbar" toggleable="md" type="dark" variant="info">
      <b-navbar-brand href="#">
        You are currently viewing the Vue_JWT_App
      </b-navbar-brand>
      <b-navbar-nav class="ml-auto">
        <b-nav-text>{{ user.firstname }} | </b-nav-text>
        <b-nav-item @click="logUserOut" active>Logout</b-nav-item>
      </b-navbar-nav>
    </b-navbar>
    <section>
      <div class="container mt-5">
        <div class="row">
          <div class="col-md-12">
            <ul class="list-group">
              <li class="list-group-item">
                Name : {{ user.firstname }} {{ user.lastname }}
              </li>
              <li class="list-group-item">Email : {{ user.email }}</li>
            </ul>
          </div>
        </div>
      </div>
    </section>
  </div>
</template>
<script>
import VueJwtDecode from "vue-jwt-decode";
export default {
  data() {
    return {
      user: {}
    };
  },
  methods: {
    getUserDetails() {
      // get token from localstorage
      let token = localStorage.getItem("user");
      try {
      //decode token here and attach to the user object
      let decoded = VueJwtDecode.decode(token);
      this.user = decoded;
      } catch (error) {
        // return error in production env
        console.log(error, 'error from decoding token')
      }
    },
    logUserOut() {
      localStorage.removeItem("user");
      this.$router.push("/login");
    }
  },
  created() {
    this.getUserDetails();
  }
};
</script>
<style>
#navbar {
  margin-bottom: 15px;
}
</style>
Because the vue-jwt-decode package is lightweight, we need to handle error cases on our end by wrapping it in a try/catch block. Additionally, you can find details about the route file and other files needed for the entire client app setup in the client folder on GitHub.
If you want to run the application locally, change the database settings in the .env to match your local Postgres database, then run npm run create-dev-tables, which will create the tables you need to run the code locally without the Heroku CLI.
To deploy our app to Heroku, we first need a Heroku account and the Heroku CLI installed on our dev machine. Visit the documentation for instructions. After we’re done specifying settings like the Node engine version and the start script, we can then go ahead and test our app locally.
To do so, we need a Procfile in the root of our project, which Heroku will use to tell our app the path of the server to run. The content of the file is shown below:
web: node ./dist/server.js
To start our app locally, we can run heroku local web. The output is shown below:
[OKAY] Loaded ENV .env File as KEY=VALUE Format
01:43:05 web.1   |  postgres://kdwqywwonzxzoa:82a2d163fe213bf3d37c1af67b9b8adbbaf2206354c6f261551eb4b8c9f15caf@ec2-54-156-149-189.compute-1.amazonaws.com:5432/daclachtll2s1g DATABASE_URL
01:43:05 web.1   |  3000 APP-PORT
01:43:05 web.1   |  App live and listening on port: 3000
As we can see, we’ve set up a Postgres add-on on the Heroku dashboard because we’re using a Postgres database for our app. Additionally, looking at the script section of our package.json file, we can see the parts needed by our app for production.
The build command runs "rm -rf dist && mkdir dist && npm run build-server", which deletes any old dist folders, creates a dist directory, and builds our app. The build-server command runs "babel server -d dist". The final start script can be found in the script section of the same file as above.
Finally, we just need to deploy our app to Heroku. To do so, we should ensure to commit our changes to Git on the master branch, then use the command heroku login on the Heroku CLI to log into our Heroku account. Once we enter the correct credentials, we can create a new Heroku app with the heroku create command.
Next, we can push our app to the Heroku master branch by running git push heroku master. We can then see the URL to our deployment, which we can find in a truncated portion of the output shown below:
remote:        found 0 vulnerabilities
remote:
remote:
remote: -----> Build succeeded!
remote: -----> Discovering process types
remote:        Default types for buildpack -> web
remote:
remote: -----> Compressing...
remote:        Done: 36.8M
remote: -----> Launching...
remote:        Released v5
remote:        https://secure-cliffs-18654.herokuapp.com/ deployed to Heroku
remote:
remote: Verifying deploy... done.
To https://git.heroku.com/secure-cliffs-18654.git
   91ced12..28baa4c  master -> master
Finally, copy the URL https://secure-cliffs-18654.herokuapp.com/, navigate to the src/main.js folder of our client app, and update the base URL. The final content of that file is shown below:
import Vue from "vue";
import App from "./App.vue";
import router from "./router";
import axios from "axios";
import BootstrapVue from "bootstrap-vue";
import "bootstrap/dist/css/bootstrap.css";
import "bootstrap-vue/dist/bootstrap-vue.css";
const base = axios.create({
  baseURL: "https://secure-cliffs-18654.herokuapp.com/api/v1" // replace on production env
});
import store from "./store/index";
Vue.config.productionTip = false;
Vue.use(BootstrapVue);
Vue.prototype.$http = base;
new Vue({
  store,
  router,
  render: h => h(App)
}).$mount("#app");
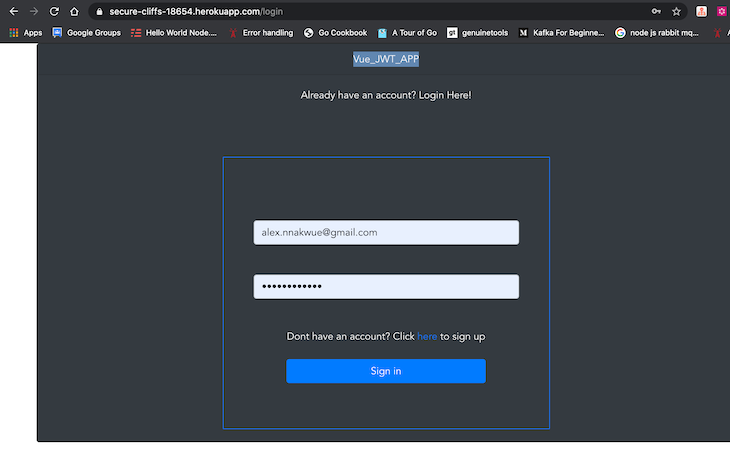
Note the part where we added the baseURL with the axios.create method. Afterwards, we can commit these new changes again to Git, and we’re live! Finally, to test our app, we can navigate to the login route and test our deployment. The path is shown below:
https://secure-cliffs-18654.herokuapp.com/login
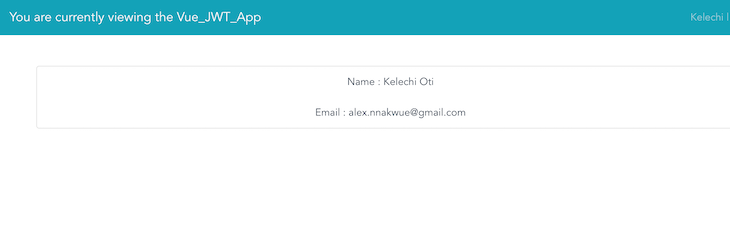
Once we register a new account, we can then log in, and we’ll be immediately redirected to the home route:
Our app’s homepage is shown below:
Once we are redirected to the homepage, for demonstration purposes, we log the JWT payload of the currently authenticated user to the console. The details are shown in the image below:

In this tutorial, we’ve learned how to integrate JWT in a Node.js and Vue app. We started with the entire backend setup, built our app, and then worked on the client-side of the application.
JWT offers a purely stateless authentication mechanism because the user state is never saved in the server memory or database. The server’s protected routes will check for a valid JWT in the authorization header, and if there is one, the user will be granted access.
We’ve reviewed how JWTs work and their structure. We’ve also learned how to generate JWTs and verify JWT data. On the client layer, we’ve learned how to decode the JWT using the vue-jwt-decode library.
Finally, we should note that storing tokens in localStorage comes with its own set of risks since they are vulnerable to cross-site scripting (XSS) attacks. It’s essential to review the details about preventing security issues with JWTs so you’ll know when to use an alternative.
For more details on JWTs, refer to this detailed handbook and the documentation. Please reach out in the comment section for questions and feedback. Thanks for reading along!
Debugging Vue.js applications can be difficult, especially when users experience issues that are difficult to reproduce. If you’re interested in monitoring and tracking Vue mutations and actions for all of your users in production, try LogRocket.

LogRocket lets you replay user sessions, eliminating guesswork by showing exactly what users experienced. It captures console logs, errors, network requests, and pixel-perfect DOM recordings — compatible with all frameworks.
With Galileo AI, you can instantly identify and explain user struggles with automated monitoring of your entire product experience.
Modernize how you debug your Vue apps — start monitoring for free.
Would you be interested in joining LogRocket's developer community?
Join LogRocket’s Content Advisory Board. You’ll help inform the type of content we create and get access to exclusive meetups, social accreditation, and swag.
Sign up now
Not sure if low-code is right for your next project? This guide breaks down when to use it, when to avoid it, and how to make the right call.

Compare Firebase Studio, Lovable, and Replit for AI-powered app building. Find the best tool for your project needs.

Discover how to use Gemini CLI, Google’s new open-source AI agent that brings Gemini directly to your terminal.

This article explores several proven patterns for writing safer, cleaner, and more readable code in React and TypeScript.


