Since it was introduced by Facebook engineer Christopher Chedeau in 2014, the developer community has seen widespread adoption of CSS-in-JS. The primary benefit of the CSS-in-JS pattern is that you can leverage a JavaScript modular approach to maintain your CSS files.

One problem with writing scalable CSS is that each rule you write will apply to the entire project. These global style rules sometimes override each other unintentionally, which can break your application design. The CSS-in-JS pattern enables you to automatically scope your style locally to ensure that only the relevant parts of your application are affected.
But CSS-in-JS doesn’t come without a cost. It requires you to execute your style at runtime, when the browser downloads your JavaScript bundle. It also puts the styling code into the bundled file, which will grow in size as your application grows.
If only you could write CSS at module level while reducing the runtime to a bare minimum — imagine the possibilities! That’s where treat comes in.
treat is a lightweight CSS-in-JS library that executes your styling code at build time and injects it into your application header. It eliminates the need to include your styling code in your JavaScript bundle. What’s more, treat has support for type safety with TypeScript and legacy browsers such as IE 11.
treat is framework-agnostic, which means you can use it with any frontend library, from Angular, to Vue, to React.
There’s only one caveat: treat requires you to use webpack for your module bundler. Other bundlers such as Rollup and Parcel are not supported.
Let’s see how treat works in React. To follow along, you can use this minimal React boilerplate. We’ll avoid bootstrapping with Create React App because it has a huge webpack config that’s confusing to edit.
First, install the treat package from NPM.
npm install treat
Next, edit your webpack config to include treat’s webpack plugin, which will automatically process all files written in *.treat.js format and inject them into your page.
const TreatPlugin = require('treat/webpack-plugin');

module.exports = {
  plugins: [
    new TreatPlugin()
  ]
};
That’s all you need to use treat in your React app. Let’s test it by creating a style using the treat.js extension. I’ll name this Button.treat.js.
import { style } from 'treat';

export const Button = style({
  cursor: 'pointer',
  backgroundColor: 'blue',
  marginLeft: 10,
  height: 28,
  color: 'white',
  borderRadius: 4,
  borderWidth: 0,
  padding: '0 15px',
  ':hover': {
    backgroundColor: 'green'
  },
});
In the code above, the style function is imported so that you can write individual style rules.
The style for Button is now ready to use in your React app, so let’s write a simple component to render the button. Add the style as its className.
import React from 'react';
import ReactDOM from 'react-dom';
import {Button} from './Button.treat';

function App() {
  return (
    <button className={Button}>Like</button>
  );
}

ReactDOM.render(<App/>,
  document.querySelector('#root'));
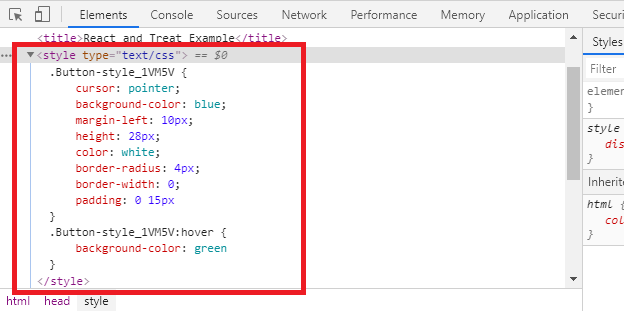
Now, run your React app with npm run start and open your browser on http://localhost:8080/. You’ll see that the button element is rendered with the style from Button.treat.js. If you inspect the HTML, you’ll see that treat has injected the style with an autogenerated suffix.
You can also export the styling into its own static CSS file by using the mini-css-extract-plugin.
First, install the webpack plugin:
npm install mini-css-extract-plugin
Next, edit your webpack config and define the outputLoaders option for your TreatPlugin to use MiniCssExtractPlugin.loader.
const TreatPlugin = require('treat/webpack-plugin');
const MiniCssExtractPlugin = require('mini-css-extract-plugin');

module.exports = {
  plugins: [
    new TreatPlugin({
      outputLoaders: [MiniCssExtractPlugin.loader]
    }),
    new MiniCssExtractPlugin()
  ]
};
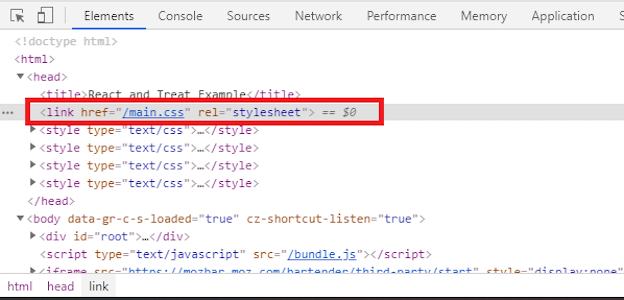
Inspect the page again, and you’ll see that main.css file is generated by treat, which contains all your CSS-in-JS code.
Because treat doesn’t use any CSS custom properties (e.g., CSS variables), the style will run even in IE 11. If you use TypeScript for your application, you can use the *.treat.ts file format to write your CSS in TS code.
treat offers a unique approach to solving CSS-in-JS runtime overhead while simultaneously providing legacy browser support and type safety. It generates a static CSS file in the building process and removes the CSS-in-JS code from your final bundle. It also supports pseudo-elements and CSS theming. Best of all, treat offers a dedicated API for React and supports serverside rendering and bundle splitting.
If you’re interested in learning more, check out the official treat documentation.
Install LogRocket via npm or script tag. LogRocket.init() must be called client-side, not
server-side
$ npm i --save logrocket

// Code:

import LogRocket from 'logrocket';
LogRocket.init('app/id');
// Add to your HTML:

<script src="https://cdn.lr-ingest.com/LogRocket.min.js"></script>
<script>window.LogRocket && window.LogRocket.init('app/id');</script>
Would you be interested in joining LogRocket's developer community?
Join LogRocket’s Content Advisory Board. You’ll help inform the type of content we create and get access to exclusive meetups, social accreditation, and swag.
Sign up now
This guide walks you through creating a web UI for an AI agent that browses, clicks, and extracts info from websites powered by Stagehand and Gemini.

This guide explores how to use Anthropic’s Claude 4 models, including Opus 4 and Sonnet 4, to build AI-powered applications.

Which AI frontend dev tool reigns supreme in July 2025? Check out our power rankings and use our interactive comparison tool to find out.

Learn how OpenAPI can automate API client generation to save time, reduce bugs, and streamline how your frontend app talks to backend APIs.


2 Replies to "Introduction to treat"
Hmmm. How about comparing this to modular css using sass?
Hi, that will be a great idea. I will try to make an objective comparison between them later. Thanks!