The game industry has more income then the music and movie industries combined. No wonder game production is on the rise and consoles such as Xbox and PlayStation are selling like crazy.

As the field of game development evolved over the years, games started veering into browser territory. Today, many of the games we play on PCs and consoles are also built to run in browsers. This is thanks in part to the myriad game engines available to help developers create 3D games for the web much more efficiently.
In this tutorial, we’ll show you how to get started with one of the most popular JavaScript libraries for creating stunning 3D animations, Three.js.
The Replay is a weekly newsletter for dev and engineering leaders.
Delivered once a week, it's your curated guide to the most important conversations around frontend dev, emerging AI tools, and the state of modern software.
Three.js is a powerful library for creating three-dimensional models and games. With just a few lines of JavaScript, you can create anything from simple 3D patterns to photorealistic, real-time scenes. You can build simple and complex 3D geometrics, animate and move objects through a lifelike scene, and more.
Three.js enables you to apply textures and materials to your objects. It also provides various light sources to illuminate your scene, advanced postprocessing effects, custom shaders, etc. You can load objects from 3D modeling software to use in your game.
For these reasons, Three.js is my go-to library for building JavaScript games.
First, download the Three.js file.
Next, create a folder, threejs-prj. Inside the folder, create two more folders: src and libs.
threejs-prj
    - /src
    - /libs
Create an index.html file at the root folder and a main.js file at the src folder. Then, copy three.min.js to the libs folder.
threejs-prj
    - /src
        - main.js
    - /libs
        - three.min.js
    - index.html
main.js will contain your game code. three.min.js is the minified Three.js framework, and index.html is the main page where Three.js will render your objects.
Open index.html and paste in the following code.
<!-- index.html -->

<!DOCTYPE html>
<html>
    <head>
        <title>Three.js demo</title>
        <meta charset="utf-8">
        <style>
            body {
                background-color: #ffffff;
                margin: 0;
                overflow: hidden;
            }
        </style>
    </head>
    <body>
        <script src="./libs/three.min.js"></script>
        <script src="./src/main.js"></script>
    </body>
</html>
This is just basic code setup. We removed the margins and hid any overflowing content.
In the following section, we’ll walk you through how to create basic objects and scenes in Three.js.
Before we start, let’s take a step back and review what a basic scene in a 3D game looks like. To follow along, you should be familiar with a few common terms, including scene, geometry, material, camera, and renderer.
A scene starts on a coordinate system. It can contain objects, such as cubes, pyramids, cars, houses, etc. — basically, anything you can imagine — just like a scene in a film.
First, declare a scene variable.
<script>
    var scene
</script>
Create a scene using the Scene class.
scene = new THREE.Scene();
The scene variable now holds a Scene object. We can use the add() method to add objects to our scene.
Geometry refers to the shapes we create — cubes, squares, pyramids, etc. Three.js provides basic, primitive shapes, the surfaces and vertices of which you can modify to create more complex shapes of your own.
To create a bo, use the BoxGeometry class in the THREE variable.
var boxGeometry = new THREE.BoxGeometry(10, 10, 10);
This creates a cube that is 10 units in length, 10 units wide, and 10 units thick.
isoGeometry = new THREE.IcosahedronGeometry(200, 1);
This creates an icosahedron shape.
Lights and materials style the objects by applying colors, textures, etc. Material is used to apply texture and color to a shape.
To create material for color and texture, use the THREE.MeshBasicMaterial class. This will pass our custom shades and textures.
var basicMaterial = new THREE.MeshBasicMaterial({
    color: 0x0095DD
});
Here, we created a material object with color 0095DD.
material = new THREE.MeshBasicMaterial({
    color: 0x000000,
    wireframe: true,
    wireframeLinewidth: 2
});
We created a basic material by passing more properties. This time, we want the object to be a wireframe shape, with the width of the wireframe line being two units.
We just used basic material here. There are more predefined materials to be used in Three.js, such as Phong, Lambert, etc.
The mesh is used to apply materials to objects. The THREE.Mesh class handles this.
To apply basicMaterial to boxGeometry:
var cubeMesh = new THREE.Mesh(boxGeometry, basicMaterial);
The cubeMesh will be a 10x10x10 box with dimens solidly painted with color 0095DD.
A camera is an eye to see objects in a scene. A scene must have at least one camera.
The camera in Three.js controls what you can see in a scene from a certain perspective. You can move the camera to look around. Just like in the real world, you can view the environment from various angles.
Three.js features many types of cameras, but the basic one is THREE.PerspectiveCamera. A THREE.PerspectiveCamera instance displays the world from a single point in space, just like your eyes. There is also the THREE.OrthographicCamera class, which is like looking out from a plane.
camera = new THREE.PerspectiveCamera(75, window.innerWidth/window.innerHeight, 1, 1000);

camera.position.z = 500;
Let’s break down the arguments here.
In the example above, we used one of the camera spatial coordinate systems to move the camera forward 500 units on its z-axis.
We can also use camera.position.y and camera.position.x to move the camera up/down and left/right, respectively.
Renderer paints the scene and camera on the browser. Three.js provides several rendering engines, including a WebGL-based renderer, Canvas, SVG, CSS, and DOM.
Using the WebGL renderer, THREE.WebGLRenderer is used.
var renderer = new THREE.WebGLRenderer({
    antialias:true
});
renderer.setSize(window.innerWidth, window.innerHeight);

document.body.appendChild(renderer.domElement);
We are creating a WebGL renderer. The antialias property on the object passed to the WebGLRenderer object is set to true, which will cause the WebGL to render our objects smoothly. The setSize method sets the rendering window on the browser to take the browser’s full width and height. Finally, the DOM in the renderer’s domElement property is appended to the DOM. This will make our scenes visible in the browser.
Lights are used to illuminate a specified area in a scene. Think of it like pointing a torch in a particular direction.
There are many light sources available in Three.js, including Point, Ambient, Directional, Hemisphere, and Spot. All are instances of the Light object.
Let’s dive deeper into each light source, as described in Game Development With Three.js by Isaac Sukin.
AmbientAmbient affects all lit objects in the scene equally.
THREE.AmbientLight(color)
DirectionalFor this type, all light is parallel and comes from a given direction, as if the source is very far away.
THREE.DirectionalLight(color, intensity = 1)
HemisphereHemisphere simulates refractive lighting from the sun. Think of it of as two opposing directional lights.
THREE.HemisphereLight(skyColor, groundColor, intensity = 1)
PointThis light source emanates from a specific point in space, like a lightbulb. It only illuminates objects within the radius.
THREE.PointLight(color, intensity = 1, radius = 0)
SpotThis emanates from a specific point in space in a specific direction. It illuminates objects in a cone pointing toward its direction of rotation, falling off exponentially within a distance of radius.
THREE.SpotLight(color, intensity, radius = 0, coneAngle = Math.PI / 3, falloff = 10)
Animations bring the objects in the scene to life. You can move objects in any direction in their spatial coordinate system.
The Geometry and Camera classes have methods and properties you can use to scale, move, and rotate objects.
To scale objects, use the scale property.
boxGeometry.scale = 2
boxGeometry.scale = 1
This grows and shrinks the boxGeometry object.
Next, use the position property to move the boxGeometry object along its x, y, and z axes.
boxGeometry.position.x = 4
This moves the boxGeometry object left and right.
boxGeometry.position.y = 2
This moves the boxGeometry object up and down.
boxGeometry.position.z = 1
This moves the boxGeometry object forward and backward.
To rotate objects, use the rotation property.
boxGeometry.rotation.x += 0.01
This rotates the boxGeometry object in the x direction.
boxGeometry.rotation.y += 0.01
boxGeometry.rotation.z += 0.01
This rotates the boxGeometry object in the y and z directions.
Open the main.js file and paste the following.
// ./src/main.js
var scene = new THREE.Scene();

var boxGeometry = new THREE.BoxGeometry(10, 10, 10);

var basicMaterial = new THREE.MeshBasicMaterial({
    color: 0x0095DD
});

var cubeMesh = new THREE.Mesh(boxGeometry, basicMaterial);
cubeMesh.rotation.set(0.4, 0.2, 0);

var camera = new THREE.PerspectiveCamera(75, window.innerWidth / window.innerHeight, 1, 1000);
camera.position.z = 50;

scene.add(camera)
scene.add(cubeMesh)

var renderer = new THREE.WebGLRenderer({
    antialias:true
});
renderer.setSize(window.innerWidth, window.innerHeight);
renderer.render(scene, camera);

document.body.appendChild(renderer.domElement);
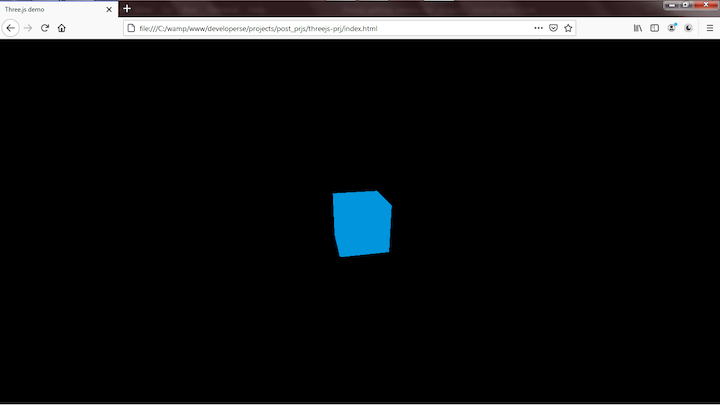
You should see the following.
scene.add(camera)
scene.add(cubeMesh)
The camera and the cubeMesh are added to the scene using the add() method. Without this, no cube would be rendered when the file is run in the browser.
cubeMesh.rotation.set(0.4, 0.2, 0);
The above will rotate the cubeMesh 0.4, 0.2, and 0 along its x, y, and z axes, respectively. This will make us see the cube in its 3D form. If not only the cube x,y-axis will be seen.
Load the index.html in your browser. You will see a light blue cube rendered on your browser.

To make a wireframe cube, add the following.
var wireframeBasicMaterial = new THREE.MeshBasicMaterial({
    color: 0x0095DD,
    wireframe: true,
    wireframeLinewidth: 2
});
Then, edit this:
var cubeMesh = new THREE.Mesh(boxGeometry, basicMaterial);
…to the following.
// var cubeMesh = new THREE.Mesh(boxGeometry, basicMaterial);
var cubeMesh = new THREE.Mesh(boxGeometry, wireframeBasicMaterial);
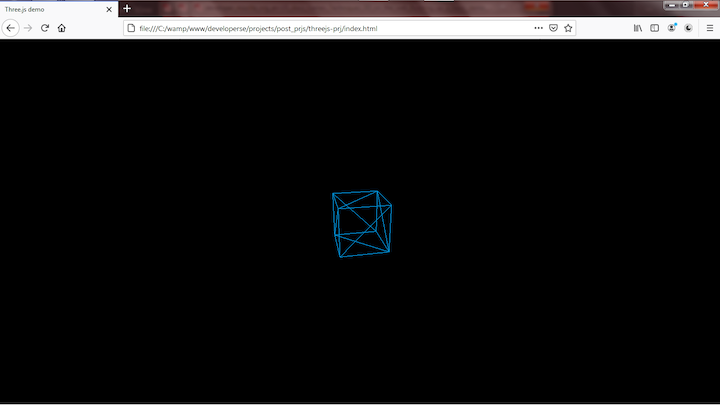
Reload index.html and you should see a wireframe cube.

This is just the beginning of what you can do with Three.js. In fact, it’s so powerful that I would compare it to Blender; Three.js can do almost everything Blender can do.
If you have any questions regarding this or anything I should add, correct or remove, feel free to comment, email, or DM me.
Thanks !!!
Debugging code is always a tedious task. But the more you understand your errors, the easier it is to fix them.
LogRocket allows you to understand these errors in new and unique ways. Our frontend monitoring solution tracks user engagement with your JavaScript frontends to give you the ability to see exactly what the user did that led to an error.

LogRocket records console logs, page load times, stack traces, slow network requests/responses with headers + bodies, browser metadata, and custom logs. Understanding the impact of your JavaScript code will never be easier!

@container scroll-state: Replace JS scroll listeners nowCSS @container scroll-state lets you build sticky headers, snapping carousels, and scroll indicators without JavaScript. Here’s how to replace scroll listeners with clean, declarative state queries.

Russ Miles, a software development expert and educator, joins the show to unpack why “developer productivity” platforms so often disappoint.

Discover what’s new in The Replay, LogRocket’s newsletter for dev and engineering leaders, in the February 18th issue.

Learn how to recreate Claude Skills–style workflows in GitHub Copilot using custom instruction files and smarter context management.
Would you be interested in joining LogRocket's developer community?
Join LogRocket’s Content Advisory Board. You’ll help inform the type of content we create and get access to exclusive meetups, social accreditation, and swag.
Sign up now