The SQLDelight library is known for generating typesafe Kotlin APIs from SQL statements, according to its official documentation. With its schema verification, statements, and compile-time migrations, SQLDelignt provides IDE features that make writing and maintaining SQL easy.

So what does SQLDelight do that other libraries don’t? Let’s take the most famous library for native Android development, Room, as an example.
Both libraries wrap around the SQLite database, which prevents us from using the nightmarish SQLiteOpenHelper by providing Kotlin and Java APIs to reason about most of the CRUD operations with compile-time validation.
Where SQLDelight separates itself is that it has cross-platform support apart from Android with the option to change the underlying database to MySQL, Postgress, or HSQL/H2.
Using Kotlin Multiplatform Mobile, SQLDelight also provides cross-platform compatibility with platform-agnostic APIs to share business logic code across different platforms like Android, iOS, and more.
And, SQLDelight provides syntax highlighting and autocompletion, migration testing and exporting, the ability to switch underlying databases for Java virtual machine (JVM) projects, and supports coroutines and RxJava.
In this article, we will cover the following:
Insert, Update, Select, and Delete queries using SQLDelightAlright, let’s get started!
The Replay is a weekly newsletter for dev and engineering leaders.
Delivered once a week, it's your curated guide to the most important conversations around frontend dev, emerging AI tools, and the state of modern software.
Since a JVM project will be the most platform-neutral for both iOS or Android developers to follow, all the operations mentioned here apply to native mobile development. The only change will be the dependency of the database driver that’s added.
To begin, open IntelliJ and create a new project inside of it. Then, select Kotlin and add the following dependencies into Console Application:
buildscript {
  repositories {
    google()
    mavenCentral()
    maven { url "https://www.jetbrains.com/intellij-repository/releases" }
    maven { url "https://jetbrains.bintray.com/intellij-third-party-dependencies" }
  }
  dependencies {
    classpath 'com.squareup.sqldelight:gradle-plugin:1.5.0'
  }
}

apply plugin: 'com.squareup.sqldelight'

dependencies {
    implementation 'com.squareup.sqldelight:jdbc-driver:1.5.1'
    implementation 'com.zaxxer:HikariCP:5.0.0'
    implementation 'org.slf4j:slf4j-simple:1.7.32'
    implementation 'mysql:mysql-connector-java:8.0.26'
    testImplementation 'org.jetbrains.kotlin:kotlin-test:1.5.31'
}

sqldelight {
  Database { // This will be the name of the generated database class.
    packageName = "com.example"
    dialect = "mysql"
  }
}
Now that we have everything setup for SQLDelight, let’s go ahead and setup a MySQL database.
Start by downloading and installing MySQL for your device (follow here for macOS)
You can then install a visual tool to visualize the data, like TablePlus or Workbench, and connect your database to the visual tool so we can see data changes in real time.
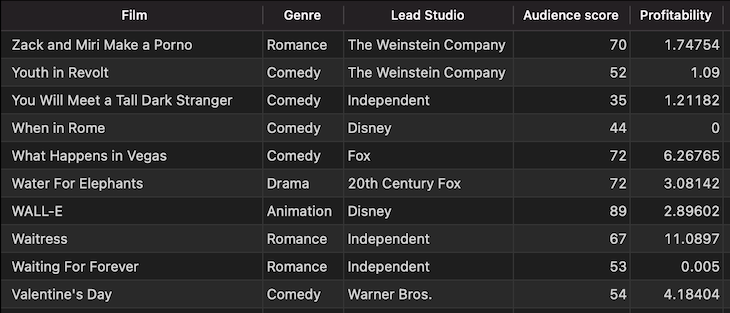
Create a database named movies_db; you can import a sample dataset to use for this tutorial by importing this csv as a new table to our movies_db database.
Our db then looks like this:
Now, let’s go back to our Java project!
For SQLDelight to connect to the MySQL database, it requires an instance of a DataSource, which we can obtain from a connection manager like HikariCP.
We can then create the following function to get the Datasource into the Main.kt file:
private fun getSqlDriver(): SqlDriver {
    val ds = HikariDataSource()
    ds.jdbcUrl = "jdbc:mysql://localhost:3306/movies_db"
    ds.driverClassName = "com.mysql.jdbc.Driver"
    ds.username = "root"
    ds.password = "mysqlroot"
    return ds.asJdbcDriver()
}
Next, let’s create a Movie.sq file in the src/sqldelight directory and add a SELECT statement:
CREATE TABLE movies (
  Film text,
  Genre text,
  `Lead Studio` text,
  `Audience score` int DEFAULT NULL,
  Profitability float DEFAULT NULL,
  `Rotten Tomatoes` int DEFAULT NULL,
  `Worldwide Gross` text,
  Year int DEFAULT NULL
);

selectAll:
SELECT *
FROM movies;
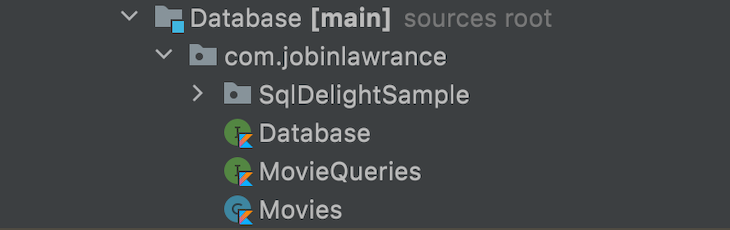
As our project builds, SQLDelight creates the required model and query files. This can help us later on with debugging and testing.
To test our initial code, we can write the following in our main function and run:
fun main(args: Array<String>) {

    val database = Database(getSqlDriver())
    val moviesQueries = database.movieQueries

    val movies = moviesQueries.selectAll().executeAsList()
    println(movies)

}
This prints our Movies table in the terminal:

Note that in production, we should only initialize the database code once and reuse it as a singleton to prevent memory issues.
All the basic CRUD operations remain the same as writing an SQL query prepended by the method name in the .sq file, and SQLDelight builds the required functions and data models.
InsertAs we saw from the SQLDelight build files, we have a Movies data class created from our movies table in the database.
We have two options for inserting: creating a function with each value in the movies table or passing the whole movie object.
If we create a function by value, we have the following:
insert:
INSERT INTO movies(Film, Genre, `Lead Studio`, `Worldwide Gross`, Year)
VALUES(?, ?, ?, ?,?);
If we create a function by object, we have the following:
insertObject:
INSERT INTO movies(Film, Genre, `Lead Studio`, `Audience score`, Profitability,
`Rotten Tomatoes`, `Worldwide Gross`, Year)
VALUES ?;
Now, we can build and run these methods in our main function:
fun main(args: Array<String>) {
  ....

// Insert by values
  insert(
      "Deadpool",
      "Action/Adventure",
      "20th Century Fox",
      "$734",
      2016
  )

  // Insert object
  val movie = Movies(
      Film = "Wonder Woman",
      Genre = "Action/Adventure",
      Lead_Studio = "DC Films",
      Audience_score = null,
      Profitability = null,
      Rotten_Tomatoes = null,
      Worldwide_Gross = "$66",
      Year = 2017
  )
  insert(movie)
}

private fun insert(
    film: String,
    genre: String,
    leadStudio: String,
    worldwideGross: String,
    year: Int
) {
    moviesQueries.insert(film, genre, leadStudio, worldwideGross, year)
}

private fun insert(movies: Movies) {
    moviesQueries.insertObject(movies)
}
By printing or viewing our tables in a viewer, we can verify the following values:

UpdateNothing fancy here, just the usual Update query to enable us to update any existing fields in our database:
update:
UPDATE movies
SET `Worldwide Gross`=? WHERE Film=?;
It then builds the following in Kotlin:
private fun update(worldwideGross: String, film: String) {
    moviesQueries.update(worldwideGross, film)
}
DeleteContinuing with our queries, we can add the delete query:
delete:
DELETE FROM movies WHERE Film=?;
And then this builds in Kotlin:
private fun delete(film: String) {
    moviesQueries.delete(film)
}
SelectWe already saw the simple select query above while printing the table, so let’s take a look at the Select query with named and variable arguments.
To add named arguments to the Select query, we must add the following:
filmOrGenre:
SELECT * FROM movies
WHERE Film LIKE :searchQuery
OR Genre LIKE :searchQuery;
This then builds the following in Kotlin:
private fun searchFilmOrGenre(query: String): List<Movies> {
    return moviesQueries.filmOrGenre(searchQuery = query).executeAsList()
}
Here we can pass a set of values as arguments to enable the search functionality in our app:
filmByNames:
SELECT * FROM movies
WHERE Film IN ?;
Which then builds in Kotlin:
private fun searchFilmsByName(films: List<String>): List<Movies> {
    return moviesQueries.filmByNames(films).executeAsList()
}
Finally, in the main function, we can pass a list of films to search by:
searchFilmsByName(listOf("Penelope", "Valentine's Day", "Mamma Mia!"))
We also have the option of executing multiple statements under one transaction using the transaction function with an option to have callbacks or rollbacks.
This is helpful when we have many queries that must combine because running multiple queries separately causes memory overhead.
So, let’s insert multiple movies into a single function as follows:
val bunchOfMovies = listOf(
    Movies(
        Film = "Sunny",
        Genre = "",
        Lead_Studio = "Dreams N Beyond",
        Audience_score = null,
        Profitability = null,
        Rotten_Tomatoes = null,
        Worldwide_Gross = "",
        Year = 2021
    ),
    Movies(
        Film = "Kala",
        Genre = "Crime",
        Lead_Studio = "Juvis Productions",
        Audience_score = null,
        Profitability = null,
        Rotten_Tomatoes = null,
        Worldwide_Gross = "",
        Year = 2020
    ),
)

moviesQueries.transaction {
    bunchOfMovies.forEach { movie ->
        moviesQueries.insertObject(movie)
    }
}
Now, let’s say we need to cancel the whole transaction based on some condition at runtime; we have the option of rolling back using the rollback():
moviesQueries.transaction {
    bunchOfMovies.forEach { movie ->
        if (movie.Genre.isNullOrEmpty())
            rollback()
        moviesQueries.insertObject(movie)
    }
}
We also have the option to get callbacks for transaction completion or rollbacks in case any of our requirements are not met:
// Rollback
moviesQueries.transaction {
    afterCommit {
      println(
          "Transaction complete: ${bunchOfMovies.size} movies inserted"
      )
    }
    afterRollback { println("Rollback: No movies were inserted") }

    bunchOfMovies.forEach { movie ->
        if (movie.Genre.isNullOrEmpty())
            rollback()
        moviesQueries.insertObject(movie)
    }
}
And that’s it, we’ve covered the basics of using SQLDelight for typesafe Kotlin-esque database operations. From here, you can dive into some advanced operations like migrations, fast text search, custom adapters, and more.
The complete working application can be found in this Github Repo.
LogRocket is an Android monitoring solution that helps you reproduce issues instantly, prioritize bugs, and understand performance in your Android apps.
LogRocket's Galileo AI watches sessions for you, instantly identifying and explaining user struggles with automated monitoring of your entire product experience.
LogRocket also helps you increase conversion rates and product usage by showing you exactly how users are interacting with your app. LogRocket's product analytics features surface the reasons why users don't complete a particular flow or don't adopt a new feature.
Start proactively monitoring your Android apps — try LogRocket for free.
Install LogRocket via npm or script tag. LogRocket.init() must be called client-side, not
server-side
$ npm i --save logrocket

// Code:

import LogRocket from 'logrocket';
LogRocket.init('app/id');
// Add to your HTML:

<script src="https://cdn.lr-ingest.com/LogRocket.min.js"></script>
<script>window.LogRocket && window.LogRocket.init('app/id');</script>

When should you move API logic out of Next.js? Learn when Route Handlers stop scaling and how ElysiaJS helps.

Explore how Dokploy streamlines app deployment with Docker, automated builds, and simpler infrastructure compared to traditional CI/CD workflows.

A side-by-side look at Astro and Next.js for content-heavy sites, breaking down performance, JavaScript payload, and when each framework actually makes sense.

AI-generated tests can speed up React testing, but they also create hidden risks. Here’s what broke in a real app.re
Hey there, want to help make our blog better?
Join LogRocket’s Content Advisory Board. You’ll help inform the type of content we create and get access to exclusive meetups, social accreditation, and swag.
Sign up now

