Nowadays, it’s crucial for applications to get instant feedback when events occur. Many modern applications have surpassed the limitations of basic polling methods and require a continuous and immediate flow of data. For applications using GraphQL, the query and mutation operations don’t suffice for implementing this behavior.

Here, GraphQL subscriptions come in handy. GraphQL subscriptions allow clients to subscribe to events on the server and get real-time updates when the event occurs. In this tutorial, you’ll learn about GraphQL subscriptions and how to use them to build a real-time to-do app in Angular.
Jump ahead:
To follow along with this tutorial, you should have a basic knowledge of GraphQL, Angular, and Express. You can find the full code for the GraphQL server and to-do app on my GitHub.
The Replay is a weekly newsletter for dev and engineering leaders.
Delivered once a week, it's your curated guide to the most important conversations around frontend dev, emerging AI tools, and the state of modern software.
GraphQL subscriptions are long-lived operations that enable a continuous stream of data from the server to the client, providing real-time updates without the need for the client to repeatedly send new requests. This is facilitated using the publish-subscribe (pub/sub) model, where clients can subscribe to specific events and get notified when that event occurs.
The GraphQL spec did not specify the transport mechanism to be used for subscriptions but is commonly implemented over WebSockets. It can also be done over HTTP, using techniques like long polling, server-sent events, etc.
For the to-do app, we’ll create both an HTTP server and a WebSocket server. The Express server will handle queries and mutations, while the WebSocket server will handle subscriptions. This separation allows us to optimize each protocol for its specific purpose.
The GraphQL server will be able to perform the following operations on a predefined todo array:
getTodos: Get all to-dosaddTodo: Create a new to-doupdateTodo: Update an existing to-dodeleteTodo: Delete a to-dotodo: A subscription to notify clients when any of the mutations above occurFirst, let’s create a new Node.js project. Create a folder called node-graphql. Navigate to the folder in the terminal, then enter the following command:
npm init -y
Next, install the following dependencies:
graphql-http: Create a GraphQL over HTTP servergraphql-ws: Create a GraphQL over WebSockets serverws: Work with WebSockets in Nodegraphql-subscriptions: Create a pub/sub system, like Redis, for implementing subscriptions in GraphQL. It includes a PubSub class that will enable our server to publish events to a particular label and listen for events of a particular label. In production, it is recommended to use the pub/sub implementation of Redisgraphql: Build a GraphQL type schemacors: Enable cross-origin resource sharingexpress: Create an Express appEnter the following command in the terminal:
npm i ws graphql-http graphql-ws graphql-subscriptions graphql cors express
Let’s also install nodemon as a dev dependency, which will restart the Node.js server when a change is detected:
npm install nodemon --save-dev
Next, to configure nodemon for our project, open the package.json file and modify the scripts property to the following:
"scripts": {
    "test": "echo \"Error: no test specified\" && exit 1",
    "start": "nodemon index.js"
}
Create an index.js file and add the following code:
const express = require("express")
const { createHandler } = require('graphql-http/lib/use/express');
const { GraphQLSchema } = require("graphql")
const cors = require("cors");
const { WebSocketServer } =  require('ws');
const { useServer } =  require('graphql-ws/lib/use/ws');

// Create a express instance
const app = express()

// Create graphql schema object
const schema = new GraphQLSchema({});

// Enable Cross-Origin Resource Sharing (CORS)
app.use(cors())

// Serve all methods on /graphql
// where the GraphQL over HTTP express request handler is
app.all('/graphql', createHandler({ schema }));

// Start the http server
const server = app.listen(4000)

// Create a websocket server
const wsServer = new WebSocketServer({
  server,
  path: '/graphql',
});

// Start the websocket server
useServer({ schema }, wsServer);
In the code above, we create an HTTP and WebSocket server and start listening on port 4000. We can now start the server using the npm start command, and our GraphQL server will be accessible via htttp://localhost:4000/graphql on HTTP and ws://localhost:4000/graphql for WebSocket communication.
First, let’s create a todo array (where operations will be performed) and custom types, which will define the structure operations carried out in the query, mutation, and subscription.
Create a file named todoData.js in the root directory and add the following code:
const { GraphQLNonNull, GraphQLBoolean, GraphQLString, GraphQLInt, GraphQLObjectType, GRAPHQL_MAX_INT } = require("graphql")

const TodoType = new GraphQLObjectType({
  name: 'Todo',
  fields: () => ({
    id: { type: new GraphQLNonNull(GraphQLInt) },
    title: { type: new GraphQLNonNull(GraphQLString) },
    description: { type: new GraphQLNonNull(GraphQLString) },
    completed: {type: new GraphQLNonNull(GraphQLBoolean)}
  })
})

const TodoSubscriptionType = new GraphQLObjectType({
  name: 'Todo_Subscription',
  fields: () => ({
    mutation: {type: new GraphQLNonNull(GraphQLString)},
    data: {type: TodoType}
  })
})

const Todos = [
  {
    id: 1,
    title: 'LEARN MORE ABOUT ANGULAR',
    description: 'Lorem ipsum dolor sit amet, consectetur adipiscing elit, sed do eiusmod tempor incididunt ut labore et dolore magna aliqua.',
    completed: false
  },
  {
    id: 2,
    title: 'UNDERSTAND GRAPHQL SUBSCRIPTINGS',
    description: 'orem ipsum dolor sit amet, consectetur adipiscing elit, sed do eiusmod tempor incididunt ut labore et dolore magna aliqua.',
    completed: false
  },
]

module.exports = {TodoType, Todos, TodoSubscriptionType}
Next, create a types.js file in the root directory, where we’ll define all the schema operation types. Define the queries as follows:
const { TodoType, Todos } = require('./todoData');
const { GraphQLObjectType, GraphQLList } = require('graphql');

const RootQueryType = new GraphQLObjectType({
  name: 'Query',
  description: 'Root Query',
  fields: () => ({
    getTodos: {
      type: new GraphQLList(TodoType),
      resolve: () => Todos
    },
  })
})
We’ll define mutations with the code below. Add the following imports and create an instance of the PubSub class:
const {PubSub} = require('graphql-subscriptions');
const {GraphQLInt, GraphQLString, GraphQLBoolean} = require('graphql')
const pubsub = new PubSub();
Now, add the code below:
const RootMutationType = new GraphQLObjectType({
  name: 'Mutation',
  description: 'Root Mutation',
  fields: () => ({
    addTodo: {
      type: TodoType,
      args: {
        title: {
          type: new GraphQLNonNull(GraphQLString)
        },
        description: {
          type: new GraphQLNonNull(GraphQLString)
        },
      },
      resolve: (source, args) => {
        const maxId = Math.max(...Todos.map(todo => todo.id))
        const todo = {
          id: maxId !== -Infinity ? maxId + 1 : 2,
          title: args.title.toUpperCase(),
          description: args.description,
          completed: false,
        }
        Todos.unshift(todo)
        pubsub.publish('TODO', {
          todo: {
            mutation: 'CREATED',
            data: todo
          }
        })
        return todo
    }},
    updateTodo: {
      type: TodoType,
      args: {
        id: {
          type: new GraphQLNonNull(GraphQLInt)
        },
        title: {
          type: GraphQLString
        },
        description: {
          type: GraphQLString
        },
        completed: {
          type: GraphQLBoolean
        }
      },
      resolve: (source, args) => {
        const todoIndex = Todos.findIndex(todo => todo.id === args.id)
        if(todoIndex !== -1){
          const todo = Todos[todoIndex];
          const {id, ...others} = args
          const updatedTodo = {
            ...todo,
            ...others,
          };
          updatedTodo.title = updatedTodo.title.toUpperCase();
          Todos.splice(todoIndex, 1, updatedTodo);
          pubsub.publish('TODO', {
            todo: {
              mutation: 'UPDATED',
              data: updatedTodo
            }
          })
          return updatedTodo
        }
        return null
      }
    },
    deleteTodo: {
      type: TodoType,
      args: {
        id: {
          type: new GraphQLNonNull(GraphQLInt)
        },
      },
      resolve: (source, args) => {
        const todo = Todos.find(todo => todo.id === args.id)
        if(todo){
          Todos.splice(Todos.indexOf(todo), 1)
          pubsub.publish('TODO', {
            todo: {
              mutation: 'DELETED',
              data: todo
            }
          })
          return todo
        }
        return null
      }
    },
})})
One important thing to note in the code above is the pubsub.publish() method, which is used to publish a TODO event and send the payload associated with the event when a mutation occurs. This will update the active subscriptions. Let’s define subscriptions as follows:
const RootSubscriptionType = new GraphQLObjectType({
  name: 'Subscription',
  description: 'Root Subscription',
  fields: () => ({
    todo: {
      type: TodoSubscriptionType,
      subscribe: () => pubsub.asyncIterator(['TODO'])
    },
  }),
})
Every subscription subscribe function must return an AsyncIterator object, which listens for events and adds them to a queue for processing.
Now, export all the defined types by adding the following line of code at the bottom of the file:
module.exports = {RootQueryType, RootMutationType, RootSubscriptionType}
Finally, let’s provide the created operation types to the GraphQL schema. Head over to the index.js file and add the following imports:
const { RootQueryType, RootMutationType, RootSubscriptionType } = require("./types");
Now, modify the schema variable to the following:
const schema = new GraphQLSchema({
  query: RootQueryType,
  mutation: RootMutationType,
  subscription: RootSubscriptionType
});
With this, we’re done creating our GraphQL server that can handle subscription requests, along with queries and mutations.
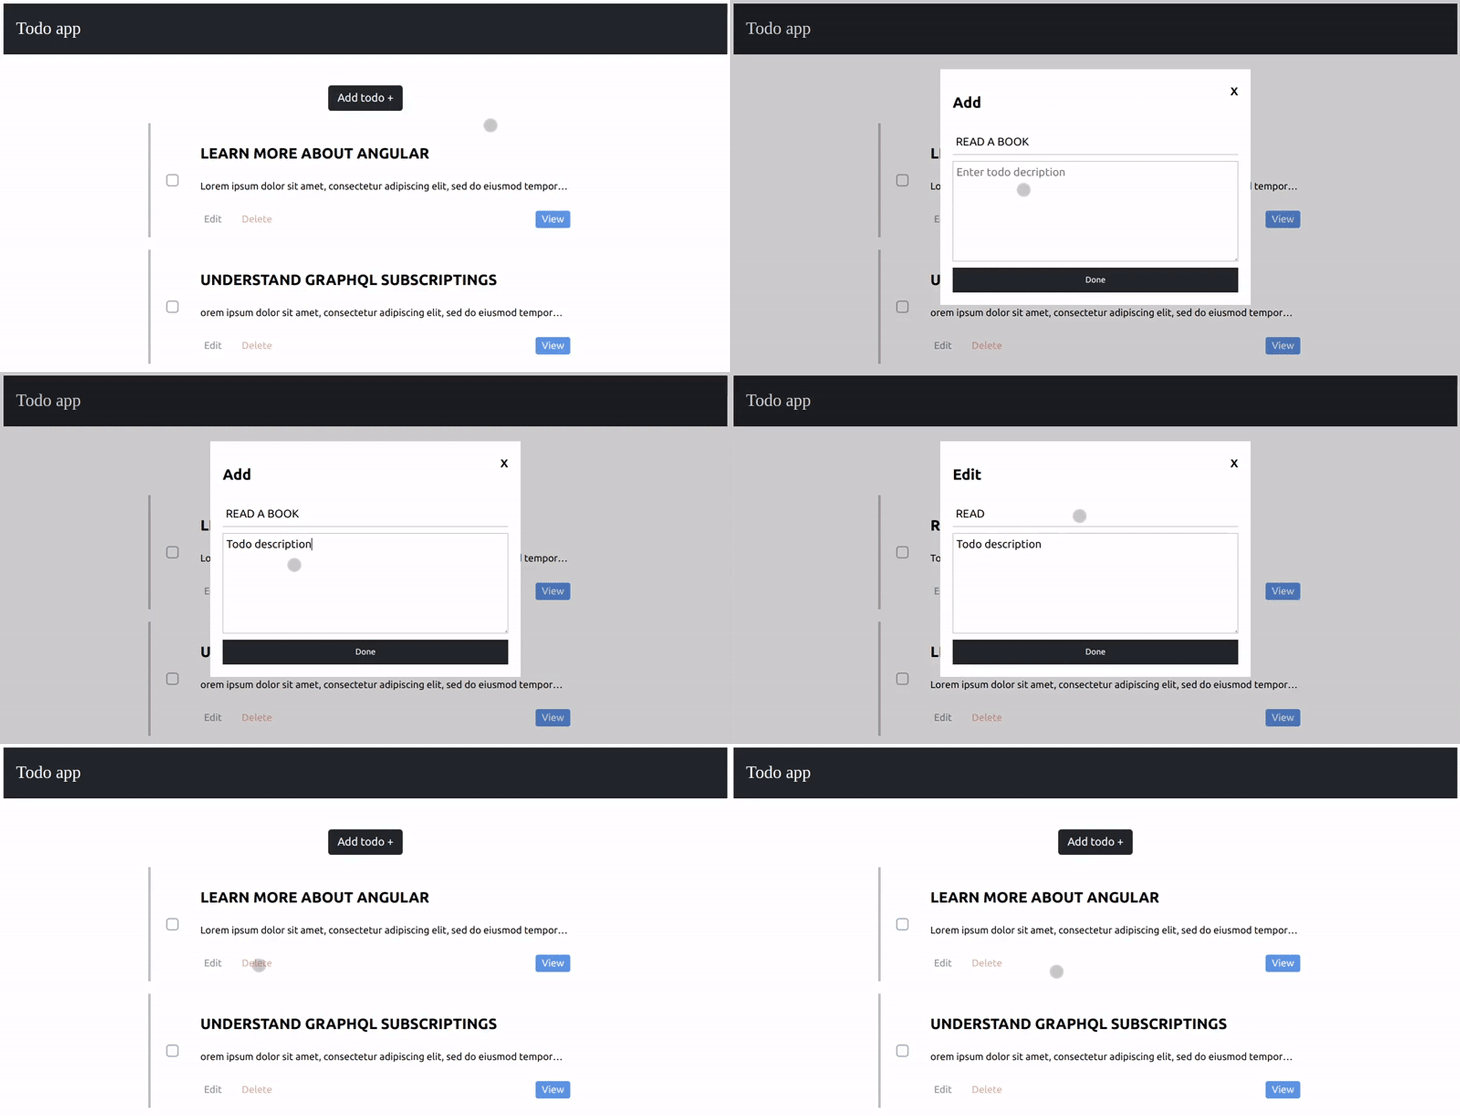
Now we’ll use Angular to build the to-do app that will perform the CRUD operations we implemented above. To integrate the server, we will be using Apollo Angular. The GIF below demonstrates the app we’ll build:

I’ve already created a to-do template that we’ll use for this tutorial. To clone it, enter the following command in your terminal:
git clone -b starter https://github.com/Tammibriggs/angular-graphql-todo-app.git
cd angular-graphql-todo-app
npm i
Now we can start our app with the npm start command, but before we do, install the following dependencies:
npm i @apollo/client apollo-angular graphql graphql-ws
Let’s import Apollo and provide its configuration settings. First, navigate to src/app/app.module.ts and add the following imports:
import { HttpClientModule } from '@angular/common/http';
import { APOLLO_OPTIONS, ApolloModule } from 'apollo-angular';
import { HttpLink } from 'apollo-angular/http';
import { InMemoryCache, split } from '@apollo/client/core';
import { getMainDefinition } from '@apollo/client/utilities';
import { GraphQLWsLink } from "@apollo/client/link/subscriptions";
import { createClient } from "graphql-ws";
Next, modify @NgModule to the following:
@NgModule({
  declarations: [
    AppComponent,
    ModalComponent,
    TodoComponent,
    TodoViewComponent,
    TodoEditComponent,
    TodoAddComponent,
  ],
  imports: [
    BrowserModule,
    FormsModule,
    ApolloModule,
    HttpClientModule
  ],
  providers: [
    {
      provide: APOLLO_OPTIONS,
      useFactory(httpLink: HttpLink) {
        // Create an http link:
        const http = httpLink.create({
          uri: 'http://localhost:4000/graphql',
        });

        // Create a WebSocket link:
        const ws = new GraphQLWsLink(
          createClient({
            url: "ws://localhost:4000/graphql",
          }),
        );

        // using the ability to split links, you can send data to each link
        // depending on what kind of operation is being sent
        const link = split(
          // split based on operation type
          ({ query }) => {
            const definition = getMainDefinition(query);
            return definition.kind === 'OperationDefinition' && definition.operation === 'subscription';
          },
          ws,
          http,
        )
        return {
          link,
          cache: new InMemoryCache()
        };
      },
      deps: [HttpLink],
    },
  ],
  bootstrap: [AppComponent]
})
In the code above, we have created two links: one for the HTTP GraphQL endpoint, and the other for the WebSocket endpoint. We provided them to the split function, which will enable us to send requests to each link depending on the operation being sent.
Let’s create a service where we will define all the operations and logic for our to-do app. Enter the following command in the terminal to create a to-do service in a services directory:
ng g s services/todo
Next, head over to src/app/services, add the following imports, then define the query, mutation, and subscription operations:
import { Apollo, gql } from 'apollo-angular'
import { Todo, TodoState } from 'src/types';

const GET_TODOS = gql`{
  getTodos {
    id
    title
    description
    completed
  }
}
`
const ADD_TODO = gql`
  mutation AddTodo($title: String!, $description: String!) {
    addTodo(title: $title, description: $description) {
      id
      title
      description
      completed
    }
  }
`
const UPDATE_TODO = gql`
  mutation UpdateTodo($id: Int!, $title: String, $description: String, $completed: Boolean) {
    updateTodo(id: $id, title: $title, description: $description, completed: $completed) {
      id
      title
      description
      completed
    }
  }
`
const DELETE_TODO = gql`
  mutation DeleteTodo($id: Int!) {
    deleteTodo(id: $id) {
      id
      title
      description
      completed
    }
  }
`
const TODO_SUBSCRIBE = gql`
  subscription {
    todo {
      mutation
      data {
        id
        title
        description
        completed
      }
  }
}`
Next, modify the TodoService class to the following:
export class TodoService {
  constructor(private apollo: Apollo) {}
  getTodos(){
    return this.apollo.query({
      query: GET_TODOS
    })
  }

  addTodo(title: string, description: string) {
    return this.apollo.mutate({
      mutation: ADD_TODO,
      variables: {
        title,
        description
      }
    })
  }

  updateTodo(id: number, title?: string, description?: string) {
    return this.apollo.mutate({
      mutation: UPDATE_TODO,
      variables: {
        id,
        title,
        description,
      }
    })
  }

  completeTodo(id: number, completed: boolean) {
    return this.apollo.mutate({
      mutation: UPDATE_TODO,
      variables: {
        id,
        completed
      }
    })
  }

  deleteTodo(id: number) {
    return this.apollo.mutate({
      mutation: DELETE_TODO,
      variables: {
        id
      }
    })
  }

  getTodoState() {
    return this.apollo.subscribe({
      query: TODO_SUBSCRIBE,
    })
  }

  updateTodosState(todos: Todo[], todoState: TodoState) {
    const newTodos = todos.map(todo => todo)
    let todoIndex = newTodos.findIndex(todo => todo.id === todoState.data.id)
    switch(todoState.mutation) {
      case 'CREATED':
        newTodos.unshift(todoState.data)
        return newTodos
      case 'UPDATED':
        newTodos[todoIndex] = todoState.data;
        return newTodos
      case 'DELETED':
        newTodos.splice(todoIndex, 1);
        return newTodos
    }
  }
}
In the code above, we have defined the function to fetch to-dos, manage them, subscribe to our server to listen for mutations, and update our app’s state based on the mutation that occurred using the returned subscription data.
Now, let’s implement the features. To fetch all to-dos, open src/app/app.component.ts and add the following imports:
import { TodoService } from './services/todo.service';
import { Todo } from 'src/types';
Next, we’ll define a todos property that will hold all to-dos after they are fetched and add a constructor to inject the to-do service:
todos: Todo[] = [];

constructor(private todoService: TodoService) {}
Now add the ngOnInit method, which will fetch all to-dos using the getTodos method in the to-do service:
ngOnInit(): void {
  this.todoService.getTodos().subscribe((result:any) => {
    this.todos = result.data.getTodos
  })
}
Finally, head over to app.component.html. Here, we’ll modify the div with a class name of todo-app__todos with the following code:
<div class='todo-app__todos'>
  <app-todo
    *ngFor="let todo of todos"
    [id]="todo.id"
    [title]="todo.title"
    [description]="todo.description"
    [completed]="todo.completed"
  ></app-todo>
</div>
With this, when the app loads, all to-dos from the server will be displayed. For adding a new to-do, first navigate to src/components/todo-add.component.ts and import the TodoService:
import { TodoService } from 'src/app/services/todo.service';
Next, inject the service by modifying the TodoAddComponent constructor with the following code:
constructor(private todoService: TodoService) { }
Now, add the following method:
addTodo(event: Event){
  event.preventDefault();
  this.todoService.addTodo(this.title, this.description).subscribe(() => this.onClose())
}
When called, the above method passes the title and description of the to-do item to the addTodo method defined in the TodoService, which added a new to-do.
Next, in the todo-add.component.html file, modify the form to call the addTodo method when it’s submitted by modifying the opening form tag <form> to the following:
<form class='todo-form' name='addTodo' (ngSubmit)="addTodo($event)">
With this, we can now add a new to-do by clicking the Add todo + button, filling out the form, and submitting it.
For editing to-dos, head over to src/components/todo-edit.component.ts and import the TodoService:
import { TodoService } from 'src/app/services/todo.service';
Next, inject the service by modifying the TodoEditComponent constructor to the following:
constructor(private todoService: TodoService) { }
Now add the following method:
editTodo(event: Event){
  event.preventDefault();
  this.todoService.updateTodo(this.id, this.title, this.description).subscribe(() => this.onClose())
}
Next, head over to the component’s template todo-edit.component.html, and modify the form to call the editTodo method when it’s submitted by modifying the opening form tag <form> to the following:
<form class='todo-form' name='addTodo' (ngSubmit)="editTodo($event)">
We’ll do the same for the todo-add.component.html file. Modify the form to call the addTodo method when it’s submitted by modifying the opening form tag <form> to the following:
<form class='todo-form' name='addTodo' (ngSubmit)="addTodo($event)">
For completing and deleting a to-do, open src/components/todo.component.ts and import the TodoService:
import { TodoService } from 'src/app/services/todo.service';
Next, inject the service by modifying the TodoComponent constructor to the following:
constructor(private todoService: TodoService) { }
Now we’ll add the following methods:
deleteTodo() {
  this.todoService.deleteTodo(this.id).subscribe()
}
completeTodo() {
  this.todoService.completeTodo(this.id, !this.checked).subscribe()
}
Next, head over to the component template to call the above when the checkbox and Delete button are clicked. Modify the label tag with a class name of checkbox-custom-label to the following:
<label
htmlFor="checkbox-{{id}}"
[class.checked]="checked"
class="checkbox-custom-label"
(click)="completeTodo()" ></label>
Modify the button tag with a class name of todo__deleteButton to the following:
<button class='todo__deleteButton' (click)="deleteTodo()">Delete</button>
With this, we can now complete and delete a to-do.
Finally, to modify the displayed to-dos based on the returned data from the subscription, head over to src/app/app.component.ts and add the following lines of code in the ngOnInit method:
this.todoService.subscribeToTodo().subscribe((result: any) => {
  if(result.data.todo) {
    const newTodos = this.todoService.updateTodosState(this.todos, result.data.todo)
    this.todos = newTodos
  }
})
In the above code, we have called the subscribeToTodo method to subscribe the client to the server. When a mutation and the data are returned, the updateTodosState method is called, which modifies the displayed to-dos to reflect the type of mutation operation carried out.
With this, we are done building a real-time to-do app using GraphQL subscriptions.
GraphQL subscriptions enable real-time communication between client and server, which can help in creating a better experience for users. Although it provides real-time updates, in some cases it is not needed; instead, you can re-execute queries on demand when a mutation occurs.
If you’ve made it this far, you can probably tell subscriptions are also a bit complex to implement. So depending on your use case, you might want to work with simple queries rather than subscriptions.
Debugging Angular applications can be difficult, especially when users experience issues that are difficult to reproduce. If you’re interested in monitoring and tracking Angular state and actions for all of your users in production, try LogRocket.

LogRocket lets you replay user sessions, eliminating guesswork by showing exactly what users experienced. It captures console logs, errors, network requests, and pixel-perfect DOM recordings—compatible with all frameworks.
With Galileo AI, you can instantly identify and explain user struggles with automated monitoring of your entire product experience.
The LogRocket NgRx plugin logs Angular state and actions to the LogRocket console, giving you context around what led to an error, and what state the application was in when an issue occurred.
Modernize how you debug your Angular apps — start monitoring for free.

Compare the top AI development tools and models of February 2026. View updated rankings, feature breakdowns, and find the best fit for you.

Broken npm packages often fail due to small packaging mistakes. This guide shows how to use Publint to validate exports, entry points, and module formats before publishing.

Discover what’s new in The Replay, LogRocket’s newsletter for dev and engineering leaders, in the February 11th issue.

Cut React LCP from 28s to ~1s with a four-phase framework covering bundle analysis, React optimizations, SSR, and asset/image tuning.
Hey there, want to help make our blog better?
Join LogRocket’s Content Advisory Board. You’ll help inform the type of content we create and get access to exclusive meetups, social accreditation, and swag.
Sign up now
One Reply to "Integrating GraphQL subscriptions in an Angular app"
that’s great!!!