
React offers us flexibility in how we choose to address problems (such as state, network, and style management) within our apps. A great codebase has problem spots identified and addressed with a reproducible pattern that is standard and consistent.

And, as frontend engineers, it’s crucial to properly relay information about changes in network state to the user, as most apps we build need to interact with one or more servers. We can accomplish these goals by using custom React Hooks.
In this article, I’ll cover the various states that network requests exist in and show you how to keep request management within custom Hooks. I’ll also walk you through building a small app that employs these Hooks.
The Replay is a weekly newsletter for dev and engineering leaders.
Delivered once a week, it's your curated guide to the most important conversations around frontend dev, emerging AI tools, and the state of modern software.
A network request typically exists in these states:
idleloading/processing/in-flightsuccesserrorThe idle network request state is the default (and ending) phase for a network request. During the loading phase, the client waits for acknowledgment and packets from the server, then transitions into either the success or error state.
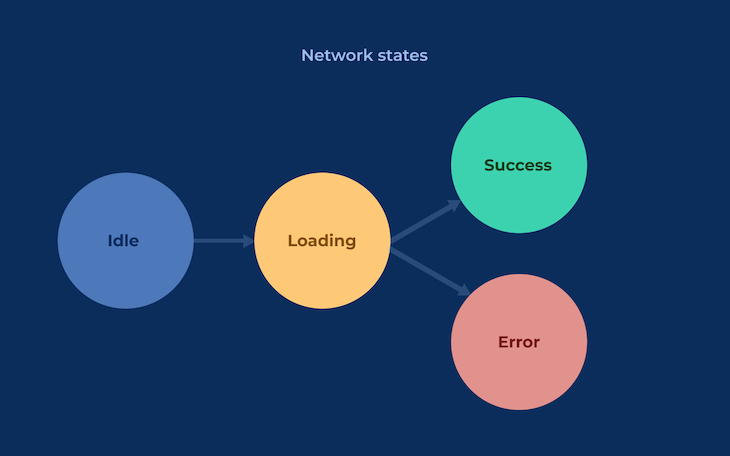
To keep network requests testable and decoupled from business logic, it’s best to manage requests with custom Hooks. This keeps your code lean and makes it easy to perform special one-off operations like data transformations on network responses.
For example, a request to fetch a list of blog posts can be kept in a usePostsQuery custom Hook, just like the one below:
import { useState, useEffect } from 'react'

const api = {
  GET: async (url) => {
    const response = await fetch(url);
    const data = await response.json();
    return data;
  }
}

export default function usePostsQuery() {
  const [error, setError] = useState()
  const [status, setStatus] = useState('idle')
  const [data, setData] =useState()

  const startFetch = async () => {
    try {
      let data = await api.GET('/posts')

      setError()
      setStatus('success')
      setData(data)
    } catch (error) {
      setError(error)
      setStatus('error')
    }
  }

  useEffect(() => {
    startFetch()
  }, []);

  return {
    data,
    error,
    isSuccess: status === 'success',
    isError: status === 'error'
    refetch: startFetch
  }
}
This Hook can be made even more concise by leveraging React Query (my preferred tool):
import { useQuery } from "react-query";

export default function usePostsQuery() {
  return useQuery("posts", () =>
    api.GET("/posts")
  );
}
Let’s build a small app called Betflix, which you can both visit and clone. This app will allow friends to choose sports teams from a set of fixtures and make predictions.
Note: For the sake of brevity, I’ll skip explaining the more mundane components used in this proof-of-concept. You are welcome to explore the entire code for this.
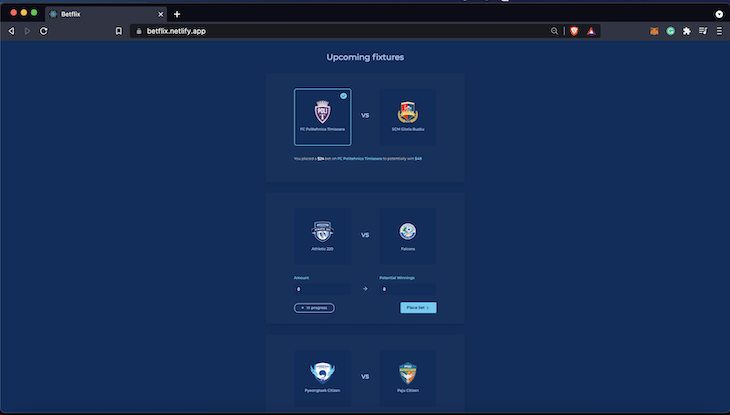
First of all, we’ll create a new React project and start the development server:
npx create-react-app betflix
cd betflix
npm start
We need to install dependencies for HTTP requests, a serverless function proxying, and a managed database (to keep fixtures and other records).
npm install react-query react-toast-notifications http-proxy-middleware @supabase/supabase-js --save
I’ll also include Netlify Lambda and CLI as development dependencies.
npm install netlify-lambda netlify -D
By the time we are done, you should have a directory structure like the one below.
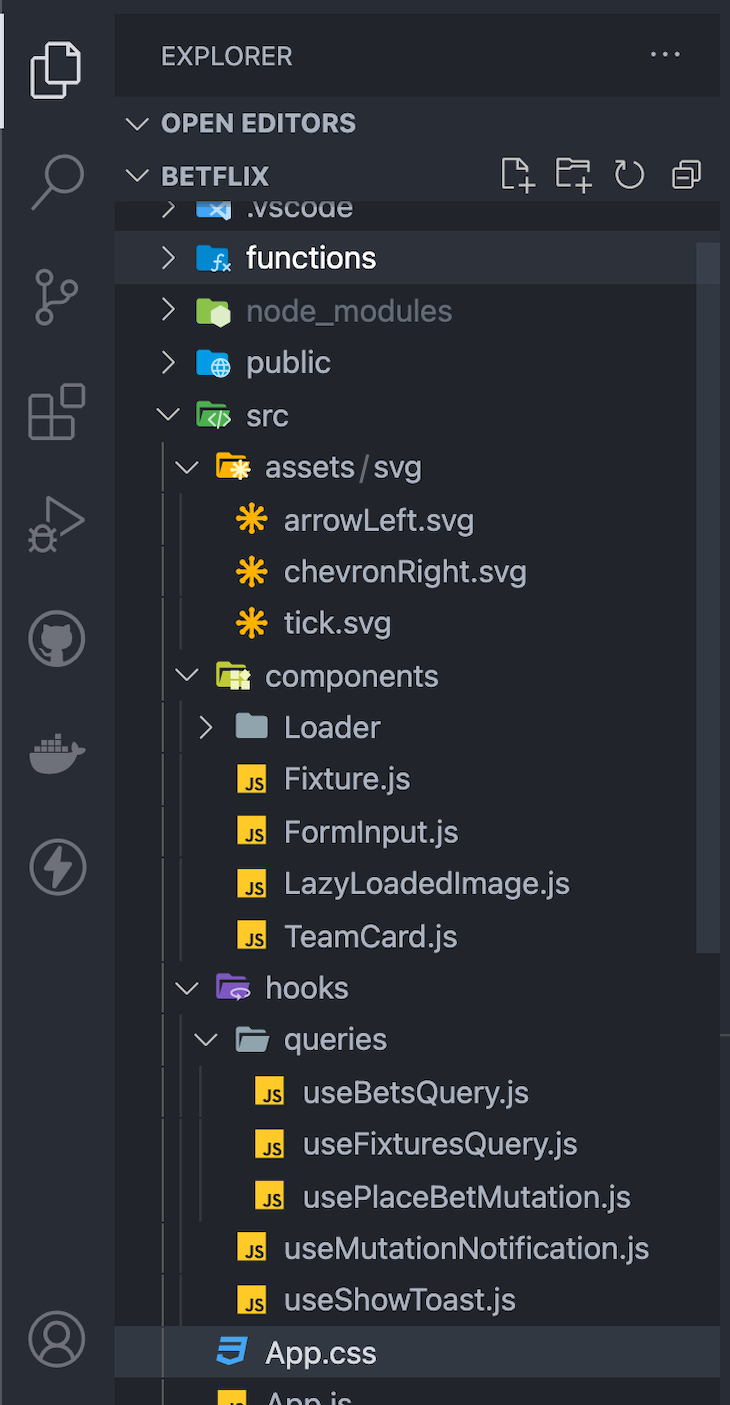
We’ll update the <App /> component to display a list of fixtures fetched from the serverless backend. We’ll be creating and handling requests for a list of bets and a list of fixtures in a sequential fashion.
import "./App.css";

import Fixture from "./components/Fixture";
import Loader from "./components/Loader";

import useBetsQuery from "./hooks/queries/useBetsQuery";
import useFixturesQuery from "./hooks/queries/useFixturesQuery";

function App() {
  const { data, isLoading, isError } = useFixturesQuery();
  const {
    data: bets,
    isLoading: betsLoading,
    isError: betsErrored,
  } = useBetsQuery();

  if (isLoading || betsLoading) return <Loader />;
  if (isError || betsErrored)
    return <p>We encountered an error fetching data</p>;

  const sortFixtures = (fixtureA, fixtureB) => {
    return (
      bets.hasOwnProperty(fixtureB.fixture.id) -
        bets.hasOwnProperty(fixtureA.fixture.id) ||
      fixtureB.fixture.status.elapsed - fixtureA.fixture.status.elapsed
    );
  };

  return (
    <div className="App">
      <header className="App-header">
        <h1 className="App-header__title">Upcoming fixtures</h1>
      </header>
      <section className="Fixtures">
        {data.results.response.length ? (
          <>
            {data.results.response
              .sort(sortFixtures)
              .map(({ fixture, teams: { away, home } }) => (
                <Fixture
                  key={fixture.id}
                  fixture={fixture}
                  away={away}
                  home={home}
                  isBetPlaced={bets.hasOwnProperty(fixture.id)}
                  defaultSelectedTeam={bets[fixture.id].choice}
                  defaultAmount={bets[fixture.id].amount}
                />
              ))}
          </>
        ) : (
          <div>No fixtures at the moment</div>
        )}
      </section>
    </div>
  );
}

export default App;
From the code above, we have declared dependencies on useBetsQuery and useFixturesQuery, so we’ll now define them.
useBetsQuery is a custom Hook used to fetch and transform a list of bets into a map of keyed objects that we can use to track the bet status of a fixture.
Let’s create useBetsQuery.js in /src/hooks/queries and update it:
import { useQuery } from "react-query";

const ENDPOINT = "/.netlify/functions/fetchBets";

// Normalize the bets payload into a keyed map with `fixture_id` as the key
function normalizeBets(betsList) {
  return betsList.reduce(
    (acc, curr) => ({
      ...acc,
      [curr.fixture_id]: curr,
    }),
    {}
  );
}

// Because we'll use the fetch API (instead of Axios), we need to explicitly return a
// Promise when an error occurs so React Query can change the status.
const getBets = async (url) => {
  const response = await fetch(url);
  const data = await response.json();
  if (response.ok) {
    return normalizeBets(data.results);
  }
  return Promise.reject(new Error(data.message));
};

export default function useBetsQuery() {
  return useQuery("bets", () => getBets(ENDPOINT));
}
With that done, we also need to create the custom Hook where we’ll be fetching. Create the useFixturesQuery.js hook in src/hooks/queries and add the code below:
import { useQuery } from "react-query";

const getFixtures = async (url) => {
  const response = await fetch(url);
  const data = await response.json();
  return data;
};

export default function useFixturesQuery() {
  return useQuery("fixtures", () =>
    getFixtures("/.netlify/functions/fetchFixtures")
  );
}
We’re now ready to define the component that will display information about the individual fixture.
<Fixture /> componentWe’ll create the <Fixture/> component in src/components/Fixture.js and display information about the home and away teams. We also introduce two new React Hooks, the useMutationNotification and usePlaceBetMutation Hooks.
useMutationNotification is an interesting custom Hook that allows us to handle network state changes in a predictable ergonomic manner so we can provide feedback on user-initiated actions straight away.
import { useEffect, useState } from "react";
import { useToasts } from "react-toast-notifications";
import { ReactComponent as ArrowLeft } from "../assets/svg/arrowLeft.svg";
import { ReactComponent as ChevronRight } from "../assets/svg/chevronRight.svg";
import TeamCard from "./TeamCard";
import FormInput from "./FormInput";
import useMutationNotification from "../hooks/useMutationNotification";
import usePlaceBetMutation from "../hooks/queries/usePlaceBetMutation";
import Loader from "./Loader";

function Fixture({
  fixture,
  away,
  home,
  isBetPlaced,
  defaultAmount,
  defaultSelectedTeam,
}) {
  const [amount, setAmount] = useState(defaultAmount || 0);
  const [selectedTeam, setSelectedTeam] = useState(defaultSelectedTeam);
  const [betPlaced, setBetPlaced] = useState(isBetPlaced);
  const { addToast } = useToasts();
  const [doPlaceBetRequest, placeBetState] = usePlaceBetMutation();

  useMutationNotification({
    ...placeBetState,
    useServerMessage: false,
    entity: "bet",
    actionType: "place",
  });
  useEffect(() => {
    if (placeBetState.isSuccess) setBetPlaced(true);
  }, [placeBetState.isSuccess]);
  const teams = {
    away,
    home,
  };

  const status = !fixture.status.elapsed ? "Up next" : "In progress";

  const doAmountUpdate = (e) => setAmount(e.target.value);
  const doTeamUpdate = (team) => {
    if (betPlaced) return;
    setSelectedTeam(team);
  };
  const doPlaceBet = () => {
    if (!selectedTeam || amount <= 0) {
      addToast("Please select a team and add an amount", {
        appearance: "info",
        autoDismiss: true,
      });
      return;
    }
    doPlaceBetRequest({
      amount,
      choice: selectedTeam,
      fixture_id: fixture.id,
    });
  };

  return (
    <div className="Fixture">
      <section className="Fixture__teams">
        <TeamCard
          name={home.name}
          logo={home.logo}
          id={home.id}
          type={"home"}
          selected={selectedTeam === "home"}
          onTeamChange={doTeamUpdate}
        />
        <div className="Fixture__separator">vs</div>
        <TeamCard
          name={away.name}
          logo={away.logo}
          id={away.id}
          type={"away"}
          selected={selectedTeam === "away"}
          onTeamChange={doTeamUpdate}
        />
      </section>

      {!betPlaced ? (
        <>
          <section className="Fixture__controls">
            <div className="Fixture__control">
              <FormInput
                label={"Amount"}
                name={`amount-${fixture.id}`}
                type="number"
                value={amount}
                onChange={doAmountUpdate}
              />
            </div>
            <div className="Fixture__controls__separator">
              <ArrowLeft />
            </div>
            <div className="Fixture__control">
              <FormInput
                label={"Potential Winnings"}
                name={`potential-winnings-${fixture.id}`}
                value={amount * 2 || 0}
                disabled
              />
            </div>
          </section>
          <section className="Fixture__footer">
            <div className="Fixture__status">
              <span className="Fixture__status__dot"></span>
              {status}
            </div>
            {!placeBetState.isLoading ? (
              <button className="Button" onClick={doPlaceBet}>
                Place bet <ChevronRight />
              </button>
            ) : (
              <Loader />
            )}
          </section>
        </>
      ) : (
        <section className="Fixture__controls">
          <p>
            You placed a <b>${amount}</b> bet on{" "}
            <b className="u-text-primary">{teams[selectedTeam]?.name}</b> to
            potentially win <b className="u-text-primary">${amount * 2}</b>
          </p>
        </section>
      )}
    </div>
  );
}

Fixture.defaultProps = {
  isBetPlaced: false,
};

export default Fixture;
In the code above, we declared dependencies on a few Hooks.
useMutationNotification will accept the network request status options (isError and isSuccess) and will allow us to either show the error message from the server (if we set useServerMessage to true) or pass entity and actionType strings in to provide a generic message to the user.
Let’s create useMutationNotification.js in src/hooks and update it with the code below:
import { useEffect, useState } from "react";
import useShowToast from "./useShowToast";

function capFirst(string) {
  return string.charAt(0).toUpperCase() + string.slice(1);
}

function useMutationNotification({
  isError,
  isSuccess,
  actionType = "create",
  entity,
  data,
  error,
  useServerMessage = true,
}) {
  const [notificationConfig, setNotificationConfig] = useState(null);
  const showToast = useShowToast();

  useEffect(() => {
    if (isError) {
      setNotificationConfig({
        type: "error",
        message: useServerMessage
          ? error.message
          : `${entity} could not be ${actionType}d`,
      });
    }
  }, [
    useServerMessage,
    isError,
    setNotificationConfig,
    entity,
    actionType,
    error,
  ]);

  useEffect(() => {
    if (isSuccess) {
      setNotificationConfig({
        type: "success",
        message: useServerMessage
          ? data.message
          : `${entity} successfully ${actionType}d`,
      });
    }
  }, [
    useServerMessage,
    isSuccess,
    setNotificationConfig,
    entity,
    actionType,
    data,
  ]);

  useEffect(() => {
    if (notificationConfig) {
      const { type, message } = notificationConfig;
      showToast({ type, message: capFirst(message) });
    }
  }, [notificationConfig, showToast]);
}

export default useMutationNotification;
We’ll then define the usePlaceBet mutation we intend to use in placing the bet. We’ll return the mutation action and its state. Create usePlaceBetMutation in src/hooks/queries and update it to the following code:
import { useMutation } from "react-query";

const ENDPOINT = "/.netlify/functions/placeBet";

export default function usePlaceBetMutation() {
  const request = async (payload) => {
    const res = await fetch(ENDPOINT, {
      method: "POST",
      body: JSON.stringify(payload),
    });
    const data = await res.json();
    if (!res.ok) return Promise.reject(new Error(data.message));
    return data;
  };
  const { mutate, ...mutationState } = useMutation(request);
  return [mutate, mutationState];
}
With these updates made, we can now handle network state changes for mutations in simple, easy-to-read fashion.
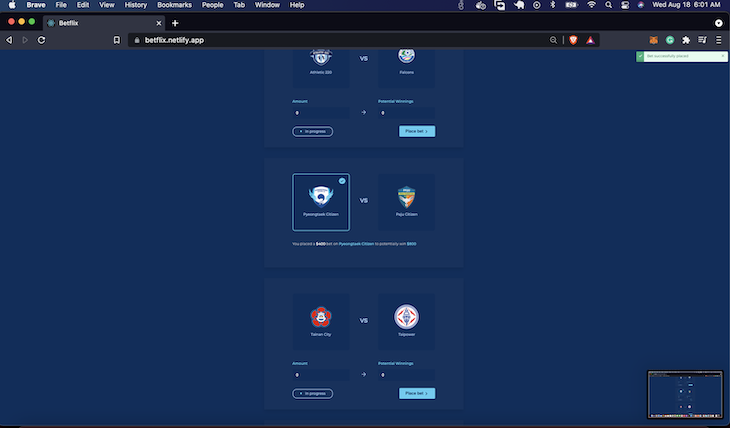
Reacting to network state changes can be challenging, but it’s also a massive opportunity to provide users with a much more meaningful experience.
You can check out the React Query documentation to learn more about enhancing the network state experience for your users when building React applications. You can find the full source code for this demo proof-of-concept on GitHub.
Install LogRocket via npm or script tag. LogRocket.init() must be called client-side, not
server-side
$ npm i --save logrocket

// Code:

import LogRocket from 'logrocket';
LogRocket.init('app/id');
// Add to your HTML:

<script src="https://cdn.lr-ingest.com/LogRocket.min.js"></script>
<script>window.LogRocket && window.LogRocket.init('app/id');</script>

React Server Components and the Next.js App Router enable streaming and smaller client bundles, but only when used correctly. This article explores six common mistakes that block streaming, bloat hydration, and create stale UI in production.

Gil Fink (SparXis CEO) joins PodRocket to break down today’s most common web rendering patterns: SSR, CSR, static rednering, and islands/resumability.

@container scroll-state: Replace JS scroll listeners nowCSS @container scroll-state lets you build sticky headers, snapping carousels, and scroll indicators without JavaScript. Here’s how to replace scroll listeners with clean, declarative state queries.

Explore 10 Web APIs that replace common JavaScript libraries and reduce npm dependencies, bundle size, and performance overhead.
Would you be interested in joining LogRocket's developer community?
Join LogRocket’s Content Advisory Board. You’ll help inform the type of content we create and get access to exclusive meetups, social accreditation, and swag.
Sign up now