Tags are frequently used in apps and websites to filter and display data. For example, you might select a Direct tag in a travel app to avoid showing flights with one or more stops or layovers. Or, in an expense app, you could use tags to better understand how much you spent on Netflix over the past couple of years. Or, in a job portal, you could filter on a particular language tag to only display job listings specifically requiring experience with a certain language such as Swift, JavaScript, Rust, or Dart.

There are many use cases in which tags may be useful for your iOS apps. This guide demonstrates how to create a simple view for working with tags in SwiftUI. We’ll illustrate a practical use case for tags using SwiftUI by creating a tag view in a quotation viewer app. The tags will be fetched from an API, and users will be able to add custom tags. We’ll create the logic for the app to ignore duplicate tags and reject tags that do not follow a particular format.
So, let’s get started adding some tags!
Jump ahead:
The Replay is a weekly newsletter for dev and engineering leaders.
Delivered once a week, it's your curated guide to the most important conversations around frontend dev, emerging AI tools, and the state of modern software.
A tag is used to distinguish between different types or categories. For example, different genres of movies or the various categories of apps in the App Store. Tags help the user filter a collection of content using predetermined criteria.
For example, you could add different tags to quotations so that similar quotes are categorized or grouped by a particular topic (or tag), such as philosophy, motivation, etc.
Each tag should be uniquely identified by itself, as it serves the purpose of separating content into different unique containers of data. Therefore, you’ll need to ensure that there are no duplicate tags, as this might confuse the user. For example, “Happiness” and “happiness” should be put under a single category.
Also, if the user has the power to add their own tags, you may want to implement conditions to accept a particular format and reject the rest. You may want to limit tags to the alphabet only, reject any that include numbers or special characters, or set some criteria around capitalization.
Now, let’s get started on our project.
There are many tag view libraries created using SwiftUI on GitHub that you can take advantage of, instead of creating one from scratch. You can use these open source libraries to create a simple view for working with tags in SwiftUI. Of the many tag view libraries available, here are three that you could consider using in your project:
In this article, rather than use the third-party library, we will demonstrate how to create a tag view in SwiftUI from scratch. By creating your own custom tag view, you’ll be able to modify it according to your needs, adding powerful customization as your project grows.
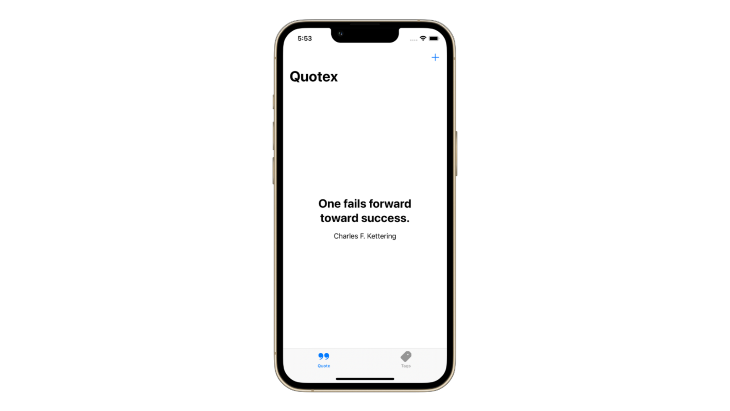
To start implementing tags using SwiftUI, we’ll work on a sample project called Quotex, containing a collection of quotes categorized by tags. This project uses Quotable, a free, open source quotations API. You can find the sample project here.
The sample app already has some basic screens set up that fetch and display random quotes:
We’ll add functionality to list the tags and create a view for users to create their own tags.
Let’s create a custom view to wrap the sample tags used in this article into multiple rows. This will prevent tags from flowing on the screen. The solution provided below was inspired by this question on StackOverflow: SwiftUI HStack with wrap and dynamic height.
We’ll start with a custom view containing data that conforms to the RandomAccessCollection protocol where each element conforms to the Identifiable and Hashable protocol. It also has a RowContent view conforming to the View protocol, representing a single tag in the collection of tags:
struct FlowLayout<Data, RowContent>: View where Data: RandomAccessCollection, RowContent: View, Data.Element: Identifiable, Data.Element: Hashable {
  @State private var height: CGFloat = .zero

  private var data: Data
  private var spacing: CGFloat
  private var rowContent: (Data.Element) -> RowContent

  public init(_ data: Data, spacing: CGFloat = 4, @ViewBuilder rowContent: @escaping (Data.Element) -> RowContent) {
    self.data = data
    self.spacing = spacing
    self.rowContent = rowContent
  }

  // implementation
}
Then, we’ll add a formula to calculate the size and width of each tag so that those with longer titles will automatically wrap to the next line:
private func content(in geometry: GeometryProxy) -> some View {
  var bounds = CGSize.zero

  return ZStack {
    ForEach(data) { item in
      rowContent(item)
        .padding(.all, spacing)
        .alignmentGuide(VerticalAlignment.center) { dimension in
          let result = bounds.height

          if let firstItem = data.first, item == firstItem {
            bounds.height = 0
          }
          return result
        }
        .alignmentGuide(HorizontalAlignment.center) { dimension in
          if abs(bounds.width - dimension.width) > geometry.size.width {
            bounds.width = 0
            bounds.height -= dimension.height
          }

          let result = bounds.width

          if let firstItem = data.first, item == firstItem {
            bounds.width = 0
          } else {
            bounds.width -= dimension.width
          }
          return result
        }
    }
  }
}
To ensure that the maximum height does not exceed the view, we’ll calculate the height using the frame locally:
var body: some View {
  GeometryReader { geometry in
    content(in: geometry)
      .background(viewHeight(for: $height))
  }
  .frame(height: height)
}

private func viewHeight(for binding: Binding<CGFloat>) -> some View {
  GeometryReader { geometry -> Color in
    let rect = geometry.frame(in: .local)

    DispatchQueue.main.async {
      binding.wrappedValue = rect.size.height
    }
    return .clear
  }
}
The final implementation will look like this:
import SwiftUI

struct FlowLayout<Data, RowContent>: View where Data: RandomAccessCollection, RowContent: View, Data.Element: Identifiable, Data.Element: Hashable {
  @State private var height: CGFloat = .zero

  private var data: Data
  private var spacing: CGFloat
  private var rowContent: (Data.Element) -> RowContent

  public init(_ data: Data, spacing: CGFloat = 4, @ViewBuilder rowContent: @escaping (Data.Element) -> RowContent) {
    self.data = data
    self.spacing = spacing
    self.rowContent = rowContent
  }

  var body: some View {
    GeometryReader { geometry in
      content(in: geometry)
        .background(viewHeight(for: $height))
    }
    .frame(height: height)
  }

  private func content(in geometry: GeometryProxy) -> some View {
    var bounds = CGSize.zero

    return ZStack {
      ForEach(data) { item in
        rowContent(item)
          .padding(.all, spacing)
          .alignmentGuide(VerticalAlignment.center) { dimension in
            let result = bounds.height

            if let firstItem = data.first, item == firstItem {
              bounds.height = 0
            }
            return result
          }
          .alignmentGuide(HorizontalAlignment.center) { dimension in
            if abs(bounds.width - dimension.width) > geometry.size.width {
              bounds.width = 0
              bounds.height -= dimension.height
            }

            let result = bounds.width

            if let firstItem = data.first, item == firstItem {
              bounds.width = 0
            } else {
              bounds.width -= dimension.width
            }
            return result
          }
      }
    }
  }

  private func viewHeight(for binding: Binding<CGFloat>) -> some View {
    GeometryReader { geometry -> Color in
      let rect = geometry.frame(in: .local)

      DispatchQueue.main.async {
        binding.wrappedValue = rect.size.height
      }
      return .clear
    }
  }
}
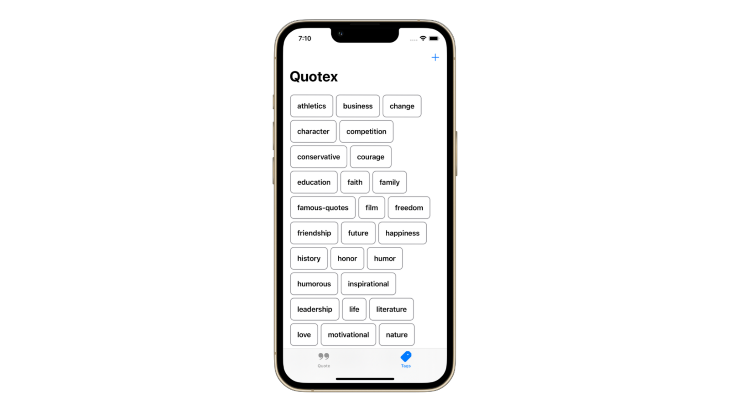
We’ll use FlowLayout in the Quotex app in the tag view by providing it with the collection of tags, like so:
ScrollView {
  FlowLayout(viewModel.tags) { tag in
    Button(action: {
      viewModel.selectTag(for: tag)
    }, label: {
      Text(tag.name)
        .bold()
        .foregroundColor(.black)
        .padding()
        .overlay(RoundedRectangle(cornerRadius: 8).stroke(.gray, lineWidth: 1.5))
    })
  }
  .padding()
}
Running the FlowLayout in the Quotex app, creates a perfect tag view that you can directly use in your app!

Since users may try to create tags with similar characters, like “Sad” or “SaD”, we’ll need to implement the logic to avoid duplication, irrespective of the character’s case. For example, we could add a condition that the tag must begin with a capital letter, followed by lowercase letters. However, it provides a better experience to let the user specify the tag and capitalize the first letter later.
A simple way to solve the duplication problem is to use Set so that the duplicate tag is automatically removed. Additionally, we could set all characters to lowercase and then check for duplication.
You may not want users to create tags with alternate characters. For example, “L$v€” instead of “Love” or “GR8ness” instead of “Greatness”. To avoid unwanted characters, we can put conditions in place to disallow tags that meet certain conditions and show an error alert and trigger error haptic feedback.
The best way to work with conditions is to use regex expressions. Consider this condition that only accepts alphabetical characters and spaces:
.*[^A-Za-z ].*
Here’s the method to validate the tag name and throw an error if the condition is not met:
enum ValidationError: Error {
  case containsNumbersOrSpecialCharacters(String)
}

public func validateTag(for name: String) throws {
  let range = NSRange(location: 0, length: name.utf16.count)
  let regex = try NSRegularExpression(pattern: ".*[^A-Za-z ].*")

  let match = regex.firstMatch(in: name, options: [], range: range)

  if match != nil {
    // Condition not met for the tag. Show an error.\
    let errorMessage = "\(name) contains numbers or special characters. Use only alphabets for the name of the tag."
    throw ValidationError.containsNumbersOrSpecialCharacters(errorMessage)
  }
}
You can also use the latest RegexBuilder introduced in iOS 16+ to add logic for rejecting tags that do not follow a particular format.
Here is what this looks like in action in the Quotex app when a user tries to create a tag with the name “GR8ness” instead of “Greatness”:

Now that you have an understanding of how to create conditions for tags, you’re ready to add different tag conditions in your tag views!
Layout protocolDuring WWDC 2022, the SwiftUI team introduced a new protocol, Layout, that defines the geometry of a collection of views.
For more complex layout behavior, like creating tag views that automatically wrap to the next row, you define a custom layout container. This structure should conform to the Layout protocol and implement its required methods:
sizeThatFits(proposal:subviews:cache:) reports the size of the composite layout viewplaceSubviews(in:proposal:subviews:cache:) assigns positions to the container’s subviewsFor example, a basic layout type looks like this:
struct BasicHStack: Layout {
  func sizeThatFits(
    proposal: ProposedViewSize,
    subviews: Subviews,
    cache: inout ()
  ) -> CGSize {
    // Calculate and return the size of the layout container.
  }

  func placeSubviews(
    in bounds: CGRect,
    proposal: ProposedViewSize,
    subviews: Subviews,
    cache: inout ()
  ) {
    // Tell each subview where to appear.
  }
}
You use this new view by providing a ViewBuilder and the subviews within it:
BasicHStack {
  Text("A Subview")
  Text("Another Subview")
}
Apple released a sample app, called the FoodTruck app, that has a FlowLayout that may be directly used to implement tags and tags view using SwiftUI:
import SwiftUI

@available(iOS 16.0, *)
struct NewFlowLayout: Layout {
  var alignment: Alignment = .center
  var spacing: CGFloat?

  func sizeThatFits(proposal: ProposedViewSize, subviews: Subviews, cache: inout Void) -> CGSize {
    let result = FlowResult(
      in: proposal.replacingUnspecifiedDimensions().width,
      subviews: subviews,
      alignment: alignment,
      spacing: spacing
    )
    return result.bounds
  }

  func placeSubviews(in bounds: CGRect, proposal: ProposedViewSize, subviews: Subviews, cache: inout Void) {
    let result = FlowResult(
      in: proposal.replacingUnspecifiedDimensions().width,
      subviews: subviews,
      alignment: alignment,
      spacing: spacing
    )
    for row in result.rows {
      let rowXOffset = (bounds.width - row.frame.width) * alignment.horizontal.percent
      for index in row.range {
        let xPos = rowXOffset + row.frame.minX + row.xOffsets[index - row.range.lowerBound] + bounds.minX
        let rowYAlignment = (row.frame.height - subviews[index].sizeThatFits(.unspecified).height) *
        alignment.vertical.percent
        let yPos = row.frame.minY + rowYAlignment + bounds.minY
        subviews[index].place(at: CGPoint(x: xPos, y: yPos), anchor: .topLeading, proposal: .unspecified)
      }
    }
  }

  struct FlowResult {
    var bounds = CGSize.zero
    var rows = [Row]()

    struct Row {
      var range: Range<Int>
      var xOffsets: [Double]
      var frame: CGRect
    }

    init(in maxPossibleWidth: Double, subviews: Subviews, alignment: Alignment, spacing: CGFloat?) {
      var itemsInRow = 0
      var remainingWidth = maxPossibleWidth.isFinite ? maxPossibleWidth : .greatestFiniteMagnitude
      var rowMinY = 0.0
      var rowHeight = 0.0
      var xOffsets: [Double] = []
      for (index, subview) in zip(subviews.indices, subviews) {
        let idealSize = subview.sizeThatFits(.unspecified)
        if index != 0 && widthInRow(index: index, idealWidth: idealSize.width) > remainingWidth {
          // Finish the current row without this subview.
          finalizeRow(index: max(index - 1, 0), idealSize: idealSize)
        }
        addToRow(index: index, idealSize: idealSize)

        if index == subviews.count - 1 {
          // Finish this row; it's either full or we're on the last view anyway.
          finalizeRow(index: index, idealSize: idealSize)
        }
      }

      func spacingBefore(index: Int) -> Double {
        guard itemsInRow > 0 else { return 0 }
        return spacing ?? subviews[index - 1].spacing.distance(to: subviews[index].spacing, along: .horizontal)
      }

      func widthInRow(index: Int, idealWidth: Double) -> Double {
        idealWidth + spacingBefore(index: index)
      }

      func addToRow(index: Int, idealSize: CGSize) {
        let width = widthInRow(index: index, idealWidth: idealSize.width)

        xOffsets.append(maxPossibleWidth - remainingWidth + spacingBefore(index: index))
        // Allocate width to this item (and spacing).
        remainingWidth -= width
        // Ensure the row height is as tall as the tallest item.
        rowHeight = max(rowHeight, idealSize.height)
        // Can fit in this row, add it.
        itemsInRow += 1
      }

      func finalizeRow(index: Int, idealSize: CGSize) {
        let rowWidth = maxPossibleWidth - remainingWidth
        rows.append(
          Row(
            range: index - max(itemsInRow - 1, 0) ..< index + 1,
            xOffsets: xOffsets,
            frame: CGRect(x: 0, y: rowMinY, width: rowWidth, height: rowHeight)
          )
        )
        bounds.width = max(bounds.width, rowWidth)
        let ySpacing = spacing ?? ViewSpacing().distance(to: ViewSpacing(), along: .vertical)
        bounds.height += rowHeight + (rows.count > 1 ? ySpacing : 0)
        rowMinY += rowHeight + ySpacing
        itemsInRow = 0
        rowHeight = 0
        xOffsets.removeAll()
        remainingWidth = maxPossibleWidth
      }
    }
  }
}

private extension HorizontalAlignment {
  var percent: Double {
    switch self {
      case .leading: return 0
      case .trailing: return 1
      default: return 0.5
    }
  }
}

private extension VerticalAlignment {
  var percent: Double {
    switch self {
      case .top: return 0
      case .bottom: return 1
      default: return 0.5
    }
  }
}
We’ll use it in the Quotex app by creating the NewFlowLayout and providing it with the collection of tags:
NewFlowLayout(alignment: .leading) {
  ForEach(viewModel.tags) { tag in
    Button(action: {
      viewModel.selectTag(for: tag)
    }, label: {
      Text(tag.name)
    })
  }
}
Running the NewFlowLayout in the Quotex app, creates a perfect tag view that you can directly use in your app!
Tags are helpful for categorizing items and filtering according to your needs. SwiftUI helps create such custom views with ease and will also automatically resize the view according to its contents, by creating a small, handy FlowLayout view like the one we created in this article.
You can find the final sample project showcased in this article on GitHub.
With just a few conditions and regex expressions, you can create the perfect tag in SwiftUI that will meet your conditions and help you avoid duplications.
I hope you found this article helpful and will try using tags in your iOS apps!
Install LogRocket via npm or script tag. LogRocket.init() must be called client-side, not
server-side
$ npm i --save logrocket

// Code:

import LogRocket from 'logrocket';
LogRocket.init('app/id');
// Add to your HTML:

<script src="https://cdn.lr-ingest.com/LogRocket.min.js"></script>
<script>window.LogRocket && window.LogRocket.init('app/id');</script>

Learn how AI-assisted development governance uses rules, agents, hooks, and protocols to help AI coding tools produce safer, more consistent code.

A step-by-step guide to building your first MCP server using Node.js, covering core concepts, tool design, and upgrading from file storage to MySQL.

Using security headers in your Next.js apps is a highly effective way to secure websites from common security threats.

A deep dive into May 2026’s AI model and tool rankings. We break down performance, usability, pricing, and real-world capabilities across 50+ features to help you pick the right tools for your development workflow.
Would you be interested in joining LogRocket's developer community?
Join LogRocket’s Content Advisory Board. You’ll help inform the type of content we create and get access to exclusive meetups, social accreditation, and swag.
Sign up now

