In this tutorial, we will implement localization in a Svelte application. The app will include routing, so you can divide the content across multiple pages of the app.

We will first set up a new project, then create the dictionary for the localized content, configure the localization packages, create the layout, and, finally, style the app.
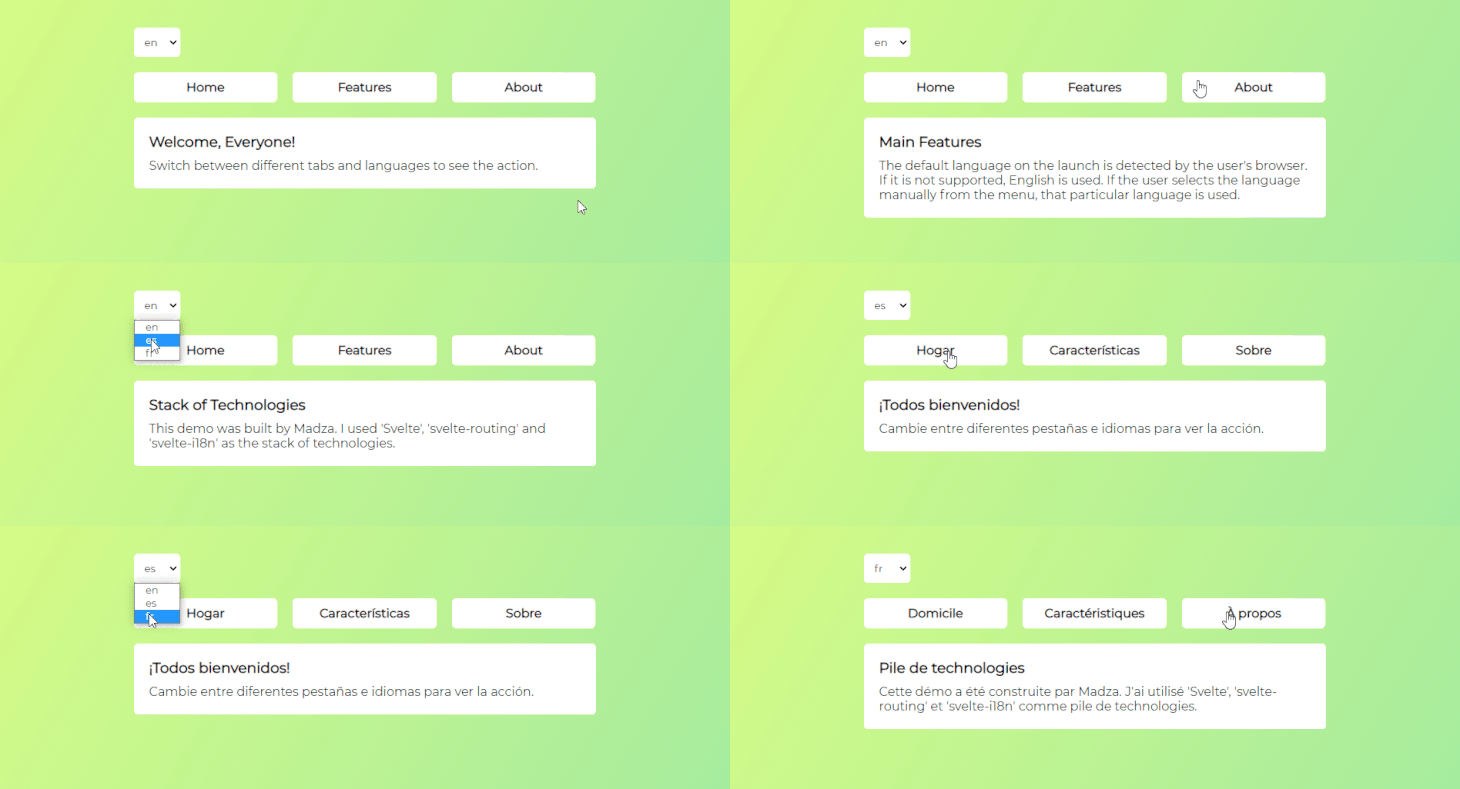
In the end, we will have a localized app where the default language is detected by the browser. Also, users will be able to manually switch between languages using the dropdown menu.
For reference, the source code and full demo app are available here.
The Replay is a weekly newsletter for dev and engineering leaders.
Delivered once a week, it's your curated guide to the most important conversations around frontend dev, emerging AI tools, and the state of modern software.
The main advantages of using Svelte are its reactivity and that it’s lightweight.
Svelte is pretty radical for building user interfaces when compared to existing solutions like React and Vue. Instead of using the browser to do most of the heavy lifting, Svelte transfers this to the compiling step, meaning the content can be displayed much faster.
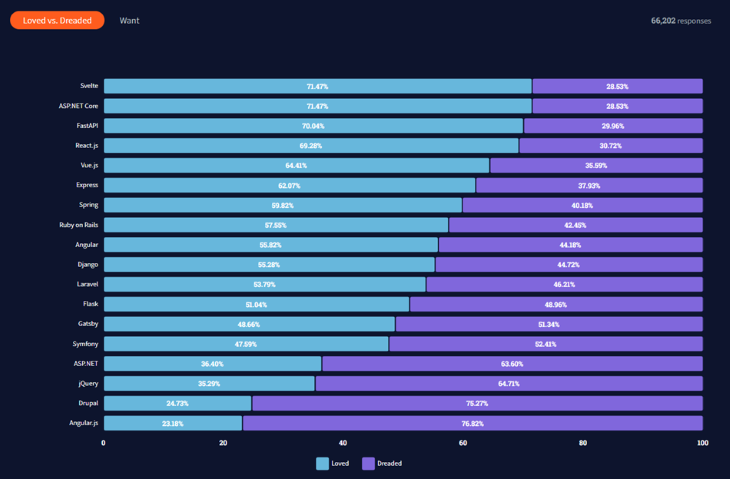
According to StackOverflow’s survey in 2021, Svelte has been voted the most-loved framework from over 66,000 respondents.

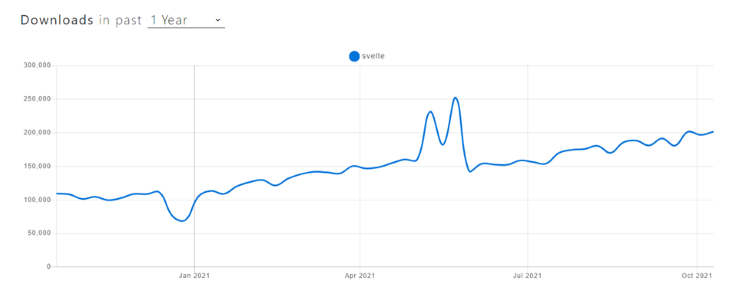
Also, if we look at npm’s trends graph and its GitHub repository, it’s clear that this framework is worth keeping an eye on and holds great potential for the future.

We will use Svelte’s official template to set up the project boilerplate via degit. To begin, open your terminal and run the following command:
npx degit sveltejs/template svelte-localization
Wait for the setup to finish, then change the directory into the newly created project folder by running cd svelte-localization. Next, run npm install to install all the necessary dependencies for the project to work.
Once it is done, you can run npm run dev, which will start up Rollup.js.
Finally, open your browser and navigate to http://localhost:5000/, which should then present a fully functional Svelte app, which looks like this:

The default boilerplate comes with some extra code we won’t need. To clean it up, navigate to the src folder, open the App.svelte file, and remove all the contents inside it. We will write everything from scratch later on.
We will create a separate locale dictionary for each language: English, Spanish, and French. Each locale will include translation for the navigation items (Home, Features, and About), as well as the included content (Title and Description) for each page.
To do that, create a new folder called langs and create three files inside it:
en.jsones.jsonfr.jsonYou can do it manually or using this command in the terminal:
mkdir langs && cd langs && touch en.json es.json fr.json
To create a locale for English, open the file en.json and include the following code:
{
  "nav": {
    "home": "Home",
    "features": "Features",
    "about": "About"
  },
  "home": {
    "title": "Welcome, Everyone!",
    "description": "Switch between different tabs and languages to see the action."
  },
  "features": {
    "title": "Main Features",
    "description": "The default language on the launch is detected by the user's browser. If it is not supported, English is used. If the user selects the language manually from the menu, that particular language is used."
  },
  "about": {
    "title": "Stack of Technologies",
    "description": "This demo was built by Madza. I used 'Svelte', 'svelte-routing' and 'svelte-i18n' as the stack of technologies."
  }
}
Next, to create a locale for Spanish, open the file es.json and include the following code:
{
  "nav": {
    "home": "Hogar",
    "features": "Características",
    "about": "Sobre"
  },
  "home": {
    "title": "¡Todos bienvenidos!",
    "description": "Cambie entre diferentes pestañas e idiomas para ver la acción."
  },
  "features": {
    "title": "Principales características",
    "description": "El navegador del usuario detecta el idioma predeterminado en el lanzamiento. Si no es compatible, se utiliza el inglés. Si el usuario selecciona el idioma manualmente en el menú, se utiliza ese idioma en particular."
  },
  "about": {
    "title": "Pila de tecnologías",
    "description": "Esta demostración fue construida por Madza. Usé 'Svelte', 'svelte-routing' y 'svelte-i18n' como pila de tecnologías."
  }
}
Finally, to create a locale for French, open the file fr.json and include the following code:
{
  "nav": {
    "home": "Domicile",
    "features": "Caractéristiques",
    "about": "À propos"
  },
  "home": {
    "title": "Bienvenue tout le monde!",
    "description": "Basculez entre différents onglets et langues pour voir l'action."
  },
  "features": {
    "title": "Caractéristiques principales",
    "description": "La langue par défaut au lancement est détectée par le navigateur de l'utilisateur. S'il n'est pas pris en charge, l'anglais est utilisé. Si l'utilisateur sélectionne la langue manuellement dans le menu, cette langue particulière est utilisée."
  },
  "about": {
    "title": "Pile de technologies",
    "description": "Cette démo a été construite par Madza. J'ai utilisé 'Svelte', 'svelte-routing' et 'svelte-i18n' comme pile de technologies."
  }
}
Next, we will set up some external packages so that we can access and use previously created dictionaries. For that, we’ll use svelte-i18n and @rollup/plugin-json.
To install both packages, open the terminal and run the command:
npm i svelte-i18n @rollup/plugin-json
Svelte-i18n is a straightforward package that uses stores to keep track of the current locale, includes a dictionary, helps to format the files, and so on. The @rollup/plugin-json is a helper package that allows us to import JSON files to work with Rollup.
Let’s also implement a simple routing so we can use localization across multiple pages. For that, we will use svelte-routing, which simplifies the routing process, thanks to built-in Router, Link and Route components.
To install the package, open the terminal and run the command:
npm i svelte-routing
At this point, we have all the necessary packages installed — we just need to configure them.
Open the App.svelte file and add the following code:
<script>
  import { Router, Route, Link } from "svelte-routing";
  import {
    _,
    getLocaleFromNavigator,
    isLoading,
    register,
    init,
    locale
  } from "svelte-i18n";

  register("en", () => import("./langs/en.json"));
  register("es", () => import("./langs/es.json"));
  register("fr", () => import("./langs/fr.json"));

  init({
    fallbackLocale: "en",
    initialLocale: getLocaleFromNavigator()
  });

  const handleLocaleChange = e => {
    e.preventDefault();
    locale.set(e.target.value);
  };
</script>
Let’s cover what we accomplished in this code block. First, we imported all the necessary components (Router, Route, and Link) from svelte-routing, so we can later implement the fully functional routing mechanism for the pages.
Then we imported the necessary methods from svelte-i18n, so we can later use them to localize the app. _ will allow us to access the dictionaries, getLocaleFromNavigator will get the default locale from the browser, isLoading will help us control the loading state of the locales, init will let us initialize them, and locale will allow us to set them manually.
After that, we registered each language and set the default (initial) language, as well as fallback language if the default one is not supported.
Finally, we created the handleLocaleChange function to set the language via the dropdown menu, which we will implement in the next section.
To use the localization features we just initialized, we must create a layout that displays the contents of the dictionaries and allow us to switch the locales.
Under the script tags in App.svelte, add the following code:
// script tags..

{#if $isLoading}
  <p>Loading</p>
{:else}
  <main>
    <Router>
      <select on:change={handleLocaleChange}>
        <option value="en">en</option>
        <option value="es">es</option>
        <option value="fr">fr</option>
      </select>
      <header >
        <nav>
          <Link to="/">{$_('nav.home')}</Link>
          <Link to="features">{$_('nav.features')}</Link>
          <Link to="about">{$_('nav.about')}</Link>
        </nav>
      </header>
      <section>
        <Route path="/">
          <h3>{$_('home.title')}</h3>
          <p>{$_('home.description')}</p>
        </Route>
        <Route path="features">
          <h3>{$_('features.title')}</h3>
          <p>{$_('features.description')}</p>
        </Route>
        <Route path="about">
        <h3>{$_('about.title')}</h3>
          <p>{$_('about.description')}</p>
        </Route>
      </section>
    </Router>
  </main>
{/if}
First, we used if and else statements to detect if the dictionary has been loaded. For that, we used the $isLoading store.
If the dictionaries have not been loaded, we return a message to inform the user (shown only after longer loading times than 200ms, which is rare). When the dictionary has been loaded, Svelte renders the app.
The entire app resides in the main wrapper. Inside it, there is a Router component, which is a wrapper for the routing mechanism.
We also have a select dropdown, allowing us to select the language of the app. We used the input event on:change and passed in the previously created handleLocaleChange function to get the selected language and set it as the active locale.
Inside header, each nav element receives an input from the language dictionaries via the $_ method, which is a shorthand alias of $format from svelte-i18n.
Each section element includes the Route component, which uses a specific path for it and includes the title and description of the page via the $_ method from svelte-i18n.
Let’s test what we have so far. Open your terminal and run npm run dev to start up Rollup, then navigate to http://localhost:5000/ in your browser.
You should see a basic layout structure of the elements:

To style our app, we will add some style rules for each of the elements.
Open App.svelte and add the following style rules:
// script tags..

// elements..

<style>
  @import url("https://fonts.googleapis.com/css2?family=Montserrat&display=swap");

  * {
    padding: 0;
    margin: 0;
    box-sizing: border-box;
    font-family: "Montserrat", sans-serif;
  }

  :global(body) {
    background-image: linear-gradient(120deg, #d4fc79 0%, #96e6a1 100%);
    min-height: 100vh;
    color: black;
    padding: 10px;
  }

  main {
    max-width: 600px;
    margin: 0 auto;
  }

  select {
    border: none;
    padding: 10px;
    margin-bottom: 20px;
    border-radius: 5px;
  }

  nav {
    margin-bottom: 20px;
    display: grid;
    grid-template-columns: 1fr 1fr 1fr;
    text-align: center;
    gap: 20px;
  }

  nav > :global(a) {
    background-color: white;
    padding: 10px 20px;
    border-radius: 5px;
    color: black;
    font-weight: bold;
    text-decoration: none;
  }

  section {
    background-color: white;
    padding: 20px;
    border-radius: 5px;
  }

  h3 {
    margin-bottom: 10px;
  }

  @media screen and (max-width: 500px) {
    nav {
      grid-template-columns: 1fr;
    }
  }
</style>
Here, we first imported the Montserrat font and set it up to be used in all elements. We also reset the rules for margin, padding, and box-sizing so they do not differ across the different browsers due to the default values used.
Then we styled the body by setting a green gradient as the background, set the height to use at least the whole viewport, set the text color to be black, and added some padding so the app looks great on the responsive screens.
For the main wrapper, we defined a specific width that can never be exceeded and centered it to the viewport horizontally.
We also removed the default border to the select dropdown, added some radius to it, set some padding, and set some bottom margin. This ensures there is some space between the direct element below.
For nav, we used a grid layout with three columns and a 20px gap between them. We centered the included text and added a bottom margin.
For the included links, we removed the text decoration, set the font color to be black, bolded them, set background-color to be white, and added some padding and border-radius.
Notice that we styled the section element by adding the white background, some padding, and a border radius, so it fits better in the overall styling of the app.
We also added some bottom margin for the h3 elements, so there is some space between section titles and the description.
Finally, we added a media rule for responsive screens, so the nav element switches to a one-column layout for the screens smaller than 500px in width, meaning each of the navigation items will be then shown directly below each other.
If we check the browser now, the output should be a fully functional app.

If you know that your target audience is international clients whose native language differs from the default language used in your app, you should implement localization. This way, users know that you care about them and, in general, it greatly improves the overall UI/UX.
You can add as many locales as you need. Also, feel free to update this demo app by adding more pages and content. Maybe you can even add a backend functionality and support private routes, so users must log in to see them.
Thanks for reading and I hope you will find a practical use for this demo!
Install LogRocket via npm or script tag. LogRocket.init() must be called client-side, not
server-side
$ npm i --save logrocket

// Code:

import LogRocket from 'logrocket';
LogRocket.init('app/id');
// Add to your HTML:

<script src="https://cdn.lr-ingest.com/LogRocket.min.js"></script>
<script>window.LogRocket && window.LogRocket.init('app/id');</script>

Compare the top AI development tools and models of February 2026. View updated rankings, feature breakdowns, and find the best fit for you.

Broken npm packages often fail due to small packaging mistakes. This guide shows how to use Publint to validate exports, entry points, and module formats before publishing.

Discover what’s new in The Replay, LogRocket’s newsletter for dev and engineering leaders, in the February 11th issue.

Cut React LCP from 28s to ~1s with a four-phase framework covering bundle analysis, React optimizations, SSR, and asset/image tuning.
Hey there, want to help make our blog better?
Join LogRocket’s Content Advisory Board. You’ll help inform the type of content we create and get access to exclusive meetups, social accreditation, and swag.
Sign up now
One Reply to "Implementing localization in Svelte"
Thanks!
It’s missing all the rollup config thing though 🙂