Editor’s note: This article was last reviewed and updated by Rosario De Chiara in January 2025. Updates include compatibility with Laravel 11 and a new demo showcasing how to restrict users from logging into multiple devices simultaneously.

JSON web token (JWT) authentication is used to verify ownership of JSON data and determine whether the data can be trusted. JWT is not encryption — it’s an open standard that enables information to be securely transmitted between two parties as a JSON object. They’re digitally signed using either a public/private key pair or a secret.
In this article, we’ll demonstrate the process of implementing JWT authentication in Laravel 11. We’ll also review some of Laravel’s features and compare JWT to Laravel’s inbuilt authentication packages, Sanctum and Passport.
Before jumping into the demo, let’s cover a brief overview of Laravel.
The Replay is a weekly newsletter for dev and engineering leaders.
Delivered once a week, it's your curated guide to the most important conversations around frontend dev, emerging AI tools, and the state of modern software.
Laravel is a free, open source PHP web framework built by Taylor Otwell based on the Symfony framework. It is designed for building online applications that follow the Model-View-Controller (MVC) architectural paradigm.
PHP frameworks are often favored by newer developers, as PHP is well-documented and has an active resource community. Laravel is the most popular PHP framework and is often the framework of choice for both new and seasoned developers. It is used to build standard business applications as well as enterprise-level apps.
Laravel remains one of the most popular backend frameworks. Here are some reasons developers like building with Laravel:
Choosing the type of authentication to use in your Laravel application will depend on the type of application you’re building.
Sanctum offers both session-based and token-based authentication and is good for single-page application (SPA) authentications. Passport uses JWT authentication as its standard but also implements full OAuth 2.0 authorization.
OAuth allows authorization from third-party applications like Google, GitHub, and Facebook, but not every app requires this feature. If you want to implement token-based authentication that follows the JWT standard, without the OAuth extras, then Laravel JWT authentication is your best bet.
Laravel offers many built-in authentication mechanisms to meet different application needs, ranging from traditional web apps to APIs. They include Laravel Breeze, Laravel Fortify, and Laravel Sanctum.
Although Laravel offers these built-in authentication frameworks, it does not support JWT out of the box. So to add JWT authentication to Laravel, developers use third-party packages such as PHP-Open-Source-Saver/jwt-auth.
Below is an overview of how JWT can be integrated with Laravel’s built-in authentication mechanisms:
Now, let’s take a look at how to implement JWT authentication in Laravel 11. The full code for this project is available on GitHub. Feel free to fork and follow along.
This tutorial is designed as a hands-on demonstration. Before getting started, make sure you’ve met the following requirements:
It’s also important to understand PHP version compatibility when working with PHP frameworks and packages to maintain a stable and secure application environment. Let’s explore this in more detail next.
PHP versions dictate which features and syntaxes are supported, which affects how PHP frameworks like Laravel and its packages work, including JWT authentication libraries. Here is how version compatibility can impact Laravel applications:
Here are a couple of steps you should take to ensure PHP version compatibility:
We’ll get started by creating a new Laravel 11 project. Install and navigate to the new Laravel project using these commands:
composer create-project laravel/laravel laravel-jwt
cd laravel-jwt
Next, create a MySQL database named laravel-jwt. For this demo, I’m using XAMMP, but any database management system will suffice.
To allow our Laravel application to interact with the newly formed database, we must first establish a connection. To do so, we’ll need to add our database credentials to the .env file:
DB_CONNECTION=mysql
DB_HOST=127.0.0.1
DB_PORT=3306
DB_DATABASE=laravel-jwt
DB_USERNAME=root
DB_PASSWORD=
The User table migration comes preinstalled in Laravel, so all we have to do is run it to create the table in our database. To create the User table, use the following command:
php artisan migrate
Now that our database is set up, we’ll install and set up the Laravel JWT authentication package. We’ll be using php-open-source-saver/jwt-auth, a fork of tymondesign/jwt-auth, because tymondesign/jwt-auth appears to have been abandoned and isn’t compatible with Laravel 11.
@PHP-Open-Source-Saver/jwt-auth and @tymondesigns/jwt-authPreviously, Sean Tymon’s @tymondesigns/jwt-auth package was the standard package for integrating JWT authentication in Laravel and Luman applications. However, the package is not being actively updated or maintained.
As a result, @PHP-Open-Source-Saver/jwt-auth was developed as a forked package to replace it and continue the development and support needed by modern Laravel applications. It maintains the same API to ease the migration process for existing users of the original package while introducing new features and improvements.
The key difference lies in the active development and support. @PHP-Open-Source-Saver/jwt-auth benefits from regular updates that address both security concerns and compatibility with the latest Laravel versions.
Install the newest version of the package using this command:
composer require php-open-source-saver/jwt-authh
Next, we need to make the package configurations public. Copy the JWT configuration file from the vendor to confi/jwt.php with this command:
php artisan vendor:publish --provider="PHPOpenSourceSaver\JWTAuth\Providers\LaravelServiceProvider"
Now, we need to generate a secret key to handle the token encryption. To do so, run this command:
php artisan jwt:secret
This will update our .env file with something like this:
JWT_SECRET=xxxxxxxx
This is the key that will be used to sign our tokens.
Inside the config/auth.php file, we’ll need to make a few changes to configure Laravel to use the JWT AuthGuard to power the application authentication.
First, we’ll make the following changes to the file:
'defaults' => [
        'guard' => 'api',
        'passwords' => 'users',
    ],

    'guards' => [
        'web' => [
            'driver' => 'session',
            'provider' => 'users',
        ],

        'api' => [
                'driver' => 'jwt',
                'provider' => 'users',
        ],

    ],
In this code, we’re telling the API guard to use the JWT driver and to make the API guard the default. Now, we can use Laravel’s inbuilt authentication mechanism, with jwt-auth handling the heavy lifting!
User modelIn order to implement the PHPOpenSourceSaverJWTAuthContractsJWTSubject contract on our User model, we’ll use two methods: getJWTCustomClaims() and getJWTIdentifier().
Replace the code in the app/Models/User.php file with the following:
namespace App\Models;
use Illuminate\Contracts\Auth\MustVerifyEmail;
use Illuminate\Database\Eloquent\Factories\HasFactory;
use Illuminate\Foundation\Auth\User as Authenticatable;
use Illuminate\Notifications\Notifiable;
use PHPOpenSourceSaver\JWTAuth\Contracts\JWTSubject;

class User extends Authenticatable implements JWTSubject {
    use HasFactory, Notifiable;

    /**
     * The attributes that are mass assignable.
     *
     * @var array<int, string>
     */
    protected $fillable = [
        'name',
        'email',
        'password',
    ];

    /**
     * The attributes that should be hidden for serialization.
     *
     * @var array<int, string>
     */
    protected $hidden = [
        'password',
        'remember_token',
    ];

    /**
     * The attributes that should be cast.
     *
     * @var array<string, string>
     */
    protected $casts = [
        'email_verified_at' => 'datetime',
    ];

     /**
     * Get the identifier that will be stored in the subject claim of the JWT.
     *
     * @return mixed
     */
    public function getJWTIdentifier()
    {
        return $this->getKey();
    }

    /**
     * Return a key value array, containing any custom claims to be added to the JWT.
     *
     * @return array
     */
    public function getJWTCustomClaims()
    {
        return [];
    }

}
That’s it for our model setup!
AuthControllerNow, we’ll create a controller to handle the core logic of the authentication process. First, we’ll run this command to generate the controller:
php artisan make:controller AuthController
Then, we’ll replace (in the /app/Http/Controllers/AuthController.php file) the controller’s contents with the following code snippet:
namespace App\Http\Controllers;
use Illuminate\Http\Request;
use Illuminate\Support\Facades\Auth;
use Illuminate\Support\Facades\Hash;
use App\Models\User;

class AuthController extends Controller
{

    public function __construct()
    {
        $this->middleware('auth:api', ['except' => ['login','register']]);
    }

    public function login(Request $request)
    {
        $request->validate([
            'email' => 'required|string|email',
            'password' => 'required|string',
        ]);
        $credentials = $request->only('email', 'password');

        $token = Auth::attempt($credentials);
        if (!$token) {
            return response()->json([
                'status' => 'error',
                'message' => 'Unauthorized',
            ], 401);
        }

        $user = Auth::user();
        return response()->json([
                'status' => 'success',
                'user' => $user,
                'authorisation' => [
                    'token' => $token,
                    'type' => 'bearer',
                ]
            ]);

    }

    public function register(Request $request){
        $request->validate([
            'name' => 'required|string|max:255',
            'email' => 'required|string|email|max:255|unique:users',
            'password' => 'required|string|min:6',
        ]);

        $user = User::create([
            'name' => $request->name,
            'email' => $request->email,
            'password' => Hash::make($request->password),
        ]);

        $token = Auth::login($user);
        return response()->json([
            'status' => 'success',
            'message' => 'User created successfully',
            'user' => $user,
            'authorisation' => [
                'token' => $token,
                'type' => 'bearer',
            ]
        ]);
    }

    public function logout()
    {
        Auth::logout();
        return response()->json([
            'status' => 'success',
            'message' => 'Successfully logged out',
        ]);
    }

    public function refresh()
    {
        return response()->json([
            'status' => 'success',
            'user' => Auth::user(),
            'authorisation' => [
                'token' => Auth::refresh(),
                'type' => 'bearer',
            ]
        ]);
    }

}
Here’s a quick explanation of the public functions in the AuthController:
constructor: We establish this function in our controller class so that we can use the auth:api middleware within it to block unauthenticated access to certain methods within the controllerlogin: This method authenticates a user with their email and password. When a user is successfully authenticated, the Auth facade attempt() method returns the JWT token. The generated token is retrieved and returned as JSON with the user objectregister: This method creates the user record and logs in the user with token generationslogout: This method invalidates the user Auth tokenrefresh: This method invalidates the user Auth token and generates a new tokenWe’re done with setting up our JWT authentication!
If that’s all you’re here for, you can skip to the test application section. But, for the love of Laravel, let’s add a simple to-do feature to our project!
Todo model, controller, and migrationWe’ll create the Todo model, controller, and migration all at once with the following command:
php artisan make:model Todo -mc
Next, go to the database/migrations/xxxx_xx_xx_xxxxxx_create_todos_table.php file, and replace its contents with the following code:
use Illuminate\Database\Migrations\Migration;
use Illuminate\Database\Schema\Blueprint;
use Illuminate\Support\Facades\Schema;

return new class extends Migration
{
    /**
     * Run the migrations.
     *
     * @return void
     */
    public function up()
    {
        Schema::create('todos', function (Blueprint $table) {
            $table->id();
            $table->string('title');
            $table->string('description');
            $table->timestamps();
        });
    }

    /**
     * Reverse the migrations.
     *
     * @return void
     */
    public function down()
    {
        Schema::dropIfExists('todos');
    }
};
Todo modelNow, navigate to the app/Models/Todo.php file, and replace its contents with the following code:
namespace App\Models;

use Illuminate\Database\Eloquent\Factories\HasFactory;
use Illuminate\Database\Eloquent\Model;

class Todo extends Model
{
    use HasFactory;
    protected $fillable = ['title', 'description'];

}
Now we need the migrate command to create the new model for the to-dos in the DB:
php artisan migrate
TodoControllerNext, go to the app/Http/Controllers/TodoController.php file, and replace its contents with the following code:
namespace App\Http\Controllers;

use Illuminate\Http\Request;
use App\Models\Todo;
use Illuminate\Routing\Controller;

class TodoController extends Controller
{
    public function __construct()
    {
        $this->middleware('auth:api');
    }

    public function index()
    {
        $todos = Todo::all();
        return response()->json([
            'status' => 'success',
            'todos' => $todos,
        ]);
    }

    public function store(Request $request)
    {
        $request->validate([
            'title' => 'required|string|max:255',
            'description' => 'required|string|max:255',
        ]);

        $todo = Todo::create([
            'title' => $request->title,
            'description' => $request->description,
        ]);

        return response()->json([
            'status' => 'success',
            'message' => 'Todo created successfully',
            'todo' => $todo,
        ]);
    }

    public function show($id)
    {
        $todo = Todo::find($id);
        return response()->json([
            'status' => 'success',
            'todo' => $todo,
        ]);
    }

    public function update(Request $request, $id)
    {
        $request->validate([
            'title' => 'required|string|max:255',
            'description' => 'required|string|max:255',
        ]);

        $todo = Todo::find($id);
        $todo->title = $request->title;
        $todo->description = $request->description;
        $todo->save();

        return response()->json([
            'status' => 'success',
            'message' => 'Todo updated successfully',
            'todo' => $todo,
        ]);
    }

    public function destroy($id)
    {
        $todo = Todo::find($id);
        $todo->delete();

        return response()->json([
            'status' => 'success',
            'message' => 'Todo deleted successfully',
            'todo' => $todo,
        ]);
    }
}
To access our newly created methods, we need to define our API routes. Navigate to the routes/api.php file and replace the contents with the following code:
use Illuminate\Http\Request;
use Illuminate\Support\Facades\Route;
use App\Http\Controllers\AuthController;
use App\Http\Controllers\TodoController;

Route::controller(AuthController::class)->group(function () {
    Route::post('login', 'login');
    Route::post('register', 'register');
    Route::post('logout', 'logout');
    Route::post('refresh', 'refresh');

});

Route::controller(TodoController::class)->group(function () {
    Route::get('todos', 'index');
    Route::post('todo', 'store');
    Route::get('todo/{id}', 'show');
    Route::put('todo/{id}', 'update');
    Route::delete('todo/{id}', 'destroy');
});
In the above code, we’re using Laravel 9 syntax. You’ll need to declare your route the normal way if you’re using lower versions of Laravel.
Before we move to Postman to start testing the API endpoints, we need to start our Laravel application. Run the following command to do so:
php artisan serve
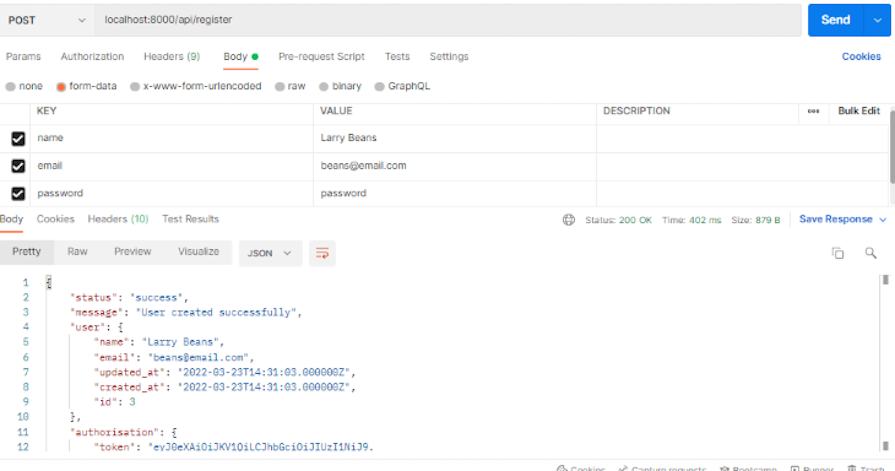
To start the Postman application, add the registration API (localhost:8000/api/register) in the address bar, select the POST HTTP request method from the dropdown, choose the form-data option on the Body tab, and select the name, email, and password input fields. In the repository, you can find a Postman collection of the API calls to easily test each endpoint.
Then, click Send to see the server response (see figure below):

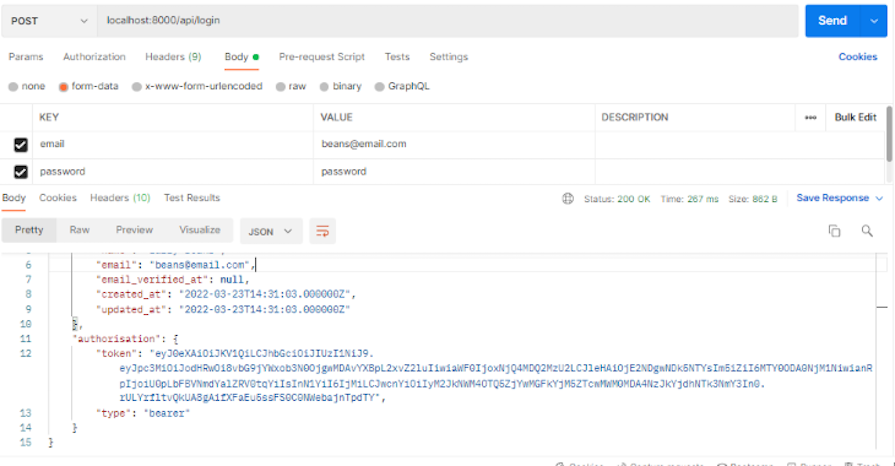
In the previous step, we created an account in the Postman application. To log in, use http://localhost:8000/api/login, set a POST method, add the email and password to the input field, and click Send to see the response (see figure below):

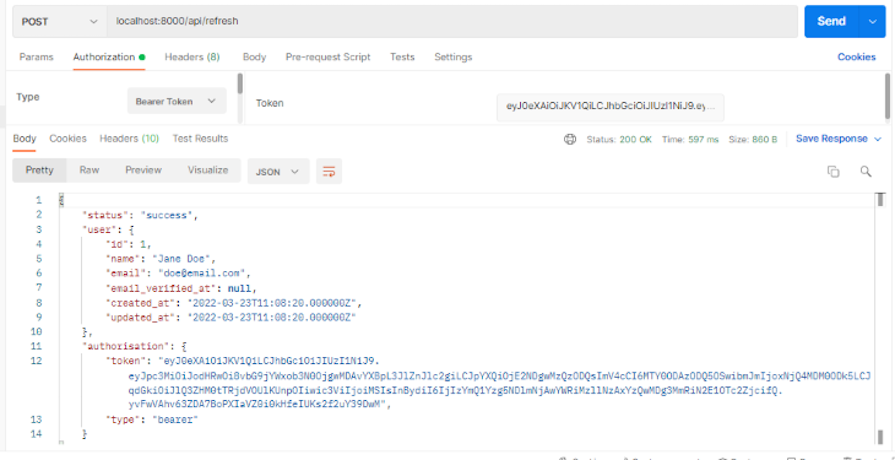
The refresh, logout, and todo endpoints are all protected by the auth:api middleware and therefore require that we send a valid token with the authorization header.
To copy the token from our login response, select Bearer Token from the dropdown on the Authorization tab, paste the copied token into the Token field, and click Send to refresh the API:

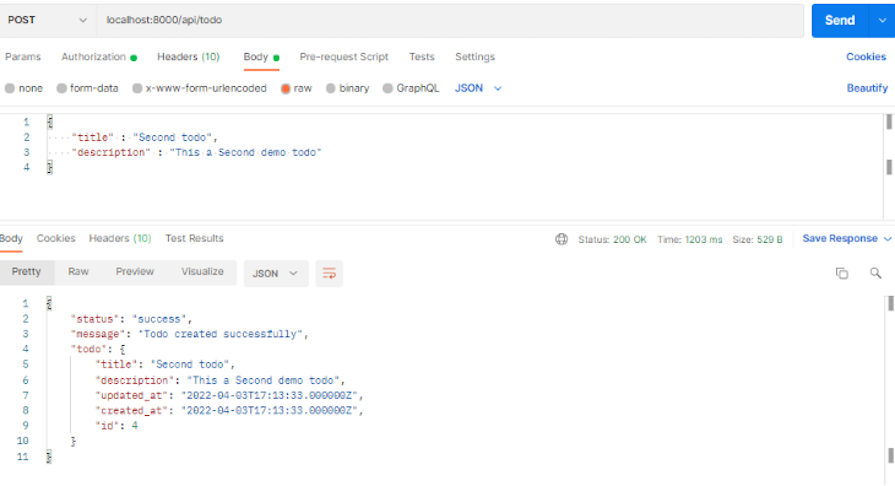
Now that you have an authorization token, add the token in the request header and create a to-do as shown below:

Now, test other endpoints to ensure they are working correctly.
In this section, we’ll explore JWTs a bit more by implementing a mechanism to prevent multiple simultaneous logins for a single user.
The idea is to extend the user profile with a counter that acts as a “generation” number for the token generated at login time. When a token is generated, it is assigned the current generation value from the database. Any token with a generation number older than the current value in the database is deemed invalid. Essentially, each new login invalidates all previously issued tokens. Let’s walk through the steps to implement this mechanism.
First, modify the User model by adding the token_version field to track versions and include this version in JWT claims through getJWTCustomClaims():
class User extends Authenticatable implements JWTSubject
{
...
    protected $fillable = [
        'name',
        'email',
        'password',
        'token_version'  // Add this field to track token versions
    ];
...
    public function getJWTCustomClaims() {
        // Include token version in JWT claims
        return [
            'token_version' => $this->token_version
        ];
    }
...
});
At this point, we need to create a new migration to add a token_version field to the users table in the database. This field will be initialized with a default value of 0:
return new class extends Migration
{
    public function up(): void
    {
        Schema::table('users', function (Blueprint $table) {
            $table->integer('token_version')->default(0);
        });
    }
    public function down(): void
    {
        Schema::table('users', function (Blueprint $table) {
            $table->dropColumn('token_version');
        });
    }
};
Now we’ll extend the AuthController to embed the token_version logic into the JWT:
token_version and increment it in the DBtoken_versionclass AuthController extends Controller
{
...
public function login(Request $request)
{
// First increment the token version
$user = Auth::getProvider()->retrieveByCredentials($credentials);
$user->token_version += 1;
$user->save();
// Then generate the token - this will include the new version in the payload
$token = auth()->attempt($credentials);
return response()->json([
'status' => 'success',
'user' => $user,
'authorisation' => [
'token' => $token,
'type' => 'bearer',
]
]);
...
}
}
The final step is to add a brand new middleware (app\Http\Middleware\CheckTokenVersion.php) that verifies that the token_version in the API call matches the version in the user profile:
namespace App\Http\Middleware;
use Closure;
use Illuminate\Support\Facades\Log;
use Illuminate\Http\Request;
use PHPOpenSourceSaver\JWTAuth\Facades\JWTAuth;
use Symfony\Component\HttpFoundation\Response;
class CheckTokenVersion
{
    public function handle(Request $request, Closure $next): Response
    {
        try {
            $token = JWTAuth::parseToken();
            $payload = $token->getPayload();
            $user = auth()->user();

            if ($payload->get('token_version') !== $user->token_version) {
                return response()->
                    json(['error' => 'Token has been invalidated'], 401);
            }
            return $next($request);
        } catch (\Exception $e) {
            return response()->json(['error' => 'Invalid token'], 401);
        }
    }
}
Once the middleware is in place, we must apply it to the APIs that interact with the to-dos; this is possible by modifying the routes\api.php file:
...
use Illuminate\Http\Request;
use Illuminate\Support\Facades\Route;
use App\Http\Controllers\AuthController;
use App\Http\Controllers\TodoController;
use App\Http\Middleware\CheckTokenVersion;
...
Route::middleware([CheckTokenVersion::class])->group(function () {
    Route::controller(TodoController::class)->group(function () {
        Route::get('todos', 'index');
        Route::post('todo', 'store');
        Route::get('todo/{id}', 'show');
        Route::put('todo/{id}', 'update');
        Route::delete('todo/{id}', 'destroy');
    });
});
...
In this new version, we just specify that every call to the to-dis API will be intercepted by the CheckTokenVersion middleware with the logic described before.
Integrating JWT into your application comes with several crucial security considerations. It’s important to address these concerns to ensure your implementation is secure and efficient.
Let’s dive into the key areas you need to focus on the approaches to secure your application with JWT:
HttpOnly cookies, which restrict JavaScript access and diminish the risk of XSS (Cross-Site Scripting) attacksWhile these are important considerations, testing and debugging your Laravel app is also critical to security. We’ll learn more in the next section.
To ensure your JWT authentication correctly secures your application, it must be properly tested against all possible vulnerabilities. This will improve your application’s security and performance.
Here are several ways to test and troubleshoot JWT authentication in a Laravel application:
This involves attempting to see the secret key used to sign the JWT token. If you can see the key, it means hackers can also generate valid tokens using those keys and gain unauthorized access to the application. You can debug this by using complex secret keys or regularly changing your secret keys to limit the time window an attacker has to crack them
Some JWT implementations may accept tokens signed with the “none” algorithm by default, which will automatically bypass the signature verification process. Make sure your JWT validation logic explicitly rejects tokens that specify “none” as their signing algorithm to enforce signature verification for all the generated tokens.
Hackers try to change the algorithm specified in the token header — for example, by changing from RSA to HMAC — to trick the server into validating a token with a completely different key to gain access to the application. You can debug this by verifying and enforcing the expected algorithm in your server’s token validation, as well as implementing mechanisms that prevent the server from accepting tokens signed with an unauthorized algorithm.
If an asymmetric method such as RSA is used in a JWT and the public key is exposed, a hacker may attempt to sign a new token using the same symmetric algorithm and the public key as the secret key. You can avoid this problem by including tight checks in your validation logic to ensure that the token’s signature algorithm matches the server’s expected asymmetric method, and also reject any tokens signed with a different method, particularly using the symmetric method.
This article discussed the benefits of building with Laravel and compared JWT authentication to Sanctum and Passport, Laravel’s inbuilt authentication packages.
We also built a demo project to show how to create a REST API authentication with JWT in Laravel 11. We discussed some security best practices to keep your JWT authentication safe. We created a sample to-do application, connected the app to a database, and performed CRUD operations.
To learn more about Laravel, check out the official documentation.
Install LogRocket via npm or script tag. LogRocket.init() must be called client-side, not
server-side
$ npm i --save logrocket

// Code:

import LogRocket from 'logrocket';
LogRocket.init('app/id');
// Add to your HTML:

<script src="https://cdn.lr-ingest.com/LogRocket.min.js"></script>
<script>window.LogRocket && window.LogRocket.init('app/id');</script>

@container scroll-state: Replace JS scroll listeners nowCSS @container scroll-state lets you build sticky headers, snapping carousels, and scroll indicators without JavaScript. Here’s how to replace scroll listeners with clean, declarative state queries.

Explore 10 Web APIs that replace common JavaScript libraries and reduce npm dependencies, bundle size, and performance overhead.

Russ Miles, a software development expert and educator, joins the show to unpack why “developer productivity” platforms so often disappoint.

Discover what’s new in The Replay, LogRocket’s newsletter for dev and engineering leaders, in the February 18th issue.
Hey there, want to help make our blog better?
Join LogRocket’s Content Advisory Board. You’ll help inform the type of content we create and get access to exclusive meetups, social accreditation, and swag.
Sign up now
18 Replies to "Implementing JWT authentication in Laravel 11"
Thank you so much this Article is very helpful
Thanks, appreciate the effort to run a quick example – will be using jst for a mobile application and this is perfect for a quick start to get the auth out of the way.
Thank you so much, you helped me a lot
Logout isnt working for me, it does not invalidate the user token.
why did my token return null value
you need change config/auth file:
‘defaults’ => [
‘guard’ => ‘api’,
‘passwords’ => ‘users’,
],
Use code like $token = auth(‘api’)->attempt($credentials);
Thanks.
I followed the tutorial and it works great, except that my todo endpoints are not protected at all. Every todo endpoint works fine without the Bearer token. 🙁
how to prevent access api/todos after runing api logout with message like this
return response()->json([
‘status’ => ‘error’,
‘message’ => ‘Unauthorized’
]);
Arigatou!
is this tutorial secure enough to apply it on a website will be released soon !
thanks for tutorial , but why when i running localhost:8000/api/register the return shown laravel default page/home. thanks
I am facing the same problem
Is It possibile implementing SSO by using this tutorial?
Thanks
`Auth::login` is a void, so, to try to use it as value for the $token variable is not correct.
I made a small API server conform your article,
it’s at https://github.com/noud/bumbal
Is there a way to authenticate only with a token and not to first need to login with user/pass credentials? Here i see the login method needs the credentials. So whether JWT, Sanctum or Passport…i always need to login with credentials.