Editor’s note: This guide to implementing a secure password reset in Node.js was last updated on 6 January 2023 to update all outdated information, add a section on API testing in Postman, and clarify a section on implementing a forgotten password reset in Node.js. You can learn more about web security here.

Creating a strong password that you can actually remember isn’t easy. Users who use unique passwords for different websites (which is ideal) are more likely to forget their passwords. So, it’s crucial to add a feature that allows users to securely reset their password when they forget it.
This article is about building a secure reset password feature with Node.js and Express.js. Now, let’s get started.
Jump ahead:
token and user models
The Replay is a weekly newsletter for dev and engineering leaders.
Delivered once a week, it's your curated guide to the most important conversations around frontend dev, emerging AI tools, and the state of modern software.
First off, to follow along with this tutorial, here are some requirements to note:
The workflow for your password reset can take different shapes and sizes, depending on how usable and secure you want your application to be.
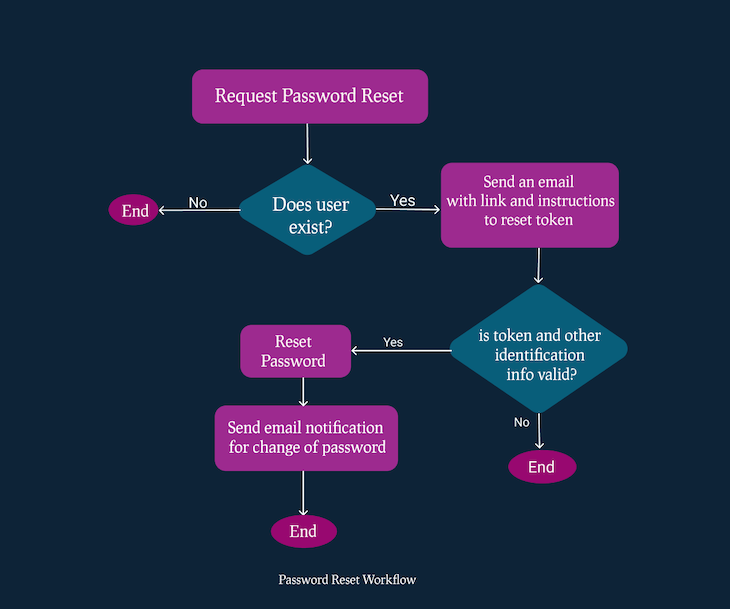
In this article, we will walk through implementing a standard and secure password reset design. The diagram below illustrates the workflow for this feature. Here are the key steps involved:
By following these steps, you can create a password reset feature that is both secure and easy for users to use. Here’s a visual example of the reset password workflow:

Let’s create a simple project to demonstrate how the password reset feature can be implemented. Note, you can find the completed project on password reset with Node.js on GitHub, or you can also jump to the password reset section of this tutorial. Let’s first initialize our project with the npm package manager.
Run npm init on your Terminal/Command Prompt and follow the instructions to set up the project.
Our folder structure will look like this:
auth.controller.jsauth.service.jsuser.model.jstoken.model.jsindex.route.jsEmails
Template
requestResetPassword.handlebarsresetPassword.handlebarssendEmail.jsindex.jsdb.jspackage.jsonRun the code below to install the dependencies we’ll use in this project with npm:
npm install bcrypt, cors, dotenv, express, express-async-errors, handlebars, jsonwebtoken, mongoose, nodemailer, nodemon
We’ll use the following:
bcrypt: To hash passwords and reset tokenscors: To disable Cross-Origin Resource Sharing, at least for development purposesdotenv: To allow our Node process to have access to the environment variablesexpress-async-errors: To catch all async errors, so our entire codebase doesn’t get littered with try-catchhandlebars: As a templating engine to send HTML emailsmongoose: As a driver to interface with the MongoDB databasenodemailer: To send emailsnodemon: To restart the server when a file changesSome variables will vary in our application depending on the environment we are running our application in — production, development, or staging. For these variables, we’ll add them to our environment variables.
First, create an .env file in your root directory and paste the following variables inside. We’re adding a bcrypt salt, our database URL, a JWT_SECRET, and a client URL. You’ll see how we’ll use them as we proceed:
# .env
BCRYPT_SALT=10
DB_URL=mongodb://127.0.0.1:27017/testDB
JWT_SECRET=mfefkuhio3k2rjkofn2mbikbkwjhnkj
CLIENT_URL=localhost://8090
Let’s create a connection to our MongoDB. This code should be in your db.js file in the root directory:
// db.js
const mongoose = require("mongoose");
let DB_URL = process.env.DB_URL;// here we are using the MongoDB Url we defined in our ENV file

module.exports = async function connection() {
  try {
    await mongoose.connect(
      DB_URL,
      {
        useNewUrlParser: true,
        useUnifiedTopology: true,
        useFindAndModify: false,
        useCreateIndex: true,
        autoIndex: true,
      },
      (error) => {
        if (error) return new Error("Failed to connect to database");
        console.log("connected");
      }
    );
  } catch (error) {
    console.log(error);
  }
};
Let’s build our application entry point and serve it at port 8080. Copy and paste this into your index.js file in the root directory:
// index.js
require("express-async-errors");
require("dotenv").config();
const express = require("express");
const app = express();
const connection = require("./db");
const cors = require("cors");

const port = 8080;
(async function db() {
  await connection();
})();

app.use(cors());
app.use(express.json());
app.use("/api/v1", require("./routes/index.route"));
app.use((error, req, res, next) => {
  res.status(500).json({ error: error.message });
});

app.listen(port, () => {
  console.log("Listening to Port ", port);
});

module.exports = app;
token and user modelsIn order to create a password reset system, we will need to establish two separate models: a user model and a token model. The user model will contain information about each individual user, such as their email address, username, and hashed password. This model will be used to verify the identity of the user requesting a password reset and to update their password once a reset has been requested.
token modelOur token model will have an expiry time of about one hour. Within this period, the user is expected to complete the password reset process. Otherwise, the token will be deleted from the database. With MongoDB, you don’t have to write additional code to make this work. Just set expires in your date field like so:
createdAt: {
  type: Date,
  default: Date.now,
  expires: 3600,// this is the expiry time
},
You should add this code to the file token.model.js inside the model directory. Here is what our model will look like:
// models/token.model.js
const mongoose = require("mongoose");
const Schema = mongoose.Schema;
const tokenSchema = new Schema({
  userId: {
    type: Schema.Types.ObjectId,
    required: true,
    ref: "user",
  },
  token: {
    type: String,
    required: true,
  },
  createdAt: {
    type: Date,
    default: Date.now,
    expires: 3600,// this is the expiry time in seconds
  },
});
module.exports = mongoose.model("Token", tokenSchema);
user modelThe user model will define how user data is saved in the database. It is important to ensure that passwords are stored securely, as storing them in plaintext is a security risk. To avoid this, we can use a secure one-way hashing algorithm such as bcrypt, which includes a salt to increase the strength of the hashing further.
In the code below, we use bcrypt to hash the passwords to protect them and make it almost impossible to reverse the hashing process even if the database is compromised. Even as administrators, we should not know the plaintext passwords of our users, and using a secure hashing algorithm helps to ensure this as well:
// user.model.js
const mongoose = require("mongoose");
const bcrypt = require("bcrypt");
const Schema = mongoose.Schema;
const bcryptSalt = process.env.BCRYPT_SALT;
const userSchema = new Schema(
  {
    name: {
      type: String,
      trim: true,
      required: true,
      unique: true,
    },
    email: {
      type: String,
      trim: true,
      unique: true,
      required: true,
    },
    password: { type: String },
  },
  {
    timestamps: true,
  }
);
userSchema.pre("save", async function (next) {
  if (!this.isModified("password")) {
    return next();
  }
  const hash = await bcrypt.hash(this.password, Number(bcryptSalt));
  this.password = hash;
  next();
});
module.exports = mongoose.model("user", userSchema);
The password is hashed using the pre-save MongoDB Hook before saving it, as shown in the code below. A salt of 10 is used, as specified in the .env file, to increase the strength of the hashing and reduce the likelihood of passwords being guessed by malicious actors:
...
userSchema.pre("save", async function (next) {
  if (!this.isModified("password")) {
    return next();
  }
  const hash = await bcrypt.hash(this.password, Number(bcryptSalt));
  this.password = hash;
  next();
});
We’ll have three services to completely start and process our password reset cycle:
Of course, we can’t reset a user’s password if they don’t have an account. So, this service will create an account for a new user.
The code below should be in the service/auth.service.js file:
// service/auth.service.js
const JWT = require("jsonwebtoken");
const User = require("../models/User.model");
const Token = require("../models/Token.model");
const sendEmail = require("../utils/email/sendEmail");
const crypto = require("crypto");
const bcrypt = require("bcrypt");

const signup = async (data) => {
  let user = await User.findOne({ email: data.email });
  if (user) {
    throw new Error("Email already exist");
  }
  user = new User(data);
  const token = JWT.sign({ id: user._id }, JWTSecret);
  await user.save();
  return (data = {
    userId: user._id,
    email: user.email,
    name: user.name,
    token: token,
  });
};
Following our workflow, the first step is to request a password reset token, right?
Yes, so let’s start there. In the code below, we check if the user exists. If the user exists, we check if there is an existing token that has been created for this user. If one exists, we delete the token as shown below:
//auth.service.js
const user = await User.findOne({ email });

  if (!user) {
      throw new Error("User does not exist");
  }
  let token = await Token.findOne({ userId: user._id });
  if (token) {
        await token.deleteOne()
  };
Now, pay attention to this part! In this section of the code, a new random token is generated using the Node.js crypto API. This token will be sent to the user and can be used to reset their password:
let resetToken = crypto.randomBytes(32).toString("hex");
Now, create a hash of this token, which we’ll save in the database because saving plain resetToken in our database can open up vulnerabilities, and that will defeat the entire purpose of setting up a secure password reset:
const hash = await bcrypt.hash(resetToken, Number(bcryptSalt));
However, we’ll send the plain token to the users’ email as shown in the code below, and then in the next section, we’ll verify the token and allow them to create a new password:
// service/auth.service.js
const JWT = require("jsonwebtoken");
const User = require("../models/User.model");
const Token = require("../models/Token.model");
const sendEmail = require("../utils/email/sendEmail");
const crypto = require("crypto");
const bcrypt = require("bcrypt");

const requestPasswordReset = async (email) => {

  const user = await User.findOne({ email });

  if (!user) throw new Error("User does not exist");
  let token = await Token.findOne({ userId: user._id });
  if (token) await token.deleteOne();
  let resetToken = crypto.randomBytes(32).toString("hex");
  const hash = await bcrypt.hash(resetToken, Number(bcryptSalt));

  await new Token({
    userId: user._id,
    token: hash,
    createdAt: Date.now(),
  }).save();

  const link = `${clientURL}/passwordReset?token=${resetToken}&id=${user._id}`;
  sendEmail(user.email,"Password Reset Request",{name: user.name,link: link,},"./template/requestResetPassword.handlebars");
  return link;
};
The reset password link contains the token and the userID, both of which will be used to verify the user’s identity before they can reset their password.
It also contains the clientURL, which is the root domain the user will have to click to continue the reset process:
const link = `${clientURL}/passwordReset?token=${resetToken}&id=${user._id}`;
For the request to reset a user’s password, the user will be sending a POST request with their email as the only item in the request body:
{
   email:"[email protected]"
}
You can find the function sendEmail in the GitHub repository and the email template here. We are using nodemailer (an npm package for Node.js that enables developers to easily send emails from their applications through various email service providers) and handlebars templating engine to send the email.
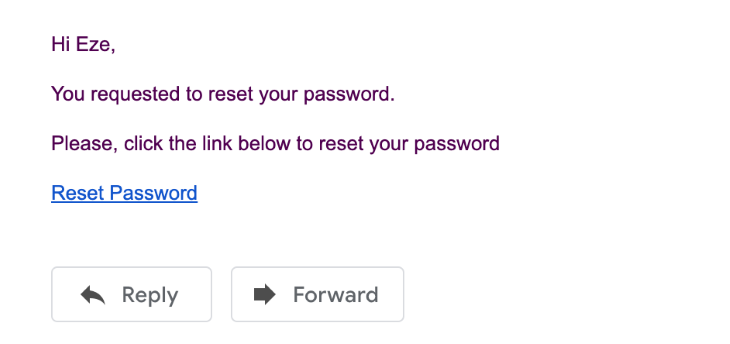
Oh, look! I received an email to confirm I made the password reset request. Now, I’m going to click the link next:

Once you click the link, it should take you to the password reset page. You can build that frontend with any technology you desire, as this is just an API.
At this point, we’ll send back the token, a new password, and a userID to verify the user and create a new password afterward.
Here’s what we’ll be sending back to the reset password API will look like:
{
    "token":"4f546b55258a10288c7e28650fbebcc51d1252b2a69823f8cd1c65144c69664e",
    "userId":"600205cc5fdfce952e9813d8",
    "password":"kjgjgkflgk.hlkhol"
}
It will be processed by the code below:
// service/auth.service.js
const resetPassword = async (userId, token, password) => {
  let passwordResetToken = await Token.findOne({ userId });
  if (!passwordResetToken) {
    throw new Error("Invalid or expired password reset token");
  }
  const isValid = await bcrypt.compare(token, passwordResetToken.token);
  if (!isValid) {
    throw new Error("Invalid or expired password reset token");
  }
  const hash = await bcrypt.hash(password, Number(bcryptSalt));
  await User.updateOne(
    { _id: userId },
    { $set: { password: hash } },
    { new: true }
  );
  const user = await User.findById({ _id: userId });
  sendEmail(
    user.email,
    "Password Reset Successfully",
    {
      name: user.name,
    },
    "./template/resetPassword.handlebars"
  );
  await passwordResetToken.deleteOne();
  return true;
};
Notice how we are using bcrypt to compare the token the server received with the hashed version in the database?:
const isValid = await bcrypt.compare(token, passwordResetToken.token);
If they are the same, then we go ahead to hash the new password:
const hash = await bcrypt.hash(password, Number(bcryptSalt));
Then, update the user’s account with the new password:
await User.updateOne(
    { _id: userId },
    { $set: { password: hash } },
    { new: true }
  );
Just to keep the user informed with every step, we’ll send them an email to confirm the change in password and delete the token from the database.
So far, we’ve been able to create the services to sign up a new user and reset their password.
Bravo!
Here are the controllers for each of those services. The controllers collect data from the user, send them to the services to process the data, and then return the result back to the user:
controllers/auth.controller.js
// controllers/auth.controller.js
const {
  signup,
  requestPasswordReset,
  resetPassword,
} = require("../services/auth.service");

const signUpController = async (req, res, next) => {
  const signupService = await signup(req.body);
  return res.json(signupService);
};

const resetPasswordRequestController = async (req, res, next) => {
  const requestPasswordResetService = await requestPasswordReset(
    req.body.email
  );
  return res.json(requestPasswordResetService);
};

const resetPasswordController = async (req, res, next) => {
  const resetPasswordService = await resetPassword(
    req.body.userId,
    req.body.token,
    req.body.password
  );
  return res.json(resetPasswordService);
};

module.exports = {
  signUpController,
  resetPasswordRequestController,
  resetPasswordController,
};
Let’s test the API using Postman to ensure proper functionality. We’ll make various requests to simulate the entire process, from requesting a password reset token to finally resetting the password.
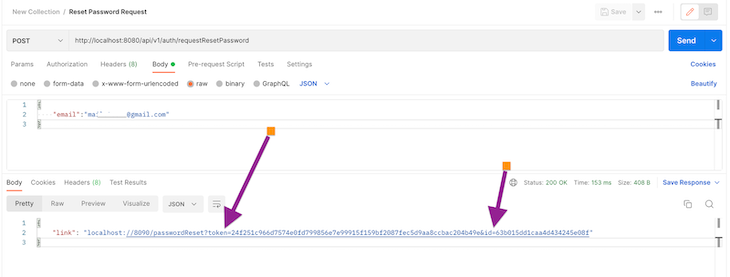
To start, we will make a POST request to the password reset request endpoint with the user’s email in the request body, as shown in the image below:

Note, the response includes a link with a token and the userId. You can design your system to return this data in any way that suits your needs. The frontend will use this information for the next step: to reset the password.
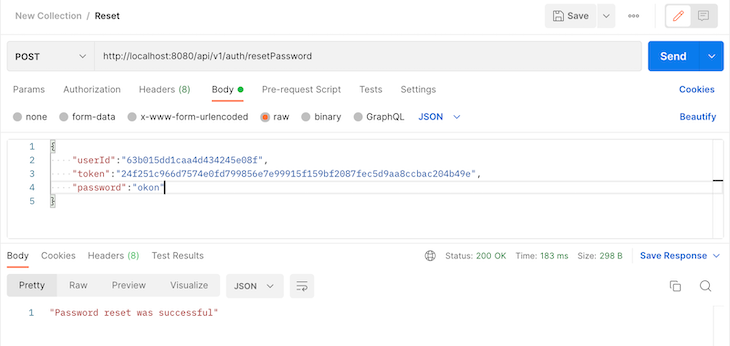
To reset the password, the client will send a POST request to the reset password endpoint with the userId, token, and the new password, as shown in the image below:

That’s it. And, I got an email, too, 😄:

Congratulations, you’ve created a secure reset password feature in Node.js for your users.
What can you do next? You could do a few things to make this password reset feature more secure.
You could ask users to provide answers to their security questions (they must have created these questions and answers already). Make sure to use secure hosting services. An insecure hosting service can create a backdoor for you as an administrator. If your hosting service isn’t getting it right, the bad guys can compromise your system even if it seems safe.
You could also implement two-factor authentication (2FA) with Google Authenticator or SMS. This way, even if the user’s email has been compromised, the hacker will also need to have the user’s phone.
Remember, don’t store users’ passwords at all. It’s stressful having to reset your password each time you forget it. Instead, you could allow your users to log in with already existing services like Facebook, GitHub, Gmail, and the like. That way, they won’t need to remember their password ever again. They will only need to worry about their passwords on those third-party websites.
If you want to play around with the completed project, you can check it out on GitHub.
Digital security isn’t a joke. Hackers are always looking for new ways to hack systems, so you should always be on the lookout for new ways to make life difficult for them.
Your users trust you to secure their data, and you don’t want to disappoint them. What other ways would you recommend to make a password reset feature more secure? Thanks for reading.
 Monitor failed and slow network requests in production
Deploying a Node-based web app or website is the easy part. Making sure your Node instance continues to serve resources to your app is where things get tougher. If you’re interested in ensuring requests to the backend or third-party services are successful, try LogRocket.

LogRocket lets you replay user sessions, eliminating guesswork around why bugs happen by showing exactly what users experienced. It captures console logs, errors, network requests, and pixel-perfect DOM recordings — compatible with all frameworks.
LogRocket's Galileo AI watches sessions for you, instantly identifying and explaining user struggles with automated monitoring of your entire product experience.
LogRocket instruments your app to record baseline performance timings such as page load time, time to first byte, slow network requests, and also logs Redux, NgRx, and Vuex actions/state. Start monitoring for free.

VSCode has architectural performance limits. Compare six fast, native code editors built for lower resource usage.

Build a React infinite scroll gallery with TanStack Pacer. Learn debouncing, throttling, batching, and rate limiting without RxJS complexity.

Discover what’s new in The Replay, LogRocket’s newsletter for dev and engineering leaders, in the January 7th issue.

useEffectEventJack Herrington breaks down how React’s new useEffectEvent Hook stabilizes behavior, simplifies timers, and enables predictable abstractions.
Hey there, want to help make our blog better?
Join LogRocket’s Content Advisory Board. You’ll help inform the type of content we create and get access to exclusive meetups, social accreditation, and swag.
Sign up now
9 Replies to "Implementing a secure password reset in Node.js"
Thank you so much!!! Simple explanation without any unnecessary stuff. Special thanks for explaining crucial parts of the code!
Eze,
You have put together a clean guide. Thank you for sharing this.
By the way, you used anonymous functions in a few places making it a bit tough to resolve issues using my call stack.
Could use your help if you can make the time.
Thank you!
This is a great tutorial, helped me a lot Thanks
great article, thanks!
I have implemented a middleware with all authentication flows, would be glad to get comments, ideas and so:
https://www.npmjs.com/package/authentication-flows-js
A well written article. I’ll be using this, thank you!
What verb would you use to request the reset email? Would it be POST since we’re creating a new token and doing so is neither safe nor idempotent?
Thank you, great article!
Can I use the same process for email verication
how do you test everything out in postman?