A search component serves as a method to easily look up and access data within an app. Users experience the search component as an interface to communicate with an application. It enables them to find, sort, and filter various parts of an application’s content through an input field where they can specify search keywords and/or a filter option to filter results.

There are different approaches to adding search functionality to your web application, such as creating the search component from scratch or using search tools to save time and improve accuracy and productivity. In this blog post, you’ll learn step by step how to implement a typo-friendly search component in your React app using a simple API.
This article will also compare two search engines (Algolia and Typesense) and look at their advantages over one another to give you a base knowledge on which of them is a better option for search functionality depending on your application needs.
The Replay is a weekly newsletter for dev and engineering leaders.
Delivered once a week, it's your curated guide to the most important conversations around frontend dev, emerging AI tools, and the state of modern software.
This article assumes you are familiar with the following:
Having a typo-friendly search component will provide your users with a better user experience while navigating through your application. When creating a search component, it is essential to note what features you should consider to deliver an efficient search component and an overall satisfying user experience.
This feature automatically provides predictions to complete a word as soon as the user starts to type the word. It saves time as it helps users to quickly complete their desired search query.
This feature provides suggestions to correct typos, incorrect spellings, and capitalization. This relieves a user from needing to ensure if terms are correct to the letter as they search through your application.
This feature provides users with a list of suggested words related to the term they are searching.
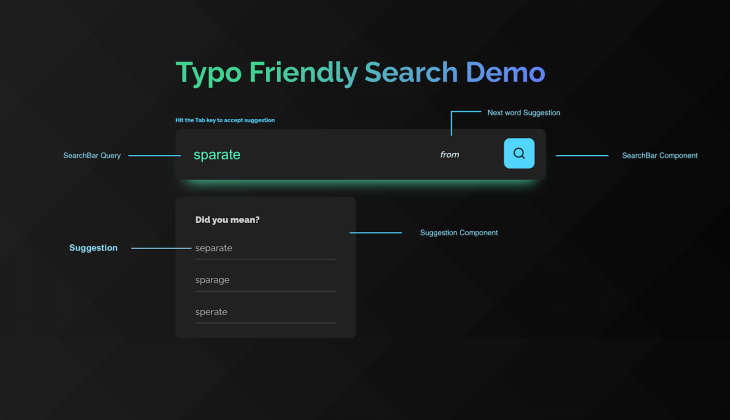
This demo tutorial will walk through how to build a simple search application using React and also how to add typo-friendly features such as correction suggestions and next-word prediction.
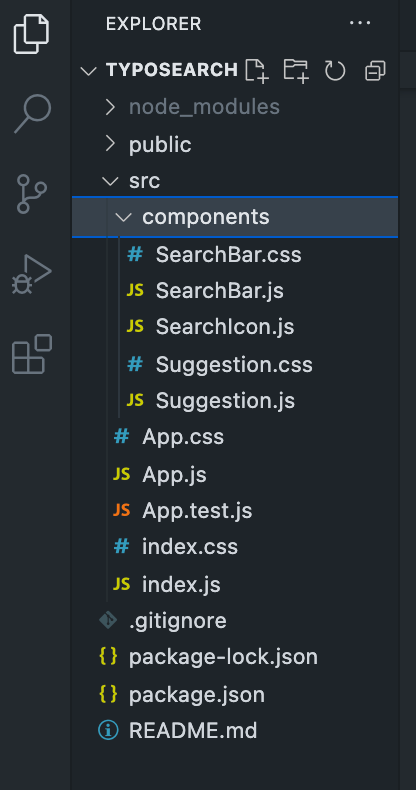
The application consists of three major components: the SearchBar.js component, the Suggestion.js component, and the overall App.js component that wraps all other components.
When you type in a keyword, the component does two things:
These features will be implemented using the free Datamuse API, which has a limit of 100,000 daily API calls.
To get started, clone the project from GitHub. Install dependencies by running the following command into your terminal:
npm install
Your folder structure should look like this:

Run the following command to spin up a local server for previewing the application:
npm run start
As mentioned above, there are three components that make up this project.
The first is the SearchBar component. This is a simple search field where you type in your search keyword.
import React from 'react';
import './SearchBar.css';
import SearchIcon from './SearchIcon';
function SearchBar({ handleSearch, nextWord, searchValue, selectSug }) {
  const handleKeyDown = (e) => {
    if (e.key === 'Tab') selectSug(false, nextWord);
  }
  return (
    <>
    { searchValue && <p className="tip">Hit the <span>Tab</span> key to accept suggestion</p> }
    <div className="search-bar" tabIndex="0">
        <input
          className="search-bar__input"
          type="text"
          name="search"
          placeholder="Enter search keyword..."
          onChange={handleSearch}
          value={searchValue}
          spellCheck={true}
          onKeyDown={handleKeyDown}
        />
        { searchValue && nextWord && <span className="search-bar__suggestion"><i>{nextWord}</i></span> }
        <span className="search-bar__icon" onClick={() => alert(searchValue)}>
          <SearchIcon />
        </span>
    </div>
    </>
  )
}
export default SearchBar;
The second is the Suggestion component. This component basically contains three-word suggestions that are meant for correcting the typo entered into the SearchBar component.
import React from 'react';
import './Suggestion.css';
function Suggestion({ correctionSugs, searchValue, selectSug }) {
  return (
    <>
    {
      searchValue && correctionSugs.length > 1 &&
      <div className="suggestion">
          <h4 className="suggestion__header">Did you mean?</h4>
          {
            correctionSugs.map(item => {
              return <p className="suggestion__sug" key={item} onClick={() => selectSug(item)}>{item}</p>
            })
          }
      </div>
    }
    </>
  )
}
export default Suggestion;
Finally we have the App component. This is the home component that encapsulates all other components. It performs computations and passes props to other components where necessary.

When you type into the input field, the application makes two API calls. The first call is for predicting the most common next word to your search keyword. When this data is returned from the API, it is stored in a state variable nextWordSug and passed as a prop to the SearchBar.js component where it is rendered. You can hit the Tab button to automatically append the next word suggestion to your search keyword.
try {
  const res = await fetch(`https://api.datamuse.com/words?lc=${word}`);
  const data = await res.json();
  if (data.length > 1) setNextWordSug(data[0].word);
} catch (err) {
  alert('Error occured while getting susggestions!');
}
The other is for suggestion corrections for a mistyped word. When the data is returned from the API, the first three suggestions are extracted, stored in the correctionSugs state variable, and passed as a prop to the Suggestion.js component where it is rendered. You can click on any of the suggestions to accept the suggestion — this replaces your typo with the accepted suggestion.
try {
  const res = await fetch(`https://api.datamuse.com/words?sp=${word}`);
  const data = await res.json();
  let _data = [];
  for (let i = 0; i < 3; i++) {
    if (data.length >= 3) {
      if (data[0].word !== word.toLowerCase()) _data.push(data[i].word);
    }
    setCorrectionSugs(_data);
  }
} catch (err) {
  alert('Error occured while getting susggestions!');
  console.log(err);
}
And that’s all there is to it! You can refer to the source code for in-depth review.
Although you can build a search component in your React application using the method above, you can also leverage search tools to quickly spin up a search component in your React application. This section of the article compares two efficient search tools — Algolia and Typesense — that you can easily integrate into your React application to improve the search experience of your end users.
Unlike creating a custom search component yourself, these search tools are easier to use, intuitive, and offer several inbuilt functionalities, like autocomplete and autocorrect, so that you don’t have to manually code these features yourself.
Algolia is a search engine offering that provides a set of building blocks for creating a fast, intuitive, and overall amazing search experience for your users. It offers you autocorrect and autocomplete search functionalities that help your users find answers faster.
It offers a developer-friendly API client, intuitive UX tools, and several integrations to help you quickly create a search component in your application. It provides a dashboard for developers to manage their search analytics and allows you also integrate your own analytics tools to see how users search.
Algolia is language-agnostic, and it has support for symbol-based languages, including Chinese, Japanese, Arabic, and others with no additional config required. This means that it supports both left-to-right (LTR) and right-to-left (RTL) scripts.
Typo-tolerance is a feature that tolerates users’ misspellings and provides them with the item they search for. Algolia offers this by matching words that are closest in spelling to the searched word.
Typesense is a typo-tolerant search engine that is built using cutting-edge search algorithms, optimized with instant search-as-you-type experiences.
It enhances the search experience with autocomplete, filters, query suggestions, and features. Unlike Algolia, Typesense is open source, meaning you can host it yourself, but they do offer a cloud-based solution: Typesense Cloud.
Typesense is a single binary that requires no runtime dependencies. This means that you can run Typsense locally or in production with a single command.
Typesense is simple to set up, manage, integrate, operate, and scale.
Search is an important feature that is useful in almost every modern application, especially in ecommerce applications, documentation, databases, and chat applications.
Creating a typo-friendly component in React can be quite a difficult task, especially if you have to build the functionalities yourself. However, leveraging search engine services like Algolia and Typesense can relieve you of the hassle.
The best option for your React app depends on your use case. Algolia is a great choice if cost is not a problem, while Typesense offers an open source version you can self-host for free. Both Algolia and Typesense are categorized as search-as-a-service tools, with several inbuilt functionalities to improve the overall user experience.
Install LogRocket via npm or script tag. LogRocket.init() must be called client-side, not
server-side
$ npm i --save logrocket

// Code:

import LogRocket from 'logrocket';
LogRocket.init('app/id');
// Add to your HTML:

<script src="https://cdn.lr-ingest.com/LogRocket.min.js"></script>
<script>window.LogRocket && window.LogRocket.init('app/id');</script>

Discover what’s new in The Replay, LogRocket’s newsletter for dev and engineering leaders, in the February 11th issue.

Cut React LCP from 28s to ~1s with a four-phase framework covering bundle analysis, React optimizations, SSR, and asset/image tuning.

Rich Harris (creator of Svelte) joined PodRocket this week to unpack his Performance Now talk, Fine Grained Everything.

Cloudflare strengthens security at the edge, but real protection depends on how you design, layer, and own controls beyond it.
Hey there, want to help make our blog better?
Join LogRocket’s Content Advisory Board. You’ll help inform the type of content we create and get access to exclusive meetups, social accreditation, and swag.
Sign up now