In-app alerts are a great way to provide your application users with real-time information. Firebase Cloud Messaging (FCM) is a cross-platform messaging system that is a great tool for sending push notifications to your client app.
In this article, we’ll cover setting up Firebase Cloud Messaging in a NestJS project. We’ll use a MySQL database to store and retrieve notification data and send push notifications to users depending on the database information.
Jump ahead:
NotificationToken entityBefore getting started, be sure that you have the following:
To follow along, you can check out the GitHub repo. Let’s get started!
To get started with FCM in NestJS, you’ll need to set up a Firebase project and enable the FCM API. To do so, follow the instructions from the Firebase documentation.
Once you’ve set up your Firebase project, you’ll need to create a service account and download the private key file, a JSON file that contains the credentials required to authenticate the Firebase Admin SDK.
Move the private key file to the root of your application; for this tutorial, we’ll rename the file firebase-admin-sdk.json. Install the firebase-admin package with the command below:
npm install --save firebase-admin
In a system that uses push notifications, user resources refer to the information that is stored and managed for each individual user; this may include information like the user’s device type, push notification preferences, and contact information. Typically, this information is used to tailor the content and delivery of push notifications to each user based on their preferences and history.
On the other hand, notification resources refer to the logic and functionality that is used to enable, disable, and send push notifications. This may include the ability to schedule notifications, create and manage notification groups, and customize the content and appearance of notifications. This may also include tracking the delivery and engagement of notifications, for example, by using open rates, click-through rates, and more.
We’ll generate these new NestJS resources with the respective code snippets below:
nest g res notification --no-spec
nest g res users --no-spec
Before working on our notification resource, let’s set up our MySQL database to store the notification data. First, install the MySQL2 and TypeORM packages:
npm install --save mysql2 typeorm @nestjs/typeorm @nestjs/config
Now, let’s update the app.module.ts:
import { Module } from '@nestjs/common';
import { TypeOrmModule } from '@nestjs/typeorm';
import { AppService } from './app.service';
import { Notification } from './notification/entities/notification.entity';
import { NotificationModule } from './notification/notification.module';

@Module({
  imports: [
    TypeOrmModule.forRoot({
      type: "mysql",
      host: process.env.DB_HOST,
      port: 3306,
      username: procees.env.DB_NAME,
      password: process.env.DB_PASSWORD,
      database: "in_app_notification",
      entities: [Notification],
      synchronize: true,
  }),
    NotificationModule
  ],
  controllers: [],
  providers: [AppService],
})

export class AppModule {}
First, TypeOrmModule.forRoot({...}) imports the TypeOrmModule. Then, it uses the .forRoot() method to provide the module with a configuration object that sets up the connection to a MySQL database, specifying the host, port, username, password, database name, the type of database, the entities to be used for the table, and the synchronization status.
We define environment variables in a .env file located in the root of your application. Keep in mind that in a production environment, it is advisable to use migrations and set synchronization to false.
We’ll use TypeOrmModule to set up the MySQL connection and to create the User entity. Add the following code to user.module.ts:
import { Module } from '@nestjs/common';
import { UsersService } from './users.service';
import { UsersController } from './users.controller';
import { NotificationModule } from 'src/notification/notification.module';
import { TypeOrmModule } from '@nestjs/typeorm';
import { User } from './entities/user.entity';

@Module({
  imports: [
    TypeOrmModule.forFeature([User]),
    NotificationModule
  ],
  controllers: [UsersController],
  providers: [UsersService]
})

export class UsersModule {}
User entityEntities help us to define the database table schema; by default, the User entity defines the ID, email, username, and status as ACTIVE:
import { Entity, Column, PrimaryGeneratedColumn } from 'typeorm';

@Entity({ name: 'users' })
export class User {
  @PrimaryGeneratedColumn()
  id: number;

  @Column()
  email: string;

  @Column()
  username: string;

  @Column({
    default: 'ACTIVE',
  })
  status: string;
}
For now, this will all be stored in the user module. We’ll revisit this module later to utilize the push notifications.
In the module, we’ll use TypeOrmModule to set up the MySQL connection, create the Notification entity, and export the service. Add the code below to notification.module.ts:
import { Module } from '@nestjs/common';
import { NotificationService } from './notification.service';
import { NotificationController } from './notification.controller';
import { TypeOrmModule } from '@nestjs/typeorm';
import { Notifications } from './entities/notification.entity';
import { NotificationToken } from './entities/notification-token.entity';

@Module({
  imports: [
    TypeOrmModule.forFeature([Notifications, NotificationToken])
  ],
  controllers: [NotificationController],
  providers: [NotificationService],
  exports: [NotificationService]
})

export class NotificationModule {}
NotificationToken entityAdd the following code to notification.entity.ts:
import { Entity, Column, PrimaryGeneratedColumn, JoinColumn, ManyToOne } from 'typeorm';
import { NotificationToken } from './notification-token.entity';

@Entity({ name: 'notifications' })
export class Notifications {
  @PrimaryGeneratedColumn()
  id: number;

  @JoinColumn({ name: 'notification_token_id', referencedColumnName: 'id' })
  @ManyToOne(() => NotificationToken)
  notification_token: NotificationToken;

  @Column()
  title: string;

  @Column({ type: 'longtext', nullable: true })
  body: any;

  @Column()
  created_by: string;

  @Column({
    default: 'ACTIVE',
  })
  status: string;
}
The Notification entity has the following columns: id, title, body, status, and created_by.
The id column is the primary key and is generated automatically by the database. The notification_token has a ManyToOne relationship with the NoticationToken table, and the other columns store the data for the notifications.
Next, add the following code to the notification-token.entity.ts file:
import { User } from 'src/users/entities/user.entity';
import { Entity, Column, JoinColumn, ManyToOne, PrimaryGeneratedColumn } from 'typeorm';

@Entity({ name: 'notification_tokens' })
export class NotificationToken {
  @PrimaryGeneratedColumn()
  id: number;

  @JoinColumn({ name: 'user_id', referencedColumnName: 'id' })
  @ManyToOne(() => User)
  user: User;

  @Column()
  device_type: string;

  @Column()
  notification_token: string;

  @Column({
    default: 'ACTIVE',
  })
  status: string;
}
The NotificationToken entity has the id, user, device_type, status, and notification_token columns; notification_token is a unique string generated on registered FCM devices.
The id column is the primary key and is generated automatically by the database. The notification_token has a ManyToOne relationship with the User table, while the other columns store the data for the notification.
A mobile application or browser registers itself with FCM, and FCM then gives that device a unique token. The device sends this token to our NestJS server, and we store that FCM token in our database.
When the user gets the push notification, the unique token registered to the user device will be responsible for sending push notifications using the Firebase Admin SDK.
notification.service.tsimport { Injectable } from '@nestjs/common';
import { InjectRepository } from '@nestjs/typeorm';
import { Notifications } from './entities/notification.entity';
import { Repository } from 'typeorm';
import * as firebase from 'firebase-admin';
import * as path from 'path';
import { NotificationToken } from './entities/notification-token.entity';
import { NotificationDto } from './dto/create-notification.dto';
import { UpdateNotificationDto } from './dto/update-notification.dto';
firebase.initializeApp({
credential: firebase.credential.cert(
path.join(__dirname, '..', '..', 'firebase-adminsdk.json'),
),
});
@Injectable()
export class NotificationService {
constructor(
@InjectRepository(Notifications) private readonly notificationsRepo: Repository<Notifications>,
@InjectRepository(NotificationToken) private readonly notificationTokenRepo: Repository<NotificationToken>,
) {}
acceptPushNotification = async (
user: any,
notification_dto: NotificationDto ,
): Promise<NotificationToken> => {};
disablePushNotification = async (
user: any,
update_dto: UpdateNotificationDto,
): Promise<void> => {};
getNotifications = async (): Promise<any> => {};
sendPush = async (user: any, title: string, body: string): Promise<void> => {};
}
The code above first imports the necessary modules and dependencies, including the NestJS Injectable and InjectRepository decorators, the TypeORM Repository, Notifications, and NotificationToken entities, and the Firebase firebase-admin module. It then initializes the Firebase app using a service account key stored in a firebase-adminsdk.json file.
The NotificationService class is then defined and decorated with the Injectable decorator. It has three repositories as private properties, notificationsRepo and notificationTokenRepo for the Notifications and NotificationToken entities, respectively.
The NotificationService class has four methods:
acceptPushNotificationacceptPushNotification = async (
user: any,
notification_dto: NotificationDto ,
): Promise<NotificationToken> => {
await this.notificationTokenRepo.update(
{ user: { id: user.id } },
{
status: 'INACTIVE',
},
);
// save to db
const notification_token = await this.notificationTokenRepo.save({
user: user,
device_type: notification_dto.device_type,
notification_token: notification_dto.notification_token,
status: 'ACTIVE',
});
return notification_token;
};
acceptPushNotification updates the status of all existing notification tokens for a user to INACTIVE using the notificationTokenRepo.update method. It creates a new notification token object with the provided user object, the token, and device type, setting the status to ACTIVE.
Finally, it saves the new notification token to the database using the notificationTokenRepo.save method.
disablePushNotificationdisablePushNotification = async (
user: any,
update_dto: UpdateNotificationDto,
): Promise<void> => {
try {
await this.notificationTokenRepo.update(
{ user: { id: user.id }, device_type: update_dto.device_type },
{
status: 'INACTIVE',
},
);
} catch (error) {
return error;
}
};
disablePushNotification updates the status of a specific notification token for a user to INACTIVE using the notificationTokenRepo.update method, based on the user’s ID and device type provided in the update DTO.
getNotificationsgetNotifications = async (): Promise<any> => {
return await this.notificationsRepo.find();
};
getNotifications retrieves all notifications from the database using the notificationsRepo.find() method.
sendPushsendPush = async (user: any, title: string, body: string): Promise<void> => {
try {
const notification = await this.notificationTokenRepo.findOne({
where: { user: { id: user.id }, status: 'ACTIVE' },
});
if (notification) {
await this.notificationsRepo.save({
notification_token: notification,
title,
body,
status: 'ACTIVE',
created_by: user.username,
});
await firebase
.messaging()
.send({
notification: { title, body },
token: notification.notification_token,
android: { priority: 'high' },
})
.catch((error: any) => {
console.error(error);
});
}
} catch (error) {
return error;
}
};
sendPush finds an active notification token for the user using the notificationTokenRepo.findOne method; it searches for a token where the user’s ID and status are ACTIVE.
If a notification token is found, it saves the notification to the database using the notificationsRepo.save method, with the title, body, and status created by the user.
It sends the notification to the user’s device using the FCM firebase.messaging().send() method, passing in the title, body of the notification, the user’s notification token, and the priority set to high for Android.
token: The FCM registration token of the device to which the notification should be senttitle: The title of the notificationbody: The body of the notificationandroid: Sets the device type priorityIt’s worth noting that the sendPush method uses the firebase-admin package to send the push notifications, an official Firebase Admin SDK for Node.js that allows you to interact with Firebase services from a server environment.
Now that we’ve set up FCM and MySQL, we can use them to send push notifications to the users based on data in the MySQL database. Using the Firebase service, we can update the user service to enable, retrieve notifications from the database, and send them.
To demonstrate this, let’s use an update endpoint. As long as the user enables notifications, each time they update their profile, we call the sendPush method in the notification service, sending push notifications to the user and saving the notifications in the database.
First, inject the NotificationService into the user service:
import { Injectable } from '@nestjs/common';
import { NotificationService } from 'src/notification/notification.service';

@Injectable()
export class UsersService {
  constructor(
    @InjectRepository(User) private readonly userRepository: Repository<User>,
    private readonly notificationService: NotificationService,
  ) {}

  create(user: CreateUserDto): Promise<User> {}

  updateProfile = async (user_id: number, update_dto: any): Promise<any> => {}

  enablePush = async (
   user_id: number,
    update_dto: NotificationDto,
  ): Promise<any> => {};

  disablePush = async (
    user_id: number,
    update_dto: UpdateNotificationDto,
  ): Promise<any> => {};

  getPushNotifications = async (): Promise<any> => {};

}
The UsersService class has five methods:
createcreate(user: CreateUserDto): Promise<User> {
return this.userRepository.save(user);
}
create creates a new user account and saves it to the database.
updateProfileupdateProfile = async (user_id: number, update_dto: any): Promise<any> => {
try {
const user = await this.userRepository.findOne({
where: { id: user_id },
});
const updated_user = {
...user,
username: update_dto.username,
email: update_dto.email,
}
const saved_user = await this.userRepository.save(updated_user);
if (saved_user) {
// send push notification
await this.notificationService.sendPush(
updated_user,
'Profiie update',
'Your Profile have been updated successfully',
)
.catch((e) => {
console.log('Error sending push notification', e);
});
}
return saved_user;
} catch (error) {
return error;
}
}
updateProfile creates a new user object with the provided user object, updating the username and email from the update DTO.
It saves the updated user object to the database using the userRepository.save method. If the user is saved successfully, it sends a push notification to the user using the notificationService.sendPush method, passing in the updated user object, the title Profile update, and the body reading Your Profile have been updated successfully.
It has a try...catch block to handle any errors that may occur while executing the method, returning the error if there are any.
enablePushenablePush = async (
user_id: number,
update_dto: NotificationDto,
): Promise<any> => {
const user = await this.userRepository.findOne({
where: { id: user_id },
});
return await this.notificationService.acceptPushNotification(
user,
update_dto,
);
};
By searching for a user where the ID matches the provided user ID, enablePush finds the user in the database using the userRepository.findOne method.
Then, it calls the notificationService.acceptPushNotification method and passes the user and update DTO as arguments. This grants users the permission to accept any push notification sent, or in our case, a push notification when a user profile is updated.
disablePushdisablePush = async (
user_id: number,
update_dto: UpdateNotificationDto,
): Promise<any> => {
const user = await this.userRepository.findOne({
where: { id: user_id },
});
return await this.notificationService.disablePushNotification(
user,
update_dto,
);
};
By searching for a user where the ID matches the provided user ID, disablePush finds the user in the database using the userRepository.findOne method. It then calls the notificationService.disablePushNotification method, passing the user and update DTO as arguments.
getPushNotificationsgetPushNotifications = async (): Promise<any> => {
return await this.notificationService.getNotifications();
};
getPushNotifications calls the notificationService.getNotifications() method and returns the result.
It’s worth noting that these methods use the userRepository and notificationService to interact with the database and handle push notifications, respectively. It could be considered a higher-level service that uses the specific services to handle the push notifications and user profiles separately.
Now that our user services are configured with the five methods mentioned above, we’ll create the different endpoints as controllers by initializing the private instance of the UsersService class, which is responsible for performing the actual user operations:
import { Controller, Get, Post, Body, Patch, Param, Delete, HttpStatus, HttpCode, Put } from '@nestjs/common';
import { NotificationDto } from 'src/notification/dto/create-notification.dto';
import { UpdateNotificationDto } from 'src/notification/dto/update-notification.dto';
import { UsersService } from './users.service';

@Controller('users')
export class UsersController {
  constructor(
    private readonly usersService: UsersService,
  ) {}

  @Post()
  @HttpCode(HttpStatus.OK)
  async CreateUser(@Body() user: CreateUserDto) {
    return await this.usersService.create(user);
  }

  @Put()
  @HttpCode(HttpStatus.OK)
  async updateProfile(
    @Body() update_dto: any,
    @Param('id') user_id: number,
  ) {
    return await this.usersService.updateProfile(user_id ,update_dto);
  }

  @Put('push/enable')
  @HttpCode(HttpStatus.OK)
  async enablePush(
    @Body() update_dto: NotificationDto,
    @Param('id') user_id: number,
  ) {
    return await this.usersService.enablePush(user_id, update_dto)
  }

  @Put('push/disable')
  @HttpCode(HttpStatus.OK)
  async disablePush(
    @Param('id') user_id: number,
    @Body() update_dto: UpdateNotificationDto,
  ) {
    return await this.usersService.disablePush(user_id, update_dto)
  }

  @Get('push/notifications')
  @HttpCode(HttpStatus.OK)
  async fetchPusNotifications() {
    return await this.usersService.getPushNotifications();
  }
}
The @Controller('users') defines the base endpoint. The @Post decorator handles HTTP POST requests, which are used to create a new user. To create a new user, the create method of the UsersService is called with the user information passed as @Body.
The @Put decorator handles HTTP PUT requests, which update a user’s profile. The updateProfile method of the UsersService is then called with the user ID as the request @Param and the updated user information to update the user’s profile.
Similarly, the @Put('push/enable') and @Put('push/disable') methods handle enabling or disabling push notifications for a user. The @Param decorator is used to extract the user ID from the URL, while the @Body decorator is extracts the information needed for enabling or disabling push notifications.
The enablePush and disablePush methods of the UsersService are then called with the user ID and the necessary information to enable or disable push notifications for the user. Finally, the @Get('push/notifications') method handles fetching push notifications. The getPushNotifications method of the UsersService is then called to fetch the push notifications.
The @HttpCode decorator is used to set the HTTP response code for each method, with the default being 200 (OK) for all methods.
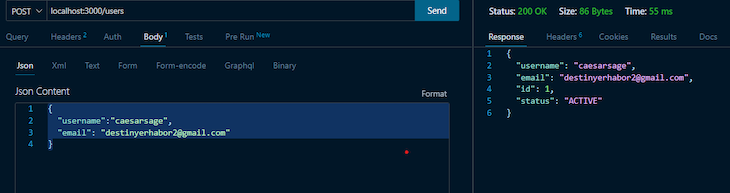
To test our user controllers, we’ll use VS Code Thunder Client. First, let’s create a user:
The user must enable push notifications in order to receive them. So, we’ll send our device_type and unique FCM token. Keep in mind that the FCM identification of your client app on a certain device is represented by the notification token.
When it first registers with FCM, your app obtains a registration token while operating on a device or the browser; the registration token is created at runtime.
notification_token:
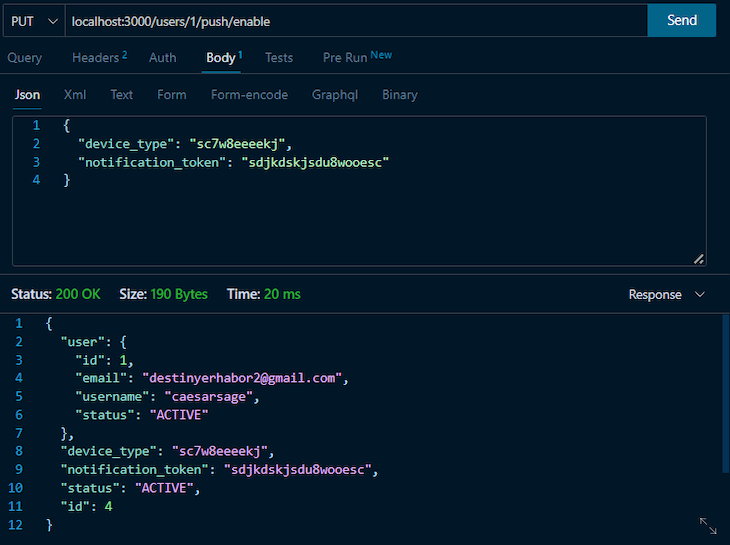
The user has accepted the push notification and its notification token generated from the frontend being stored. Therefore, the user can update their profile and notification prefrences, save, and get the notification about their profile update when handled on the frontend:

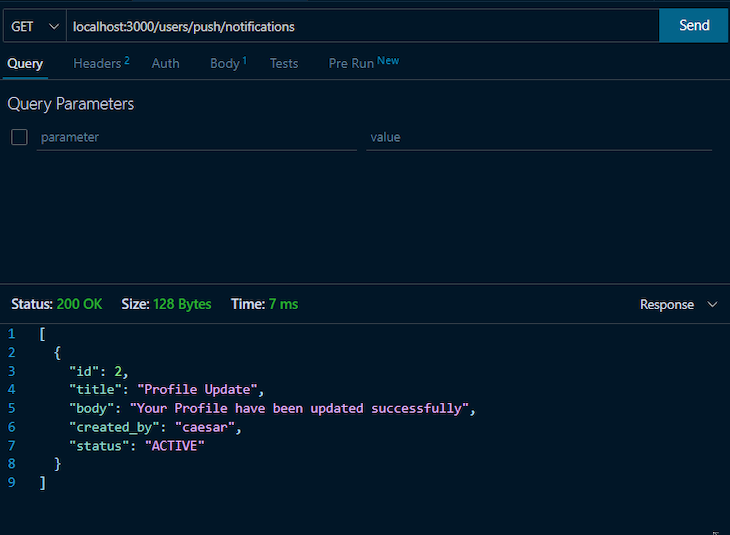
Finally, you can view all notifications:
On the client side, you’ll need to use the Firebase JavaScript SDK to request permission to show push notifications and handle incoming push notifications.
In this article, we learned how to implement in-app notifications in a NestJS app using Firebase and MySQL. First, we set up the Firebase Admin SDK to send push notifications. We then set up a MySQL database to store notification data, and we created a service to retrieve and send notifications based on data in the database.
I hope you enjoyed this article. Leave a comment if you have any questions, and happy coding!
Install LogRocket via npm or script tag. LogRocket.init() must be called client-side, not
server-side
$ npm i --save logrocket

// Code:

import LogRocket from 'logrocket';
LogRocket.init('app/id');
// Add to your HTML:

<script src="https://cdn.lr-ingest.com/LogRocket.min.js"></script>
<script>window.LogRocket && window.LogRocket.init('app/id');</script>

Learn how to protect full-stack projects from NPM supply chain attacks with a practical security checklist.

Explore 15 essential MCP servers for web developers to enhance AI workflows with tools, data, and automation.

Learn how contrast-color() automatically picks accessible text colors using native CSS, without JavaScript.

Learn how to build a harness-style AI workflow using Claude Code with specialized Dev, QE, and Ops subagents, gated handoffs, MCP telemetry, and LEARNING.md.
Hey there, want to help make our blog better?
Join LogRocket’s Content Advisory Board. You’ll help inform the type of content we create and get access to exclusive meetups, social accreditation, and swag.
Sign up now

