In a nutshell, Rockpack is Create React App (CRA) on steroids. It is a React bootstrapping tool that aims to do the heavy lifting and it simplifies the process of setting up React applications.

Rockpack enables developers to bootstrap React applications with support for server-side rendering, bundling, linting, testing, logging, localizing, and more.
The easiest way to think of Rockpack is that it is CRA with a lot of useful, well thought out, and, often, required additions.
In this post, we will learn about Rockpack, its architecture, modules, and why it’s needed.
One of the greatest things about Rockpack is that it has a modular architecture so you can use only the Rockpack module you want.
In this section, we will be looking at each Rockpack module in detail.
This is a Webpack based React bundler. It is preconfigured with the necessary loaders and plugin and using the best practices out of the box.
To use this module run the follow steps below.
#NPM
npm install  @rockpack/compiler --save-dev
#YARN
yarn add @rockpack/compiler --dev
build.js file in the root directory with the following code:
const { frontendCompiler } = require('@rockpack/compiler');

frontendCompiler();
build.js:
#DEVELOPMENT
cross-env NODE_ENV=development node build
#PRODUCTION
cross-env NODE_ENV=production node build
When you run the production build it creates a minified version of your app with production optimization.
The Rockpack compiler ships with numerous awesome features. Below are some of them:
The list continues. You can get a full list here.
This important library provides universal server-side rendering (SSR) support for the Rockpack project. It is said to provide universal SSR support because it works with Redux (thunk, sagas), Apollo, Mobx, and other solutions.
Out of the box React supports SSR but it does this without considering asynchronous operations. @rockpack/ussr adds support for asynchronous operations to React during SSR.
It provides some APIs (custom hooks) that are analogous to their React counterparts. Some of these are the useUssrState and the useUssrEffect. These are analogous to the useState and the useEffect hook. However, the useUssrState and the useUssrEffect supports asynchronous operations and SSR.
To use the @rockpack/ussr follow the steps below.
# NPM
npm install @rockpack/ussr --save
npm install @rockpack/compiler --save-dev

# YARN
yarn add @rockpack/ussr
yarn add @rockpack/compiler --dev
SSR support like this:
import React from 'react';
import { useUssrState, useUssrEffect } from '@rockpack/ussr';

const getUsers = async () => {
  // performs some async operation
}

export const App = () => {
  const [users, setUsers] = useUssrState({ users: [] });
  useUssrEffect(async () => {
        const allUsers = await getUsers();
        setUsers(allUsers);
  });
  return {
    // performs some operations to render the list of users
  };
};
client.jsx:
import React from 'react';
import { hydrate } from 'react-dom';
import createUssr from '@rockpack/ussr';
import { App } from './App';

const [Ussr] = createUssr(window.USSR_DATA);
hydrate(
    <Ussr>
        <App />
    </Ussr>,
    document.getElementById('root')
);
The line:
const [Ussr] = createUssr(window.USSR_DATA);
Ensures the useUssrState works correctly by associating the state executed on the server with the client.
Also, build.js and a server.jsx (which uses a Koa) file are set up by default once we choose to bootstrap a SSR application. These files are preconfigured to work with each other and need no further editing.
You can get more details on using the @rockpack/ussr module here.
This uses Jest and some recommended modules and add-ons. It features a robust test suite configured with best practices. And it fully supports TypeScript and babel.
To use this module follow the steps below.
# NPM
npm install @rockpack/tester --save-dev

# YARN
yarn add @rockpack/tester --dev
test.js in your project root and add the following codes:
const tests = require('@rockpack/tester');

tests();
node tests.js

#Development
node tests.js --watch
This is Eslint configured using best practices.
To use this module follow the steps below.
# NPM
npm install @rockpack/codestyle --save-dev

# YARN
yarn add @rockpack/codestyle --dev
eslintrc.js file with the following code:
const { rockConfig } = require('@rockpack/codestyle');

module.exports = rockConfig({
  'no-plusplus': 'error'
});
rockConfig() function as shown below:
module.exports = rockConfig({}, {
  plugins: [
    'some new plugin'
  ]
});
You can learn more about this module here.
This is where things get really interesting and where Rockpack shines. The @rockpack/logger module is an advanced logging system that records all user actions (buttons pressed, OS information, displays, etc. ). These actions can then be analyzed during a debugging section.
To use this module follow the steps below.
# NPM
npm install @rockpack/logger --save

# YARN
yarn add @rockpack/logger
App.js component in the LoggerContainer component as seen below:
...
  <LoggerContainer
    sessionID={window.sessionID}
    limit={75}
    getCurrentDate={() => dayjs().format('YYYY-MM-DD HH:mm:ss')}
    stdout={showMessage}
    onError={stackData => sendToServer(stack)}
    onPrepareStack={stack => stack.language = window.navigator.language}
  >
    <App/>
  </LoggerContainer>
...
The above code snippet should be the return value of an exported anonymous function. The complete setup and usage of the @rockpack/logger module is a bit demanding.
This is an advance localizer module that uses gettext. It provides an easy way to (localize) adapt our applications to different languages and regions.
# NPM
npm install @rockpack/localaser --save
npm install @rockpack/compiler --save-dev

# YARN
yarn add @rockpack/localaser
yarn add @rockpack/compiler --dev
App.js in LocalizationObserver components as shown below:
import { LocalizationObserver } from '@rockpack/localaser';

const Root = () => {
    return (
      <LocalizationObserver
        currentLanguage={this.state.currentLanguage}
        languages={this.state.languages}
      >
        <App/>
      </LocalizationObserver>
    )
}
The setup and usage of the @rockpack/localaser module are a bit demanding.
Some notable Rockpack alternatives are Next.js and Create React App. However, Rockpack outshines its competitors in a number of ways.
First, all Rockpack application supports the following out of the box:
The full list can be found here (these are all put together using best practices). By providing all these out of the box Rockpack aims to reduce the application setup time. This is regardless of the app size and developer skill.
Other reasons to use Rockpack include:
The advantages of Rockpack are exciting and great, any developer would be interested in using this awesome library. We will look at how to bootstrap React applications using Rockpack in the next section.
The easiest way to get started with Rockpack is to use the @rockpack/starter module. This is part of the Rockpack project.
It supports three different types of application:
React CSR) – This gives boilerplate code similar to Create React AppReact SSR Light Pack) — This gives boilerplate code the following:
SSR)Koa for its Node.js server@loadable/componentsReact SSR Full Pack) — This gives boilerplate code with the following:
React SSR Light PackTo bootstrap any of the applications, follow the steps below.
#NPM
npm install @rockpack/starter -g
rockpack < your project name>
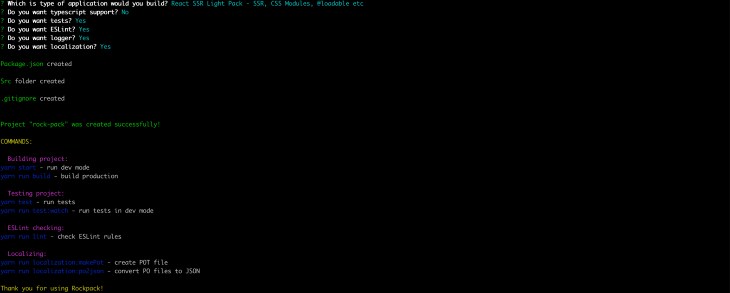
cd < your project name>
# and run
npm start
Rockpack is a well-thought-out library. I am already excited about using it. One of the beautiful things about Rockpack is that there is no real learning curve because you still get to write React code. And it offers you the flexibility of using your preferred library for things like state management.
Install LogRocket via npm or script tag. LogRocket.init() must be called client-side, not
server-side
$ npm i --save logrocket

// Code:

import LogRocket from 'logrocket';
LogRocket.init('app/id');
// Add to your HTML:

<script src="https://cdn.lr-ingest.com/LogRocket.min.js"></script>
<script>window.LogRocket && window.LogRocket.init('app/id');</script>

Learn how to use Skybridge, an open-source React framework, to build and deploy cross-platform AI apps and interactive UI widgets for ChatGPT, Claude, and MCP clients from a single codebase.

Learn how to set up Meilisearch, index documents, and build keyword, semantic, and hybrid search with AI-powered retrieval.

Compare pnpm and npm across security defaults, disk usage, dependency strictness, and workspace policy to decide which package manager fits your project.

I migrated 20 production-style components from Tailwind to StyleX. Here’s what the data showed about LOC, CSS bundle size, build time, and type safety.
Hey there, want to help make our blog better?
Join LogRocket’s Content Advisory Board. You’ll help inform the type of content we create and get access to exclusive meetups, social accreditation, and swag.
Sign up now

