Atlassian, GitHub, Slack, and Zoom are some popular services that many of us use everyday. If you are a curious soul, I bet that you are fascinated by how these SaaS products issue out custom subdomains to their customers on the fly.

Let’s consider an example. When signing up for an Atlassian product, you get a subdomain for your company, like mycompany.atlassian.net; when you publish on GitHub Pages, you automatically get a subdomain, like myusername.github.io.
Im this guide, I will take you through the process of building a web app that supports multiple subdomains step-by-step, demystifying the parts that make it seem complex.
Before we get started, let’s map out the journey, so you can refer back and forth as you go along.
Aside from the services you’ll need to follow this tutorial, it is worth mentioning that I will be using Linux Ubuntu v 20.04 in my server instance. You can use any OS of your choice.
This tutorial will require you to have:
For this article, I will use change.co.ke, and my domain registrar is KenyaWebExperts. You can purchase a domain name from any domain registrar of your choice, such as:
You’ll need a cloud provider in order to deploy a server instance.
For this article, I will be using AWS EC 2, but you can use any cloud provider of your choice.
Here are some examples of other cloud providers besides AWS:
You should also have a public IP address for your server instance. For this article, my IP address is 3.143.148.31.
Its purpose is to set up DNS records. For this article, I will be using Amazon’s Route 53.
You can use any DNS provider of your choice, such as:
For this article, I will be using MongoDB, hosted in MongoDB Atlas. You can use any database of your choice, provided that you can store and retrieve data.
To make our journey easier, here are the definitions of some terms you’ll need to know:
A naming system that is used for identifying IP networks over the internet where the domains and the IP addresses are unique identifiers for a network over the internet.
It works like the Contacts app on your phone, in that you can save people’s phone numbers labelled with their names (assuming both the numbers and names are uniquely theirs).
An A-record maps a domain (or a subdomain, or a wildcard domain) to an IP address. A wildcard domain is a record in the DNS zone that responds to requests for subdomains that have not previously been defined, usually defined by an asterisk prepended to the domain name, i.e.,*.logrocket.com.
Let’s say you request somerandomtext.logrocket.com, but the DNS server doesn’t recognize it. The DNS will attempt to check the value of the wildcard, and if *.logrocket.com maps to an A-record of 104.22.4.148, then any undefined subdomain of logrocket.com will be served by the resource whose IP address is 104.22.4.148.
Therefore, on requesting somerandomtext.logrocket.com, the DNS server will respond with the IP address 104.22.4.148.
Time to Live is a time interval that specifies how long a DNS record should be cached by a DNS server. For example, if you set an A-record’s TTL for 1 hour, then the DNS server will cache the A-record for one hour.
In the development stage, it is a good practice to set a low TTL so that you can quickly change the IP address of your server instance and see your changes without having to wait for for the TTL to expire, which can sometimes take a while. The lower the TTL, the shorter the DNS’s propagation time, and vice versa.
At the production/live stage, you should set a high TTL so that you can avoid DNS latency issues.
A TXT record is a record that maps a domain, subdomain, or wildcard domain to a text value. It is mostly used by external entities to prove that a person or organization indeed owns the domain they claim to.
The first thing we need to do is point our domain name to our Nameservers. This is done by logging into the domain registrar’s control panel, clicking the Nameservers tab, and adding the Nameservers issued to us by the DNS provider. My DNS provider (AWS Route 53) issued me the following Nameservers:
ns-1443.awsdns-52.orgns-2028.awsdns-61.co.ukns-720.awsdns-26.netns-418.awsdns-52.comThe answer to this varies, depending on the DNS provider. I obtained mine by creating a Hosted Zone in Route 53. The specific instructions for Route 53 are out of scope for this article, but you can find them in the AWS documentation.
Below are screenshots of the DNS setup for this article.
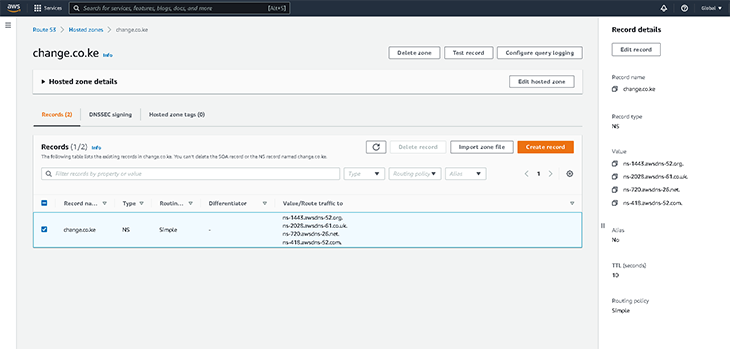
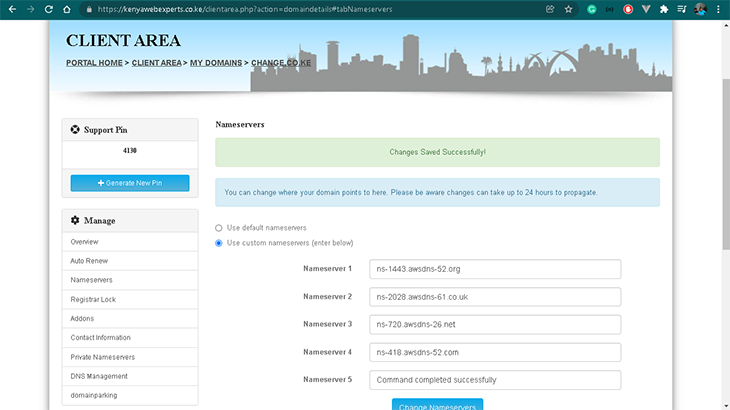
Next, we will add an A-record to our domain name. This is done by logging into the DNS provider’s control panel and then adding our domain name to the DNS zone to resolve to the IP address of our Cloud Provider’s deployed instance. Below is a screenshot showing this configuration on Route53. Take note of the domain name (change.co.ke), IP address (3.143.148.31), the TTL (10 seconds), and the record type (A-record).

Next, we will add another A-record. This time it will be a wildcard domain. We can do this by logging into the DNS provider’s control panel and adding a wildcard domain name to the DNS zone to resolve to the IP address of our cloud provider’s deployed instance.
Below is a screenshot showing this configuration on Route 53. Take note of the domain name (*.change.co.ke), IP address (3.143.148.31), the TTL (10 seconds), and the record type (A-record).

We’ve set up our domain name and DNS and we have our IP address. Now, we need to set up Nginx, a web server that sits on top of the TCP/IP stack. For our article, we will use Nginx as a reverse proxy.
It is a good practice. Our EC2 instance exposes external ports 80 and 443 to the internet. If we were to use Node.js as a server, we would also have to open the internal ports 80 and 443 to the internet, too.
There is no problem with this, until we need to configure multiple Node servers on the same machine for load balancing purposes — not to mention how maintaining SSL certificates without Nginx can be a pain.
Alternatively, we can add more ports, but wouldn’t you find it ugly to tell your clients to use addresses like change.co.ke:3000 or change.co.ke:8080?
Run the following command in your terminal to install Nginx:
sudo apt-get install nginx
Next, we will install SSL certificates for both our domain and our wildcard domain.
https://certbot.eff.org/instructions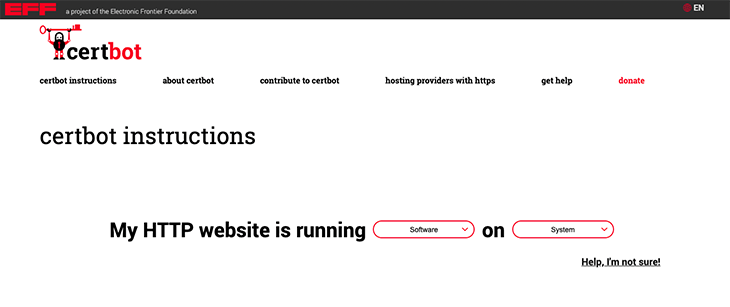
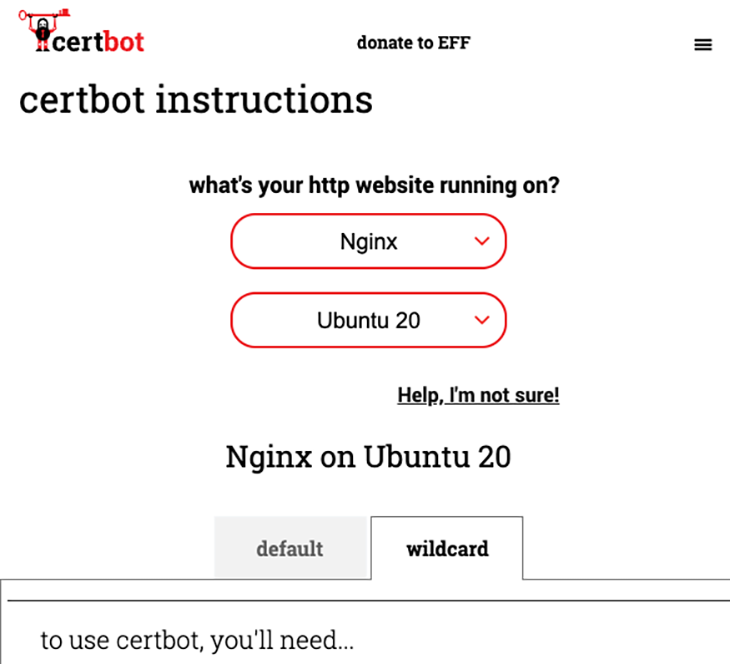
The form helps you to get the exact commands you need to run in the terminal for your specific OS. In my case, when using an Ubuntu 20.04 distro, the form recommends that I use the following commands:
First, install Snap by running the below commands in the terminal:
sudo snap install core; sudo snap refresh core
Then install and prepare Certbot by running the below commands in the terminal:
sudo snap install --classic certbot
sudo ln -s /snap/bin/certbot /usr/bin/certbot
sudo snap set certbot trust-plugin-with-root=ok
Now we are ready to run the Certbot commands.
For the domain change.co.ke, run the command:
certbot certonly --manual --preferred-challenges=dns -d change.co.ke -i nginx
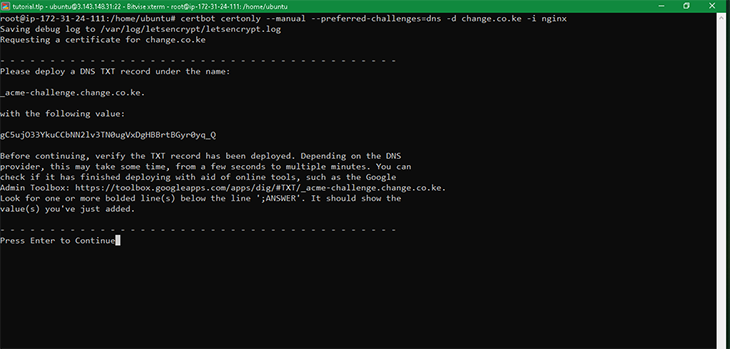
As seen in the screenshot below, the script will prompt you to add a TXT record to your DNS zone. In my case, I was prompted to add a TXT record of _acme-challenge.change.co.ke with its value as gC5ujO33YkuCCbNN2lv3TN0ugVxDgHBBrtBGyr0yq_Q.
The screenshot below shows the output of the command.
To add this value, I logged into the DNS provider’s control panel (i.e., Route 53) and added the TXT record, as shown in the screenshot below.
Take note of the record name (_acme-challenge.change.co.ke), the value (gC5ujO33YkuCCbNN2lv3TN0ugVxDgHBBrtBGyr0yq_Q), the record type (TXT-record), and the TTL (10seconds).

After adding the TXT record in your DNS zone, go back to the terminal and hit Enter.
Your SSL certificate for your root domain has been created. The response when you run the command will show you where the certificate has been stored in your OS’s filesystem. In my case, the locations were:
1. Certificate for change.co.ke is saved at: /etc/letsencrypt/live/change.co.ke/fullchain.pem
2. Key for change.co.ke is saved at:         /etc/letsencrypt/live/change.co.ke/privkey.pem
For the wildcard domain *.change.co.ke, run the command:
certbot certonly --manual --preferred-challenges=dns -d *.change.co.ke -i nginx
The procedure that follows is similar to the one for the domain change.co.ke above; the only difference is the value of the TXT record. Add this value to the TXT record in your DNS zone. Then, go back to the terminal and hit Enter.
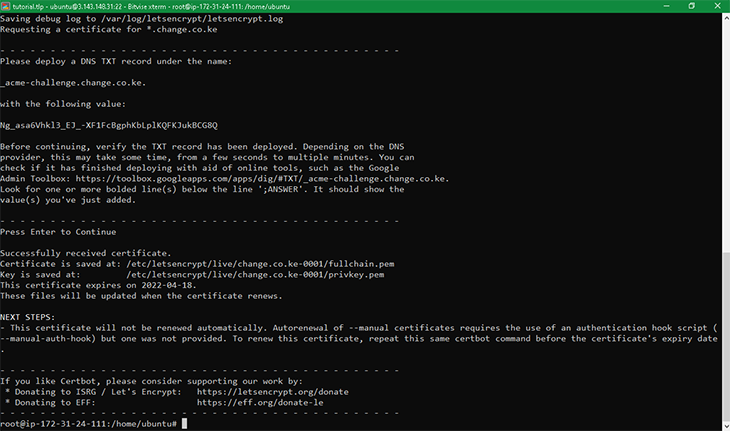
As seen in the screenshot below, the wildcard’s certificate has been stored in the following locations:
1. Certificate for *.change.co.ke is saved at: /etc/letsencrypt/live/change.co.ke-0001/fullchain.pem
2. Key for *.change.co.ke is saved at:         /etc/letsencrypt/live/change.co.ke-0001/privkey.pem
At this point, we have our SSL certificates installed. We can now configure Nginx to use these certificates.
In Ubuntu, the Nginx configuration file is located at /etc/nginx/sites-available/default. We will edit this file by running sudo nano /etc/nginx/sites-available/default.
First, clear everything inside this file and add the following lines:
# For use in /etc/nginx/sites-available/default

# This directive redirects all(All is denoted by a dot prefix on the domain) HTTP requests of change.co.ke and *.change.co.ke to their HTTPS versions respectively.
server {
  listen 80;
  listen [::]:80;
  server_name .change.co.ke;

  return 301 https://$server_name$request_uri;
}

# This directive tells Nginx to use HTTP2 and SSL. And also proxy requests of https://change.co.ke to a local Node.js app running on port 9000
server {
    listen 443 ssl http2;
    listen [::]:443 ssl http2;
  server_name change.co.ke;

  ssl_certificate /etc/letsencrypt/live/change.co.ke/fullchain.pem;
  ssl_certificate_key /etc/letsencrypt/live/change.co.ke/privkey.pem;
  ssl_session_timeout 5m;

  location / {
    proxy_set_header X-Real-IP $remote_addr;
    proxy_set_header X-Forwarded-For $proxy_add_x_forwarded_for;
    proxy_set_header X-NginX-Proxy true;
    proxy_pass http://localhost:9000/;
    proxy_ssl_session_reuse off;
    proxy_set_header Host $http_host;
    proxy_cache_bypass $http_upgrade;
    proxy_redirect off;
  }
}

# This directive tells Nginx to use HTTP2 and SSL. And also proxy requests of wildcard *.change.co.ke (first level subdomain of change.co.ke) to a local Node.js app running on port 9000
server {
    listen 443 ssl http2;
    listen [::]:443 ssl http2;
  server_name *.change.co.ke;

  ssl_certificate /etc/letsencrypt/live/change.co.ke-0001/fullchain.pem;
  ssl_certificate_key /etc/letsencrypt/live/change.co.ke-0001/privkey.pem;
  ssl_session_timeout 5m;

  location / {
    proxy_set_header X-Real-IP $remote_addr;
    proxy_set_header X-Forwarded-For $proxy_add_x_forwarded_for;
    proxy_set_header X-NginX-Proxy true;
    proxy_pass http://localhost:9000/;
    proxy_ssl_session_reuse off;
    proxy_set_header Host $http_host;
    proxy_cache_bypass $http_upgrade;
    proxy_redirect off;
  }
}
The most important part of this whole setup is the networking bits, and now we’re done with them! You can now comfortably use any tech stack to build your web app. I’ll be using the MERN stack for this tutorial, which includes:
To keep things simple, our web app will be a simple CRUD application that will allow us to create a user and assign them a unique subdomain. If we browse a subdomain that has been assigned to a user, we will see the information of that user. If we try to browse a subdomain that has not been assigned to a user, we will get an error message.
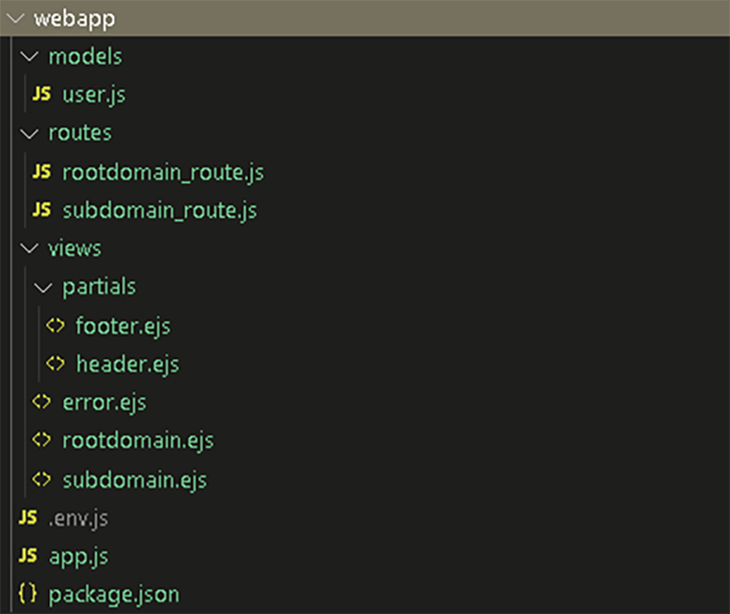
The screenshot below shows the directory structure of our web app.
First, let’s create a directory for our Node app; I’ll call mine webapp. Then I will cd into this directory and run the following command:
npm init --yes
Next, I will install the required packages:
npm install ejs express mongoose signale vhost mongoose-unique-validator --save
The package vhost is used to create virtual hosts. We will use this package to create virtual hosts for our web app to separate the subdomains from the root domain.
Next, we will create a file ./.env.js, which will contain the environment variables that we need to connect to our MongoDB database. It will also contain the port that we will use to run our Node app and the domain that we will use to create virtual hosts.
You should replace the values of the MONGODB_URI to your MongoDB Atlas URI and DOMAIN to your domain name. The code in this file will look like this:
module.exports = {
  ...process.env,
  MONGODB_URI: 'mongodb+srv://dbuser:[email protected]/tutorial?retryWrites=true&w=majority',
  DOMAIN: 'change.co.ke',
  PORT: 9000
};
Next, we will create a file called ./app.js. This file will contain the code for connecting to our MongoDB database and running our Express app on port 9000. This file will also contain the code that splits traffic between the root domain and the subdomains, depending on the user’s request.
Since both the root domain and the subdomains will be served through the same Express app, the vhost package will be used to split traffic between the root domain and the subdomains. The code in this file will look like this:
process.env = require('./.env.js');
const express = require('express');
const path = require('path');
const mongoose = require('mongoose');
const vhost = require('vhost');

const rootDomainRoutes = require('./routes/rootdomain_route.js');
const subDomainRoutes = require('./routes/subdomain_route.js');

const main = async () => {
    const app = express();
    const port = process.env.PORT;

    const db = await mongoose.connect(process.env.MONGODB_URI);
    console.log('Connected to MongoDB ' + db.connection.name);

    // view engine setup
    app.set('views', path.join(__dirname, 'views'));
    app.set('view engine', 'ejs');

    app.use(express.json());
    app.use(express.urlencoded({ extended: false }));

    app.use(vhost(process.env.DOMAIN, rootDomainRoutes))
        .use(vhost('www.' + process.env.DOMAIN, rootDomainRoutes))
        .use(vhost('*.' + process.env.DOMAIN, subDomainRoutes));

    // error handler
    app.use(function (err, req, res) {
        res.status(404).render('error', {
            title: 'Error',
            Domain: process.env.DOMAIN,
        });
    });

    app.listen(port, () => console.log('App now listening on port ' + port));

    return app;
};

main()
    .then(() => console.log('App is running'))
    .catch((err) => console.log({ err }));
The part of the code .use(vhost('www.' + process.env.DOMAIN, rootDomainRoutes)) simply tells Node to consider the www.change.co.ke subdomain as part of the root domain. Without this line, Node would consider www.change.co.ke as an undefined subdomain, and therefore would have handled it in the wildcard.
Next, we’ll create a file called ./routes/rootdomain_route.js. This file will contain the code for the routes of the root domain. The code in this file will look like this:
const express = require('express');
const router = express.Router();
const User = require('../models/user.js');

router.get('/', async (req, res, next) => {
    var allUsers = await User.find({});

    return res.render('rootdomain', {
        title: 'Accessing: ' + req.vhost.hostname,
        allUsers: allUsers.map((user) => {
            return {
                ...user._doc,
                link: 'https://' + user.link,
                fullname: user.fullname,
            };
        }),
    });
});

router.post('/', async (req, res) => {
    try {
        let data = {
            email: req.body.email,
            username: req.body.username,
            firstname: req.body.firstname,
            lastname: req.body.lastname,
        };

        var user = new User(data);
        await user.save();
        return res.redirect('/');
    } catch (error) {
        return res.json({ ...error });
    }
});
module.exports = router;
Next, we will create a file called ./routes/subdomain_route.js. This file will contain the code specific to a requested subdomain. The code in this file will look like this:
const express = require('express');
const router = express.Router();
const User = require('../models/user.js');

router.use(async (req, res, next) => {
    var users = await User.find({});

    users.forEach((user) => {
        if (user.link.indexOf(req.headers.host) > -1) {
            res.profile = {
                ...user._doc,
                link: 'https://' + user.link,
                fullname: user.fullname,
            };
        }
    });

    next();
});

router.get('/', (req, res, next) => {
    if (res.profile) {
        return res.render('subdomain', {
            subdomain: req.vhost.hostname,
            profile: res.profile,
            title: 'Accessing: ' + req.vhost.hostname,
        });
    } else {
        return res.render('subdomain', {
            subdomain: req.vhost.hostname,
            profile: null,
            title: 'Invalid: ' + req.vhost.hostname,
            create_subdomain_link: 'https://' + process.env.DOMAIN,
        });
    }
});

module.exports = router;
Next, we will create a file called ./models/user.js. This file will be used to create a MongoDB collection called users, which we’ll then use to store the data of the users. The code in this file will look like this:
const Mongoose = require('mongoose');
const uniqueValidator = require('mongoose-unique-validator');

const UserSchema = new Mongoose.Schema({
    firstname: { type: String },
    lastname: { type: String },
    email: {
        type: String,
        require: true,
        unique: true,
        uniqueCaseInsensitive: true,
    },
    username: {
        type: String,
        require: true,
        unique: true,
        uniqueCaseInsensitive: true,
    },
});

UserSchema.plugin(uniqueValidator);

UserSchema.virtual('fullname').get(function () {
    return this.firstname + ' ' + this.lastname;
});

UserSchema.virtual('link').get(function () {
    return this.username + '.' + process.env.DOMAIN;
});

module.exports = Mongoose.model('User', UserSchema);
Next, we will create a file called ./views/partials/header.ejs. This file will be used to render the header of every page. The code in this file will look like this:
<!DOCTYPE html>
<html>
  <head>
    <title><%= title %></title>
  </head>
  <body>
Next, we will create a file called ./views/partials/footer.ejs. This file will be used to render the footer of every page. The code in this file will look like this:
 </body>
</html>
Next, we will create a file called ./views/rootdomain.ejs. This file will be used to render the root domain page. The code in this file will look like this:
<%- include('./partials/header.ejs') %>
<h2><%= title %></h2>

<div id="main">
  <div id="new">
    <form method="POST" action="/">
      <h3>Create a new subdomain</h3>
      First Name: <input type="text" name="firstname"><br>
      Last Name: <input type="text" name="lastname"><br>
      Email: <input type="email" name="email"><br>
      Username: <input type="text" name="username"><br>
      <input type="submit" value="Signup">
    </form>
  </div>

  <div id="list">
    <% if(allUsers.length){ %>
      <p>List of registered users and their Subdomains</p>

      <table>
        <thead>
          <tr>
            <th>Id</th>
            <th>Name</th>
            <th>Email</th>
            <th>Username</th>
            <th>Subdomain</th>
          </tr>
        </thead>
        <tbody>
          <%
            allUsers.map((user)=>{
          %>
            <tr>
              <td>
                <%= user._id %>
              </td>
              <td>
                <%= user.fullname %>
              </td>
              <td>
                <%= user.email %>
              </td>
              <td>
                <%= user.username %>
              </td>
              <td>
                <a href="<%= user.link %>"><%= user.link %></a>
              </td>
            </tr>
          <% })%>
        </tbody>
      </table>

    <% }else{ %>
      <p>No users have been registered</p>
    <% } %>
  </div>
</div>
<%- include('./partials/footer.ejs') %>
Next, we will create a file called ./views/subdomain.ejs. This file will be used to render the subdomain page. The code in this file will look like this:
<%- include('./partials/header.ejs') %>

<h2><%= title %></h2>

<div id="main">

  <% if (profile) { %>
    <h3>This is the profile page for <%= profile.fullname %>.</h3>
    <p>Email: <%= profile.email %></p>
    <p>Username: <%= profile.username %></p>
    <p>Subdomain: <a href="<%= profile.link %>"><%= profile.link %></a></p>

  <% }else{ %>
      <p>
          This is not a valid subdomain.
      </p>
      <p>
          <a href="<%= create_subdomain_link %>">Want this subdomain? Click to claim it now.</a>
      </p>
  <% } %>

</div>
<%- include('./partials/footer.ejs') %>
At this point, all of our essential files are in place. We are ready to start our server.
To start the server, we will run the following command:
node ./app.js
If you have followed every above step, you should see the following:
https://change.co.ke, in my case) will display a page that looks like the screenshot below:
https://somerandomtext.change.co.ke) will display a page that looks like the screenshot below:


If the above screenshots resemble what you see in your browser, congratulations! You have successfully understood the basics of the project.
In this tutorial, we have covered what is required for building a web app that supports multiple subdomains. You now have a solid foundation to build your web app that supports multiple customizable subdomains, good job!
I am looking forward to seeing what you build. Happy coding, and stay safe!
Install LogRocket via npm or script tag. LogRocket.init() must be called client-side, not
server-side
$ npm i --save logrocket

// Code:

import LogRocket from 'logrocket';
LogRocket.init('app/id');
// Add to your HTML:

<script src="https://cdn.lr-ingest.com/LogRocket.min.js"></script>
<script>window.LogRocket && window.LogRocket.init('app/id');</script>
Hey there, want to help make our blog better?
Join LogRocket’s Content Advisory Board. You’ll help inform the type of content we create and get access to exclusive meetups, social accreditation, and swag.
Sign up now
Which AI frontend dev tool reigns supreme in July 2025? Check out our power rankings and use our interactive comparison tool to find out.

Learn how OpenAPI can automate API client generation to save time, reduce bugs, and streamline how your frontend app talks to backend APIs.

Discover how the Interface Segregation Principle (ISP) keeps your code lean, modular, and maintainable using real-world analogies and practical examples.

<selectedcontent> element improves dropdowns
One Reply to "How to build a web app with multiple subdomains using Nginx"
Amazing. Is there a way to tell nginx to avoid resolving some domains? meaning it does not exist