Handling media uploads securely and efficiently is something developers can’t afford to get wrong, especially if their website relies heavily on user-generated content or dynamic media delivery. In Astro, this can be achieved through integration with a headless Digital Asset Manager (DAM) like Cloudinary.

A DAM provides a centralized way to manage media assets like images, videos, and other rich media. With headless DAMs like Cloudinary, you can store, transform, and deliver media through APIs or SDKs, making them a good fit for Astro’s component-based architecture.
In this article, you’ll learn how to build a secure file upload system in Astro using Cloudinary’s SDKs and native integration. We’ll cover how to handle uploads safely using Astro’s SSR mode while maintaining Astro’s static-first advantages, and display media using Astro components.
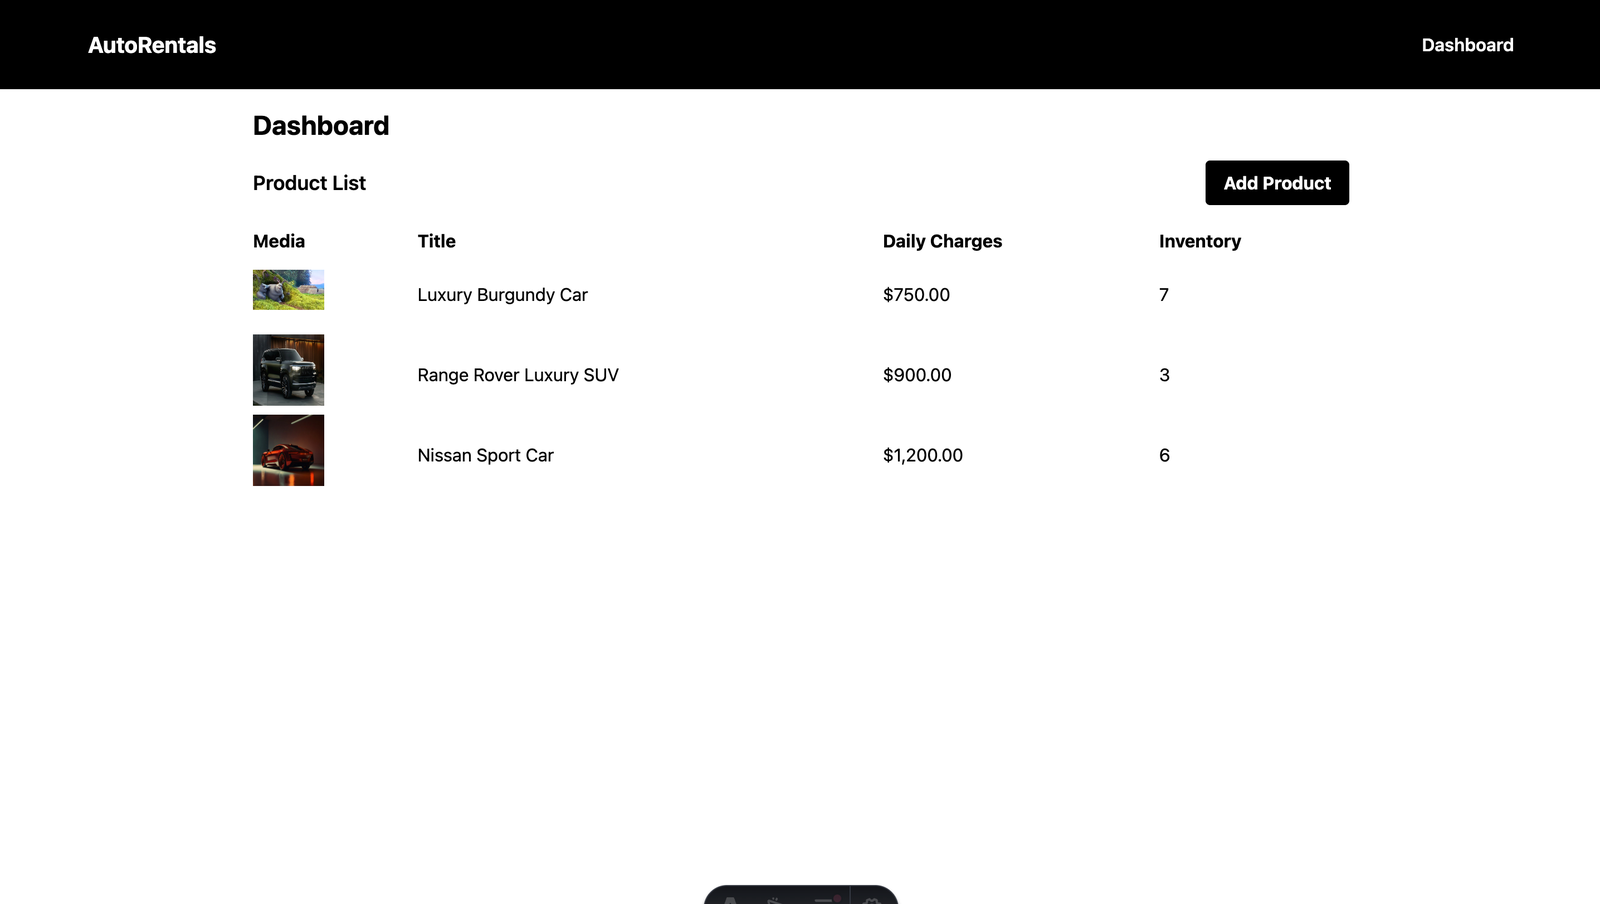
We will build a product showcase portal where users can create products and upload media files (video and image) for each product, view the list of products, and delete media uploads.
This is what the final application will look like:
Here is the GitHub repo for the final build.
Run the following command in your terminal to scaffold an Astro project:
npm create astro@latest
Then, choose the basic template.
Next, update the project’s package.json file with the following dependencies:
{
  "dependencies": {
    "@astrojs/db": "^0.14.11",
    "@astrojs/netlify": "^6.2.6",
    "@astrojs/react": "^4.2.4",
    "@tailwindcss/vite": "^4.1.4",
    "@types/react": "^19.1.2",
    "@types/react-dom": "^19.1.2",
    "astro": "^5.6.2",
    "react": "^19.1.0",
    "react-dom": "^19.1.0",
    "tailwindcss": "^4.1.4",
    "swiper": "^11.2.6",
    "uuid": "^11.1.0"
  }
}
@astrojs/tailwind: For utility-first CSS styling with Tailwind@astrojs/db: A local-first ORM/ SQL database layer for database interactions, defining schema, and seeding data@astrojs/react: To enable the use of React components within the Astro application@astrojs/netlify: Integration for deploying Astro projects on Netlifyuuid: Used to generate universally unique IDsastro:db)During development, Astro uses your database configuration to automatically generate local TypeScript types and autocompletion based on your defined schemas each time the dev server is started. We’ll configure and use Astro DB for the app database. Let’s begin by defining the database tables and their relationships.
Create a db/config.ts file at the root of your project, where you will define a schema for the database tables and their relationships. Then add the following:
import { column, defineDb, defineTable } from "astro:db";
const Product = defineTable({
  columns: {
    id: column.text({ primaryKey: true }),
    description: column.text(),
    price: column.number(),
    brand: column.text(),
    slug: column.text({ unique: true }),
    stock: column.number(),
    tags: column.text(),
    name: column.text(),
    type: column.text(),
  },
});
const ProductMedia = defineTable({
  columns: {
    id: column.text({ primaryKey: true }),
    productId: column.text({ references: () => Product.columns.id }),
    media: column.text(),
    media_type: column.text(),
  },
});

export default defineDb({
  tables: {
    Product,
    ProductMedia,
  },
});
Here, we’ve defined a database schema using Astro DB with two tables: Product and ProductMedia. The Product table stores details about individual products, the ProductMedia table stores the media type and the media URL or identifier.
The ProductMedia table is linked to the Product table via the productId field, establishing a relationship where each media item (like an image or video) is associated with a specific product.
Next, update astro.config.mjs as follows:
import { defineConfig } from 'astro/config';
import db from '@astrojs/db';

export default defineConfig({
  integrations: [db()],
});
To seed the database with initial data, create a seed-data.ts file in the db folder with the following:
interface SeedVehicle {
  description: string;
  media: string[];
  media_type: string;
  stock: number;
  price: number;
  brand: string;
  slug: string;
  name: string;
  type: VehicleTypes;
  tags: string[];
}
type VehicleTypes = 'COUPE' | 'SEDAN' | 'SPORTS CAR' | 'CONVERTIBLE' | 'TRUCK' | 'STATION WAGON';
export const seedVehicles: SeedVehicle[] = [
  {
    description:
      'Sleek burgundy luxury car with multi-spoke rims in a minimalist beige and brown indoor setting, exuding elegance and modern design.',
    media: ['sample-video.mp4', 'sample-video.mp4'],
    media_type: 'video',
    stock: 7,
    price: 750,
    brand: 'Tesla',
    slug: 'luxury_burgundy_car',
    name: 'Luxury Burgundy Car',
    type: 'COUPE',
    tags: ['sleek vehicle', 'luxury car', 'modern design']
  },
  {
    description:
      'Sleek black SUV with futuristic design parked in front of a modern building with warm lighting and glass panels.',
    media: ['luxury_suv_1.jpeg', 'luxury_suv_2.jpeg'],
    media_type: 'image',
    stock: 3,
    price: 900,
    brand: 'Tesla',
    slug: 'range_rover_luxury_suv',
    name: 'Range Rover Luxury SUV',
    type: 'COUPE',
    tags: ['SUV', 'luxury car', 'modern design']
  },
  {
    description:
      'Front view of a vibrant orange sports car with sharp LED headlights, bold grille, and dramatic lighting in a dark setting.',
    media: ['nissan_sport_1.jpeg', 'nissan_sport_2.jpeg'],
    media_type: 'image',
    stock: 6,
    price: 1200,
    brand: 'Nissan',
    slug: 'nissan_sport_car',
    name: 'Nissan Sport Car',
    type: 'SPORTS CAR',
    tags: ['aerodynamics', 'sports', 'speed']
  },
]
This code defines a SeedVehicle TypeScript interface of a single vehicle object and a list of vehicle objects used to seed data into an application. The VehicleTypes union type defines a limited set of allowed vehicle types.
Next, create a seed.ts file in the db folder with the following:
import { db,Product, ProductMedia } from "astro:db";
import { v4 as UUID } from "uuid";
import { seedVehicles } from "./seed-data";

export default async function seed() {
  const queries: any = [];
  seedVehicles.forEach((p) => {
    const product = {
      id: UUID(),
      description: p.description,
      price: p.price,
      brand: p.brand,
      slug: p.slug,
      stock: p.stock,
      tags: p.tags.join(","),
      name: p.name,
      type: p.type,
    };
    queries.push(db.insert(Product).values(product));
    p.media.forEach((content) => {
      const media = {
        id: UUID(),
        media: content,
        productId: product.id,
        media_type: p.media_type
      };
      queries.push(db.insert(ProductMedia).values(media));
    });
  });
  db.batch(queries);
}
This populates the database with the seed data once the dev server starts. It iterates through seedVehicles from db/seed-data.ts to create Product and associated ProductMedia and uses db.batch() for efficient insertion of multiple product and media records.
To use React and Tailwind in the Astro project, add the following to astro.config.mjs:
import { defineConfig } from 'astro/config';
import react from "@astrojs/react";
import tailwindcss from "@tailwindcss/vite";
export default defineConfig({
  integrations: [react()],
  output: "server",
  vite: {
    plugins: [tailwindcss()]
  }
});
Next, update the tsconfig.json file as follows:
{
  "extends": "astro/tsconfigs/strict",
  "compilerOptions": {
    "baseUrl": ".",
    "paths": {
      "@/*": [
        "src/*"
      ]
    },
    "jsx": "react-jsx",
    "jsxImportSource": "react"
  }
}
This config enables strict TypeScript settings with React JSX support and a cleaner import alias for the src directory.
Next, create styles/global.css in the asset folder and add the following:
@import "tailwindcss";
To enable SSR in the Astro project, add the following to astro.config.mjs:
import { defineConfig } from 'astro/config';
import netlify from "@astrojs/netlify";
export default defineConfig({
  output: "server",
  adapter: netlify(),
});
The netlify adapter allows the server to render any page on demand when a route is visited.
Astro supports creating components with Svelte, Vue, React, SolidJS, and Preact. It’s also framework agnostic, meaning developers can choose and combine different frameworks and libraries for their projects. For this tutorial, we’ll combine React and Astro to create components.
Create shared/Navbar.astro in the components folder and add the following:
---
---
<!-- component -->
<nav
  class="flex justify-between px-20 py-10 items-center fixed top-0 w-full z-10 h-20"
  style="background-color: #000000;"
>
  <h1 class="text-xl text-white font-bold">
    <a href="/">AutoRentals</a>
  </h1>
  <div class="flex items-center">
    <ul class="flex items-center space-x-6">
      <li class="font-semibold text-white">
        <a href="/dashboard">Dashboard</a>
      </li>
    </ul>
  </div>
</nav>
Create ProductSlideShow.astro in the components folder and add the following:
---
import "swiper/css";
import "swiper/css/pagination";
interface Props {
  media: string[];
  media_type: string;
  product_name: string;
}
const { media, media_type, product_name } = Astro.props;
const fullMedia = media.map((mediaURL) => {
  return mediaURL.startsWith("http")
    ? mediaURL
    : `${import.meta.env.PUBLIC_URL}/media/vehicles/${mediaURL}`;
});
---
<div class="swiper mt-10 col-span-1 sm:col-span-2">
  <!-- Additional required wrapper -->
  <div class="swiper-wrapper">
    <!-- Slides -->
    {
      fullMedia.map((mediaURL) => (
        <div class="swiper-slide">
          {media_type === "video" ? (
            <video class="w-full h-full object-cover px-10" autoplay loop muted>
              <source src={mediaURL} type="video/mp4" />
              Your browser does not support the video tag.
            </video>
          ) : (
            <img
              src={mediaURL}
              alt={product_name}
              class="w-full h-full object-cover px-10"
            />
          )}
        </div>
      ))
    }
  </div>
  <div class="swiper-pagination"></div>
</div>
<style>
  .swiper {
    width: 100%;
    height: 600px;
  }
</style>
<script>
  import Swiper from "swiper";
  import { Pagination } from "swiper/modules";
  document.addEventListener("astro:page-load", () => {
    const swiper = new Swiper(".swiper", {
      pagination: {
        el: ".swiper-pagination",
      },
      modules: [Pagination],
    });
  });
</script>
This component displays a product media slideshow using Swiper.js. If a URL doesn’t start with "http", it prepends a local path using import.meta.env.PUBLIC_URL. Depending on the media type, each slide displays either an <img> or <video> element.
For more tutorials using Swiper.js, check out the following guides:
Layouts are Astro components that provide a reusable UI structure for sharing UI elements like navigation bars, menus, and footers across multiple pages.
Create MainLayout.astro in the layouts folder and add the following:
---
import Navbar from "@/components/shared/Navbar.astro";
import "@/assets/styles/global.css";
import { ClientRouter } from "astro:transitions";
interface Props {
  title?: string;
  description?: string;
  image?: string;
}
const {
  title = "AutoRentals",
  description = "One stop shop for all your vehicle rentals",
  image = "/vehicles/images/no-image.png",
} = Astro.props;
---
<html lang="es">
  <head>
    <meta charset="utf-8" />
    <link rel="icon" type="image/svg+xml" href="/favicon.svg" />
    <meta name="viewport" content="width=device-width" />
    <meta name="generator" content={Astro.generator} />
    <title>{title}</title>
    <!-- Meta tags -->
    <meta name="title" content={title} />
    <meta name="description" content={description} />
    <!-- Open Graph / Facebook -->
    <meta property="og:title" content={title} />
    <meta property="og:url" content={Astro.url} />
    <meta property="og:description" content={description} />
    <meta property="og:type" content="website" />
    <meta property="og:image" content={image} />
    <!-- Twitter -->
    <meta property="twitter:card" content="summary_large_image" />
    <meta property="twitter:url" content={Astro.url} />
    <meta property="twitter:title" content={title} />
    <meta property="twitter:description" content={description} />
    <meta property="twitter:image" content={image} />
    <ClientRouter />
  </head>
  <body>
    <Navbar />
    <main class="container m-auto max-w-5xl px-5 pt-24 pb-10">
      <slot />
    </main>
  </body>
</html>
The MainLayout component supports optional title, description, and image props to dynamically set SEO and social media meta tags, improving the site’s visibility. The <ClientRouter /> from astro:transitions to enable smooth, client-side page transitions.
To display prices with corresponding currencies, we need a currency formatting utility.
Create a utils/formatter.ts file in the src folder and add the following:
export class Formatter {
  static currency(value: number, decimals = 2): string {
    return new Intl.NumberFormat("en-US", {
      style: "currency",
      currency: "USD",
      maximumFractionDigits: decimals,
    }).format(value);
  }
}
The Formatter class formats a number into a U.S. dollar currency string using the built-in Intl.NumberFormat API.
To format the media URL for an absolute URL and a relative path URL, add the following to formatter.ts file:
export class Formatter {
  ...
  static formatMedia (mediaURL: string): string {
    return mediaURL.startsWith("http")
      ? mediaURL
      : `${import.meta.env.PUBLIC_URL}/media/vehicles/${mediaURL}`;
  };
}
The formatMedia method checks if the given mediaURL is already an absolute URL (i.e., starts with “http”). If so, it returns the URL as-is. Otherwise, it assumes the media is stored locally and prepends a base path, constructed from an environment variable (PUBLIC_URL), followed by the relative path to the media directory (/media/vehicles/).
Create a interface/product-with-media.interface.ts file in the src folder and add the following:
export interface ProductWithMedia {
  id: string;
  description: string;
  media: string;
  media_type: string;
  price: number;
  brand: string;
  slug: string;
  stock: number;
  tags: string;
  name: string;
  type: string;
}
The product list view will display all available products with their associated media (video/image).
We need to create a server action that fetches all available products with their associated media from the database. Create a products/get-products.action.ts file in the actions folder and add the following:
import type { ProductWithMedia } from "@/interfaces";
import { defineAction } from "astro:actions";
import { db, sql } from "astro:db";
export const getProducts = defineAction({
  accept: "json",
  handler: async () => {
    const productsQuery = sql`
  SELECT a.*,
    (
      SELECT GROUP_CONCAT(media)
      FROM ProductMedia
      WHERE productId = a.id
    ) AS media,
    (
      SELECT media_type
      FROM ProductMedia
      WHERE productId = a.id
    ) AS media_type
  FROM Product a;
`;
    const { rows } = await db.run(productsQuery);
    const products = rows.map((product) => {
      return {
        ...product,
        media: product.media ? product.media : "no-image.png",
        media_type: product.media_type
      };
    }) as unknown as ProductWithMedia[];
    return {
      products: products,
    };
  },
});
The getProducts server-side action fetches a list of products from the database, including associated media data. It uses Astro’s defineAction utility to create an endpoint that accepts JSON and runs an SQL query.
Create a index.ts file in actions/products folder and add the following:
import {
  getProducts,
} from "./products";
export const server = {
  getProducts,
};
Next, create dashboard/products/index.astro in the pages folder and add the following:
---
import { actions } from "astro:actions";
import MainLayout from "@/layouts/MainLayout.astro";
import { Formatter } from "@/utils";

const { data, error } = await Astro.callAction(actions.getProducts, {});
if (error) {
  return Astro.redirect("/");
}
const { products } = data;
---
<MainLayout title="Admin Dashboard" description="Admin Dashboard">
  <h1 class="font-bold text-2xl">Dashboard</h1>
  <div class="flex justify-between items-center mt-4">
      <p class="font-semibold text-lg">Product List</p>
    <a class="bg-black text-white font-bold py-2 px-4 rounded transition-all"
        href="/dashboard/products/new">Add Product</a>
  </div>
  <table class="w-full mt-5">
    <thead>
      <tr>
        <th class="text-left">Media</th>
        <th class="text-left">Title</th>
        <th class="text-left">Daily Charges</th>
        <th class="text-left">Inventory</th>
      </tr>
    </thead>
    <tbody>
      {
        products.map((product) => (
          <tr>
            <td>
              {
                product.media.length > 0 ? (
                    product.media_type === "video" ? (
                      <video
                        src={Formatter.formatMedia(product.media.split(',')[0])}
                        class="w-16 h-16 mb-2"
                        autoplay
                        loop
                        muted
                      />
                    ) : (
                  <img
                      src={Formatter.formatMedia(product.media.split(',')[0])}
                      alt={product.name}
                      class="w-16 h-16 mb-2"
                  />
                )) : (
                  <img src=`/media/products/no-image.png` alt="No image">
                )
              }
            </td>
            <td>
              <a
                class="hover:underline cursor-pointer"
                href={`/dashboard/products/${product.slug}`}
              >
                {product.name}
              </a>
            </td>
            <td>{Formatter.currency(product.price)}</td>
            <td class="justify-end">{product.stock}</td>
          </tr>
        ))
      }
    </tbody>
  </table>
</MainLayout>
This page calls the getProducts server action via Astro.callAction() to fetch product data. If successful, the list of products is rendered in a table format.
You should see the following when visiting http://localhost:4321/dashboard:
To create a dynamic route for the product creation and update, create the following file:
/pages/products/[...slug].astro
[...slug] is a dynamic segment that Astro uses to render different content based on the URL.
Add the following to products/[...slug].astro file:
---
import ProductSlideShow from "@/components/products/ProductSlideShow.astro";
import MainLayout from "@/layouts/MainLayout.astro";
import { actions } from "astro:actions";
import { Formatter } from "@/utils";
const { slug } = Astro.params;
const { data, error } = await Astro.callAction(
  actions.getProductBySlug,
  slug ?? ""
);
if (error) {
  return Astro.redirect("/404");
}
const { product, media } = data;
---
<MainLayout title="Product update page">
  <form>
    <input type="hidden" name="id" value={product.id} />
    <div class="flex justify-between items-center">
      <h1 class="font-bold text-2xl">{product.name}</h1>
      <button
        type="submit"
        class="bg-black mb-5 p-2 rounded text-white cursor-pointer"
        >Save Changes</button
      >
    </div>
    <div class="grid grid-cols-1 sm:grid-cols-2 gap-4">
      <!-- File upload -->
      <div>
        <div class="mb-4">
          <label for="name" class="block">Name</label>
          <input
            type="text"
            id="name"
            name="name"
            value={product.name}
            class="w-full p-2 border border-gray-300 rounded"
          />
        </div>
        <div class="mb-4">
          <label for="slug" class="block">Slug</label>
          <input
            type="text"
            id="slug"
            name="slug"
            value={product.slug}
            class="w-full p-2 border border-gray-300 rounded"
          />
        </div>
        <div class="mb-4">
          <label for="description" class="block">Description</label>
          <textarea
            id="description"
            name="description"
            class="w-full p-2 border border-gray-300 rounded"
            rows="8">{product.description}</textarea
          >
        </div>
        <div class="grid grid-cols-1 sm:grid-cols-2 gap-5">
          <div class="mb-4">
            <label for="price" class="block">Daily Charges</label>
            <input
              type="number"
              id="price"
              name="price"
              value={product.price}
              class="w-full p-2 border border-gray-300 rounded"
            />
          </div>
          <div class="mb-4">
            <label for="stock" class="block">Inventory</label>
            <input
              type="number"
              id="stock"
              name="stock"
              value={product.stock}
              class="w-full p-2 border border-gray-300 rounded"
            />
          </div>
        </div>
        <div class="mb-4">
          <label for="brand" class="block">Brand</label>
          <input
            type="text"
            id="brand"
            name="brand"
            value={product.brand}
            class="w-full p-2 border border-gray-300 rounded"
          />
        </div>
        <div class="mb-4">
          <label for="tags" class="block"
            >Tags <small class="text-gray-500">(Separate with comas)</small
            ></label
          >
          <input
            type="text"
            id="tags"
            name="tags"
            value={product.tags}
            class="w-full p-2 border border-gray-300 rounded"
          />
        </div>
        <div class="grid grid-cols-2 gap-4">
          <div class="mb-4">
            <label for="tags" class="block">Type</label>
            <select
              class="w-full p-2 border border-gray-300 rounded"
              name="type"
            >
              <option value="">[ Select ]</option>
              {
                [
                  "COUPE",
                  "SEDAN",
                  "SPORTS CAR",
                  "CONVERTIBLE",
                  "TRUCK",
                  "STATION WAGON",
                ].map((type) => (
                  <option
                    value={type}
                    class="capitalize"
                    selected={type === product.type}
                  >
                    {type.toUpperCase()}
                  </option>
                ))
              }
            </select>
          </div>
        </div>
      </div>
    </div>
  </form>
</MainLayout>
<script>
  import { actions } from "astro:actions";
  import { navigate } from "astro:transitions/client";
  document.addEventListener("astro:page-load", () => {
    const form = document.querySelector("form") as HTMLFormElement;
    if (!form) {
      return;
    }
    form.addEventListener("submit", async (e) => {
      e.preventDefault();
      const formData = new FormData(form);
      const { data, error } = await actions.createUpdateProduct(formData);
      if (error) {
        return alert(error.message);
      }
      navigate(`/dashboard/products/${data.slug}`);
    });
  });
</script>
This Astro component renders a product update page where users can edit and save changes to an existing product. It uses the product’s slug from the route parameters to fetch the current product data and media via the getProductBySlug action. If the product is not found, it redirects to a 404 page.
We’ll create the getProductBySlug server action to fetch a single product by its slug from the database.
Create get-product-by-slug.action.ts in actions/products folder and add the following:
import { defineAction} from "astro:actions";
import { z } from "astro:schema";
import { Product, ProductMedia, db, eq } from "astro:db";
const newProduct = {
  id: "",
  description: "New product description",
  brand: "New Brand",
  media: "no-image.png",
  media_type: "image",
  name: "Sample product",
  price: 100,
  slug: "sample-product",
  stock: 5,
  tags: "car,speed,modern",
  type: "Truck",
};
export const getProductBySlug = defineAction({
  accept: "json",
  input: z.string(),
  handler: async (slug) => {
    if (slug === "new") {
      return {
        product: newProduct,
        media: [],
      };
    }
    const [product] = await db
      .select()
      .from(Product)
      .where(eq(Product.slug, slug));
    if (!product) throw new Error(`Product with slug ${slug} not found.`);
    const media = await db
      .select()
      .from(ProductMedia)
      .where(eq(ProductMedia.productId, product.id));
    return {
      product: product,
      media: media,
    };
  },
});
The getProductBySlug action retrieves product data by its slug and is designed to support both fetching existing products and preparing a template for creating new ones. It checks if the provided slug is "new", so it returns a default product object (newProduct) and an empty media array. Otherwise, it queries the database for a product matching the given slug and, if found, also fetches its associated media files. If the product doesn’t exist, it throws an error.
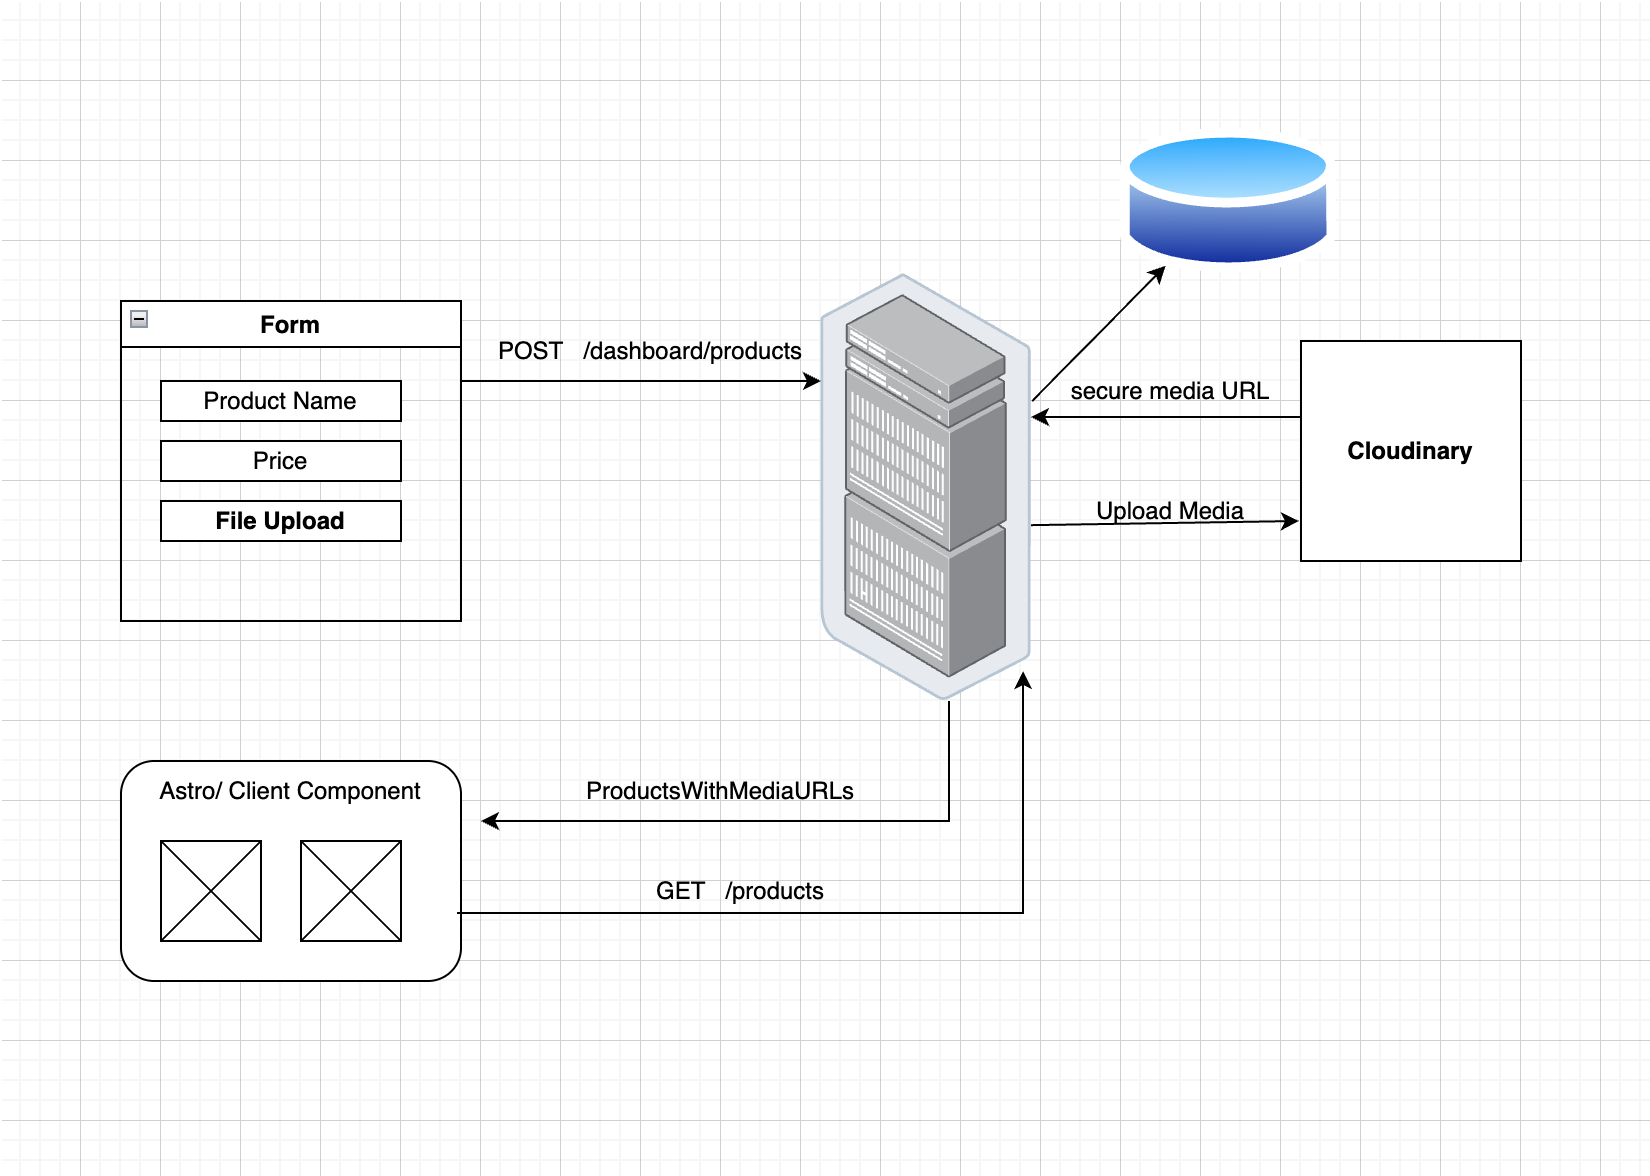
Before we dive into the implementation of the secure file upload in Astro, let’s review the project’s file upload flow. As you can see in the diagram above, we have the form component for uploading files from the client to the server.
As users fill out and submit the form, the server receives the data, stores the product in the Product table, then uploads the media files to Cloudinary, which returns a secure URL for each uploaded media file to the server. The server proceeds to store the secure media URLs along with their associated product IDs in the ProductMedia table.
When the user visits the /products route, the server responds with the products along with media URLs.
This section will cover how to implement a secure file upload system in Astro using Cloudinary’s SDKs and native integration.
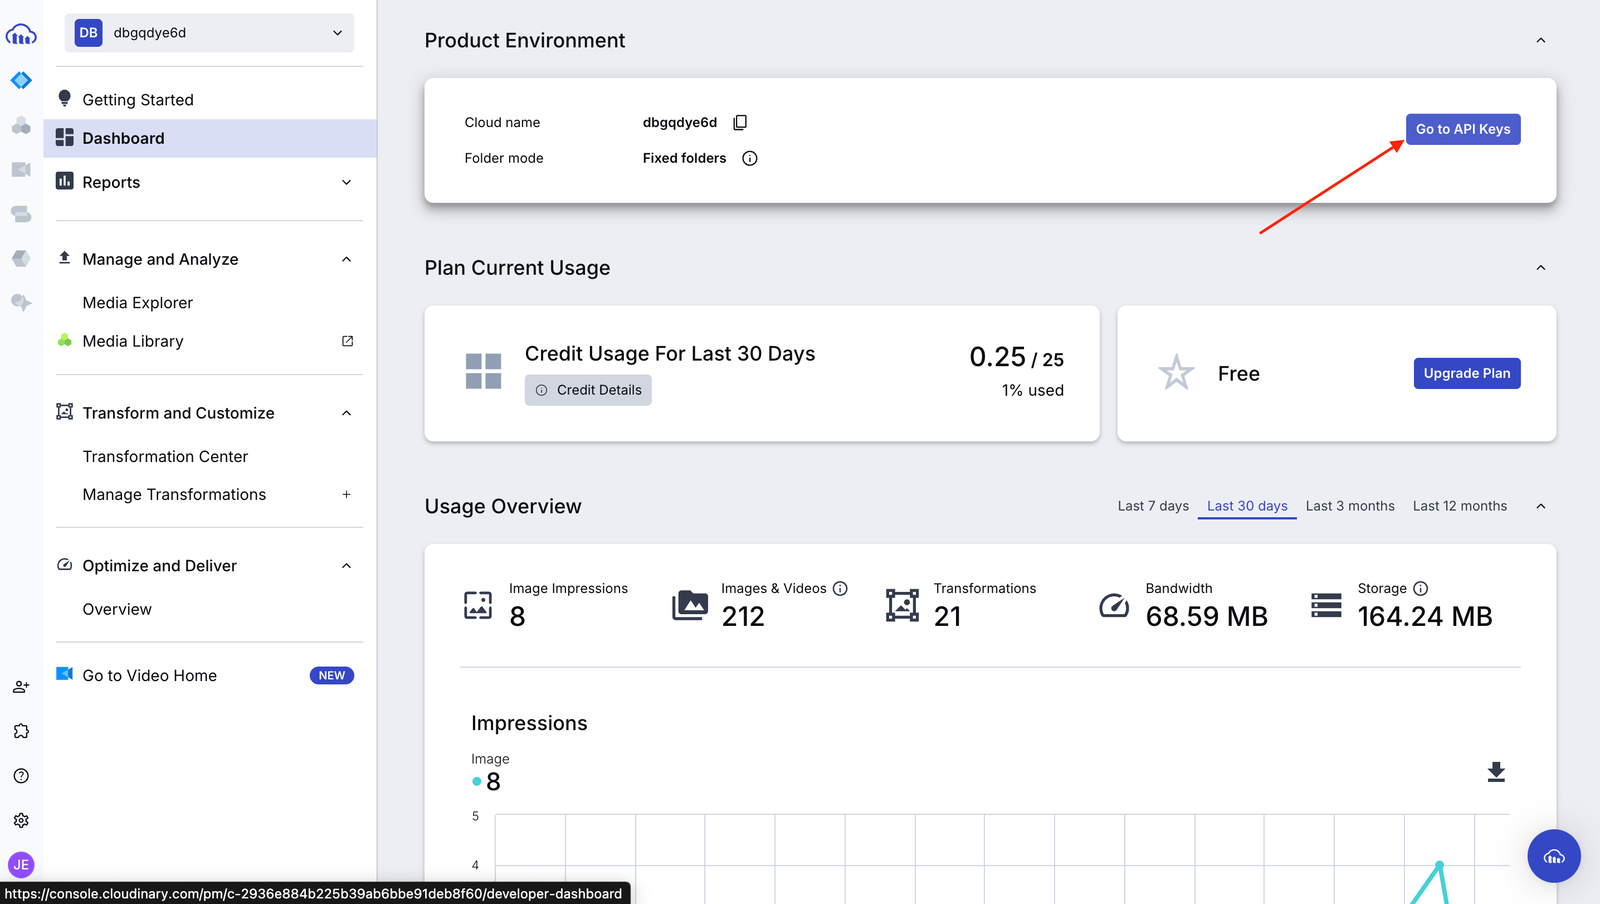
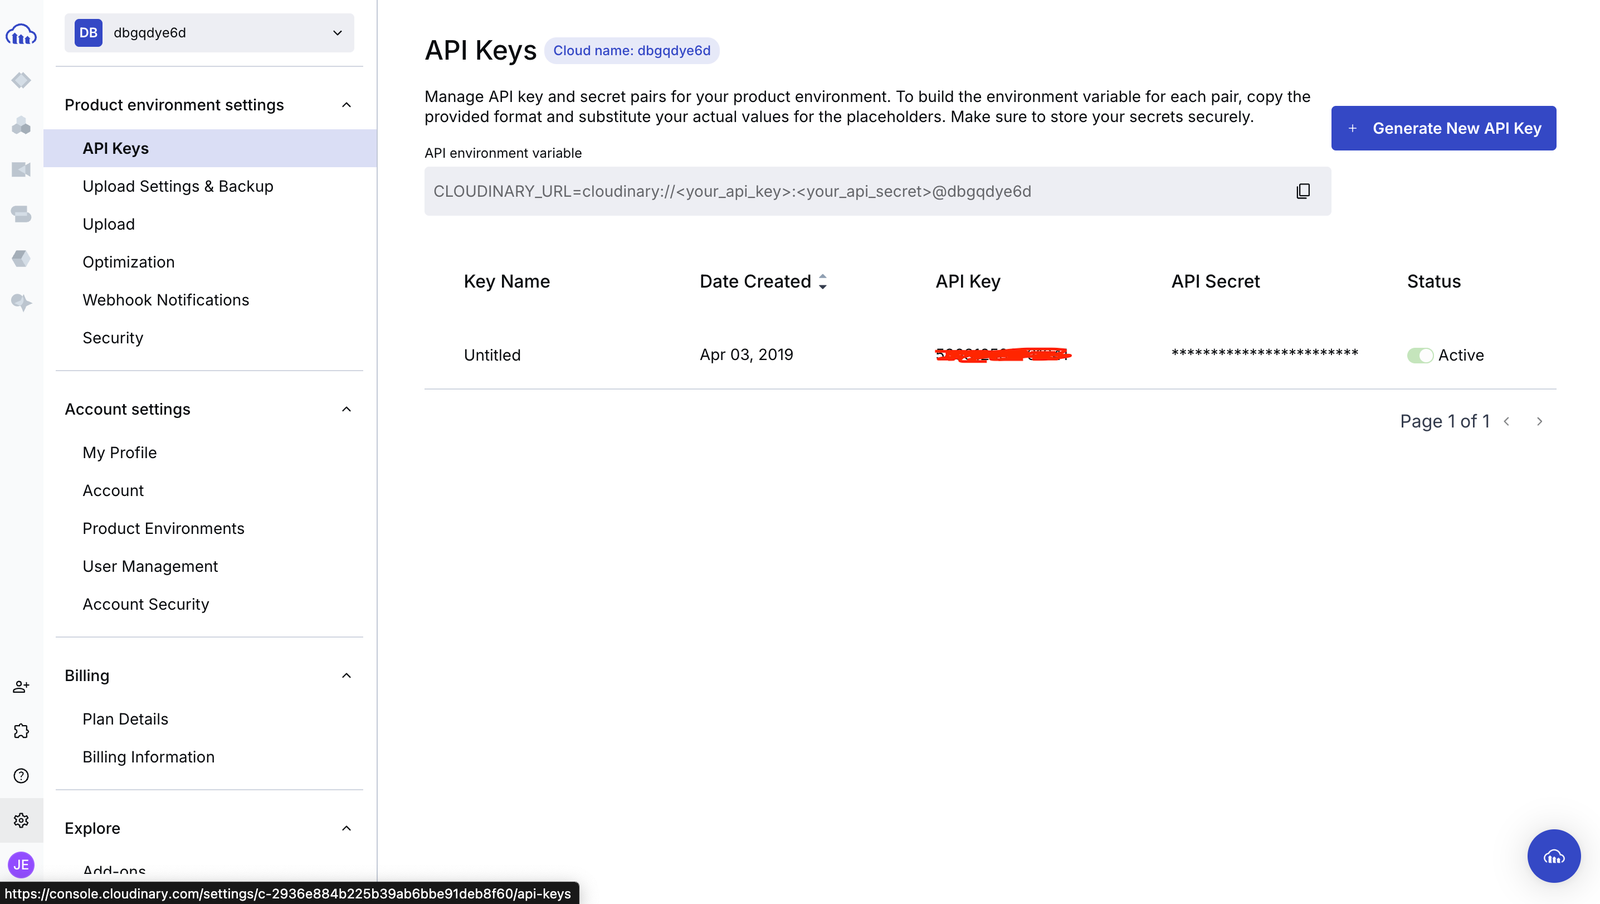
To configure Cloudinary in your app, you need the following credentials in your .env file:
CLOUDINARY_CLOUD_NAME=
CLOUDINARY_API_KEY=
CLOUDINARY_API_SECRET=
Sign in to your Cloudinary account, then click on Go to API Keys to access the above credentials
Next, create media-upload.ts in the utils folder and add the following:
import { v2 as cloudinary } from "cloudinary";

cloudinary.config({
  cloud_name: import.meta.env.CLOUDINARY_CLOUD_NAME,
  api_key: import.meta.env.CLOUDINARY_API_KEY,
  api_secret: import.meta.env.CLOUDINARY_API_SECRET,
});

export class MediaUpload {
  static async upload(file: File) {
    try {
      const buffer = await file.arrayBuffer();
      const base64Data = Buffer.from(buffer).toString("base64");
      const [fileType, format] = file.type.split("/");
      const resourceType = fileType as "image" | "video" | "raw" | "auto";
      const supportedTypes = ["image", "video"] as const;

      if (!supportedTypes.includes(fileType as typeof supportedTypes[number])) {
        throw new Error(`Unsupported file type: ${file.type}`);
      }
      const dataUri = `data:${file.type};base64,${base64Data}`;
      const resp = await cloudinary.uploader.upload(dataUri, {
        resource_type: resourceType,
      });
      return {secure_url:resp.secure_url, fileType};
    } catch (error) {
      throw new Error(JSON.stringify(error));
    }
  }
}
Here, we’ve initialized Cloudinary with credentials stored in environment variables and defined a MediaUpload class for uploading media files to Cloudinary. The upload method accepts a File object, reads its contents as a buffer, and converts it to a Base64-encoded data URI. It determines the file’s type and ensures it’s either an image or a video, rejecting unsupported types. Then, it uploads the file to Cloudinary using the appropriate resource_type and returns the secure URL and file type upon success.
With the MediaUpload util implemented, we’ll create a server action to handle file uploads. Create create-update-product.action.ts and add the following:
import { defineAction } from "astro:actions";
import { z } from "astro:schema";
import { Product, db, eq, ProductMedia } from "astro:db";
import { v4 as UUID } from "uuid";
import { MediaUpload } from "@/utils";
const MAX_FILE_SIZE = 50_000_000;
const ACCEPTED_MEDIA_FILE = [
  "image/jpeg",
  "image/jpg",
  "image/png",
  "image/webp",
  "image/svg+xml",
  "video/mp4"
];

export const createUpdateProduct = defineAction({
  accept: "form",
  input: z.object({
    id: z.string().optional(),
    description: z.string(),
    price: z.number(),
    brand: z.string(),
    slug: z.string(),
    stock: z.number(),
    tags: z.string(),
    name: z.string(),
    type: z.string(),
    mediaFiles: z
      .array(
        z
          .instanceof(File)
          .refine((file) => file.size <= MAX_FILE_SIZE, "Max file size 50Mb")
          .refine((file) => {
            if (file.size === 0) return true;
            return ACCEPTED_MEDIA_FILE.includes(file.type);
          }, `Only supported media files are valid ${ACCEPTED_MEDIA_FILE.join(", ")}`)
      )
      .optional(),
  }),
  handler: async (form) => {}
});
The createUpdateProduct handles product creation or updates, including media file uploads. It uses defineAction to specify that the input will come from a form and validates it using Zod (z). Each media file is validated to ensure it’s no larger than 50MB and matches one of the accepted MIME types (images and MP4 videos).
Next, update the handler method with the following:
export const createUpdateProduct = defineAction({
  handler: async (form) => {
    type mediaContentObj = {
      secure_url: string;
      fileType: string;
    }
    const secureUrls: mediaContentObj[] = [];
    const { id = UUID(), mediaFiles, ...rest } = form;
    rest.slug = rest.slug.toLowerCase().replaceAll(" ", "-").trim();
    const product = {
      id: id,
      ...rest,
    };
    const queries: any = [];

    if (!form.id) {
      queries.push(db.insert(Product).values(product));
    } else {
      queries.push(
        await db.update(Product).set(product).where(eq(Product.id, id))
      );
    }


    if (
      form.mediaFiles &&
      form.mediaFiles.length > 0 &&
      form.mediaFiles[0].size > 0
    ) {
      const urls = await Promise.all(
        form.mediaFiles.map((file) => MediaUpload.upload(file))
      );
      secureUrls.push(...urls);
    }
    secureUrls.forEach((media) => {
      const mediaObj = {
        id: UUID(),
        media: media.secure_url,
        productId: product.id,
        media_type: media.fileType,
      };
      queries.push(db.insert(ProductMedia).values(mediaObj));
    });
    await db.batch(queries);
    return product;
  },
});
The handler function inserts a new product if an id is not provided. Otherwise, it updates an existing product if an id is provided. If media files are included, it uploads them using the MediaUpload.upload utility, collects their secure URLs and file types, and adds them to the database as entries in the ProductMedia table. Finally, all the queries are executed as a single batch using db.batch() for efficient insertion/update of product and media records.
Navigate to products/[…slug].astro and add the following, where you have <!-- File upload -->:
<div class="mt-4">
  <!-- File input -->
  <div class="flex items-center justify-center w-full">
    <label
      for="file-upload"
      class="flex flex-col items-center justify-center w-full h-52 border-2 border-dashed border-gray-300 rounded-lg cursor-pointer hover:bg-gray-100"
      id="drop-zone"
    >
      <div class="flex flex-col items-center justify-center pt-5 pb-6">
        <svg
          class="w-8 h-8 mb-4 text-gray-500"
          fill="none"
          stroke="currentColor"
          viewBox="0 0 24 24"
          xmlns="http://www.w3.org/2000/svg"
        >
          <path
            stroke-linecap="round"
            stroke-linejoin="round"
            stroke-width="2"
            d="M7 16V4a2 2 0 012-2h6a2 2 0 012 2v12m-6 4l-4-4m0 0l4-4m-4 4h12"
          ></path>
        </svg>
        <p class="mb-2 text-sm text-gray-500" id="lbl-selected-files">
          <span class="font-semibold">Click here to upload </span> or drag/drop files
        </p>
        <p class="text-xs text-gray-500">
          MP4, SVG, PNG, JPG or GIF (max. 800x400px)
        </p>
      </div>
      <input
        id="file-upload"
        name="mediaFiles"
        type="file"
        multiple
        class="hidden"
      />
    </label>
  </div>
  <!-- Slideshow -->
  <ProductSlideShow
    media_type={media.map((i) => i.media_type)[0]}
    product_name={product.name}
    media={media.map((i) => i.media)}
  />
  <table class="w-full border mt-10">
    <thead>
      <tr>
        <th>Media</th>
        <th>Delete</th>
      </tr>
    </thead>
    <tbody>
      {
        media.map(({ media, media_type, id }) => (
          <tr class="border" id={id}>
            <td class="flex py-2 justify-center">
              {media_type === "video" ? (
                <video
                  src={Formatter.formatMedia(media)}
                  class="w-16 h-16 rounded"
                  autoplay
                  loop
                  muted
                />
              ) : (
                <img
                  src={Formatter.formatMedia(media)}
                  alt={product.name}
                  class="w-16 h-16 rounded"
                />
              )}
            </td>
            <td class="text-center">
              <button type="button" data-id={id} class="btn-delete-media rounded border cursor-pointer border-black w-10 h-10 mr-4 hover:bg-black hover:text-white transition-all">
                X
              </button>
            </td>
          </tr>
        ))
      }
    </tbody>
  </table>
</div>
This creates a user interface for uploading and deleting media files (images or videos) for a product. It features a drag-and-drop file upload area and allows users to either click to select files or drop them directly into the zone. It renders a ProductSlideShow component to preview the product’s existing media.
Next, update the script with the following:
<script>
  import { actions } from "astro:actions";
  import { navigate } from "astro:transitions/client";
  document.addEventListener("astro:page-load", () => {
    const form = document.querySelector("form") as HTMLFormElement;
    const btnsDeleteMedia = document.querySelectorAll(".btn-delete-media");
    const lblSelectedFiles = document.querySelector(
      "#lbl-selected-files"
    ) as HTMLParagraphElement;
    const dropZone = document.querySelector("#drop-zone") as HTMLLabelElement;
    const fileInput = document.querySelector(
      "#file-upload"
    ) as HTMLInputElement;
    if (!form) {
      return;
    }

    form.addEventListener("submit", async (e) => {
      e.preventDefault();
      const formData = new FormData(form);
      const { data, error } = await actions.createUpdateProduct(formData);
      if (error) {
        return alert(error.message);
      }
      navigate(`/dashboard/products/${data.slug}`);
    });


    // Drag & Drop
    const preventDefaults = (e: DragEvent) => {
      e.preventDefault();
      e.stopPropagation();
    };
    const highlight = (e: DragEvent) => {
      dropZone.classList.add("border-blue-500", "bg-blue-50");
    };
    const unHighlight = (e: DragEvent) => {
      dropZone.classList.remove("border-blue-500", "bg-blue-50");
    };
    const createFileList = (files: File[]): FileList => {
      const dataTransfer = new DataTransfer();
      files.forEach((file) => dataTransfer.items.add(file));
      return dataTransfer.files;
    };
    const handleFiles = (files: FileList) => {
      const validFiles = Array.from(files).filter((file) =>
        file.type.startsWith("*")
      );
      if (fileInput && validFiles.length > 0) {
        fileInput.files = createFileList(validFiles);
      }
      lblSelectedFiles.innerHTML = `<strong>${validFiles.length} archivos seleccionados</strong>`;
    };
    (["dragenter", "dragover", "dragleave", "drop"] as const).forEach(
      (eventName) => {
        dropZone.addEventListener(eventName, preventDefaults);
        document.body.addEventListener(eventName, preventDefaults);
      }
    );
    (["dragenter", "dragover"] as const).forEach((eventName) => {
      dropZone.addEventListener(eventName, highlight);
    });
    (["dragleave", "drop"] as const).forEach((eventName) => {
      dropZone.addEventListener(eventName, unHighlight);
    });
    dropZone.addEventListener("drop", (e) => {
      const files = e.dataTransfer?.files;
      if (files) {
        handleFiles(files);
      }
    });
  });
</script>
This enables file uploads with a drag-and-drop interface for media uploads, preventing default browser behavior during drag events, visually highlighting the drop zone, updating the file input with selected files, and displaying the number of files selected.
This section covers the deletion of media both from the database and Cloudinary.
First, we’ll create a utility function to delete media files from Cloudinary. Add the following delete function to the media-upload.ts file:
export class MediaUpload {
  ...
  static async delete(mediaUrl: string, type: "image" | "video") {
    const fileName = mediaUrl.split("/").pop() ?? "";
    const publicId = fileName.split(".")[0];
    try {
      await cloudinary.uploader.destroy(publicId, {
        resource_type: type,
      });
      return true;
    } catch (error) {
      console.error("Deletion error:", error);
      return false;
    }
  }
}
Next, create a delete-product-media.action.ts file in the actions/products folder and add the following:
import { MediaUpload } from "@/utils/media-upload";
import { defineAction } from "astro:actions";
import { z } from "astro:schema";
import { ProductMedia, db, eq } from "astro:db";
const isValidMediaType = (type: string): type is "image" | "video" => {
  return ["image", "video"].includes(type);
};
export const deleteProductMedia = defineAction({
  accept: "json",
  input: z.string(),
  handler: async (mediaId) => {
    const [productMedia] = await db
      .select()
      .from(ProductMedia)
      .where(eq(ProductMedia.id, mediaId));
    if (!productMedia) {
      throw new Error(`media with id ${mediaId} not found`);
    }
    const deleted = await db
      .delete(ProductMedia)
      .where(eq(ProductMedia.id, mediaId));
    if (productMedia.media.includes("http")) {
      if (!isValidMediaType(productMedia.media_type)) {
        throw new Error(`Invalid media type: ${productMedia.media_type}`);
      }
      await MediaUpload.delete(productMedia.media, productMedia.media_type);
    }
    return { ok: true };
  },
});
This deleteProductMedia action handles the server logic for deleting a product’s media file. It accepts a media ID as input, fetches the corresponding record from the ProductMedia table, and throws an error if it’s not found. If the record exists, it deletes the entry from the database. If the media’s URL is an external link, it validates the media_type, then calls MediaUpload.delete() to remove the file from Cloudinary.
Now, update the script in products/[…slug].astro with the following:
<script>
  import { actions } from "astro:actions";
  import { navigate } from "astro:transitions/client";
  document.addEventListener("astro:page-load", () => {
    ...
    btnsDeleteMedia.forEach((btn) => {
      btn.addEventListener("click", async (e) => {
        const id = btn.getAttribute("data-id");
        if (!id) return;
        const { error } = await actions.deleteProductMedia(id);
        if (error) {
          console.log(error);
          alert(error);
          return;
        }
        const trId = `#${id}`;
        document.querySelector(trId)?.remove();
        navigate(window.location.pathname);
      });
    });
  }
</script>
This deletes media files associated with a product. Once the page is loaded, it selects all delete buttons (.btn-delete-media) and attaches a click event listener to each. When clicked, it retrieves the data-id of the media item, calls the deleteProductMedia action to remove it from the database, and upon success, removes the corresponding row from the HTML table.
In this tutorial, we implemented a secure file upload by leveraging Astro’s server-side rendering (SSR) support and Cloudinary. We also explored Astro server actions for managing server/client interactions efficiently, handling multiple file uploads, validating forms, and handling errors.
If you encounter any issues while following this tutorial or need expert help with web/mobile development, don’t hesitate to reach out on LinkedIn. I’d love to connect and am always happy to help!
There’s no doubt that frontends are getting more complex. As you add new JavaScript libraries and other dependencies to your app, you’ll need more visibility to ensure your users don’t run into unknown issues.
LogRocket is a frontend application monitoring solution that lets you replay JavaScript errors as if they happened in your own browser so you can react to bugs more effectively.

LogRocket works perfectly with any app, regardless of framework, and has plugins to log additional context from Redux, Vuex, and @ngrx/store. Instead of guessing why problems happen, you can aggregate and report on what state your application was in when an issue occurred. LogRocket also monitors your app’s performance, reporting metrics like client CPU load, client memory usage, and more.
Build confidently — start monitoring for free.

A guide for using JWT authentication to prevent basic security issues while understanding the shortcomings of JWTs.

Discover how to build, render, and automate product demo videos with Remotion, replacing traditional screen recordings with reusable React code.

Chrome’s Modern Web Guidance embeds modern web platform skills into AI coding agents, helping them choose native HTML, CSS, and browser APIs over legacy patterns.

Learn how to use Fallow to analyze AI-generated code, detect dead code, duplicate logic, and complexity issues, and integrate automated code quality checks into your AI-assisted development workflow.
Would you be interested in joining LogRocket's developer community?
Join LogRocket’s Content Advisory Board. You’ll help inform the type of content we create and get access to exclusive meetups, social accreditation, and swag.
Sign up now

