
Building ecommerce applications offers you the opportunity to learn how to handle data from remote sources but more importantly, how to intentionally build web applications that communicate with different services.

Last weekend I picked up a new tool in my list of “to learn” tools. It is called Strapi. I enjoyed learning this tool as I got even more exposed to all the features it offers. As a frontend developer, I was excited by how fast I could build backend services that communicate effortlessly with my frontend application. This is why I decided to share what I’ve learned with you in hopes that you find it as helpful as I did (if you don’t already use this tool).
In this tutorial, you will learn how to build a mini ecommerce application using Vue.js, Strapi, and Flutterwave.
The Replay is a weekly newsletter for dev and engineering leaders.
Delivered once a week, it's your curated guide to the most important conversations around frontend dev, emerging AI tools, and the state of modern software.
To build out this tutorial, we are going to use these tools:
Before we get started, here are a few things to note:
Now that we’ve gotten the preliminaries out of the way, let’s talk about how we’ll build this product. First, we’ll use Strapi to create a /products endpoint. This endpoint will return a list of products we’ll be selling on our ecommerce store. Afterward, we’ll build a Vue.js client to render these products to customers, and finally, we’ll integrate Flutterwave to allow customers to pay for our products.
The fastest and most recommended way to create Strapi projects is through the Strapi CLI. You can do this with yarn or npx as the case may be. Open a terminal window and run the command:
yarn create strapi-app VueStrap --quickstart
#OR
npx create-strapi-app VueStrap --quickstart
The --quickstart flag will set up the project with an SQLite database. If you intend to create a new project with a different database, you can omit the flag and the CLI will prompt you to choose your preferred database.
If you created the project using the --quickstart flag, the project will start automatically on port 1337 on your browser, however, if you chose a custom database, you can run the following command to start the project:
yarn develop
#OR
npm run develop
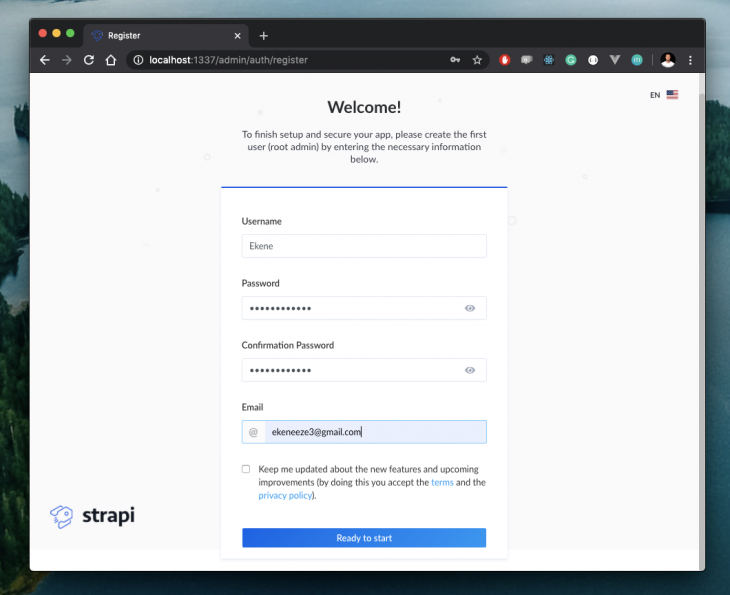
Now if you navigate to localhost:1337/admin on your browser, you will see a form that allows you to create the first admin user. Fill it and click Ready to start:
This will now launch the admin area where you can create the required products for our store:
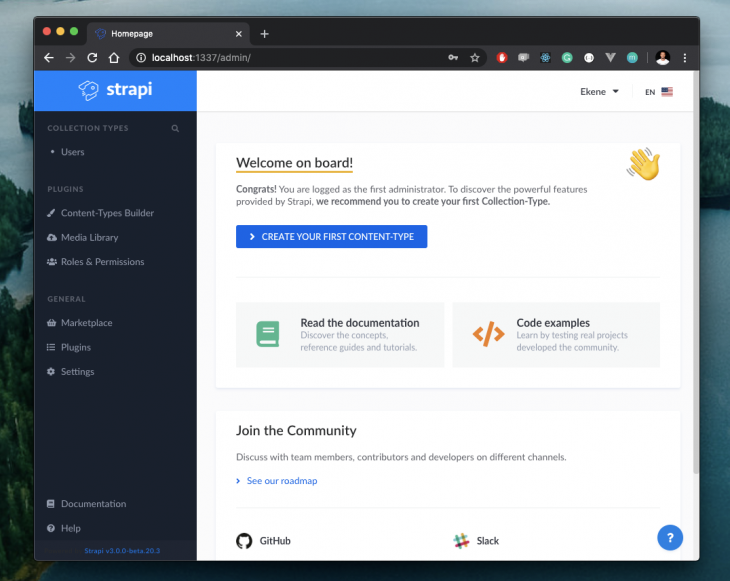
By design, we want to create a /products endpoint that we could call to return a list of products. To do this, create a Product content type by clicking the big blue button and filling out the form like so:
![]()
Clicking on Continue , will display a new section where you will be required to create fields for this endpoint. In our case, we’ll have just four fields for:
We’ll need two text fields for title and description, a number field for price and a media field for the product image. Here’s how we fill the fields:
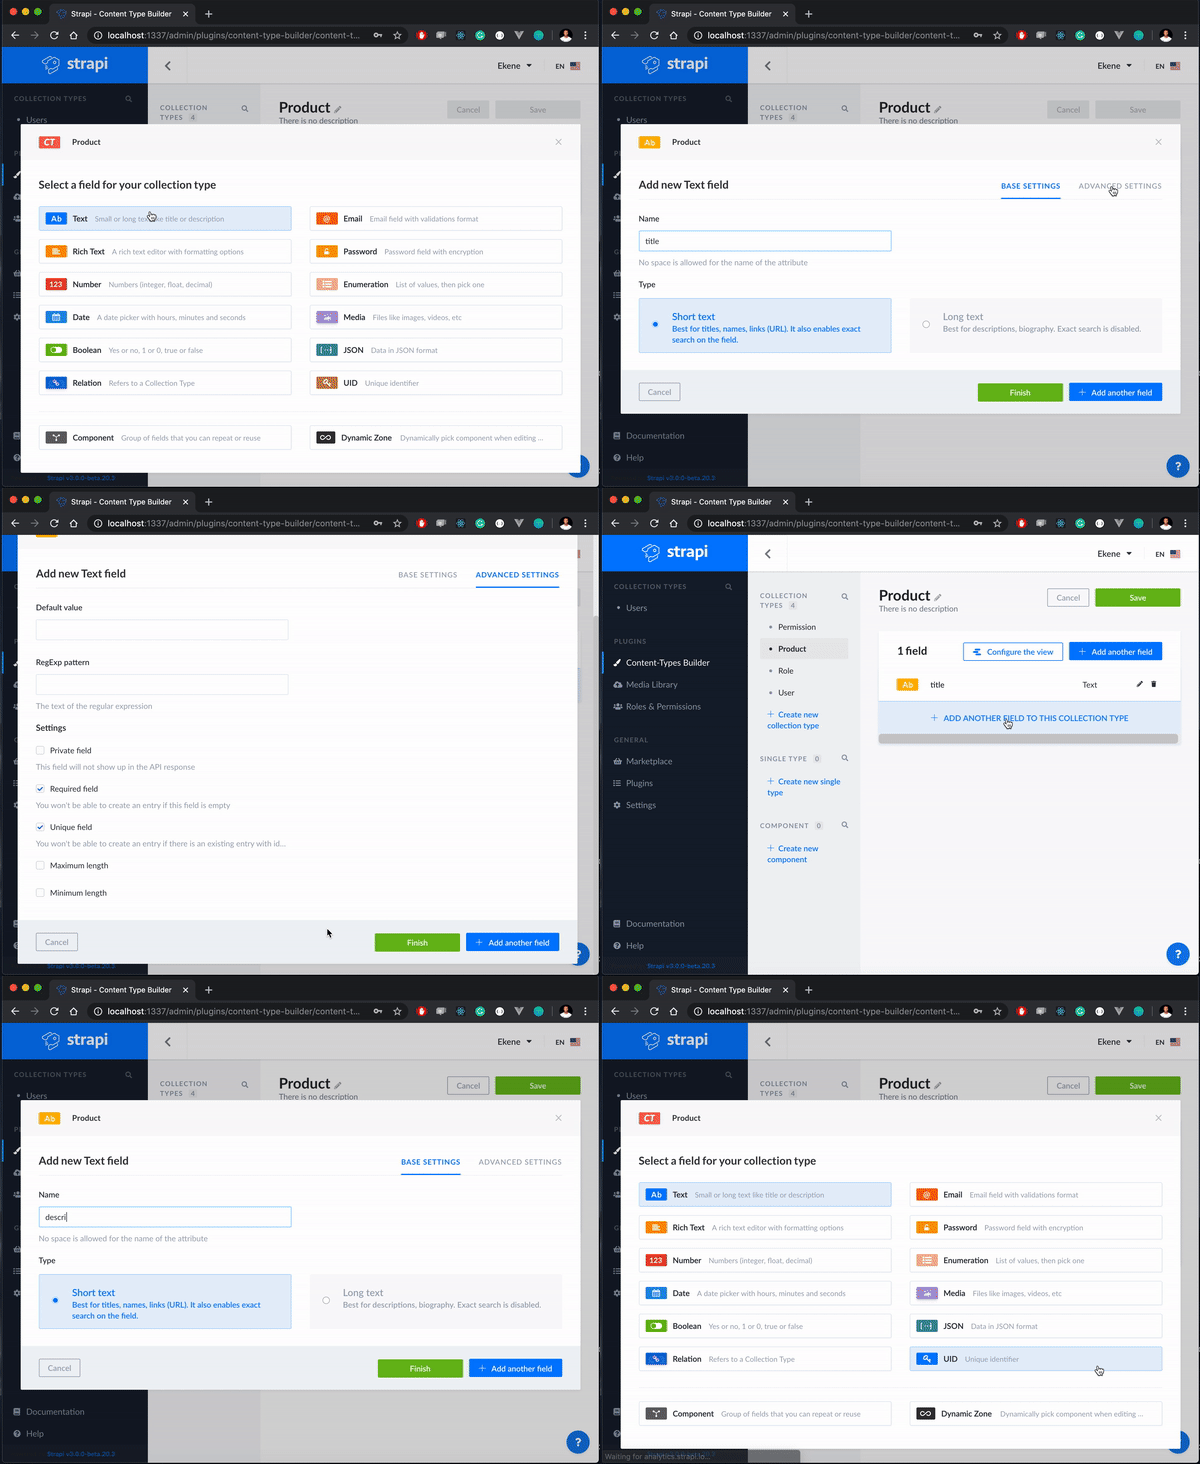
After adding all the fields we specified, you can preview the product endpoint with all the added fields when you click on Finish:
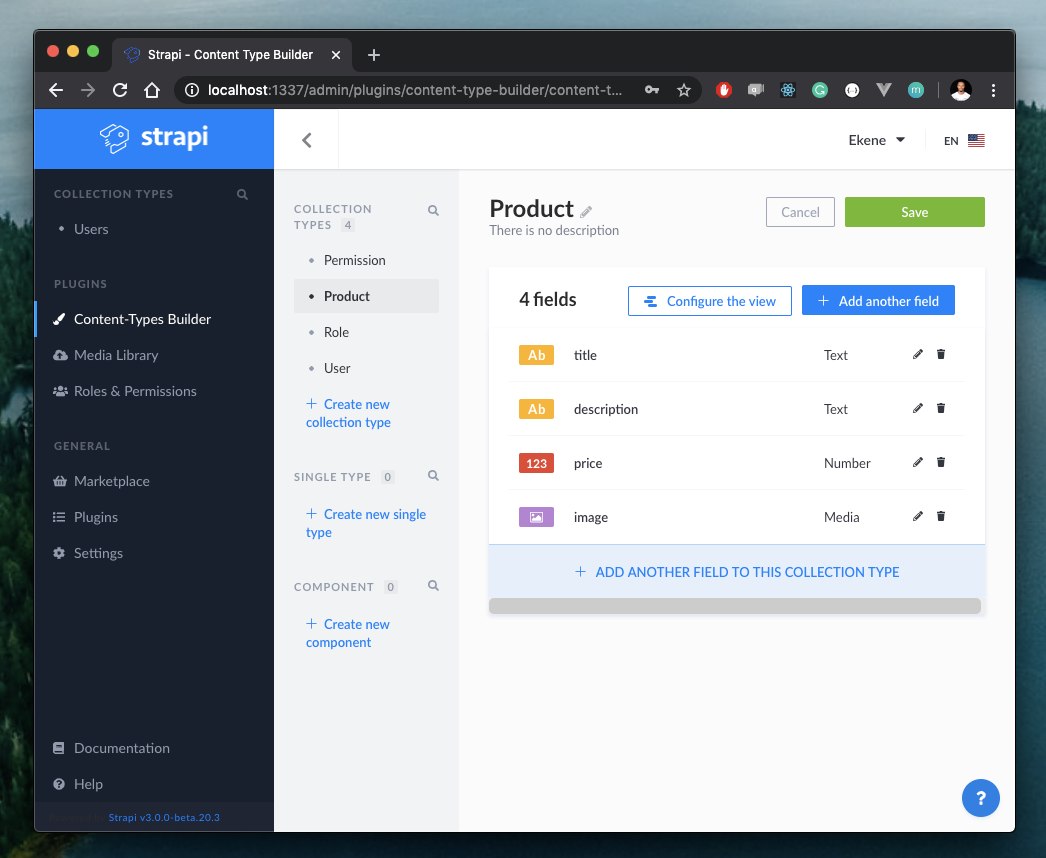
And just like that, we’ve created a functional /products endpoint that we can use to create the products we’d like to show in our store. Let’s quickly save this collection and add a few products to it:
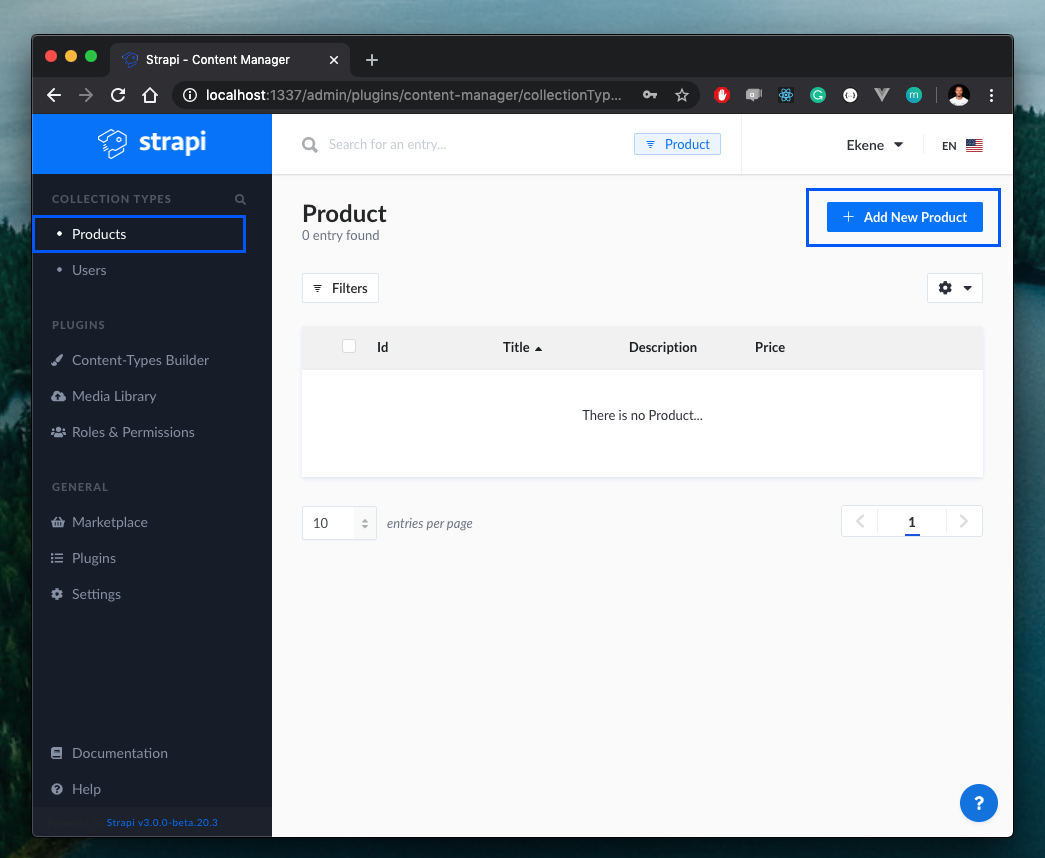
Click on the Products collection on the sidebar and click on Add New Product to start adding your products:

Save this product and repeat the same process for as many products as you’d like to put up on your store. In the end, this is what my products look like:
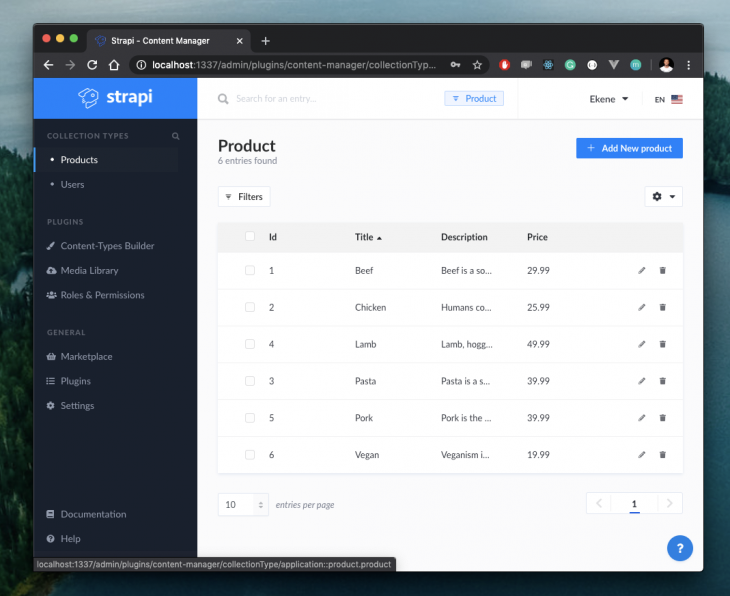
And that’s it! We have just created a completely functional /products endpoint that we can call from the client to retrieve a list of all the products we have created here.
Finally, let’s update the user roles and permissions section to properly manage access to this endpoint. At the moment if we try to access the /products endpoint, we’ll get a forbidden error:
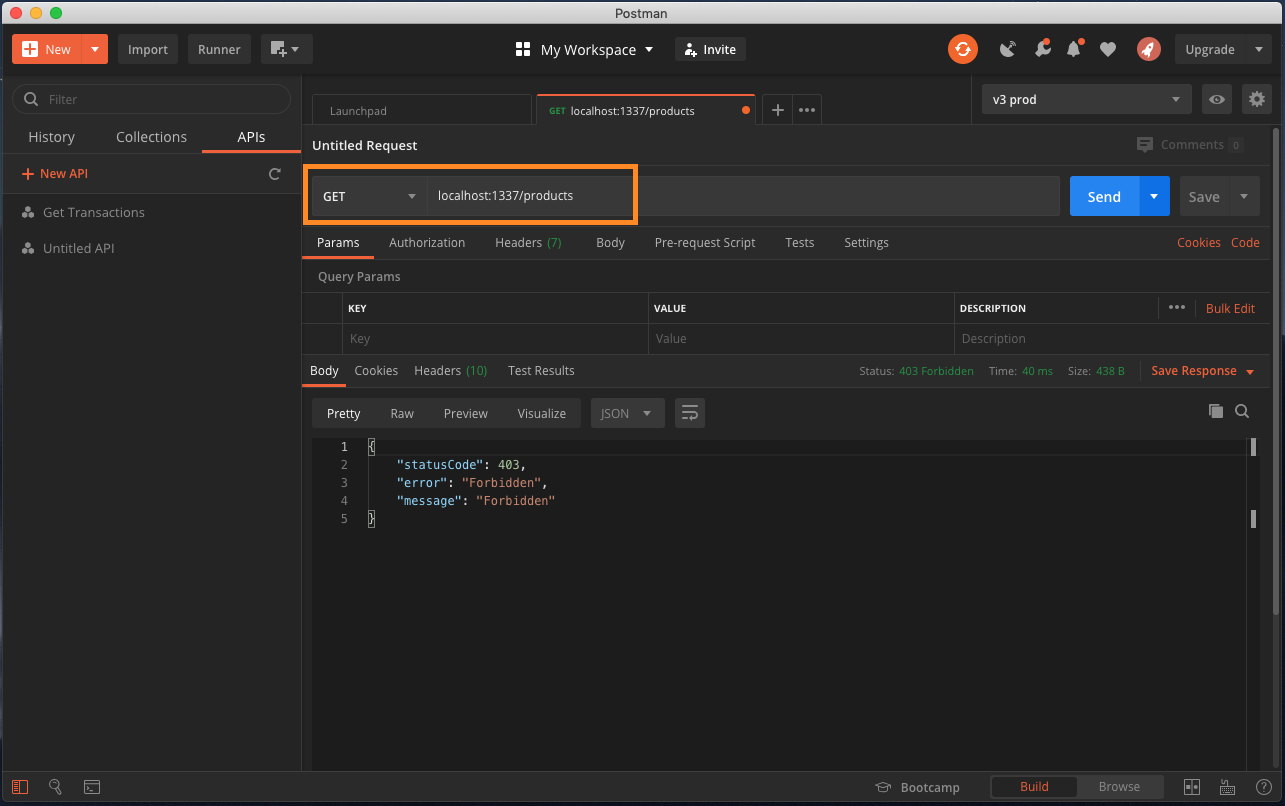
This is happening because we’ve not authorized this public user to access this endpoint. To manage access, use the Roles and Permissions button on the sidebar, select public and check the boxes you will like to give public users access to:
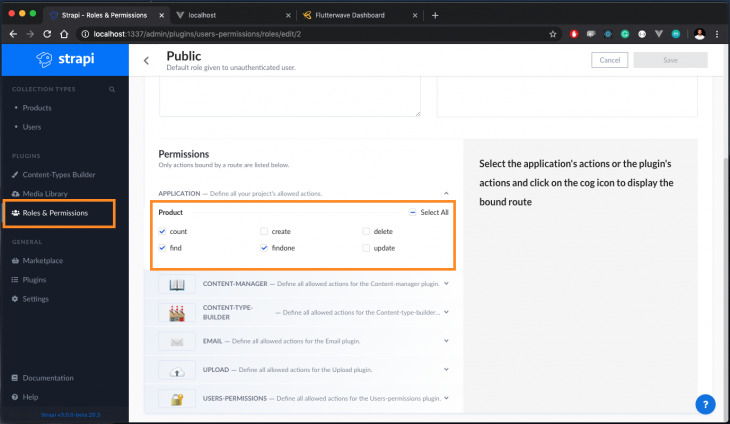
This way, every public user will now have access to the selected actions on our endpoint.
Let’s test this again using Postman. If you have the app installed, make a GET request to the localhost:1337/products endpoint:
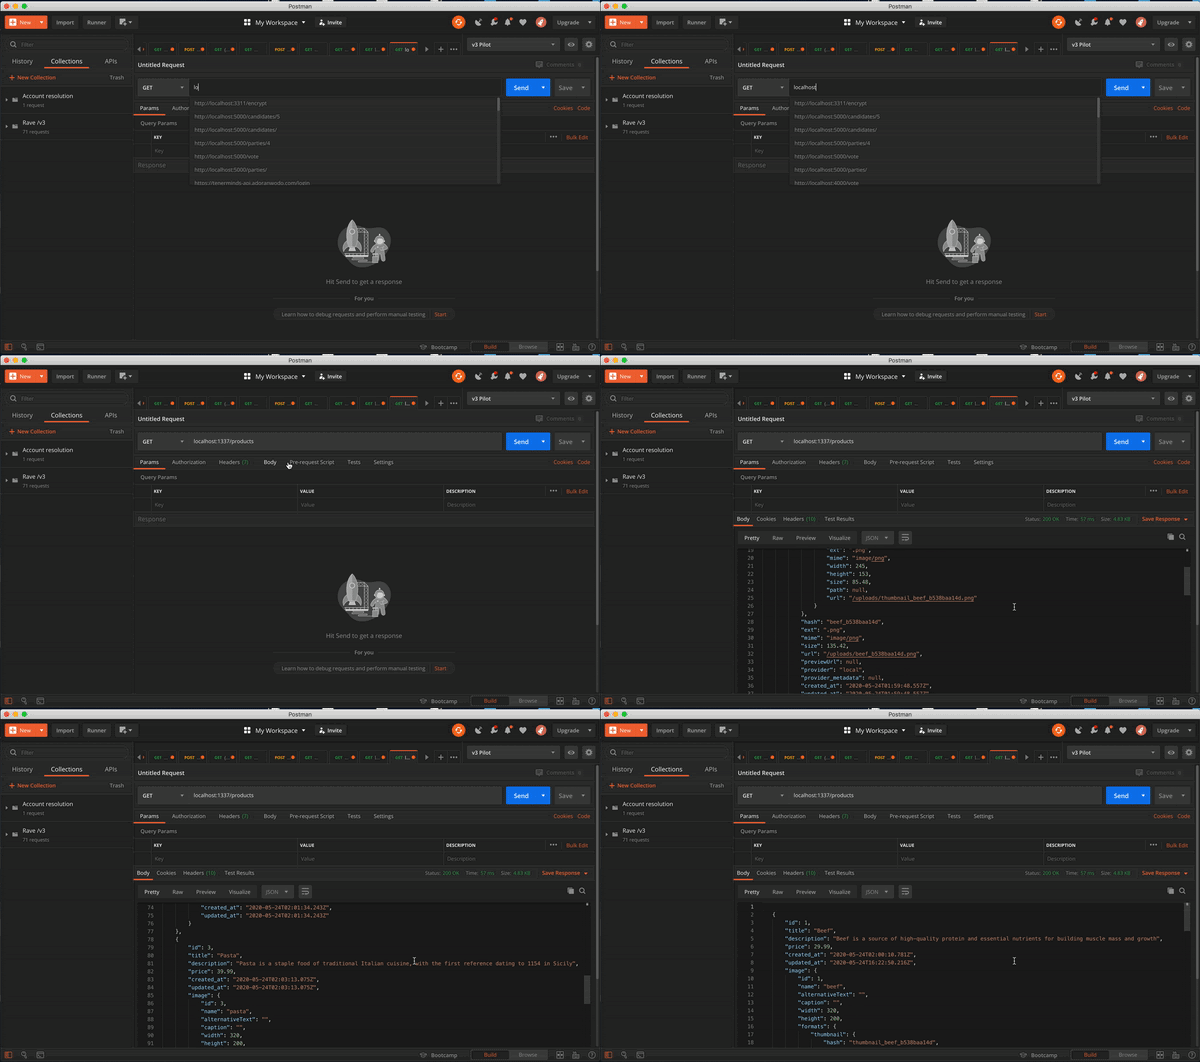
Voila! now we get the products.
Now that we have the endpoint ready, let’s create the client to consume the data we’ve prepared on the server and display these products to customers. To do this, we’ll use the Vue CLI tool to scaffold a new Vue project. If you don’t already have Vue CLI installed, run the following command:
npm install -g @vue/cli-service-global
#OR
yarn global add @vue/cli-service-global
To create and start a new Vue project, run the following commands:
#create a new Vue project:
vue create vue-strapi

#navigate into the newly created app and start the dev server:
cd vue-strapi && npm run serve
The project will now be live at localhost:8080 on your browser.
As a personal preference, I use BootstrapVue when working with Vue.js applications. Install Bootstrap and BootstrapVue like so:
npm i bootstrap bootstrap-vue
Now you can make the Bootstrap package available in the project via the main entry file like this:
// main.js
import Vue from "vue";
import App from "./App.vue";
import "bootstrap/dist/css/bootstrap.css";
import "bootstrap-vue/dist/bootstrap-vue.css";
import BootstrapVue from "bootstrap-vue";
  Vue.config.productionTip = false;
  Vue.use(BootstrapVue);
  new Vue({
    render: (h) => h(App),
  }).$mount("#app");
By default, our Vue project has a HelloWorld component. Delete that component and create a new Meals component to handle the API communications with our Strapi project:
# src/components/Meals.vue
<script>
export default {
  data() {
    return {
      meals: [],
    };
  },
  mounted() {
    fetch("http://localhost:1337/products")
      .then((res) => res.json())
      .then((data) => {
        this.meals = data;
      });
  }
};
</script>
Here, we are using Vue’s mounted() lifecycle method and the native browser API fetch to call the /products endpoint when our app loads. We have also defined a meals data property to receive the response coming from the API and populate the UI with it. Next, let’s use BootstrapVue’s UI components and Vue directives to render the product details in our meals component:
# src/components/Meals.vue
<template>
  <b-container>
    <div v-if="meals.length">
      <b-row>
        <div v-bind:key="meal.index" v-for="meal in meals">
          <b-col l="4">
            <b-card
              v-bind:img-src="`http://localhost:1337/uploads/beef_b538baa14d.png`"
              v-bind:title="meal.title"
              img-alt="Image"
              img-top
              tag="article"
              style="max-width: 20rem;"
              class="mb-2"
            >
              <b-card-text>{{ `${meal.description}` }}</b-card-text>
              <span>
                <strong>Price: ${{ `${meal.price}` }} </strong>
              </span>
              <b-button @click="placeOrder" variant="primary">Order meal</b-button>
            </b-card>
          </b-col>
        </div>
      </b-row>
    </div>
    <div v-else>
      <h5>Fetching meals . . .</h5>
    </div>
  </b-container>
</template>
With the meals data property, we iterate and render the individual products returned from the endpoint to show the product title, description, price, and image respectively. You might also notice that I’m using a single image for all the products, instead of rendering the associated images per product. I wanted to fix this before completing this tutorial but I figured it might make for a great challenge for you. Parse the image URL in the data response and dynamically display each product’s image yourself, feel free to share your code or send a PR to this repo when you’re done.
Now that we have our Meals component ready, let’s update the App.vue component to render the Meals component we’ve just defined:
// src/App.vue
<template>
  <div>
    <br />
    <Meals />
  </div>
</template>
<script>
import Meals from "./components/Meals";
export default {
  name: "App",
  components: {
    Meals,
  },
};
</script>
<style>
#styles here
</style>
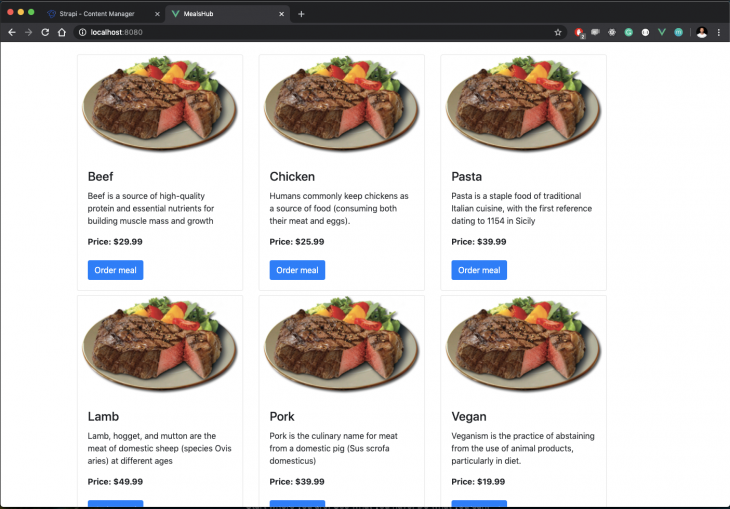
When you save and check on the browser, you should now see the app working as expected like so:
Since we are building a mini ecommerce application, it would make sense to ensure that it looks as close to a real web app as possible. Thankfully, BootstrapVue makes this possible in just a few steps. Create a new Navbar.vue component in the components folder and update it with the snippet below:
#src/components/navbar.vue
<template>
  <div>
    <b-navbar toggleable="lg" type="dark" variant="info">
      <b-navbar-brand href="#">MealsHub</b-navbar-brand>
      <b-navbar-toggle target="nav-collapse"></b-navbar-toggle>
      <b-collapse id="nav-collapse" is-nav>
        <b-navbar-nav class="ml-auto">
          <b-nav-form>
            <b-form-input
              size="sm"
              class="mr-sm-2"
              placeholder="Search"
            ></b-form-input>
            <b-button size="sm" class="my-2 my-sm-0" type="submit"
              >Search</b-button
            >
          </b-nav-form>
          <b-nav-item-dropdown right>
            <template v-slot:button-content>
              <em>User</em>
            </template>
            <b-dropdown-item href="#">Profile</b-dropdown-item>
            <b-dropdown-item href="#">Sign Out</b-dropdown-item>
          </b-nav-item-dropdown>
        </b-navbar-nav>
      </b-collapse>
    </b-navbar>
  </div>
</template>
<script></script>
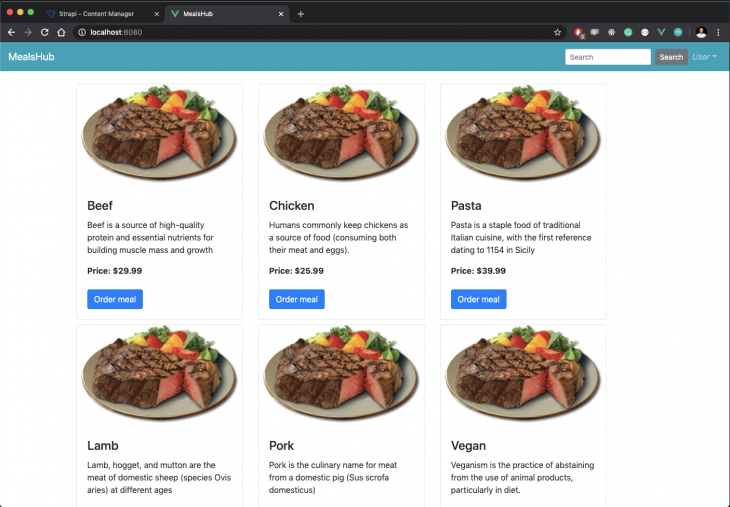
This is a BootstrapVue navbar component that does absolutely nothing apart from making our ecommerce store look a bit more real. If you update the \App.vue component with this navbar and render it before the Meals component, our store will take on a new look similar to this:
Flutterwave offers the easiest way to make and accept payments from customers anywhere in the world. What’s more, the integration instructions are very straightforward and the barrier to entry is very low as you’ll see shortly.
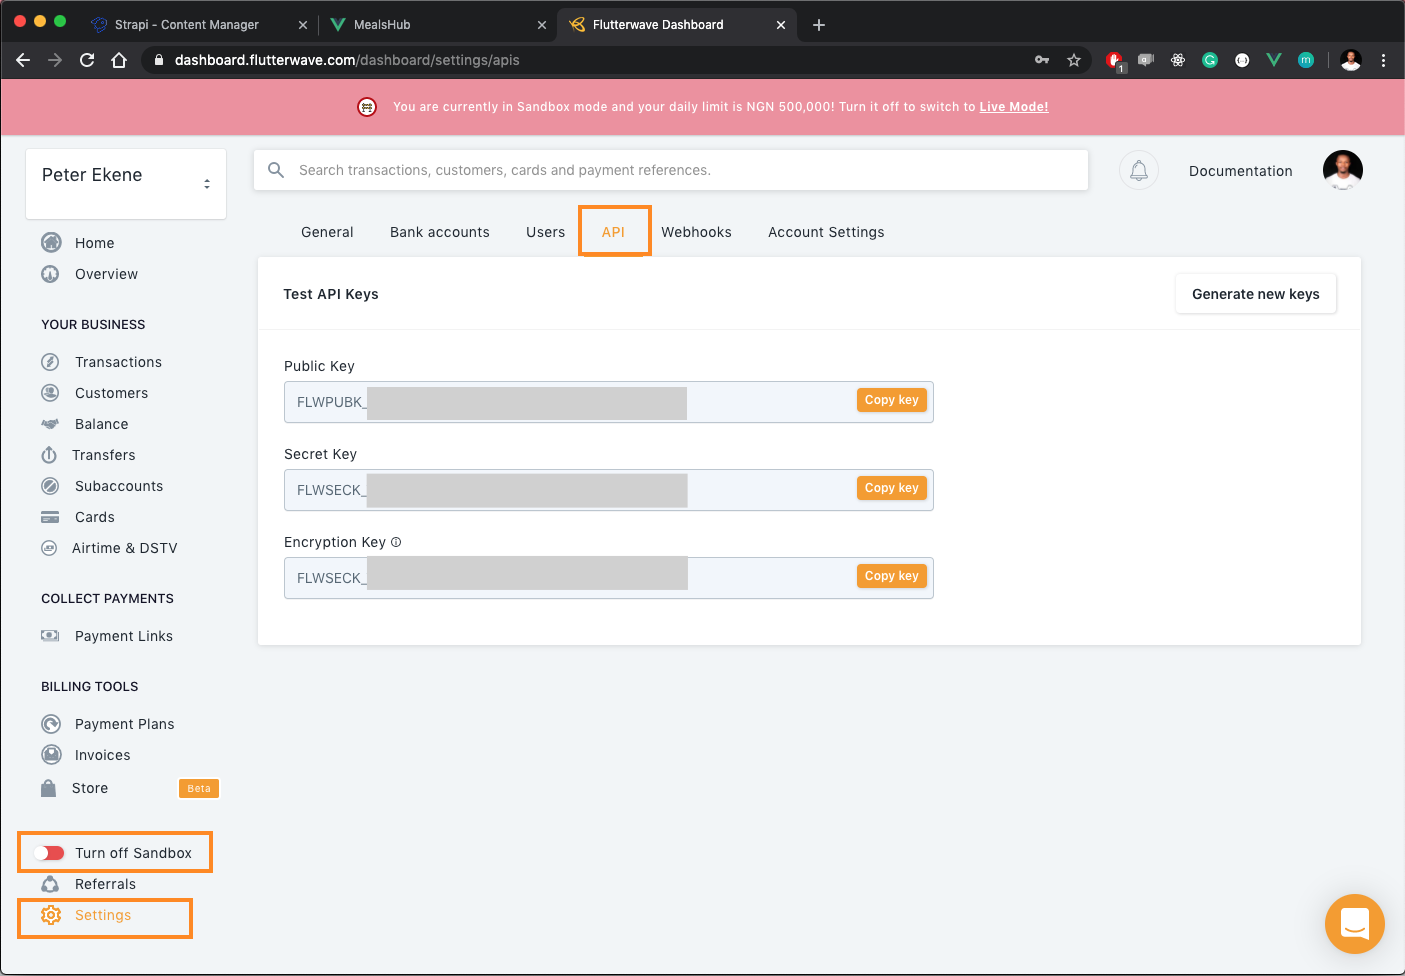
At the prerequisites, I mentioned that you will need a Flutterwave account, if you don’t have one yet, create a free account here. When you do, log in to your dashboard and toggle your account to sandbox mode. Then navigate to Settings on the sidebar, select the API tab and copy your public key:
That’s all you need to set up a personal Flutterwave account. Next, add Flutterwave to our Vue app. Open the Meals component and create an instance of Flutterwave’s inline checkout modal and append it to the DOM using Vue’s created() lifecycle method:
// src/components/Meals.vue
<script>
export default {
data() {
return {
meals: [],
};
},
mounted() {
//Fetch products
},
created() {
const script = document.createElement("script");
script.src = "https://checkout.flutterwave.com/v3.js ";
document.getElementsByTagName("head")[0].appendChild(script);
},
};
</script>
Next, we define the placeOrder() function that will activate the Flutterwave’s checkout modal when the order meal button is clicked. We will do this using Vue’s methods property like so:
// src/components/Meals.vue
<script>
export default {
  data() {
    return {
      meals: [],
    };
  },
  methods: {
    placeOrder() {
      window.FlutterwaveCheckout({
        public_key: "INSERT YOUR PUBLIC KEY",
        tx_ref: "new-sale"+ new Date(),
        amount: 29.99,
        currency: "USD",
        country: "NG",
        payment_options: "card",
        customer: {
          email: "[email protected]",
          phone_number: "+234702909304",
          name: "Ekene Eze",
        },
        callback: function(data) {
          console.log(data);
        },
        onclose: function() {},
        customizations: {
          title: "MealsHub",
          description: "Payment for selected meal",
          logo: "http://localhost:1337/uploads/beef_b538baa14d.png",
        },
      });
    },
  },
  mounted() {
    fetch("http://localhost:1337/products"){
          // Fetch products
    });
  },
  created() {
      // Install Flutterwave
  },
};
</script>
The FlutterwaveCheckout function makes it possible for you to define the payment parameters that your customers are providing. This includes the amount to be charged, the currency to charge the customer in, the payment options you want to enable, and so on. The function also accepts a customer and a customizations object to provide more customizations on the checkout modal and lets you store more information about the paying customer.
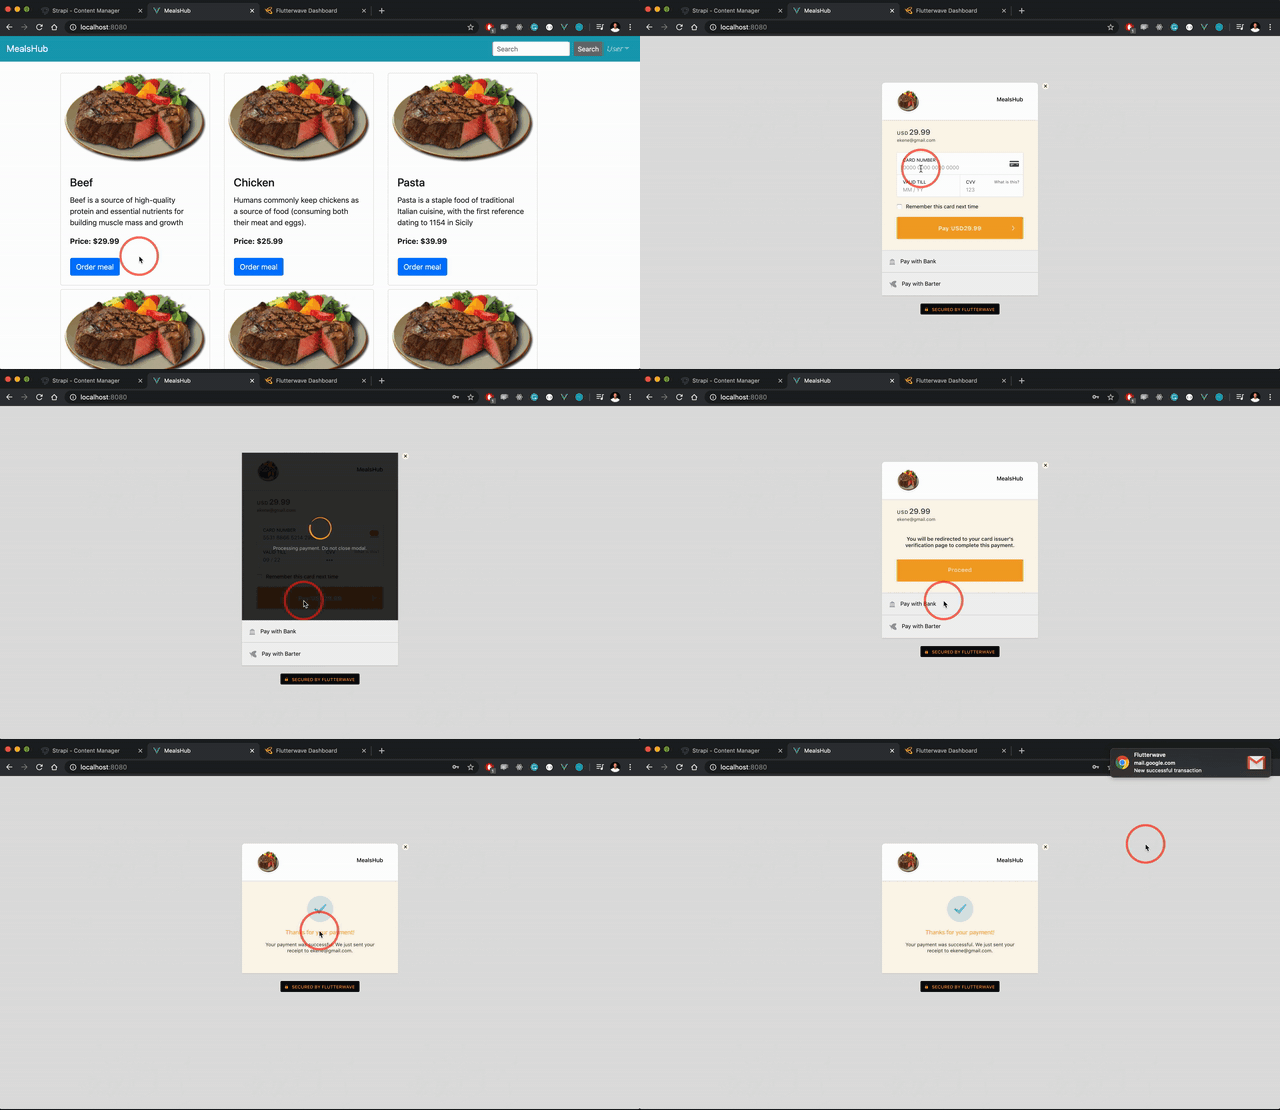
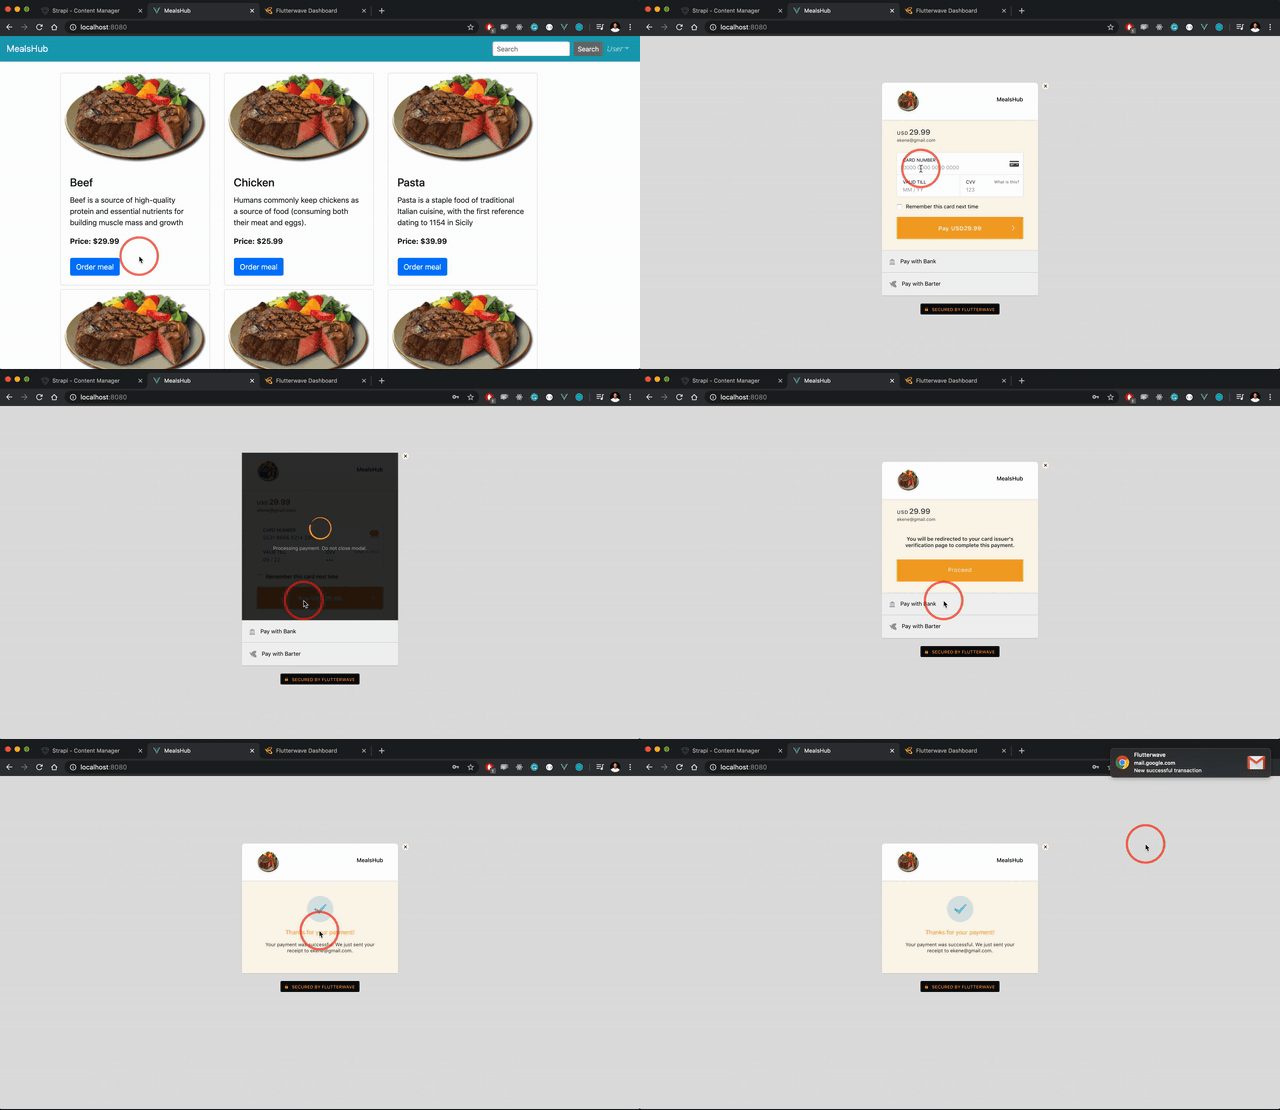
At this point, if you click the order meal button, the Flutterwave checkout modal will be loaded for you to complete payment for the order:
In this project, we’ve built a mini ecommerce application using Vue.js, Strapi, and Flutterwave. With Strapi we were able to quickly build a /products endpoint that returns a list of products and with some details. With Vue, we built the client that consumes the products we created with Strapi to allow users on our store view and interact with our products. Finally, we integrated Flutterwave to allow customers pay for these products from anywhere in the world. For more resources on these tools, visit the documentation for Flutterwave, Strapi, and Vue.js.
Debugging Vue.js applications can be difficult, especially when users experience issues that are difficult to reproduce. If you’re interested in monitoring and tracking Vue mutations and actions for all of your users in production, try LogRocket.

LogRocket lets you replay user sessions, eliminating guesswork by showing exactly what users experienced. It captures console logs, errors, network requests, and pixel-perfect DOM recordings — compatible with all frameworks.
With Galileo AI, you can instantly identify and explain user struggles with automated monitoring of your entire product experience.
Modernize how you debug your Vue apps — start monitoring for free.
LogRocket lets you replay user sessions, eliminating guesswork around why users don't convert by showing exactly what users experienced. It captures console logs, errors, network requests, and pixel-perfect DOM recordings — compatible with all frameworks.
LogRocket's Galileo AI watches sessions for you, instantly identifying and explaining user struggles with automated monitoring of your entire product experience.
Start proactively monitoring your ecommerce apps — try LogRocket for free.

@container scroll-state: Replace JS scroll listeners nowCSS @container scroll-state lets you build sticky headers, snapping carousels, and scroll indicators without JavaScript. Here’s how to replace scroll listeners with clean, declarative state queries.

Explore 10 Web APIs that replace common JavaScript libraries and reduce npm dependencies, bundle size, and performance overhead.

Russ Miles, a software development expert and educator, joins the show to unpack why “developer productivity” platforms so often disappoint.

Discover what’s new in The Replay, LogRocket’s newsletter for dev and engineering leaders, in the February 18th issue.
Would you be interested in joining LogRocket's developer community?
Join LogRocket’s Content Advisory Board. You’ll help inform the type of content we create and get access to exclusive meetups, social accreditation, and swag.
Sign up now
9 Replies to "How to build an ecommerce site with Strapi, Vue.js, and Flutterwave"
Hey you missed a part about the Roles & Permissions, without updating them, the endpoint throws a forbidden error 😛
Wow, thanks Vel. I totally missed that part. Will make the update shortly
Hi Ekene,
Thank you so much for this tutorial.
I’m having a problem in payment connecting to flutterwave. It says Invalid public key passed even if i input the correct public key.
This is the error in my network:{“status”:”error”,”message”:”Invalid public key passed”,”data”:{“code”:”INV_PUBK”,”message”:”Invalid public key passed”}}
I suspect it’s something related to https://ravemodal-dev.herokuapp.com/v3.js connecting to flutterwave. Any idea on how to solve this? Thanks in advance.
Regards,
Saf
All this sounds good, but how about adding payment valuation on our side? Flutterwave knows nothing about product prices and it means all the orders will be needed to be controlled manually.
Ideally we should after popup close check on our server side if the payment was successful and here the mist interesting part begins: how easy is to setup connection from it to flutterwave and validate order?
I think Someone can change the Flutterwave requested price, from the js console. How do i ascertain that a user payed the intended price?
Thanks
Fabulo articulo, gracias por el ejemplo 😀
Hi Saf, Yes It is related to that script. I understand that it is not a production ready script. Please use this instead https://checkout.flutterwave.com/v3.js
I will also try and get the editors to update it on the post
Hi Bogdan, very nice points you raised there. However, this post is only but an introduction to these tools, not necessarily an in-depth exposition of their features.
The demo used in the post is also just “a demo”. Flutterwave handles payment validation and verification in a lot of ways. I’m sure you’ll find more if you look at the docs here https://developer.flutterwave.com/v3.0/docs/transaction-verification.
In this post, I used the Flutterwave inline method, you can read more about it here https://developer.flutterwave.com/v3.0/docs/flutterwave-inline. You can also integrate via APIs https://developer.flutterwave.com/v3.0/docs/card-payments-1 It gives you more flexibility on how you handle processes and validation. Maybe some time we can deal with it in detail
You didn’t say anything about user authentication