Adding animation and transition effects to your website’s components and elements can improve user experience and also add some flair. However, transitions created with heavy animation libraries tend to be slow due to the overhead the library adds to the application.

While we can’t completely eliminate the performance dip created by animations even in smaller libraries, we can reduce it by selecting the right package.
In this tutorial, we’ll demonstrate how to create fast transition animations in React using transition-hook.
This article will cover the following:
useTransitionuseSwitchTransitionlistTransitionAt the time of writing, transition-hook is not ready for production, so it can’t be used in actual applications. However, it has reached a v1.5.1 release status, so a stable, production-ready release may be just around the corner!
To follow along with the examples used in this article, set up a React project and install transition-hook with Yarn or npm:
/*yarn*/
yarn add transition-hook

/*npm*/
npm install transition-hook --save
transition-hook is one of many Hooks available for creating animations in React. It’s similar to the popular react-transition-group, but it’s lightweight, has simpler syntaxes, and is more performant.
To be clear, transition-hook is not an all-out animation library like Framer Motion or react-spring. It does not animate elements automatically. Instead, it allows you to add animations to an element’s entrance and exit from the DOM using its lifecycle methods with CSS classes and styles.
The overhead cost of React Hooks to add animations to your applications is negligible since Hooks are fairly small compared to full animation libraries.
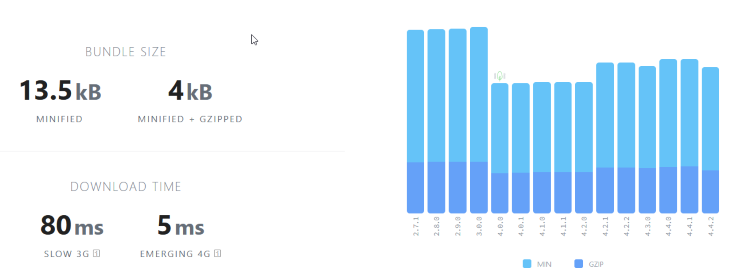
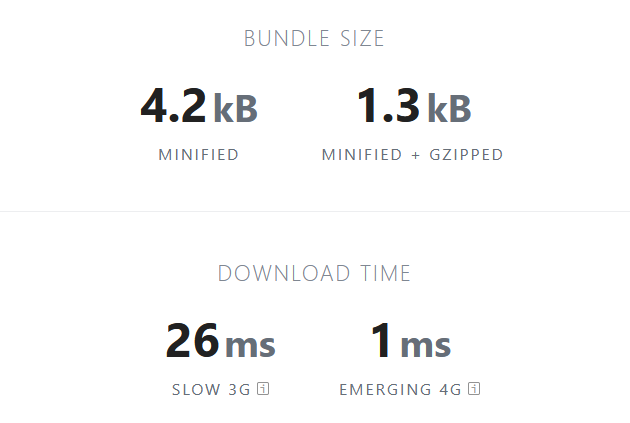
For example, the minified version of the react-transition-group adds 13.5kB bundle weight to an application and it takes about 5ms to load up on a 4G network. For comparison, transition-hook adds only 4.3kB bundle weight and loads up in just 1ms. Its lightweight nature and its ability to render fast, optimized animations make transition-hook more performant than its predecessors.
Here’s a side-by-side comparison of the bundle sizes of both libraries:
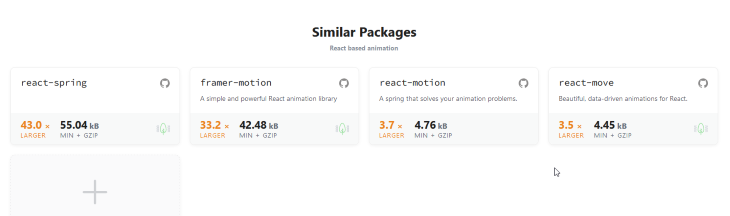
Here’s a comparison showing how the transition-hook bundle size compares to other React animation libraries: react-spring, framer-motion, react-motion, and react-move:
transition-hook leverages the series of lifecycle methods that are invoked when a component enters and exits the DOM. transition-hook uses these lifecycle methods to create transition stages that allow us to add animations to components with CSS classes and styles based on when the components mount and unmount.
When a component is mounted, it gets inserted into the DOM as an element. The opposite happens when a component unmounts; it gets removed from the DOM. However, these lifecycle methods can be overridden to run desired logic at a particular time in the process.
transition-hook exposes three React Hooks:
useTransitionuseSwitchTransitionlistTransitionThese Hooks transform a Boolean state into transition stages that can be invoked when a component mounts or unmounts after a specified duration. This allows us to add CSS styling based on different stages to create animation transitions.
Here are transition-hook’s transition stages:
from: before the element entersenter: when the element entersleave: before the element exitsNow, let’s look at some practical examples to get a clear idea of how this works.
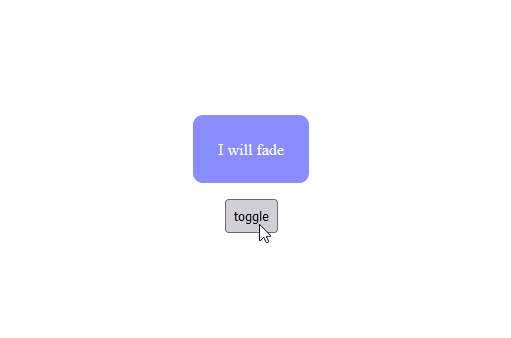
useTransitionBelow is an example of a simple component with fade-in and fade-out animations achieved using the useTransition Hook:
const [onOff, setOnOff] = useState(true)
const {stage, shouldMount} = useTransition(onOff, 300) // (state, timeout)
return <div>
  {shouldMount && (
    <p style={{
      ….
      transition: '.3s',
      opacity: stage === 'enter' ? 1 : 0
    }}>
      I will fade
    </p>
  )}
  <button onClick={()=>setOnOff(!onOff)}>toggle</button>
</div>
In this example, we first create an onOff state variable with the useState Hook, then pass it as a prop to the useTransition Hook alongside a 3ms timeout duration.
The onOff state variable indicates whether the component should enter the DOM by controlling the Boolean value of the destructured shouldMount variable from the useTransition Hook. If the value is set to true, the component will mount and the transition stages will be invoked for the duration of the specified timeout until the component unmounts.
const {stage, shouldMount} = useTransition(onOff, 300)
The stage variable gives us access to the transition stages mentioned earlier. We can use the stage variable to change the component’s CSS styling and animate the component.
But first, we need to check if the component has been mounted or not. We perform this check in the code snippet below using the logical AND (&&) operator. The element to the right of the && would only be evaluated (mounted) if the Boolean value of the shouldMount variable is true. In this case, the value of the onOff state variable is set to true by default, so the component will be mounted, giving us access to the transition stages.
  {shouldMount && (
    <p style={{
      ….
      transition: '.3s',
      opacity: stage === 'enter' ? 1 : 0
    }}>
      I will fade
    </p>
  )}
In the below code, the CSS styles responsible for the animations are applied inline on the paragraph element. The opacity property is where the magic happens!
Creating animations with CSS is as simple as adding a transition property to an element and toggling the opacity or transform values conditionally. That’s exactly what we’ve done in this example; the value of the opacity property on the paragraph element is conditionally applied based on the transition stages.
<p style={{
      ….
      transition: 'all 3s',
      opacity: stage === 'enter' ? 1 : 0
    }}>
      I will fade
</p>
When the component gets to the enter transition stage, the paragraph’s opacity value will be set to 1, otherwise, it will be set to zero.
opacity: stage === 'enter' ? 1 : 0
Since a transition property is also applied to the element, a fade-in and fade-out effect will be created when the component mounts and unmounts, as shown below:
Animations can also be created by applying styles to elements with classes. But in this case, the className is what will be applied conditionally:
<p className={stage === 'enter' ? 'fade-in' : 'fade-out'}>
      I will fade
</p>
The useTransition Hook is useful for creating simple and linear animations. However, when the animation is based on certain criteria and complex functionalities, the useSwitchTransition and listTransition Hooks are better options.
Next, we’ll review several React Hooks that can be used to animate elements and look at specific use cases for each Hook.
useSwitchTransitionThe useSwitchTransition Hook animates elements based on state changes. Suppose we have a button that toggles back and forth between two states and requires a change in the appearance of another element. In this case, useSwitchTransition would be the best Hook to use.
The useSwitchTransition hook accepts three props; state, timeout, and mode. We’ve discussed the first two props in the previous sections, we’ll take a look at the mode prop and learn how to use it with a practical example.
The mode prop indicates how the states of components change and how they enter or exit the scene. When the state of a component changes, the component exits and a new component with a new state enters.
The mode prop accepts one of three values: default, out-in, or in-out. The out-in value indicates that the old state will exit the scene first before a new state enters. Conversely, the in-out value indicates the new state will enter the scene before the old state exits.
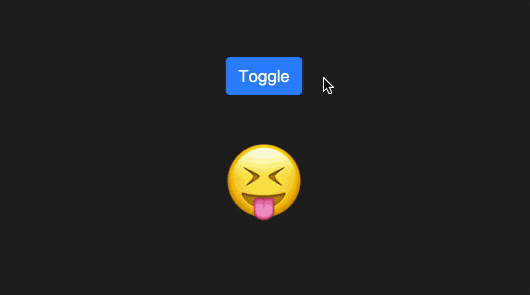
The below example of an emoji switcher properly showcases a comprehensive use of the useSwitchTransition Hook:
export function EmojiSwitchTransition() {
  const [isHappy, setIsHappy] = useState(false)
  const transition = useSwitchTransition(isHappy, 300)

  return (
    <div className="EmojiSwitchTransition">
      <Button
        onClick={() => {
          setIsHappy(!isHappy)
        }}
      >
        Toggle
      </Button>

      <div
        style={{
          display: 'flex',
          justifyContent: 'center',
        }}
      >
        {transition((state, stage) => (
          <h1
            style={{
              transition: '.3s',
              marginTop: 40,
              fontSize: '5em',
              position: 'absolute',
              opacity: stage === 'enter' ? 1 : 0,
              transformOrigin: 'center bottom',
              transform: {
                from: 'translateX(-100%) rotate(-90deg)',
                enter: 'translateX(0%)',
                leave: 'translateX(100%) rotate(90deg)',
              }[stage],
            }}
          >
            {state ? '🤣' : '😝'}
          </h1>
        ))}
      </div>
    </div>
  )
}
In this example, we have an isHappy state variable and a transition variable that stores the useSwitchTransition function with the isHappy state variable, a 3ms timeout, and a default mode prop passed into it.
  const [isHappy, setIsHappy] = useState(false)
  const transition = useSwitchTransition(isHappy, 300, "default")
In the previous useTransition example we destructured the stage and shouldMount variables from the useTransition Hook instead of storing them In a variable like this example.
In the component body, there’s a button with an event listener that toggles the isHappy variable’s state between true and false, as well as a div element that wraps the transition render function.
{transition((state, stage) => (
          <h1
            style={{
              transition: '.3s',
              marginTop: 40,
              fontSize: '5em',
              position: 'absolute',
              opacity: stage === 'enter' ? 1 : 0,
              transformOrigin: 'center bottom',
              transform: {
                from: 'translateX(-100%) rotate(-90deg)',
                enter: 'translateX(0%)',
                leave: 'translateX(100%) rotate(90deg)',
              }[stage],
            }}
          >
            {state ? '🤣' : '😝'}
          </h1>
        ))}
Inside the render function, there’s a callback function that has two parameters: state and stage. These parameters represent the isHappy state and the transition stages, respectively.
Inside the callback function is an h1 element that displays one of two emojis based on the current state.
{state ? '🤣' : '😝'}
These emojis are animated by the inline styles applied to the h1 element. The opacity and transform properties are responsible for the animations and they are set based on the transition stages.
style={{
              ...
              opacity: stage === 'enter' ? 1 : 0,
              ...
          }}
The opacity of each emoji is set to 0 by default, when the state changes and it gets to the enter stage, the opacity will be set to 1, and 0 on leave. This adds a fade-in and fade-out animation to the element when it enters and exits the scene.
The transform method adds a translate and rotate animation to the element based on the transition stages.
style={{
              ...
              …
              transform: {
                from: 'translateX(-100%) rotate(-90deg)',
                enter: 'translateX(0%)',
                leave: 'translateX(100%) rotate(90deg)',
              }[stage],
          }}
When in the from transition stage, the emoji moves from the negative plane ( i.e from the left ) of the x-axis and is rotated 90 degrees counterclockwise as it enters the scene.
In the enter transition stage, the translate method is set to zero, thus making the emoji adopt its default transform position. The leave transition stage initiates the exit animation by moving the emoji from the default position to the positive plane of the x-axis ( i.e to the right ) and rotating it 90 degrees clockwise.
listTransitionThe listTransition Hook is best if you have a list of items and you want to animate whenever an element is added or removed from the list.
This Hook accepts a list of arrays and useRef Hook’s current property as a timeout prop. In the component body, it encapsulates a callback function with two parameters: item and stage. The item parameter represents the array of items that will be animated with the stage parameter based on the transition stages.
Here’s a practical use of the listTransition Hook from CodeSandbox:
export function ListShifting() {
  const [list, setList] = useState([1])
  const timeoutRef = useRef(300)
  const transition = useListTransition(list, timeoutRef.current)

  return (
    <div className="ListShifting">
      <div
        style={{
          display: 'flex',
          alignItems: 'center',
          justifyContent: 'center',
          gap: 20,
          marginBottom: 50,
        }}
      >
        <Button onClick={() => setList((prev) => prev.concat(prev.length + 1))}>
          Add Item
        </Button>
        <Button
          variant="danger"
          onClick={() => {
            setList([])
            timeoutRef.current = list.length * 50
          }}
        >
          Remove All
        </Button>
      </div>
      {transition((item, stage) => (
        <h1
          style={{
            transition: '.3s',
            ...(stage === 'leave' && { transitionDelay: item * 50 + 'ms' }),
            opacity: stage === 'enter' ? 1 : 0,
            display: 'flex',
            alignItems: 'center',
            justifyContent: 'center',
            gap: 20,
            transformOrigin: 'center right',
            transform: {
              from: 'translateX(-100%) rotate(90deg)',
              enter: 'translateX(0%)',
              leave: 'translateX(100%) rotate(-90deg)',
            }[stage],
          }}
        >
          Item: {item}
          <Button
            variant="danger"
            size="sm"
            onClick={() =>
              setList((prev) => prev.filter((pitem) => pitem !== item))
            }
          >
            <RiSubtractLine />
          </Button>
        </h1>
      ))}
    </div>
  )
}
transition-hook provides the option of creating animations using the Function as Child Component (FaCC) pattern. This pattern lets you pass a render function to a component as the child prop.
This is a more concise and comprehensive way of creating animations with transition-hook. We can use this pattern to define transition functions as components and pass the state, timeout, and mode to them as props.
useTransitionHere’s an example of a Transition function in JSX:
const [onOff, setOnOff] = useState(true);
const {stage, shouldMount} = useTransition(onOff, 300);
...
{shouldMount && (
   {...}
)}
Here’s the same example using an FaCC pattern with useTransition:
const [onOff, setOnOff] = useState(true);
...
<Transition state={onOff} timeout={300}>
    {...}
</Transition>
useSwitchTransitionHere’s an example of a SwitchTransition function in JSX:
const [isHappy, setIsHappy] = useState(false);
const transition = useSwitchTransition(isHappy, 300, "default");
...
{transition((state, stage) => (
     {...}
  )}
Here’s the same example using an FaCC pattern with useSwitchTansition:
const [isHappy, setIsHappy] = useState(false);
...
<SwitchTransition state={isHappy} timeout={300} mode='default'>
    {...}
</SwitchTransition>
listTransitionHere’s an example of a listTransition function in JSX:
const [list, setList] = useState([1]);
  const timeoutRef = useRef(300);
  const transition = useListTransition(list, timeoutRef.current);
...
{transition((item, stage) => (
    {...}
  )
}
Here’s the same example using an FaCC pattern with listTransition:
const [list, setList] = useState([1]);
const timeoutRef = useRef(300);
...
<listTransition state={list} timeout={timeoutRef.current}>
 {...}
</listTransition>
In this tutorial, we discussed the features of transition-hook and how it works. We also demonstrated how to use transition-hook to animate React components on their entrance or exit from the DOM, and we looked at specific use cases for each Hook exposed by the library.
To learn more about transition-hook, visit GitHub. For additional examples and use cases, visit this CodeSandbox.
Install LogRocket via npm or script tag. LogRocket.init() must be called client-side, not
server-side
$ npm i --save logrocket

// Code:

import LogRocket from 'logrocket';
LogRocket.init('app/id');
// Add to your HTML:

<script src="https://cdn.lr-ingest.com/LogRocket.min.js"></script>
<script>window.LogRocket && window.LogRocket.init('app/id');</script>

A guide for using JWT authentication to prevent basic security issues while understanding the shortcomings of JWTs.

Discover how to build, render, and automate product demo videos with Remotion, replacing traditional screen recordings with reusable React code.

Chrome’s Modern Web Guidance embeds modern web platform skills into AI coding agents, helping them choose native HTML, CSS, and browser APIs over legacy patterns.

Learn how to use Fallow to analyze AI-generated code, detect dead code, duplicate logic, and complexity issues, and integrate automated code quality checks into your AI-assisted development workflow.
Would you be interested in joining LogRocket's developer community?
Join LogRocket’s Content Advisory Board. You’ll help inform the type of content we create and get access to exclusive meetups, social accreditation, and swag.
Sign up now