When building an application for a native platform like Android or iOS, traditionally you would have to learn how to code in a specific language (Java, Swift, etc.) and then also learn additional tooling like emulators.

When React Native came out, it was a game changer for frontend developers because they were able to develop applications for native platforms using the same skills they applied in everyday web development.
In May, Microsoft issued a preview release of React Native for macOS. This expanded the scope of the React Native world; now you can create desktop apps with the same tooling that had previously been used for Android and iOS.
This post will introduce React Native for macOS. I’m going to be walking through a sample project that can be accessed on the GitHub repo here.
This post and all of the examples were run on a MacBook Pro. Since we’re going to be leveraging Xcode, that’s a dependency to follow the approach and discussion covered here.
React Native is an extension of the React ecosystem that enables web developers to get into native development without having to learn new languages and skills. There are new tools that developers will need to learn, of course, but as long as they’re familiar with React development, this learning curve is minimal.
React Native converts JavaScript code into native apps that can actually be deployed onto the various app stores. There is a set of core components that any developer can leverage to get up to speed fairly fast. Check out the React Native components page here for more information.
There is also a variety of tools and CLIs available for development with React Native. I found using the Expo CLI was the easiest to get up and running, and I’d recommend following the instructions here.
If you go with the Expo CLI route, you can run expo init ReactNativeFirstProject to create your first project. This creates a project that looks like the following:
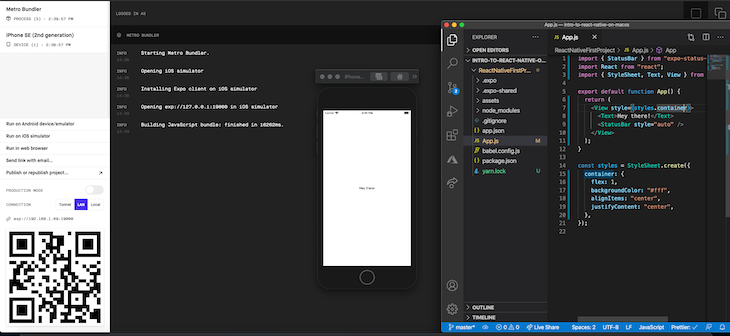
As you can see, React Native can run your JS code on an emulator (in this case, I’m using the iPhone emulator on my MacBook). Just by modifying the App.js file, the app is recompiled and a native app is created. This experience is similar if you leverage the React Native CLI as well.
In my sample project, I’ve created a generic React Native project in the folder ReactNativeFirstProject that you can reach here.
React Native for macOS builds on the original React Native project to include the desktop environment on a Mac. There is also a version for Windows development — check out Microsoft’s announcement here.
React Native for macOS has a similar setup that you saw with the Expo CLI in the earlier section. To get started, I recommend reviewing the Microsoft page here. The recommended process from the Microsoft docs is to use the React Native npx script as follows:
npx react-native init <projectName>
Once you’ve run that initial script, cd into your project and install the macOS extension with
npx react-native-macos-init.
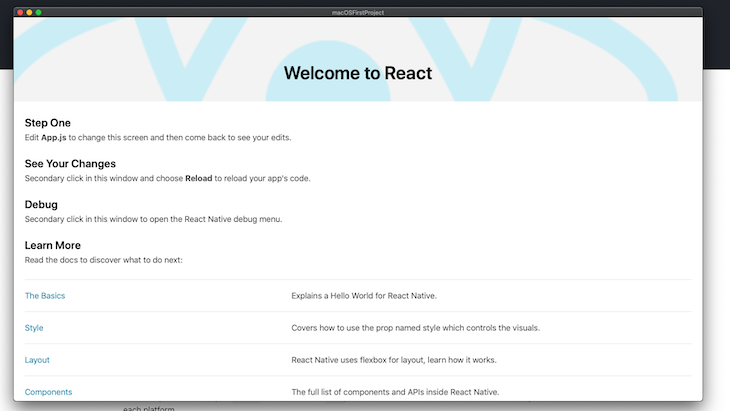
With these installed, you then should be able to run the app by opening your terminal, navigating to the project directory, and running npx react-native run-macos. The result should be something like the following:
To showcase basic development (and some more advanced features), we’re going to create a calculator. The source code for the original version of this calculator was copied from the react-native-windows examples here. I’ve modified this code so that it will run with macOS.
If you want to see a completed version of this in my sample GitHub project, navigate over to the
calculatorfolder you can see here.
This section will just focus on creating the calculator, and we will discuss what the code is actually doing in the next section.
Open your terminal and run npx react-native init calculator. When that completes, navigate into the calculator folder that was created and add the macOS extension with npx react-native-macos-init.
Once the initial install finishes, in the calculator folder, run the app locally with npx react-native run-macos.
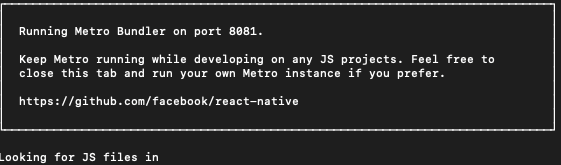
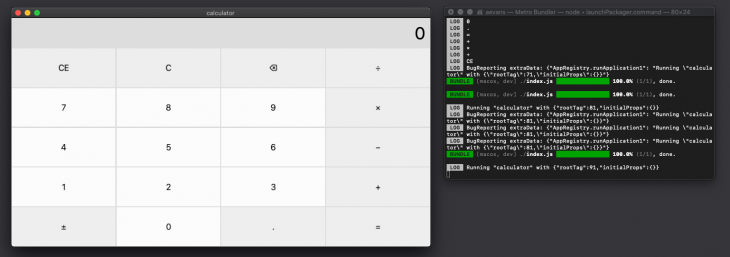
Once it’s running, you’ll see an additional terminal screen that’s showcasing the hot reloading being done by the Metro bundler:
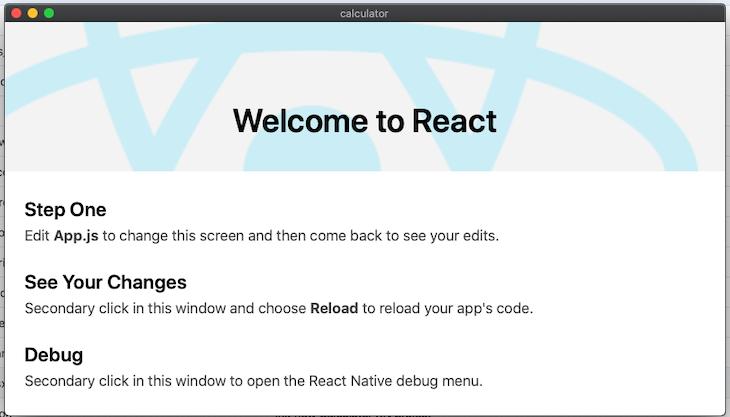
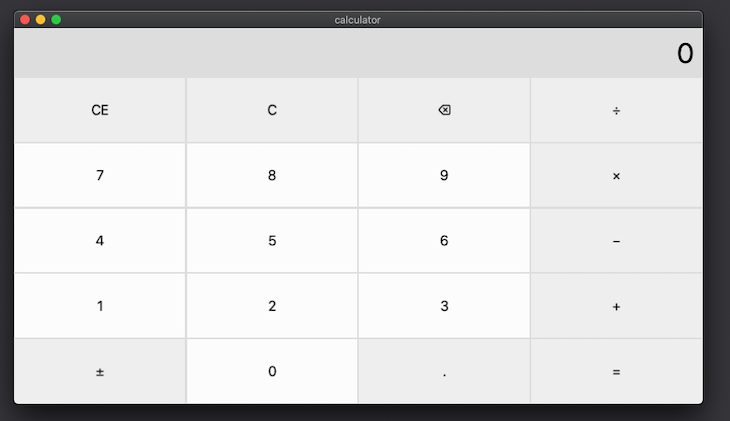
The initial application you built should open an app window on your Mac and you should see the following:
With all that done, we’re ready to start building our calculator. The app should be running, and it will hot-reload as you change and save your project.
First, replace the contents of your App.js file with the following:
/**
 * Sample React Native App
 * https://github.com/facebook/react-native
 *
 * @format
 * @flow strict-local
 */
import React, {useState} from 'react';
import {StyleSheet, View, Text} from 'react-native';
import CalcButton from './components/CalcButton';
const operators = {
  clearEntry: 'CE',
  clear: 'C',
  backspace: '⌫',
  decimal: '.',
  sign: '±',
  add: '+',
  subtract: '−',
  multiply: '×',
  divide: '÷',
  equals: '=',
};
let calc = {
  stackValue: NaN,
  pendingOperator: '',
  decimalPressed: false,
  showingPreviousResult: false,
};
const App: () => React$Node = () => {
  const [displayText, setDisplayText] = useState('0');
  const buttonPress = (btn) => {
    let text = displayText;
    if (btn === operators.clearEntry) {
      // Clear entry
      clearEntry();
    } else if (btn === operators.clear) {
      // Clear
      calc.stackValue = NaN;
      calc.pendingOperator = '';
      clearEntry();
    } else if (btn === operators.backspace) {
      // Backspace
      if (calc.decimalPressed) {
        calc.decimalPressed = false;
      } else {
        if (isFinite(Number(text))) {
          text = text.substring(0, text.length - 1);
          if (text.length === 0) {
            text = '0';
          } else if (text[text.length - 1] === operators.decimal) {
            text = text.substring(0, text.length - 1);
          }
          setDisplayText(text);
        }
      }
    } else if (btn === operators.decimal) {
      // Decimal
      if (isFinite(Number(text))) {
        if (!calc.decimalPressed && text.indexOf(operators.decimal) === -1) {
          calc.decimalPressed = true;
        }
      }
    } else if (btn === operators.sign) {
      // Sign change
      if (isFinite(Number(text))) {
        let num = Number(text);
        num *= -1.0;
        setDisplayText(num.toString());
      }
    } else if (
      btn === operators.add ||
      btn === operators.subtract ||
      btn === operators.multiply ||
      btn === operators.divide
    ) {
      // Add, Subrtract, Multiply, or Divide
      if (isFinite(Number(text))) {
        computeAndUpdate(btn);
        setDisplayText(calc.stackValue);
      }
    } else if (btn === operators.equals) {
      // Equals
      if (isFinite(Number(text))) {
        computeAndUpdate(btn);
        setDisplayText(calc.stackValue);
        calc.stackValue = NaN;
      }
    } else if (!isNaN(Number(btn))) {
      // Number
      if (isFinite(Number(text))) {
        if (calc.showingPreviousResult) {
          text = '0';
          calc.showingPreviousResult = false;
        }
        if (calc.decimalPressed) {
          text += '.';
          calc.decimalPressed = false;
        }
        if (text === '0') {
          text = '';
        }
        text += btn;
        setDisplayText(text);
      }
    } else {
      alert('error occured');
    }
  };
  const clearEntry = () => {
    calc.decimalPressed = false;
    calc.showingPreviousResult = false;
    setDisplayText('0');
  };
  const computeAndUpdate = (nextOperator) => {
    if (!isNaN(calc.stackValue)) {
      // There's something on the stack, let's compute
      let o1 = calc.stackValue;
      let o2 = Number(displayText);
      if (calc.pendingOperator === operators.add) {
        o1 = o1 + o2;
      } else if (calc.pendingOperator === operators.subtract) {
        o1 = o1 - o2;
      } else if (calc.pendingOperator === operators.multiply) {
        o1 = o1 * o2;
      } else if (calc.pendingOperator === operators.divide) {
        o1 = o1 / o2;
      }
      calc.stackValue = o1;
    } else {
      let num = Number(displayText);
      calc.stackValue = num;
    }
    calc.pendingOperator = nextOperator;
    calc.showingPreviousResult = true;
  };
  return (
    <View style={styles.container}>
      <View style={styles.textRow}>
        <Text style={styles.text}>{displayText}</Text>
      </View>
      <View style={styles.buttonRow}>
        <CalcButton
          name={operators.clearEntry}
          onPress={(n) => buttonPress(n)}
        />
        <CalcButton name={operators.clear} onPress={(n) => buttonPress(n)} />
        <CalcButton
          name={operators.backspace}
          onPress={(n) => buttonPress(n)}
        />
        <CalcButton name={operators.divide} onPress={(n) => buttonPress(n)} />
      </View>
      <View style={styles.buttonRow}>
        <CalcButton name="7" onPress={(n) => buttonPress(n)} />
        <CalcButton name="8" onPress={(n) => buttonPress(n)} />
        <CalcButton name="9" onPress={(n) => buttonPress(n)} />
        <CalcButton name={operators.multiply} onPress={(n) => buttonPress(n)} />
      </View>
      <View style={styles.buttonRow}>
        <CalcButton name="4" onPress={(n) => buttonPress(n)} />
        <CalcButton name="5" onPress={(n) => buttonPress(n)} />
        <CalcButton name="6" onPress={(n) => buttonPress(n)} />
        <CalcButton name={operators.subtract} onPress={(n) => buttonPress(n)} />
      </View>
      <View style={styles.buttonRow}>
        <CalcButton name="1" onPress={(n) => buttonPress(n)} />
        <CalcButton name="2" onPress={(n) => buttonPress(n)} />
        <CalcButton name="3" onPress={(n) => buttonPress(n)} />
        <CalcButton name={operators.add} onPress={(n) => buttonPress(n)} />
      </View>
      <View style={styles.buttonRow}>
        <CalcButton name={operators.sign} onPress={(n) => buttonPress(n)} />
        <CalcButton name="0" onPress={(n) => buttonPress(n)} />
        <CalcButton name={operators.decimal} onPress={(n) => buttonPress(n)} />
        <CalcButton name={operators.equals} onPress={(n) => buttonPress(n)} />
      </View>
    </View>
  );
};
const styles = StyleSheet.create({
  container: {
    flex: 1,
    backgroundColor: '#dddddd',
  },
  textRow: {
    padding: 5,
    alignItems: 'flex-end',
  },
  text: {
    padding: 5,
    fontSize: 36,
  },
  buttonRow: {
    flex: 1,
    flexDirection: 'row',
  },
});
export default App;
We’re also going to create a component for the calculator buttons, so create a file at components/CalcButton.js and add the following:
import React from 'react';
import {StyleSheet, Text, TouchableHighlight} from 'react-native';
function CalcButton(props) {
  return (
    <TouchableHighlight
      style={[
        styles.button,
        !isNaN(Number(props.name)) && styles.buttonNumeric,
      ]}
      onPress={() => props.onPress(props.name)}>
      <Text style={styles.buttonText}>{props.name}</Text>
    </TouchableHighlight>
  );
}
const styles = StyleSheet.create({
  button: {
    flex: 1,
    justifyContent: 'center',
    alignItems: 'center',
    backgroundColor: '#eeeeee',
    borderWidth: 1,
    borderColor: '#dddddd',
  },
  buttonNumeric: {
    backgroundColor: '#fcfcfc',
  },
  buttonText: {
    fontSize: 18,
  },
});
export default CalcButton;
When you’re finished, you should have a fully functioning calculator — something like this:
Here’s a screenshot of the calculator running with the hot reloader right next to it:
With this set up, let’s talk about what the code is doing in the next section.
So in the previous section, we got a calculator running. Now, let’s walk through the code to talk about how it’s actually doing what it’s doing.
If you notice in the App.js file, our template looks like this:
    <View style={styles.container}>
      <View style={styles.textRow}>
        <Text style={styles.text}>{displayText}</Text>
      </View>
      <View style={styles.buttonRow}>
        <CalcButton
          name={operators.clearEntry}
          onPress={(n) => buttonPress(n)}
        />
        <CalcButton name={operators.clear} onPress={(n) => buttonPress(n)} />
        <CalcButton
          name={operators.backspace}
          onPress={(n) => buttonPress(n)}
        />
        <CalcButton name={operators.divide} onPress={(n) => buttonPress(n)} />
      </View>
      <View style={styles.buttonRow}>
        <CalcButton name="7" onPress={(n) => buttonPress(n)} />
        <CalcButton name="8" onPress={(n) => buttonPress(n)} />
        <CalcButton name="9" onPress={(n) => buttonPress(n)} />
        <CalcButton name={operators.multiply} onPress={(n) => buttonPress(n)} />
      </View>
      <View style={styles.buttonRow}>
        <CalcButton name="4" onPress={(n) => buttonPress(n)} />
        <CalcButton name="5" onPress={(n) => buttonPress(n)} />
        <CalcButton name="6" onPress={(n) => buttonPress(n)} />
        <CalcButton name={operators.subtract} onPress={(n) => buttonPress(n)} />
      </View>
      <View style={styles.buttonRow}>
        <CalcButton name="1" onPress={(n) => buttonPress(n)} />
        <CalcButton name="2" onPress={(n) => buttonPress(n)} />
        <CalcButton name="3" onPress={(n) => buttonPress(n)} />
        <CalcButton name={operators.add} onPress={(n) => buttonPress(n)} />
      </View>
      <View style={styles.buttonRow}>
        <CalcButton name={operators.sign} onPress={(n) => buttonPress(n)} />
        <CalcButton name="0" onPress={(n) => buttonPress(n)} />
        <CalcButton name={operators.decimal} onPress={(n) => buttonPress(n)} />
        <CalcButton name={operators.equals} onPress={(n) => buttonPress(n)} />
      </View>
    </View>
You’ll notice that there are <View> and <Text> tags here rather than the traditional elements that we’d normally see in templates. As I stated in the intro sections, the way you build a React Native application is by utilizing the core components that you see here.
Specifically, the <View> tag is a prebuilt React Native element that supports a basic layout, including flexbox and some accessibility controls. You normally wrap your content areas with either this element or one of the similar variations in the core components. To learn more about <View>, check out the docs here.
The <Text> element is similar to what you’d would see with a <p> tag or similar. You use this to show text within your app. To learn more about the <Text> element, check out the docs here.
If you go to the CalcButton component that we also created, you’ll notice the template looks like this:
    <TouchableHighlight
      style={[
        styles.button,
        !isNaN(Number(props.name)) && styles.buttonNumeric,
      ]}
      onPress={() => props.onPress(props.name)}>
      <Text style={styles.buttonText}>{props.name}</Text>
    </TouchableHighlight>
The <TouchableHighlight> component is a wrapper for making a <View> properly respond to touch events. Our app here is specifically for macOS and doesn’t need this, but I left it as such since I was using the sample code provided in the Microsoft repo. This also highlights different possibilities with React Native projects that are built for native devices.
The remainder of both the App and CalcButton components are similar to what you would see with any other React project. If you notice, we’re pulling in the react-native components alongside our typical import from react:
import React, {useState} from 'react';
import {StyleSheet, View, Text} from 'react-native';
From here, you could build out additional components just like you would in any other React application — you can even use Hooks. I’m already using a React Hook with useState, and it worked the same way it would work for a web app.
So this all basically gets you started, but you also may want to deploy an app eventually. While you’re developing, you can use the Metro bundler to hot-reload your code as you build.
When it comes to deployment, you should rely on Xcode to read in the project you’ve created. There are several places you can go once you’ve got your project open in Xcode. React Native provides a comprehensive set of documentation specific for deployment here. You should also read over the Apple Docs here.
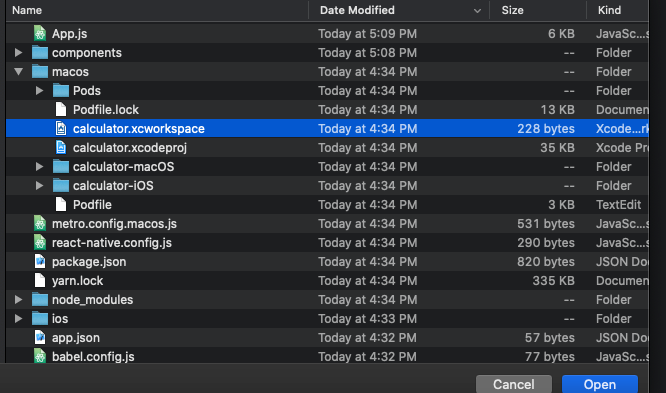
To open your project in Xcode, you’ll need to find the macos folder that was created and then open the associated workspace file. In our case, with the calculator app, you’ll need to open macos/calculator.xcworkspace, as you see here:
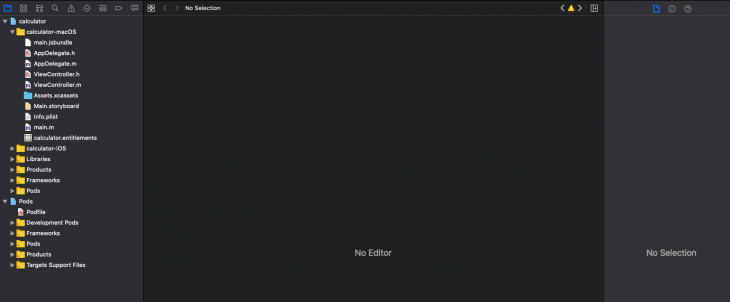
Open this file with Xcode, and now you can get to all the necessary artifacts you’ll need to submit your project for review in the Apple App Store:
In this post, you’ve seen an introduction to React Native for macOS. We walked through what React Native is and then saw a real example app that we built with React Native for macOS.
If you’re a developer who wants to get into native applications, React Native is a great place to start. The tooling is very intuitive, and React Native has a great set of docs.
We saw just a small sample of what is possible in this post. The best part is that if you’re familiar with React, React Native for macOS requires only a minimal learning curve. You can build the same quality apps that you’ve come to build with React using the tools for React Native.
Thanks for reading my post! Follow me on Twitter at @AndrewEvans0102!

LogRocket's Galileo AI watches sessions for you and and surfaces the technical and usability issues holding back your React Native apps.
LogRocket also helps you increase conversion rates and product usage by showing you exactly how users are interacting with your app. LogRocket's product analytics features surface the reasons why users don't complete a particular flow or don't adopt a new feature.
Start proactively monitoring your React Native apps — try LogRocket for free.
Hey there, want to help make our blog better?
Join LogRocket’s Content Advisory Board. You’ll help inform the type of content we create and get access to exclusive meetups, social accreditation, and swag.
Sign up now
Not sure if low-code is right for your next project? This guide breaks down when to use it, when to avoid it, and how to make the right call.

Compare Firebase Studio, Lovable, and Replit for AI-powered app building. Find the best tool for your project needs.

Discover how to use Gemini CLI, Google’s new open-source AI agent that brings Gemini directly to your terminal.

This article explores several proven patterns for writing safer, cleaner, and more readable code in React and TypeScript.


