
Storing data locally and persisting between app launches is one of the fundamental concepts of any mobile app development process. Almost every app requires that you handle data — from storing customer information for a food delivery app, to the number of points scored in a game or a simple value to understand whether the user has turned on dark mode during their last visit.

Flutter provides many local data persistence options for developers to choose from. shared_preferences is a good package for storing small key-value pairs locally, and sqflite, the SQLite package for Flutter, is a good choice when you’re dealing with strong relational data that requires you to handle complex relationships in the database.
But if you want a fast and secure local database with no native dependencies that also runs on Flutter web (😉), then Hive is a pretty good choice.
In this article, you will learn how to get started with Hive before we build a simple app using Flutter. We will also look into a concept that allows you to handle simple relational data in Hive.
The Replay is a weekly newsletter for dev and engineering leaders.
Delivered once a week, it's your curated guide to the most important conversations around frontend dev, emerging AI tools, and the state of modern software.
Let’s first take a look at why you should choose Hive over the other solutions available for persisting data locally in Flutter.
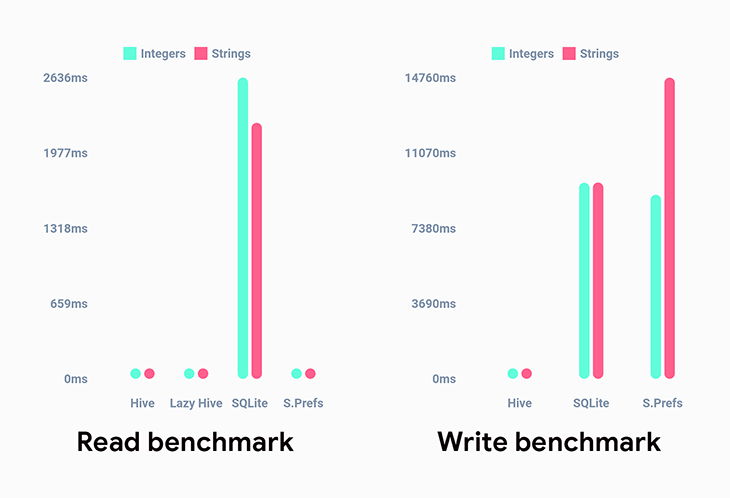
Hive is a lightweight and fast key-value database solution that is cross-platform (runs on mobile, desktop, and web) and is written in pure Dart. This gives it an instant advantage over sqflite, which doesn’t support Flutter web — Hive has no native dependencies, so it runs seamlessly on the web.
Below is a graph that benchmarks Hive against other similar database solutions:
Hive also allows you to store custom classes using TypeAdapters. We will take a look at this in more detail later in the article.
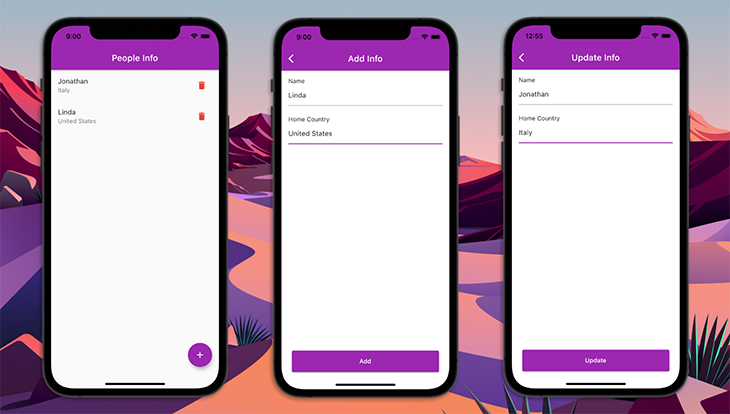
Let’s build a basic app where our users’ details are stored and where add, read, update, and delete operations on the data can be performed.
Create a new Flutter project using the following command:
flutter create hive_demo
You can open the project using your favorite IDE, but for this example, I’ll be using VS Code:
code hive_demo
Add the Hive and hive_flutter packages to your pubspec.yaml file:
dependencies:
  hive: ^2.1.0
  hive_flutter: ^1.1.0
Replace the content of your main.dart file with:
import 'package:flutter/material.dart';

main() {
  runApp(MyApp());
}

class MyApp extends StatelessWidget {
  @override
  Widget build(BuildContext context) {
    return MaterialApp(
      title: 'Hive Demo',
      theme: ThemeData(
        primarySwatch: Colors.purple,
      ),
      debugShowCheckedModeBanner: false,
      home: InfoScreen(),
    );
  }
}
The InfoScreen will display the details of the user — we will take a look at it in a moment. Before that, let’s understand an important concept used by Hive.
Hive uses the concept of “boxes” for storing data in the database. A box is similar to a table on an SQL database, except that boxes lack a strict structure. This means boxes are flexible and can only handle simple relationships between data.
Before accessing the data stored inside a box, you must open it. This loads the entire content of the box from local storage into the memory so that any data present inside the box can be easily accessed.
The following example shows how to open a box named peopleBox and get the parameter name from it:
var box = await Hive.openBox('peopleBox');
String name = box.get('name');
Other than the normal boxes, there are two more varieties of boxes:
Normal Hive boxes load the entire content of the box into the memory as it’s opened. But this might not be a good way to load a box if there’s a massive amounts of data inside it.
On opening a lazy box, only the keys are read and stored in memory. You can use the key to retrieve its respective value from the box.
You can use a lazy box like this:
var lazyBox = await Hive.openLazyBox('hugePeopleBox');
String name = await lazyBox.get('name');
Note: for accessing a value from a normal box, you have to get it without using await. But, in a lazy box, you have to use await because the content is not present in the memory — only its respective key is available.
You might need to store some sensitive information using Hive, and this is where an encrypted box comes to the rescue. Hive comes with support for AES-256 encryption out of the box, along with a helper function for generating an encryption key using the Fortuna algorithm.
To store the encryption key securely in the device, it’s recommended to use the flutter_secure_storage package.
Here’s an example of creating and opening an encrypted box:
const secureStorage = FlutterSecureStorage();
final encryprionKey = await secureStorage.read(key: 'key');

if (encryprionKey == null) {
  final key = Hive.generateSecureKey();
  await secureStorage.write(
    key: 'key',
    value: base64UrlEncode(key),
  );
}

final key = await secureStorage.read(key: 'key');
final encryptionKey = base64Url.decode(key!);
print('Encryption key: $encryptionKey');

await Hive.openBox(
  'securedBox',
  encryptionCipher: HiveAesCipher(encryptionKey),
);
To fetch and store data in this box, the following methods can be used:
final encryptedBox = Hive.box('securedBox');

_getData() {
  setState(() {
    data = encryptedBox.get('secret');
  });
  log('Fetched data');
}

_putData() async {
  await encryptedBox.put('secret', 'Test secret key');
  log('Stored data');
}
The complete example of using a Hive encrypted box is available here.
Before moving on to the CRUD operations of the database, initialize Hive and open a box that will be used for storing the data.
Hive should be initialized before we load any boxes, so it’s best to initialize it inside the main() function of your Flutter app to avoid any errors. Note that if you are using Hive in a non-Flutter, pure Dart app, use Hive.init() to initialize Hive.
main() async {
  // Initialize hive
  await Hive.initFlutter();
  runApp(MyApp());
}
Make the main function asynchronous and use await to initialize Hive.
Now, open a Hive box. If you plan to use multiple boxes in your project, note that you should open a box before using it.
In this app, we’ll use a single box we’ll open just after Hive completes initialization.
main() async {
  // Initialize hive
  await Hive.initFlutter();
  // Open the peopleBox
  await Hive.openBox('peopleBox');
  runApp(MyApp());
}
We are now ready to perform CRUD operations on the local database.
We will define the basic CRUD operations in the InfoScreen StatefulWidget. The structure of this class will be as follows:
import 'package:flutter/material.dart';
import 'package:hive/hive.dart';

class InfoScreen extends StatefulWidget {
  @override
  _InfoScreenState createState() => _InfoScreenState();
}

class _InfoScreenState extends State<InfoScreen> {
  late final Box box;

  @override
  void initState() {
    super.initState();
    // Get reference to an already opened box
    box = Hive.box('peopleBox');
  }

  @override
  void dispose() {
    // Closes all Hive boxes
    Hive.close();
    super.dispose();
  }

  @override
  Widget build(BuildContext context) {
    return Container();
  }
}
First, we retrieve a reference to the box inside the initState() method that we had opened earlier. You should always close the opened boxes after you are done using them and before closing the application.
As we currently only require the box inside this widget, we can close the box inside the dispose() method of this class.
Let’s create some methods for performing the CRUD operations.
class _InfoScreenState extends State<InfoScreen> {
  late final Box box;

  _addInfo() async {
    // Add info to people box
  }

  _getInfo() {
    // Get info from people box
  }

  _updateInfo() {
    // Update info of people box
  }

  _deleteInfo() {
    // Delete info from people box
  }

  // ...
}
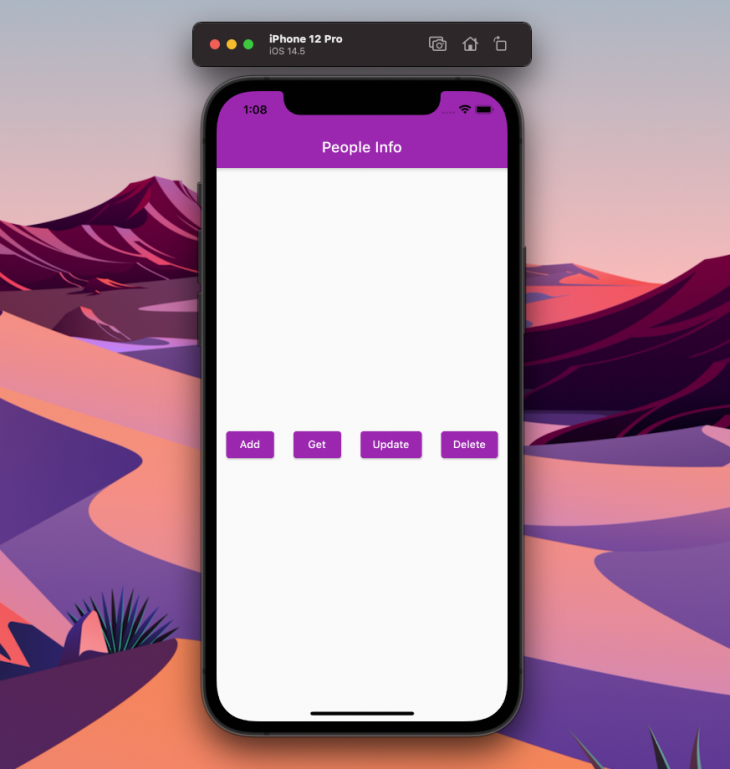
Now we’ll build a very basic UI so that we can test out whether the operations are working properly.
class _InfoScreenState extends State<InfoScreen> {
  // ...
  @override
  Widget build(BuildContext context) {
    return Scaffold(
      appBar: AppBar(
        title: Text('People Info'),
      ),
      body: Center(
        child: Row(
          mainAxisAlignment: MainAxisAlignment.spaceAround,
          children: [
            ElevatedButton(
              onPressed: _addInfo,
              child: Text('Add'),
            ),
            ElevatedButton(
              onPressed: _getInfo,
              child: Text('Get'),
            ),
            ElevatedButton(
              onPressed: _updateInfo,
              child: Text('Update'),
            ),
            ElevatedButton(
              onPressed: _deleteInfo,
              child: Text('Delete'),
            ),
          ],
        ),
      ),
    );
  }
}
The app will look like this:
If you need to store data, you can use the reference to the Hive box and call put() on it. This method accepts a key-value pair.
// Add info to people box
_addInfo() async {
  // Storing key-value pair
  box.put('name', 'John');
  box.put('country', 'Italy');
  print('Info added to box!');
}
Here, we have stored two key-value pairs, the Name of the person and their Home Country.
Hive also supports integer keys, so you can use auto-incrementing keys. This can be useful if you are storing multiple values (kinda similar to a list) and want to retrieve by their indices. You can store like this:
box.add('Linda'); // index 0, key 0
box.add('Dan');   // index 1, key 1
To read data, you can use the get() method on the box object. You just have to provide the key for retrieving its value.
// Read info from people box
_getInfo() {
  var name = box.get('name');
  var country = box.get('country');
  print('Info retrieved from box: $name ($country)');
}
If you are using auto-incrementing values, you can read using the index, like this:
box.getAt(0); // retrieves the value with index 0
box.getAt(1); // retrieves the value with index 1
To update the data of a particular key, you can use the same put() method that you originally used to store the value. This will update the value present at that key with the newly provided value.
// Update info of people box
_updateInfo() {
  box.put('name', 'Mike');
  box.put('country', 'United States');
  print('Info updated in box!');
}
If you are using auto-incrementing values, you can use the putAt() method for updating the value present at a particular index.
box.putAt(0, 'Jenifer');
For deleting data, you can use the delete() method by providing the key.
// Delete info from people box
_deleteInfo() {
  box.delete('name');
  box.delete('country');
  print('Info deleted from box!');
}
This will delete the values present at those particular keys. Now, if you try to call the get() method using these keys, it will return null values.
If you are using auto-incrementing values, you can use deleteAt() method by providing the index.
box.deleteAt(0);
In general, Hive supports all primitive types like List, Map, DateTime, and Uint8List. But sometimes you may need to store custom model classes that make data management easier.
To do this, you can take advantage of a TypeAdapter, which generates the to and from binary methods.
TypeAdapters can either be written manually or generated automatically. It’s always better to use code generation to generate the required methods because it helps to prevent any mistakes that might occur while writing manually (and also it’s faster).
The model class that we’ll be using for storing Person data is:
class Person {
  final String name;
  final String country;

  Person({
    required this.name,
    required this.country,
  });
}
You will need to add some dependencies to generate the TypeAdapter for Hive. Add the following to your pubspec.yaml file:
dev_dependencies:
  hive_generator: ^1.1.2
  build_runner: ^2.1.8
Annotate the model class to use code generation:
import 'package:hive/hive.dart';
part 'people.g.dart';

@HiveType(typeId: 1)
class People {
  @HiveField(0)
  final String name;

  @HiveField(1)
  final String country;

  People({
    required this.name,
    required this.country,
  });
}
You can then trigger code generation using the following command:
flutter packages pub run build_runner build
You should register the TypeAdapter before opening the box that is using it — otherwise, it will produce an error. As we are just using a single box and have opened it inside the main() function, we have to register the adapter before that.
main() async {
  // Initialize hive
  await Hive.initFlutter();
  // Registering the adapter
  Hive.registerAdapter(PersonAdapter());
  // Opening the box
  await Hive.openBox('peopleBox');

  runApp(MyApp());
}
Now, you can directly perform database operations using this custom class.
The final app will mainly comprise three screens:
AddScreen: for storing the user’s information on the databaseInfoScreen: for showing the user’s information that is present in the Hive database, and a button for deleting the user’s dataUpdateScreen: for updating the user’s information on the databaseYou do not need to modify the main.dart file containing the MyApp widget and the main() function.
AddScreenThe AddScreen will display a form for taking the user’s data as inputs. In our case, we will input just two values, Name and Home Country. At the bottom will be a button for sending the data to Hive.
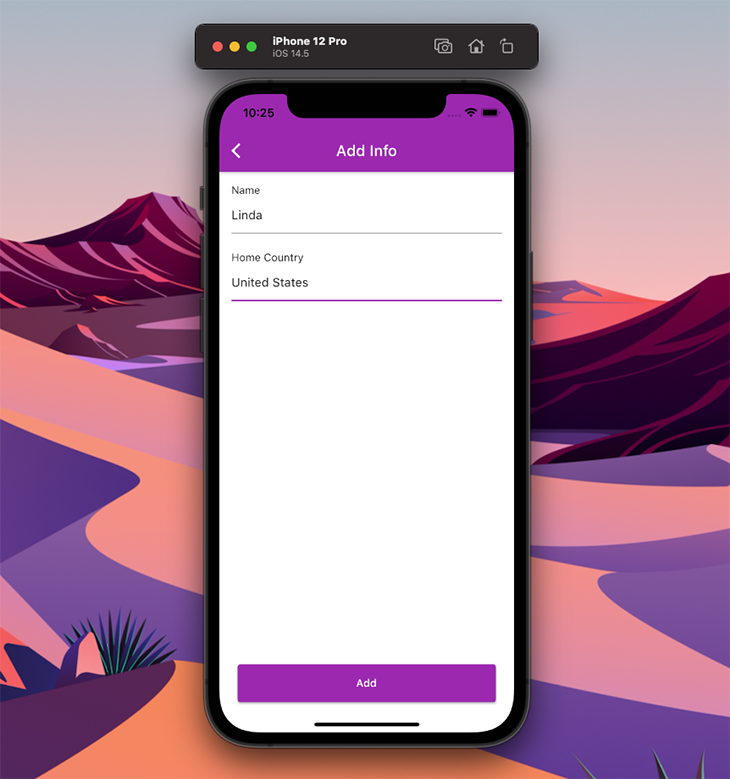
The code for the AddScreen is:
class AddScreen extends StatefulWidget {
  @override
  _AddScreenState createState() => _AddScreenState();
}
class _AddScreenState extends State<AddScreen> {
  @override
  Widget build(BuildContext context) {
    return Scaffold(
      backgroundColor: Colors.white,
      appBar: AppBar(
        title: Text('Add Info'),
      ),
      body: Padding(
        padding: const EdgeInsets.all(16.0),
        child: AddPersonForm(),
      ),
    );
  }
}
AddPersonForm is the main widget where the UI for the form is created. It also contains the Hive storage functionality.
The basic structure of the widget will look like this:
class AddPersonForm extends StatefulWidget {
  const AddPersonForm({Key? key}) : super(key: key);
  @override
  _AddPersonFormState createState() => _AddPersonFormState();
}

class _AddPersonFormState extends State<AddPersonForm> {
  late final Box box;

  @override
  void initState() {
    super.initState();
    // Get reference to an already opened box
    box = Hive.box('peopleBox');
  }

  @override
  Widget build(BuildContext context) {
    return Container();
  }
}
We have retrieved a reference to the box inside the initState() method. Now, we have to define a global key for the form and add some text editing controllers.
class _AddPersonFormState extends State<AddPersonForm> {
  final _nameController = TextEditingController();
  final _countryController = TextEditingController();
  final _personFormKey = GlobalKey<FormState>();

  // ...
}
Define a method for storing data to Hive and add a text field validator:
class _AddPersonFormState extends State<AddPersonForm> {
  // ...

  // Add info to people box
  _addInfo() async {
    Person newPerson = Person(
      name: _nameController.text,
      country: _countryController.text,
    );
    box.add(newPerson);
    print('Info added to box!');
  }

  String? _fieldValidator(String? value) {
    if (value == null || value.isEmpty) {
      return 'Field can\'t be empty';
    }
    return null;
  }

  // ...
}
The code for the UI is as follows:
class _AddPersonFormState extends State<AddPersonForm> {
  // ...

  @override
  Widget build(BuildContext context) {
    return Form(
      key: _personFormKey,
      child: Column(
        crossAxisAlignment: CrossAxisAlignment.start,
        children: [
          Text('Name'),
          TextFormField(
            controller: _nameController,
            validator: _fieldValidator,
          ),
          SizedBox(height: 24.0),
          Text('Home Country'),
          TextFormField(
            controller: _countryController,
            validator: _fieldValidator,
          ),
          Spacer(),
          Padding(
            padding: const EdgeInsets.fromLTRB(8.0, 0.0, 8.0, 24.0),
            child: Container(
              width: double.maxFinite,
              height: 50,
              child: ElevatedButton(
                onPressed: () {
                  if (_personFormKey.currentState!.validate()) {
                    _addInfo();
                    Navigator.of(context).pop();
                  }
                },
                child: Text('Add'),
              ),
            ),
          ),
        ],
      ),
    );
  }
}
UpdateScreen in HiveThe UpdateScreen will be similar to the AddScreen, but here we’ll pass the Person object to show the current value in the text fields.
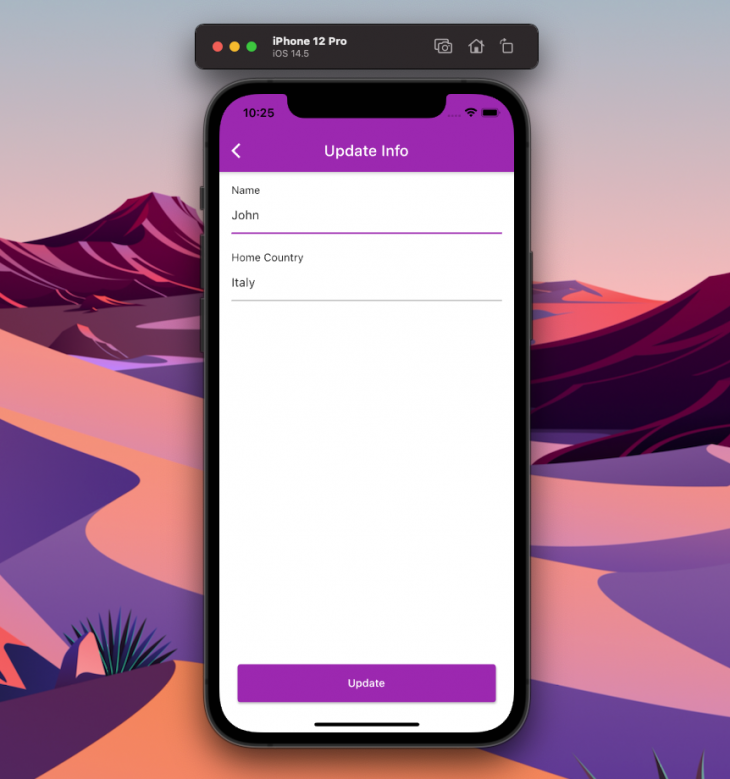
The code for this screen will be:
class UpdateScreen extends StatefulWidget {
  final int index;
  final Person person;

  const UpdateScreen({
    required this.index,
    required this.person,
  });

  @override
  _UpdateScreenState createState() => _UpdateScreenState();
}

class _UpdateScreenState extends State<UpdateScreen> {
  @override
  Widget build(BuildContext context) {
    return Scaffold(
      backgroundColor: Colors.white,
      appBar: AppBar(
        title: Text('Update Info'),
      ),
      body: Padding(
        padding: const EdgeInsets.all(16.0),
        child: UpdatePersonForm(
          index: widget.index,
          person: widget.person,
        ),
      ),
    );
  }
}
The only difference in the UpdatePersonForm widget is that it will contain a method for updating the value present in the Hive database.
class _UpdatePersonFormState extends State<UpdatePersonForm> {
  late final _nameController;
  late final _countryController;
  late final Box box;

  // ...

  // Update info of people box
  _updateInfo() {
    Person newPerson = Person(
      name: _nameController.text,
      country: _countryController.text,
    );
    box.putAt(widget.index, newPerson);
    print('Info updated in box!');
  }

  @override
  void initState() {
    super.initState();
    // Get reference to an already opened box
    box = Hive.box('peopleBox');
    // Show the current values
    _nameController = TextEditingController(text: widget.person.name);
    _countryController = TextEditingController(text: widget.person.country);
  }

  @override
  Widget build(BuildContext context) {
    return Form(
      // ...
    );
  }
}
InfoScreenThe InfoScreen will display the Person data stored in Hive. Basically, the read operation will be performed here.
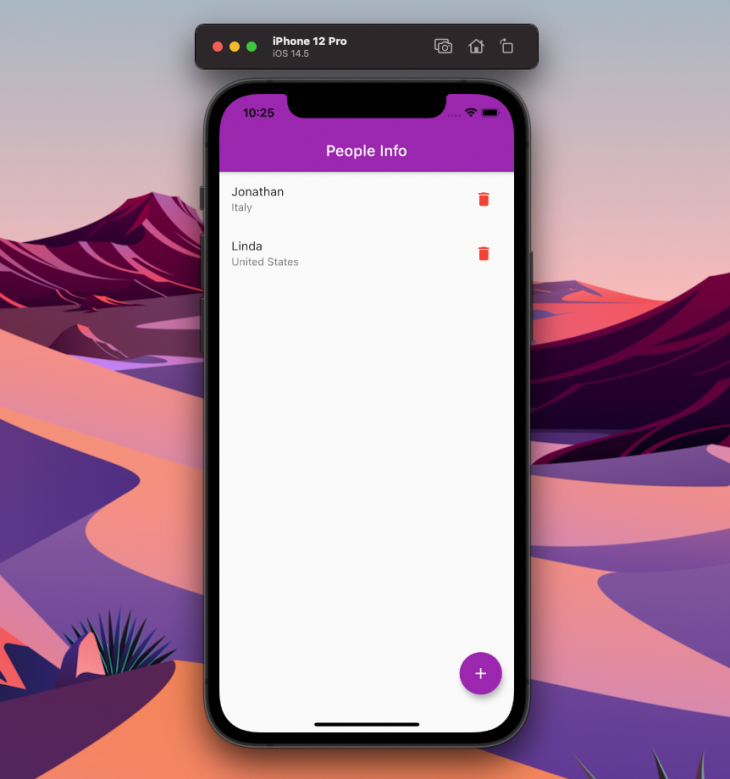
Hive provides a widget called ValueListenableBuilder that only refreshes when any value inside the database is modified.
This screen will contain some additional functionalities:
UpdateScreenAddScreenThe code for this screen is:
class InfoScreen extends StatefulWidget {
  @override
  _InfoScreenState createState() => _InfoScreenState();
}

class _InfoScreenState extends State<InfoScreen> {
  late final Box contactBox;

  // Delete info from people box
  _deleteInfo(int index) {
    contactBox.deleteAt(index);
    print('Item deleted from box at index: $index');
  }

  @override
  void initState() {
    super.initState();
    // Get reference to an already opened box
    contactBox = Hive.box('peopleBox');
  }

  @override
  Widget build(BuildContext context) {
    return Scaffold(
      appBar: AppBar(
        title: Text('People Info'),
      ),
      floatingActionButton: FloatingActionButton(
        onPressed: () => Navigator.of(context).push(
          MaterialPageRoute(
            builder: (context) => AddScreen(),
          ),
        ),
        child: Icon(Icons.add),
      ),
      body: ValueListenableBuilder(
        valueListenable: contactBox.listenable(),
        builder: (context, Box box, widget) {
          if (box.isEmpty) {
            return Center(
              child: Text('Empty'),
            );
          } else {
            return ListView.builder(
              itemCount: box.length,
              itemBuilder: (context, index) {
                var currentBox = box;
                var personData = currentBox.getAt(index)!;
                return InkWell(
                  onTap: () => Navigator.of(context).push(
                    MaterialPageRoute(
                      builder: (context) => UpdateScreen(
                        index: index,
                        person: personData,
                      ),
                    ),
                  ),
                  child: ListTile(
                    title: Text(personData.name),
                    subtitle: Text(personData.country),
                    trailing: IconButton(
                      onPressed: () => _deleteInfo(index),
                      icon: Icon(
                        Icons.delete,
                        color: Colors.red,
                      ),
                    ),
                  ),
                );
              },
            );
          }
        },
      ),
    );
  }
}
Congratulations 🥳, you have completed your Flutter app using Hive as the local persistent database.
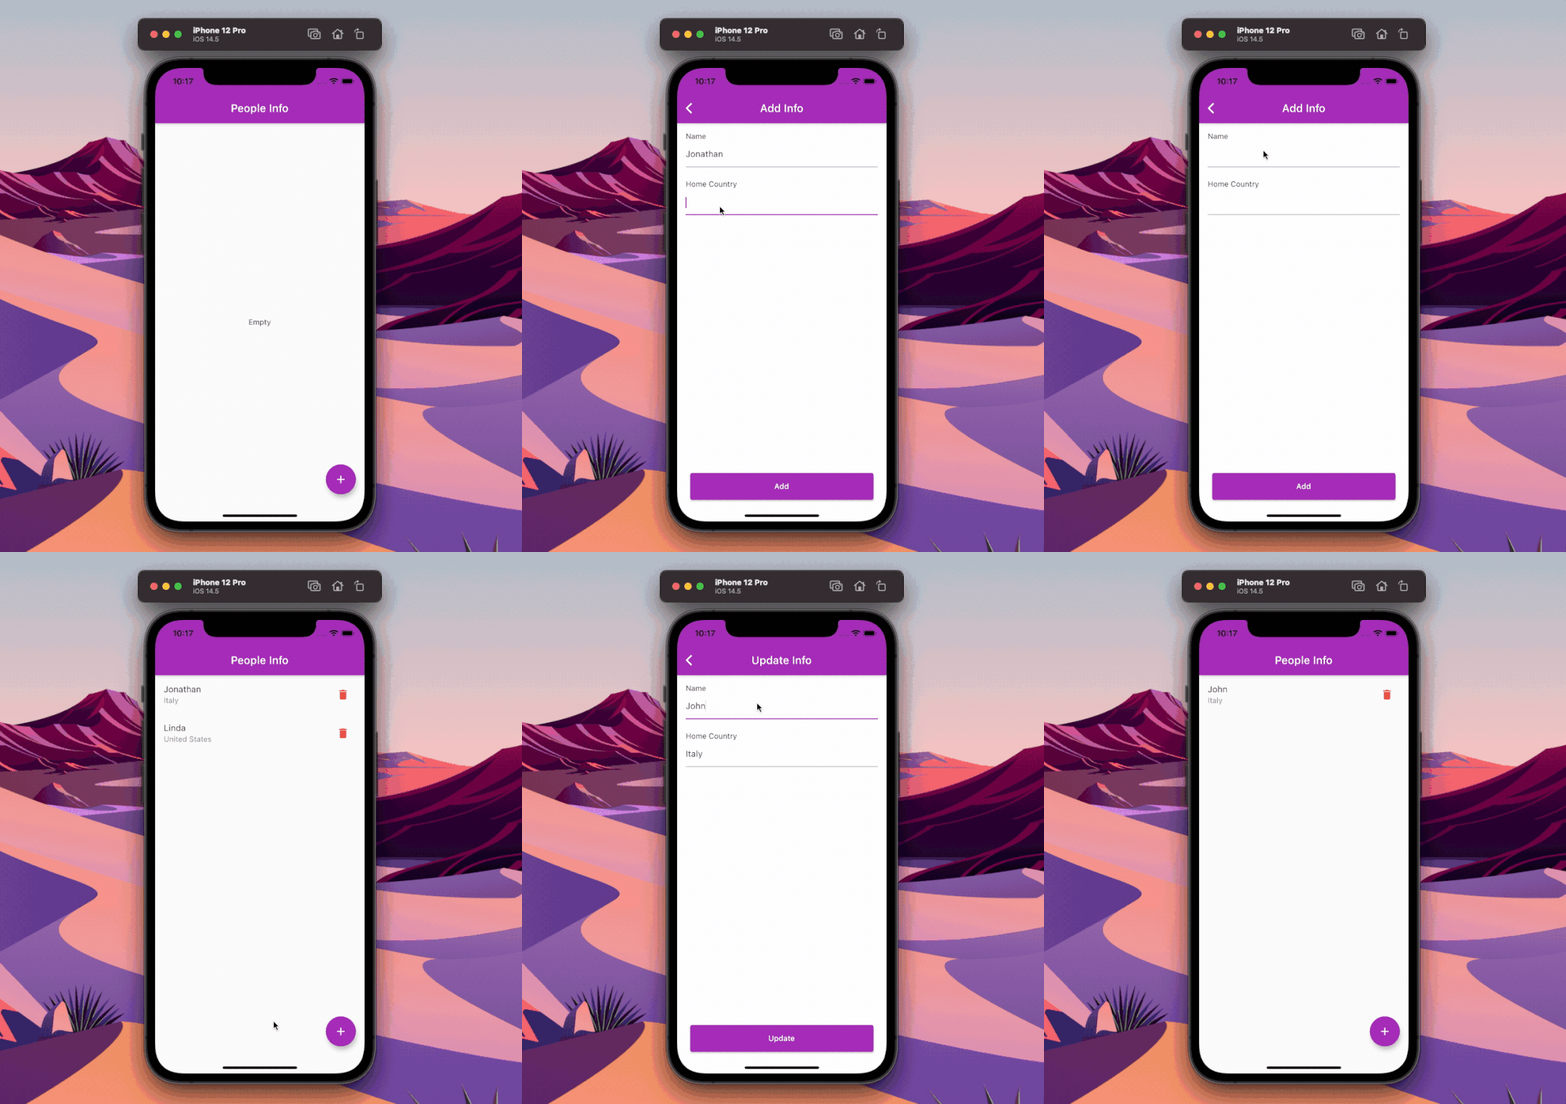
A demo of the final app is shown below:
This article covers most of the important, basic concepts of Hive. There are a few more things you can do with the Hive database, including storing simple relational data. Simple relationships between data can be handled using HiveList, but if you are storing any sensitive data in Hive, then you should use the encrypted box.
In a nutshell, Hive is one of the best choices you have for local data persistence in Flutter, especially considering that it’s blazing fast and supports almost all platforms.
Thank you for reading the article! If you have any suggestions or questions about the article or examples, feel free to connect with me on Twitter or LinkedIn. You can also find the repository of the sample app on my GitHub.
Install LogRocket via npm or script tag. LogRocket.init() must be called client-side, not
server-side
$ npm i --save logrocket

// Code:

import LogRocket from 'logrocket';
LogRocket.init('app/id');
// Add to your HTML:

<script src="https://cdn.lr-ingest.com/LogRocket.min.js"></script>
<script>window.LogRocket && window.LogRocket.init('app/id');</script>

Learn how LLM routing works in production, when it’s worth the complexity, and how teams choose the right model for each request.

Compare key features of popular meta-frameworks Remix, Next.js, and SvelteKit, from project setup to styling.

Discover what’s new in The Replay, LogRocket’s newsletter for dev and engineering leaders, in the February 4th issue.

AI-first isn’t about tools; it’s about how teams think, build, and decide. Ken Pickering, CTO at Scripta Insights, shares how engineering leaders can adapt.
Hey there, want to help make our blog better?
Join LogRocket’s Content Advisory Board. You’ll help inform the type of content we create and get access to exclusive meetups, social accreditation, and swag.
Sign up now
2 Replies to "Handling local data persistence in Flutter with Hive"
Is there any way to get data by joining two boxes in hive db flutter?
I am looking for something which would help me fetch data from two different boxes and join them as we do in traditional databases.
you have a inconsistency about class name for TypeAdapter , “Person” or “People” ?