Markdown, since its introduction to the web, has allowed content creators (such as technical writers and documentation engineers, etc.) to have a more simplistic tool to do their authoring in. In this article, we will have a look at MDX and how to get started with it in Nuxt.js applications.
The Replay is a weekly newsletter for dev and engineering leaders.
Delivered once a week, it's your curated guide to the most important conversations around frontend dev, emerging AI tools, and the state of modern software.
MDX is a syntax extension that allows you to write JSX in your Markdown documents. Also, according to the official MDX documentation, MDX is:
An authorable format that lets you seamlessly write JSX in your Markdown documents. You can import components, such as interactive charts or alerts, and embed them within your content
So basically, MDX is Markdown with JSX. Before MDX, writing JSX in Markdown was a hassle because the simplicity of authoring Markdown was lost in the process of sprinkling JSX in it.
MDX opens the door to a lot of fun applications to Markdown documents. For example, the Chakra UI documentation website uses MDX to allow readers to edit components and see their changes live on the page.
MDX is useful for design systems documentations like we mentioned above with the Chakra UI documentation usage of MDX. MDX also allows you to import Markdown (.md or .mdx) files as components!
Though JSX was originally used in React projects, you can now use it as well in Vue.js. With that said, you can freely integrate MDX in your Vue.js projects.
.md or .mdx files as Vue componentsLet’s see these features in action by integrating MDX and Vue. We will get started by creating a fresh Vue project. Using the Vue CLI run:
vue create mdx-vue-demo
After creating the Vue projects we will add MDX support by installing @mdx-js/vue-loader which is the official loader that makes it possible to use MDX in Vue. Let’s install it below:
npm install @mdx-js/vue-loader
After we’ve installed the loader we will then include the loader inside our project’s webpack config. Since we are using Vue CLI, we can create a vue.config.js file in the root of our projects, and on the configureWebpack property, we include @mdx-js/vue-loader under the module rules:
// vue.config.js
module.exports = {
  configureWebpack: {
    module: {
      rules: [
        {
          test: /\.mdx?$/,
          use: ['babel-loader', '@mdx-js/vue-loader'],
        },
      ],
    },
  },
};
What the code means is that any file ending with .md or .mdx will be handled by both babel-loader and @mdx-js/vue-loader
The step above is still the same if you are configuring your Vue application using webpack. You just have to include the loader in webpack.config.js likes so:
// webpack.config.js
module: {
  rules: [
    // ...
    {
      test: /\.mdx?$/,
      use: ['babel-loader', '@mdx-js/vue-loader']
    }
  ]
}
Now that we have both installed and configured @mdx-js/vue-loader let’s create a md file in src/ directory and render it as a Vue component in src/App.vue. We will create MyFirstMdx.mdx in the components/ directory and add the following content:
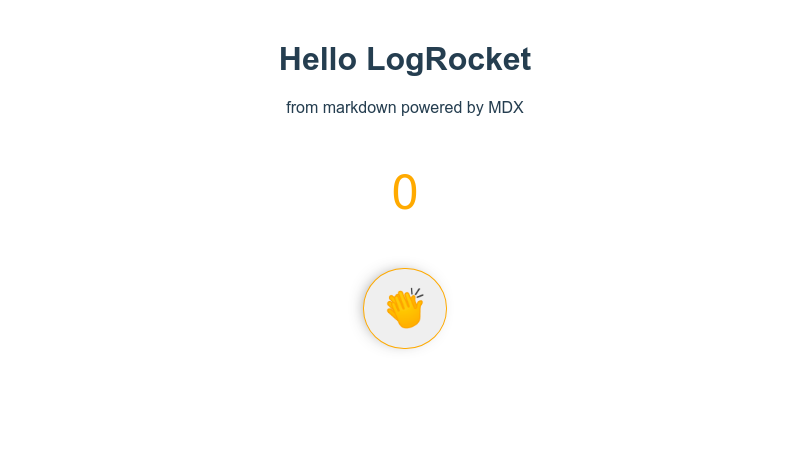
# Hello LogRocket

from markdown powered by MDX
Import the .mdx file in src/App.vue as you will import a Vue component. Like so:
import MyFirstMDX from '@/components/MyFirstMdx.mdx'
We will register the component:
components: {
  MyFirstMdx
}
Then replace the template in App.vue with <my-first-mdx />. The App.vue file should now look like this:
<template>
  <div id="app">
    <my-first-mdx />
  </div>
</template>
<script>
import MyFirstMdx from "./components/MyFirstMdx.mdx";
export default {
  name: "App",
  components: {
    MyFirstMdx,
  },
};
</script>
<style>
#app {
  font-family: Avenir, Helvetica, Arial, sans-serif;
  -webkit-font-smoothing: antialiased;
  -moz-osx-font-smoothing: grayscale;
  text-align: center;
  color: #2c3e50;
  margin-top: 60px;
}
</style>
Start the Vue development server and you will see the content of MyFirstMdx.mdx when you visit your app in the browser.
To demonstrate how MDX makes it easy to import Vue components in markdown documents, we will create a component in components/ that allows users to clap for MDX(why not!). We will call this component ClapForMdx.vue. Add the following snippets to it:
// components/ClapForMdx.vue
<template>
  <section>
    <p class="claps">{{ claps }}</p>
    <button class="clap-btn" @click="clap" title="Clap for MDX">👏</button>
  </section>
</template>
<script>
export default {
  data() {
    return {
      claps: 0,
    };
  },
  methods: {
    clap() {
      this.claps += 5;
    },
  },
};
</script>
<style>
.claps {
  font-size: 3rem;
  color: #f0ab1f;
}
.clap-btn {
  padding: 1rem;
  border-radius: 100%;
  font-size: 2.5rem;
  cursor: pointer;
  border: 1px solid #f0ab1f;
  box-shadow: -4px -1px 18px -10px rgba(0, 0, 0, 0.75);
}
.clap-btn:focus {
  outline: none;
}
</style>
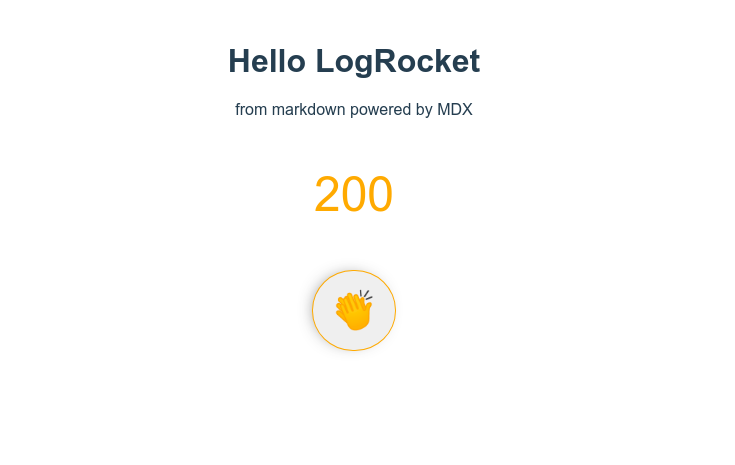
Then modify MyFirstMdx.mdx to this
import ClapForMdx from './ClapForMdx.vue';
# Hello LogRocket
from markdown powered by MDX
<ClapForMdx />
And you should get this in your browser:
You can interact with the button and it will respond as expected!
We have now seen how MDX works in a Vue project. In this final section, we will introduce the installation in a Nuxt.js application. Since Nuxt is a framework for Vue, our code examples will work in it so we won’t need to repeat that.
To get started we will need to add the official NuxtJS module for MDX in a Nuxt.js project as a development dependency. Run the following in your terminal:
npm install --save-dev @nuxtjs/mdx
Then in nuxt.config.js add the module to buildModule property like so:
buildModules: ['@nuxtjs/mdx']
If you are using nuxt < 2.9.0, use the modules property instead.
And that’s it! You can reuse our examples above and it will work.
In this component-driven era, MDX allows you to mix markdown and JSX seamlessly. In this article, we looked at how to set up and use MDX in your Vue.js/Nuxt.js projects. If you want to keep exploring MDX or its integration with Vue.js or Nuxt.js, check out these resources:
Here is the link to the GitHub repo for our demo VueJS project.
Debugging Vue.js applications can be difficult, especially when users experience issues that are difficult to reproduce. If you’re interested in monitoring and tracking Vue mutations and actions for all of your users in production, try LogRocket.

LogRocket lets you replay user sessions, eliminating guesswork by showing exactly what users experienced. It captures console logs, errors, network requests, and pixel-perfect DOM recordings — compatible with all frameworks.
With Galileo AI, you can instantly identify and explain user struggles with automated monitoring of your entire product experience.
Modernize how you debug your Vue apps — start monitoring for free.
There’s no doubt that frontends are getting more complex. As you add new JavaScript libraries and other dependencies to your app, you’ll need more visibility to ensure your users don’t run into unknown issues.
LogRocket is a frontend application monitoring solution that lets you replay JavaScript errors as if they happened in your own browser so you can react to bugs more effectively.

LogRocket works perfectly with any app, regardless of framework, and has plugins to log additional context from Redux, Vuex, and @ngrx/store. Instead of guessing why problems happen, you can aggregate and report on what state your application was in when an issue occurred. LogRocket also monitors your app’s performance, reporting metrics like client CPU load, client memory usage, and more.
Build confidently — start monitoring for free.

Claude Code vs. OpenCode in a real Next.js refactor: benchmark results, mistakes, prompts, and when to use each CLI agent.

Every time you explain your team’s coding standards to Claude, you are doing work that should be reusable. The same […]

Learn how to move beyond one-shot prompting in Claude with structured workflows for AI-assisted coding, debugging, PR reviews, documentation, testing, and automation.

Learn how to build advanced Next.js forms with rule engines, client-side previews, Server Actions, and server-validated form logic.
Hey there, want to help make our blog better?
Join LogRocket’s Content Advisory Board. You’ll help inform the type of content we create and get access to exclusive meetups, social accreditation, and swag.
Sign up now

