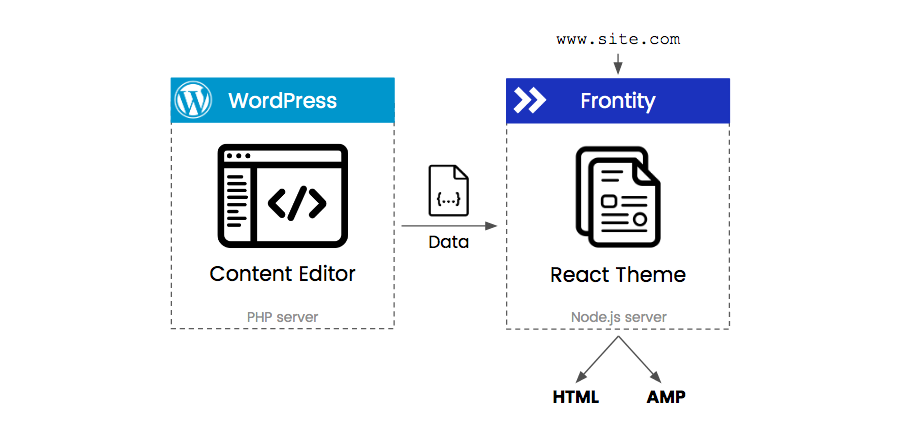
As described on its landing page, Frontity is an open source React framework for WordPress. In essence, it works as a dynamic framework for headless WordPress sites and blogs.

Frontity provides a seamless connection between WP’s REST API and your React app. Without Frontity, this connection is much more complex to configure.
The Replay is a weekly newsletter for dev and engineering leaders.
Delivered once a week, it's your curated guide to the most important conversations around frontend dev, emerging AI tools, and the state of modern software.
For this tutorial, we’re going to assume you already have Node.js installed.
To get started with a Frontity project, all you need to do is to run the following:
npx frontity create my-app
Follow the prompt and wait for the dependencies to get installed. Once this is finished, you can get into your app with cd my-app , and then use npx frontity dev to start the server.
Frontity helps set up everything you need from bundling to server rendering. Right away, you’ll be ready to start connecting, styling, and deploying.
The magic of Frontity happens in the frontity.settings.js file. Just by changing the state.source.api attribute, we’ll be able to pull all the posts available in your common WP website.
Right here, you can edit most of the available configuration: the menu, the router module, multiple sites, components, packages, head tags and much more.
A full overview of the configurations you can work with in this file is available here in the docs. It is as simple as working with a small JSON file.
Right from the file structure, a Frontity project doesn’t look like a regular React application. This is an opinionated design choice and it is great at what it does. Your app’s code is grouped into packages, just like in the node_modules folder, and Frontity makes them interact.
There are two types of packages available in Frontity:
Core packages including frontity and @frontity/core These packages contain the core of Frontity and need to be installed in any Frontity project.
Frontity packages including @frontity/wp-source , @frontity/tiny-router or @frontity/my-theme . These need to be declared in the settings file. They’re similar to WordPress theme and plugins. You can change them if you want, add more, or create new ones.
When installing the app, the core packages are automatically installed.
/my-frontity-project
|__ frontity.settings.js
|__ package.json
|__ /node_modules
|__ /packages
    |__ /my-theme
    |__ /my-custom-extension-1
    |__ /my-custom-extension-2
As mentioned before, this file structure is unorthodox in React and can probably lead to some confusion. However, it’s not that hard to figure out once you break it down.
frontity.settings.js – (we’ve covered it above)node_modules – where the dependencies are installed (aren’t meant to be modified)package.json – used for Node.js configurationpackages/ – holds your local packages and includes your theme, custom packages, and maybe some core packages from Frontity that you need to editAfter you have run npx frontity create my-app in the step above, you’ll find the selected theme in the packages folder. Here, you are free to create any frontend that may suit your taste.
If you open a package folder, you’ll recognize the common React project structure with an src folder containing JavaScript code. By default, the only file you need is the index.js, which helps Frontity communicate with your local package. Via this file, you may export any of the following elements:
You can learn more about these right here on the docs.
The local packages development practices are all based on React. With a basic knowledge of React, one can easily get along with Frontity just by understanding its basic architecture.
If you ever want to make your website more personalized, which you probably will, you can work with CSS in JS. While this is a popular method in the React ecosystem, it may be unintuitive for developers coming from WordPress. You shouldn’t worry, because it’s still just CSS.
Let’s start by covering some styling facilities that you have with Frontity.
Frontity is an “opinionated framework,” as we can see from its directory structure and design choices. It also comes with its own state manager and styling facilities.
Styling with Styled
import { styled } from "frontity";

const StyledDiv = styled.div`
    width: 100%;
    text-align: center;
    color: white;
`;
The CSS prop
import { css } from "frontity";

const Component = () => (
    <div css={css`background: pink`}>
        Styling my theme
    </div>
);
React’s style prop
Note: This is not recommended because it won’t go through Frontity’s optimization procedure.
const Page = () => (
  <div style={{
      margin: '40px',
      border: '5px solid pink'
  }}>
    NOT RECOMMENDED :(
  </div>
);
Rather than using React’s style prop, you’re probably better off using the first two methods listed above.
<Global>
You may need to add global styles like h1, h2, or body tags. This can be done with the Global component.
import { Global, css } from "frontity";

const Page = () => (
    <>
        <Global
          styles={css`
            body {
                margin: 0;
                font-family: "Roboto";
            }
          `}
        />
        <OtherContent />
    </>
);
Global is recommended only for native HTML tags because these styles too won’t be optimized by Frontity.
As some may have noticed, Frontity uses Emotion under the hood. If you ever want to get into more advanced configurations, you can check out its documentation.
Even though TypeScript is optional in Frontity, the framework does offer excellent support for it.
TypeScript gets really complex when you try to modify the structure of your objects. In order to make it as simple as possible, it’s good to create objects with the same structure as the objects that will be consumed later.
Search Engine Optimization (SEO) is very well-implemented on Frontity. By default, Frontity delivers a well-formed HTML file, which is crucial for indexing, performance and SEO. The ability to customize these features is also very important. With Frontity, you can customize the following:
Frontity allows you to add a robots.txt file in your project’s root.
Once you’re ready to deploy, you can create a production version with npx frontity build.
This will create an optimized serveable app that’s ready to be deployed on any Node.js server.
Now, let’s talk about hosting.

To get along with deployment and hosting in Frontity, you need to first understand Frontity’s architecture.
You will need to have a PHP server which could serve your WP API (BlueHost, Ionos, Siteground etc) and a NodeJS server which could be serverless. This will make it affordable. Scalable options include: Netlify, Firebase, Vercel, Lambda, etc.
They made a guide on how to deploy Frontity with Vercel.
Frontity recommends that you have two domains, or a separate sub-domain: one for the WP dashboard, and a main domain for the Frontity frontend. For example, you’d have wp.logrocket.com for the API and logrocket.com for the Frontity instance.
Frontity is compatible with all the plugins that are compatible with the REST API. Many of them just add their output to the content, and that works by default.
For plugins that are not compatible with the REST API, you have two options. First, you can adapt the logic in your Frontity project. Your other options is to use PHP to extend the uncooperative plugin in either your WordPress theme’s functions.php file, or in a custom plugin.
Combining the power of the popular CMS WordPress to create a static website is a huge improvement to web development. Not only is Frontity a good competitor for Gatsby, Gridsome, etc., but it’s also a competitor for its own collaborator: WordPress.
Install LogRocket via npm or script tag. LogRocket.init() must be called client-side, not
server-side
$ npm i --save logrocket

// Code:

import LogRocket from 'logrocket';
LogRocket.init('app/id');
// Add to your HTML:

<script src="https://cdn.lr-ingest.com/LogRocket.min.js"></script>
<script>window.LogRocket && window.LogRocket.init('app/id');</script>

Claude Code is deceptively capable. Point it at a codebase, describe what you need, and it’ll autonomously navigate files, write […]

Compare the top AI development tools and models of February 2026. View updated rankings, feature breakdowns, and find the best fit for you.

Broken npm packages often fail due to small packaging mistakes. This guide shows how to use Publint to validate exports, entry points, and module formats before publishing.

Discover what’s new in The Replay, LogRocket’s newsletter for dev and engineering leaders, in the February 11th issue.
Hey there, want to help make our blog better?
Join LogRocket’s Content Advisory Board. You’ll help inform the type of content we create and get access to exclusive meetups, social accreditation, and swag.
Sign up now
One Reply to "Getting started with Frontity"
Nice article, Dylan! Seems like you got a good hang of Frontity!
The only part that I would dispute is that Frontity is a competitor to WordPress. I think it’s definitely more of a partner! 🙂
Curios to hear what you’ve been building with Frontity and what your experience was like.