Beyond using the native HTML 5 drag-and-drop API, there are tons of JavaScript libraries out there that help you implement drag-and-drop functionality in your web application with little to no effort.

One of the most popular and sought-after in this list is Sortable.js, having over 23k likes on its GitHub repo. You might guess that it’s because the community behind this project worked on bringing the library to literally all frontend frameworks, including Angular, React, Vue, Polymer, Ember.js, and others.
In this tutorial, we will be exploring vue.draggable — the official Sortable.js component for Vue-based projects — while covering the following sections:
<draggable /> componentAt the end of the tutorial, here is what our project will look like:
Before we get into the article, here are some things you should have:
Some of the reasons the developer community prefers vue.draggable for drag-and-drop implementation includes:
Adding vue.draggable to a new Vue project is pretty straightforward. First, you want to create a new application with Vue CLI:
vue create drag-app && cd drag-app
After creating our new application, we can add the vue.draggable package by running:
npm i -s vuedraggable
# OR
yarn add vuedraggable
N.B., if your application is built with Vue 3 rather than 2.x, you should install vuedraggable@next instead:
npm i -s vuedraggable@next
# OR
yarn add vuedraggable@next
To try things out, open up src/App.vue in your project folder and change its contents to the code below:
<template>
  <main>
    <div class="mt-5 container">
      <div class="row justify-content-center border py-5">
        <div class="col-5">
          <h4 class="mb-3">Draggable 1</h4>
          <draggable class="draggable-list" :list="list1" group="my-group">
            <div class="list-item" v-for="element in list1" :key="element.name">
              {{ element.name }}
            </div>
          </draggable>
        </div>

        <div class="col-5">
          <h4 class="mb-3">Draggable 2</h4>
          <draggable class="draggable-list" :list="list2" group="my-group">
            <div class="list-item" v-for="element in list2" :key="element.name">
              {{ element.name }}
            </div>
          </draggable>
        </div>
      </div>
    </div>
  </main>
</template>
<script>
import draggable from "vuedraggable";
export default {
  components: {
    draggable,
  },
  data() {
    return {
      list1: [{ name: "Drag Me!" }],
      list2: [{ name: "Drag Me Too!" }],
    };
  },
};
</script>
<style scoped>
.draggable-list {
  background: #3f51b5;
  color: #fff;
  border: 1px solid;
  height: 50vh;
}
.list-item {
  margin: 10px;
  padding: 40px;
  cursor: pointer;
  font-size: 18px;
  border-radius: 5px;
  background: #f44336;
  display: inline-block;
}
</style>
Here, we’d imported the draggable component from vue.draggable and rendered it twice with dummy data just to showcase how this library works. In the next section, we will dive into how these data are added, along with some other props you can use in the draggable component.
Next, run the app:
npm run serve
You should see the following output in your browser:
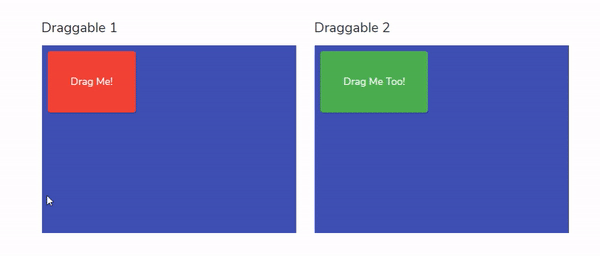
<draggable /> componentOut of the box, all child elements in the <draggable> component will have drag-and-drop functionality. This is quite similar to how CSS flexbox works:

While this is not required, it is advisable to sync all draggable items with the <draggable> component. This is useful in cases where we want to attach custom functions to draggable events.
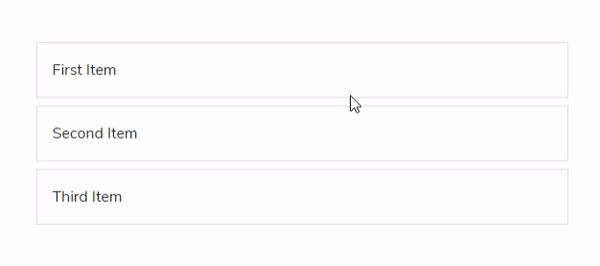
We can do this by adding the value v-model or list prop to our component:
<template>
  <main>
    <div>
      <draggable :list="myList">
        <div v-for="(list, i) in myList" :key="i">
          {{ list }}
        </div>
      </draggable>
    </div>
  </main>
</template>
<script>
import draggable from "vuedraggable";
export default {
  components: {
    draggable,
  },
  data() {
    return {
      myList: ["First Item", "Second Item", "Third Item"],
    };
  },
};
</script>
Running the code above, you should have the following output in your browser:
vue.draggable also supports other useful props for your project.
groupThe group prop accepts an object that we can use to categorize draggable items, and it also sets what happens when we pull or put new items into this category.
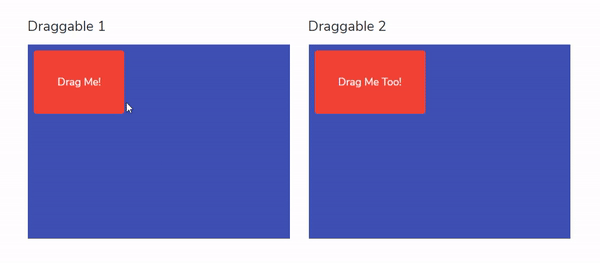
Below is the updated code from our first example where we’d set the pull option to clone and put to false:
    <draggable
        class="draggable-list"
        :list="list1"
        :group="{ name: 'myGroup', pull: 'clone', put: false}"
    >
    ....
Setting the pull option to clone means that dragging an element out of this list will clone the element and not move it permanently out of the list. And setting put to false means we can’t drag new elements into this group.
Running this code will give the following output:
tagWe use the tag prop to specify the HTML element or the name of a Vue component that <draggable> creates as an outer element for the included slot, and this defaults to div.
cloneWhen the push or pull value is set to clone in a group (like in our previous example), we can add an additional clone prop to the source component.
This prop accepts a function that is triggered when elements inside the group are cloned — i.e., if we have our second draggable element with the new clone prop like so:
<draggable
  class="draggable-list"
  :list="list2"
  :group="{ name: 'my-group', pull: 'clone', put: false }"
  :clone="cloneAction()"
>
And we define a method cloneAction():
cloneAction(item) {
    console.log("cloned", item);
}
...
Every time, an item is cloned in list2, this function is triggered, and the message “cloned” along with the cloned item property will be logged in the browser console.
moveThis prop accepts a function with which we can access the event and details of a draggable element when it is on move:
<draggable :list="myList" :move="detectMove"></draggable>
And we can have our detectMove function as:
    detectMove: function(evt){
       console.log(evt)
    }
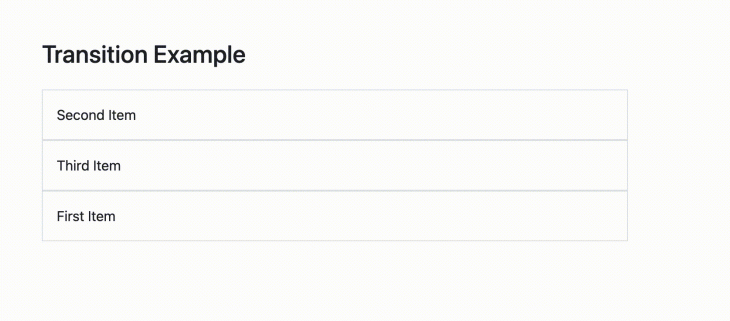
vue.draggable also provides a transition wrapper with which we can animate the movement of draggable items. This is possible with the <transition-group> component. We’ll only need to add a transition name to this element, and anytime a drag happens, a new string -move is appended to our transition name so that we can specify the transition properly with CSS.
Below is a code that adds a transition to our previous simple list example:
<template>
  <div>
    <h3>Transition Example</h3>
    <draggable
      v-model="myList"
    >
      <transition-group name="flip-transition">
        <div
          class="list-item"
          v-for="item in myList"
          :key="item.order"
        >
          {{ item.name }}
        </div>
      </transition-group>
    </draggable>
  </div>
</template>

<script>
import draggable from "vuedraggable";

export default {
  components: {
    draggable,
  },
  data() {
    return {
      myList: [
        { name: "Third Item", order: 3 },
        { name: "First Item", order: 1 },
        { name: "Second Item", order: 2 },
      ],
    };
  },
};
</script>

<style>
.flip-transition-move {
  transition: all 0.7s;
}
.list-item{
  padding: 10px;
  border: 1px solid #ccc;
}
</style>
Running this new example, we have a smooth transition when we drag our elements:
Our goal here is to create a four-column project management board that lets you move tasks to the categories idea, to do, in progress, and finally to ready to go.
To avoid writing excess CSS code, we will be using Bootstrap to quickly set up our grid and task cards. To do this, open up public/index.html in your project folder and add an entry for Bootstrap CDN inside the head tag like below:
<link
rel="stylesheet"
href="https://maxcdn.bootstrapcdn.com/bootstrap/4.0.0/css/bootstrap.min.css"
/>
Next, open up src/App.vue and change its contents to the following:
<template>
  <div class="container mt-5 mb-5">
    <div class="row">
      <div class="col mx-2 px-2 py-3 bg-light border rounded">
        <h6>Idea</h6>
      </div>
      <div class="col mx-2 px-2 py-3 bg-light border rounded">
        <h6>Todo</h6>
      </div>
      <div class="col mx-2 px-2 py-3 bg-light border rounded">
        <h6>In Progress</h6>
      </div>
      <div class="col mx-2 px-2 py-3 bg-light border rounded">
        <h6>Ready to go</h6>
      </div>
    </div>
  </div>
</template>
<style scoped>
h6 {
  font-weight: 700;
}
.col {
  height: 90vh;
}
</style>
The code above will create the necessary columns for our Kanban board. Running the program, you should see the following output displayed in your browser: 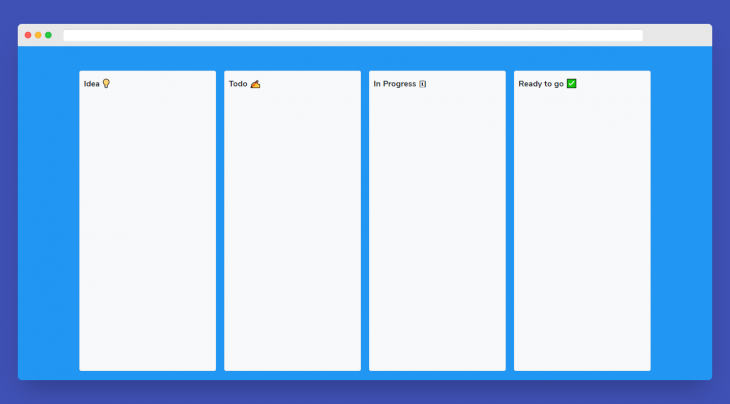
Next, we want to import vue.draggable in the script section and also create some dummy tasks for each column in our board:
<script>
import draggable from "vuedraggable";
export default {
components: {
draggable,
},
data() {
return {
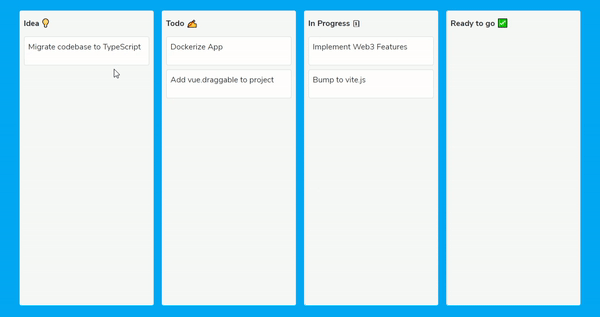
tasks: {
ideas: ["Migrate codebase to TypeScript"],
todos: ["Dockerize App", "Add vue.draggable to project"],
inProgress: ["Implement Web3 Features", "Bump to vite.js"],
completed: [],
},
};
},
};
</script>
The final step is to implement the <draggable> component in our page and loop through tasks in each column respectively.
To do this, update src/App.vue to the code below:
<template>
  <div class="container mt-5 mb-5">
    <div class="row">
      <div class="col mx-2 px-2 py-3 bg-light border rounded">
        <h6>Idea 💡</h6>
        <draggable class="draggable-list" :list="tasks.ideas" group="tasks">
          <div v-for="(idea, i) in tasks.ideas" :key="i">
            <div class="bg-white mt-3 p-2 shadow border rounded">
              <p>{{ idea }}</p>
            </div>
          </div>
        </draggable>
      </div>
      <div class="col mx-2 px-2 py-3 bg-light border rounded">
        <h6>Todo ✍</h6>
        <draggable class="draggable-list" :list="tasks.todos" group="tasks">
          <div v-for="(todo, i) in tasks.todos" :key="i">
            <div class="bg-white mt-3 p-2 shadow border rounded">
              <p>{{ todo }}</p>
            </div>
          </div>
        </draggable>
      </div>
      <div class="col mx-2 px-2 py-3 bg-light border rounded">
        <h6>In Progress 🗓</h6>
        <draggable
          class="draggable-list"
          :list="tasks.inProgress"
          group="tasks"
        >
          <div v-for="(task, i) in tasks.inProgress" :key="i">
            <div class="bg-white mt-3 p-2 shadow border rounded">
              <p>{{ task }}</p>
            </div>
          </div>
        </draggable>
      </div>
      <div class="col mx-2 px-2 py-3 bg-light border rounded">
        <h6>Ready to go ✅</h6>
        <draggable class="draggable-list" :list="tasks.completed" group="tasks">
          <div v-for="(task, i) in tasks.completed" :key="i">
            <div class="bg-white mt-3 p-2 shadow border rounded">
              <p>{{ task }}</p>
            </div>
          </div>
        </draggable>
      </div>
    </div>
  </div>
</template>

<script>
import draggable from "vuedraggable";
export default {
  components: {
    draggable,
  },
  data() {
    return {
      tasks: {
        ideas: ["Migrate codebase to TypeScript"],
        todos: ["Dockerize App", "Add vue.draggable to project"],
        inProgress: ["Implement Web3 Features", "Bump to vite.js"],
        completed: [],
      },
    };
  },
};
</script>

<style scoped>
h6 {
  font-weight: 700;
}
.col {
  height: 90vh;
  overflow: auto;
}
.draggable-list {
  min-height: 10vh;
}
.draggable-list > div {
  cursor: pointer;
}
</style>
And running the code, we should have our Kanban board ready:
You could do a lot more with vue.draggable, such as develop a more complex interface. All that stands in your way is your own imagination. Some other examples of what you could do with this library are highlighted below:
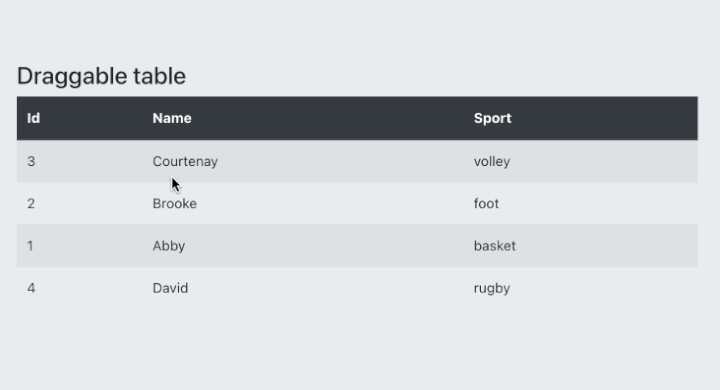
It’s also easy to include the drag and drop feature in a table with vue.draggable, as shown in the example below. The implementation is as simple as the previous ones, and the code for this is included below for your convenience:
Another interesting concept is the drag and replace feature; i.e., drag an item from one group so that it replaces another item in another group. An example for this can also be seen below, as well as the code reference:

You can also explore a lot more interesting examples of what people have built with vue.draggable on CodePen.
Sortable.js offers a fast and easy solution for implementing drag-and-drop in your application, with support for multiple frontend frameworks. And in this article, we’ve explored vue.draggable (the Sortable.js official component for Vue.js projects), how easy it is to use, and we also learned how to create a Kanban board.
While this article offers all you need to get started with implementing vue.draggable, if you are interested in learning more about Sortable.js as a framework itself, their GitHub repo is a great place to get started.
Debugging Vue.js applications can be difficult, especially when users experience issues that are difficult to reproduce. If you’re interested in monitoring and tracking Vue mutations and actions for all of your users in production, try LogRocket.

LogRocket lets you replay user sessions, eliminating guesswork by showing exactly what users experienced. It captures console logs, errors, network requests, and pixel-perfect DOM recordings — compatible with all frameworks.
With Galileo AI, you can instantly identify and explain user struggles with automated monitoring of your entire product experience.
Modernize how you debug your Vue apps — start monitoring for free.
Hey there, want to help make our blog better?
Join LogRocket’s Content Advisory Board. You’ll help inform the type of content we create and get access to exclusive meetups, social accreditation, and swag.
Sign up now
This guide explores how to use Anthropic’s Claude 4 models, including Opus 4 and Sonnet 4, to build AI-powered applications.

Which AI frontend dev tool reigns supreme in July 2025? Check out our power rankings and use our interactive comparison tool to find out.

Learn how OpenAPI can automate API client generation to save time, reduce bugs, and streamline how your frontend app talks to backend APIs.

Discover how the Interface Segregation Principle (ISP) keeps your code lean, modular, and maintainable using real-world analogies and practical examples.


