Square is a full-scale business application that enables organizations to run and grow their ecommerce business, manage payroll, and run business banking services. Square allows for the integration of numerous third-party applications relating to analytics, tax, accounting, team management, and more.

This article will demonstrate how to use the Square Node.js SDK to easily integrate Square’s credit card processing functionality into an application. By the end of this tutorial, you’ll have a working code you can start using to take advantage of the many features the Square SDK has to offer.
N.B., there is a deprecated Square Connect SDK that is no longer supported and should not be used; in fact, most of the functions in this tutorial can not be found in the deprecated version.
Jump ahead:
The Replay is a weekly newsletter for dev and engineering leaders.
Delivered once a week, it's your curated guide to the most important conversations around frontend dev, emerging AI tools, and the state of modern software.
To follow along with this tutorial, you’ll need the following:
To better understand what the Square SDK is, let’s first quickly review the definitions of APIs and SDKs.
An API is an intermediary that enables applications to access each other’s capabilities and send information. Application programming interfaces enhance the functionality of applications.
Meanwhile, an SDK is a set of tools that allows you to access an application’s functionalities and services, including its APIs. Software development kits simplify app development by equipping you with almost everything you need to kickstart your development, allowing you to focus on your application business logic.
The Square SDK enables you to easily integrate Square into your application. In this tutorial, you’ll see that with the Square SDK you don’t need to concern yourself with how to call an API endpoint or worry about how Square processes your payment. You just need to know what SDK functions are required and what data the SDK is expecting in order complete an order.
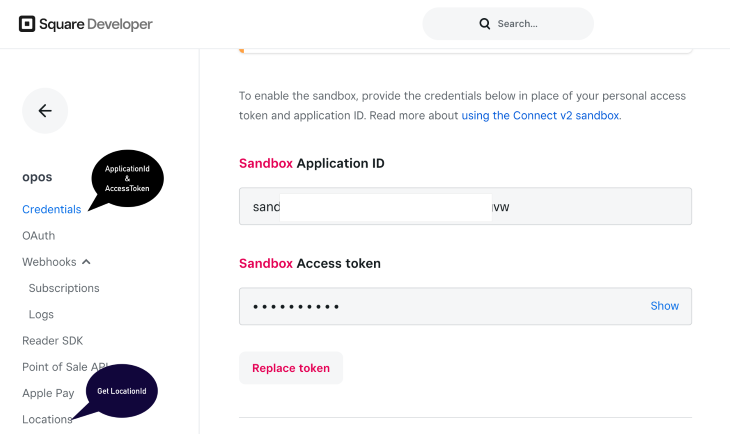
To explore and use Square’s suite of business tools, we’ll need to set up a Square account and get an Application ID, Location ID, and an Access token. These credentials are required to use the Square SDK.
Start by signing up on the Square website as a developer and get your credentials. For this tutorial, we’ll be using the Sandbox environment so, ensure you get the Sandbox credentials to follow along.
Log in to your dashboard and click on the Credentials tab to view your Application ID and your Access token. To get your Location ID, click on the Locations tab as shown below.

It’s important to note that the Square Node.js SDK should only be used in the backend. There are frontend integrations for the Square SDK that we’ll review later in this article.
To start, we’ll create a basic server with Fastify, an open source Node.js framework.
First, initialize the application using the yarn init command. Then, update the package.json file to include the following dependencies:
"dependencies": {
    "@fastify/cors": "^7.0.0",
    "dotenv": "^16.0.1",
    "fastify": "^3.29.0",
    "square": "^19.0.0",
    "uuid4": "^2.0.2"
  }
Now, run the command yarn on your terminal to install the dependencies.
Next, create an index.js file. This will be the main file and also the server file. Add the following code:
const { fastify } = require('fastify');
const PORT = 3001;

const app = fastify();
async function startApp() {
    try {
        app.register(require('@fastify/cors'), {
            origin: '*',
        });
        app.post("/pay", async (request, reply) => {
            // our logic will go here.
        });
        await app.listen(PORT);
        console.log('listening on port', PORT);
    } catch (e) {
        console.error(e);
    }
}
startApp();
This code will set up a server for us on PORT 3001 with a post route /pay.
Next, add your Square integration code. In order to keep the code clean, create a new file called square.connect.js. Now, add the following:
const dotenv = require('dotenv');
const { Client, Environment } = require("square");
dotenv.config();

const client = new Client({
  accessToken: process.env.SQUARE_ACCESS_TOKEN,
  environment: Environment.Sandbox,
});

module.exports = client;
This code will initialize Square and then allow you to authenticate your account with your access token. Without this setup, you’ll be unable to access Square.
Be sure to add your Square Access token to your .env file using this key: SQUARE_ACCESS_TOKEN.
Next, modify the index file, import uuidv4, and the Square client you just initialized. Also, modify the /pay endpoint to include the payment API function.
const { fastify } = require('fastify');
const uuidv4 = require('uuid4');
const { paymentsApi } = require("./connect.square.js");
const PORT = 3001;
const app = fastify();

async function startApp() {
    try {
        app.register(require('@fastify/cors'), {
            origin: '*',
        });
        app.post("/pay", async (request, reply) => {
            let body = request.body;
            body.idempotencyKey = uuidv4();
            body.amountMoney = {
                amount: 1,
                currency: 'GBP',
            };
            let paymentResponse = paymentsApi.createPayment(body);
            paymentResponse.then((response) => {
                console.log(response)
                reply.send(response)
            })
        });
        await app.listen(PORT);
        console.log('listening on port', PORT);
    } catch (e) {
        console.error(e);
    }
}
startApp();
If you examine the code carefully, you’ll notice a key called idempotencyKey. This is a requirement that prevents a user from making duplicate transactions; no transaction can have more than one idempotencyKey.
Normally, you’d generate and store this key in your database to validate a transaction, but for this tutorial, we’ll use a universally unique identifier, uuidv4, to generate this key and then use it to make payments.
Also, you’ll notice that the amountMoney is an object. This is also a compulsory requirement as every payment must have an amount to pay. To avoid exploitation, you should get this value from your database, rather than sending it from the frontend. But for the purpose of this tutorial, we’ll hard code the amountMoney:
body.amountMoney = {
    amount: 1,
    currency: 'GBP',
};
You can use any of Stripe’s supported currencies but for the sandbox account, only GBP is supported.
With this data in the backend, along with one payload from the client, you should be able to create a payment by calling the createPayment() method.
paymentsApi.createPayment(body)
Now that we’ve set up the Node.js backend and integrated the Square Node.js SDK, let’s integrate it with a client.
Let’s create a basic React app that will accept user credit card information and payments.
It is preferable to use Vite to set up the React app, but if you prefer you can set up the app with Create React App.
Next, install the Square React community-powered web payment SDK, react-square web-payments-sdk, by running the following command:
yarn add react-square-web-payments-sdk
Now that you have React set up and the SDK installed, create a component, SqurePayment.jsx, and add the following code:
import * as React from 'react';
import { CreditCard, PaymentForm } from 'react-square-web-payments-sdk';
const SquarePaymentForm = () => (
   {
      console.info({ token, buyer });
      let body = JSON.stringify({
        sourceId: token.token
      });
      const paymentResponse = await fetch('http://localhost:3001/pay', {
        method: 'POST',
        headers: {
          'Content-Type': 'application/json',
        },
        body,
      });
      if (paymentResponse.ok) {
        return paymentResponse.json();
      }
    }}

    /**
     * This function enables the Strong Customer Authentication (SCA) flow
     *
     * It's important you use this function to verify a user to reduce the
     * chances of fraudulent transactions
     */

    createVerificationDetails={() => ({
      amount: '1.00',
      /* collected from the buyer */
      billingContact: {
        addressLines: ['123 Main Street', 'Apartment 1'],
        familyName: 'Doe',
        givenName: 'John',
        countryCode: 'GB',
        city: 'London',
      },
      currencyCode: 'GBP',
      intent: 'CHARGE',
    })}
    /**
     * Identifies the location of the merchant that is taking the payment.
     */
    locationId="LPWYFGdds9"
  >


);
export default SquarePaymentForm;
Here we use the PaymentForm and Card components to collect the user’s credit card details and payment information to then send it to Square.
Import this component in the App.jsx file and render it as shown below:
import SquarePaymentForm from './SquarePayment'
import { Button, Container } from 'react-bootstrap';
import './App.css'
function App() {
  return (
    <Container>
      <h1>My Payment Page</h1>
      <p>
        Ensure you enter the correct test card details from <a href="https://developer.squareup.com/docs/devtools/sandbox/payments" target="_blank">here</a>
      </p>
      <p>
        <SquarePaymentForm  />
      </p>
    </Container>
  )
}
export default App
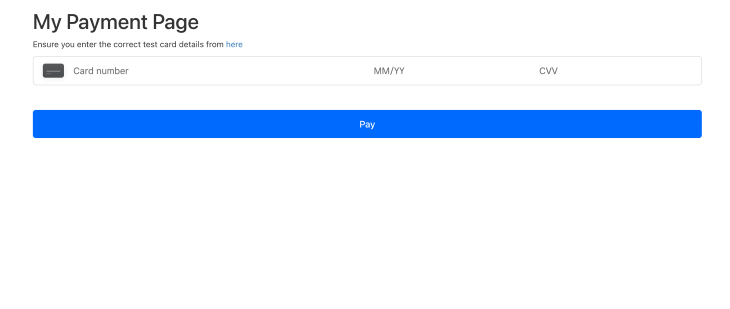
It should look like this:

You can create a form to collect the user’s billing information as well:
billingContact: {
  addressLines: ['123 Main Street', 'Apartment 1'],
  familyName: 'Doe',
  givenName: 'John',
  countryCode: 'GB',
  city: 'London',
},
Now, make the API call to your server, which will make a request to the Square server and return a response. Remember that we created the /pay endpoint earlier; the request should be there with all the information as shown in the code above.
Square’s SDK for Node.js gives you the power to use the Square API effortlessly. You just have to focus on calling functions, passing data around, and manipulating the response. I hope you found this article helpful for getting started with integrating Square into your Node.js workflow.
The Square Node.js SDK offers many features that can be advantageous for improving the effectiveness of ecommerce business operations. Check out the documentation to learn more about all the things you can do with the Square SDK.
You can find all the code used in this tutorial in the following GitHub repositories:

LogRocket lets you replay user sessions, eliminating guesswork around why users don't convert by showing exactly what users experienced. It captures console logs, errors, network requests, and pixel-perfect DOM recordings — compatible with all frameworks.
LogRocket's Galileo AI watches sessions for you, instantly identifying and explaining user struggles with automated monitoring of your entire product experience.
Start proactively monitoring your ecommerce apps — try LogRocket for free.
 Monitor failed and slow network requests in production
Deploying a Node-based web app or website is the easy part. Making sure your Node instance continues to serve resources to your app is where things get tougher. If you’re interested in ensuring requests to the backend or third-party services are successful, try LogRocket.

LogRocket lets you replay user sessions, eliminating guesswork around why bugs happen by showing exactly what users experienced. It captures console logs, errors, network requests, and pixel-perfect DOM recordings — compatible with all frameworks.
LogRocket's Galileo AI watches sessions for you, instantly identifying and explaining user struggles with automated monitoring of your entire product experience.
LogRocket instruments your app to record baseline performance timings such as page load time, time to first byte, slow network requests, and also logs Redux, NgRx, and Vuex actions/state. Start monitoring for free.

Explore how the Universal Commerce Protocol (UCP) allows AI agents to connect with merchants, handle checkout sessions, and securely process payments in real-world e-commerce flows.

React Server Components and the Next.js App Router enable streaming and smaller client bundles, but only when used correctly. This article explores six common mistakes that block streaming, bloat hydration, and create stale UI in production.

Gil Fink (SparXis CEO) joins PodRocket to break down today’s most common web rendering patterns: SSR, CSR, static rednering, and islands/resumability.

@container scroll-state: Replace JS scroll listeners nowCSS @container scroll-state lets you build sticky headers, snapping carousels, and scroll indicators without JavaScript. Here’s how to replace scroll listeners with clean, declarative state queries.
Hey there, want to help make our blog better?
Join LogRocket’s Content Advisory Board. You’ll help inform the type of content we create and get access to exclusive meetups, social accreditation, and swag.
Sign up now
One Reply to "Getting started with the Square Node.js SDK"
Excellent content! I found your tips on integrating payment APIs and preventing transaction errors extremely useful. Very insightful post.