Editor’s note: This article was last updated 03 June 2022 to reflect changes made in Vue 3 and include tutorial steps that were previously implied.

When building forms, it’s important for developers to be able to monitor and control the content users enter into the form fields, which is called validation. For quality assurance, you should conduct validation on both the client side and the server side of your application.
To help with validation, the HTML input tag has a placeholder option that you can use to direct users to the exact information you need from them. However, on their own, placeholders aren’t enough to alert users when they’ve entered invalid information. Therefore, developers often write scripts that prompt the user to avoid entering invalid characters.
Vue enables developers to use JavaScript methods to validate form inputs within Vue components. In this article, we’ll use a Vue instance option called watch to implement form input validation. You can find the complete code for this tutorial on GitHub. Let’s get started!
The Replay is a weekly newsletter for dev and engineering leaders.
Delivered once a week, it's your curated guide to the most important conversations around frontend dev, emerging AI tools, and the state of modern software.
In Vue, developers can create forms just as they would with HTML5, meaning little to no additional skills are required to build forms in the Vue template section of any component with plain HTML.
This tutorial is suited for developers at all stages, including beginners. You’ll need Node.js ≥v10.x installed. You can verify whether you have it installed by running the following command in your terminal or the command prompt:
node -v
You’ll also need a code editor like VS Code, Vue installed globally on your machine, and finally, Vue CLI 3.0 installed on your machine. To do this, uninstall the old CLI version first:
npm uninstall -g vue-cli
Then, install the new one:
npm install -g @vue/cli
Go ahead and download a Vue starter project, or clone it with git git clone as follows:
[email protected]:viclotana/vue-canvas.git
Unzip the downloaded project, then navigate into the unzipped file or cloned project from inside your terminal. Run the command below to keep all the dependencies up to date:
npm install
Run the development server to view the project on localhost:8080 in your browser:
npm run serve
Vue ships with the watch option, just like the computed methods and data option. Watchers are a great way to respond to data changes in a given element. The watch option is also a very powerful tool for conducting form validation.
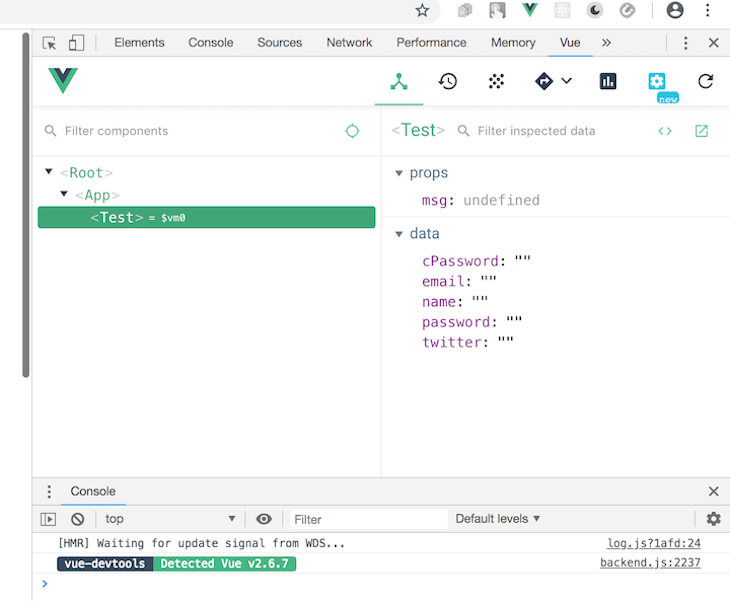
Throughout this tutorial, we’ll inspect our code with vue-devtools, a browser extension that developers use to debug their Vue projects. With vue-devtools, you can filter components, select components right inside the UI, inspect the DOM, and filter the inspected data.
The extension also ships with some cool switching tabs that let you switch to, for example, Vuex, components, events, routing, performance, and settings. Go ahead and download vue-devtools for either Chrome or Firefox:

To illustrate how to use the Vue watch option to handle form input validation, we’ll build a form for creating a new account. Our form will contain fields for the user to enter their email and password.
You should have already downloaded the canvas project. Open the project in your IDE, go into the component folder, and replace the content of your Test.vue file with the code block below:
<template>
  <div id="visa">
    <h1>Create a New Vue Account</h1>
    <form>
      <label for="full name">Full Name:</label>
      <input type="text" v-model="name" required>
      <br>
      <label for="email">Email Address:</label>
      <input type="text" v-model="email" required>
      <br>
      <label for="password">Password:</label>
      <input type="text" v-model="password" required>

      <label for="twitter">Twitter Handle:</label>
      <input type="text" v-model="twitter" required>

    </form>
</div>
</template>
<script>
export default {
  name: 'Test',
  props: {
    msg: String
  },
  data(){
    return {
      name: '',
      password: '',
      email: '',
      twitter: ''
    }
  }
}
</script>
<style scoped>
#visa {
  margin: 20px auto;
  max-width: 700px;
  margin-bottom: 28px;
}
label{
  display: block;
  margin: 20px 0 10px;
}
span {
  padding-top: 0px;
  margin-top: 0px;
  font-size: 12px; color:red;
}
input {
  font-size: 30px;
  border: 1px double rgb(102, 97, 96) ;
  border-radius: 4px;
}
</style>
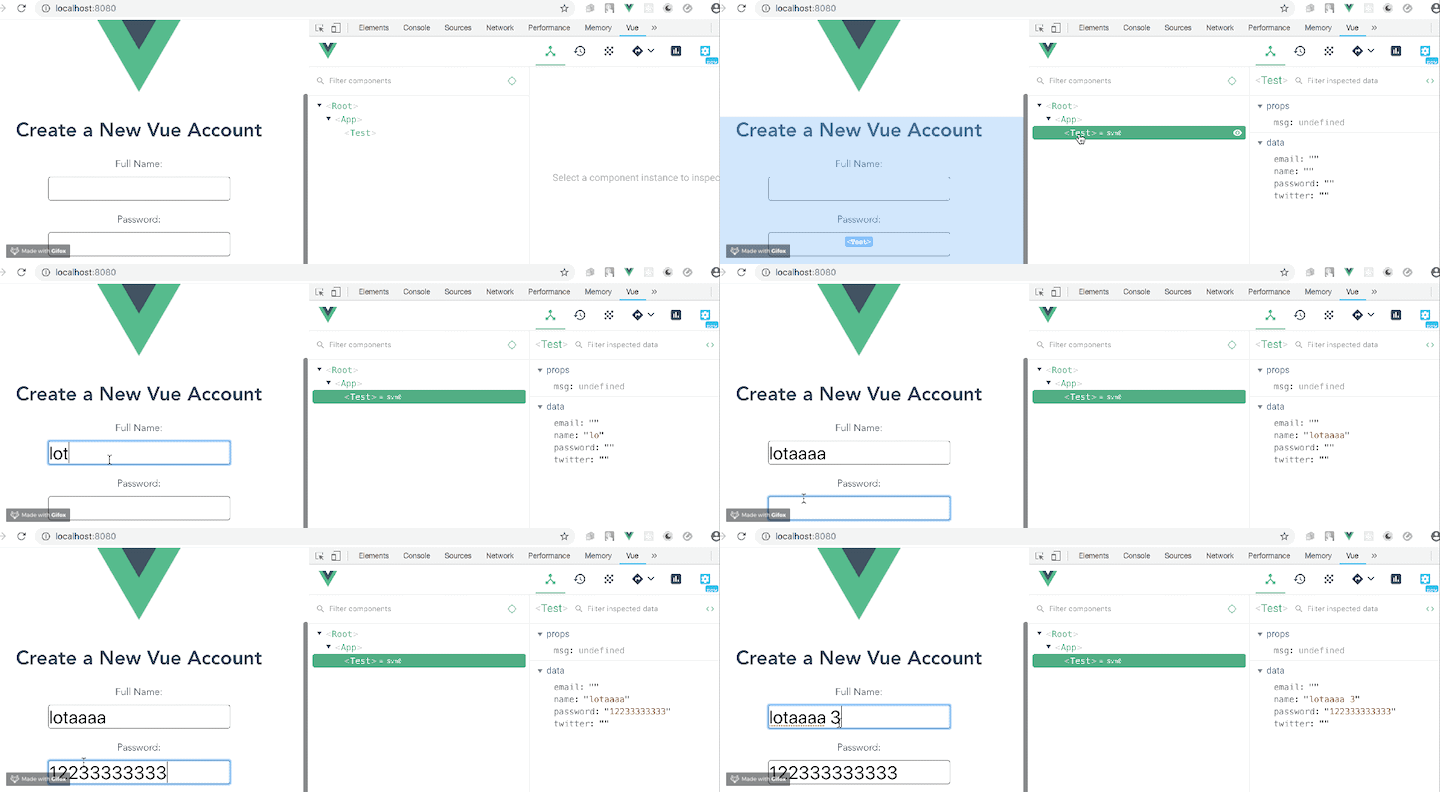
The code above creates the form with Vue input binding. You can see it in action in the browser using the vue-devtools extension:

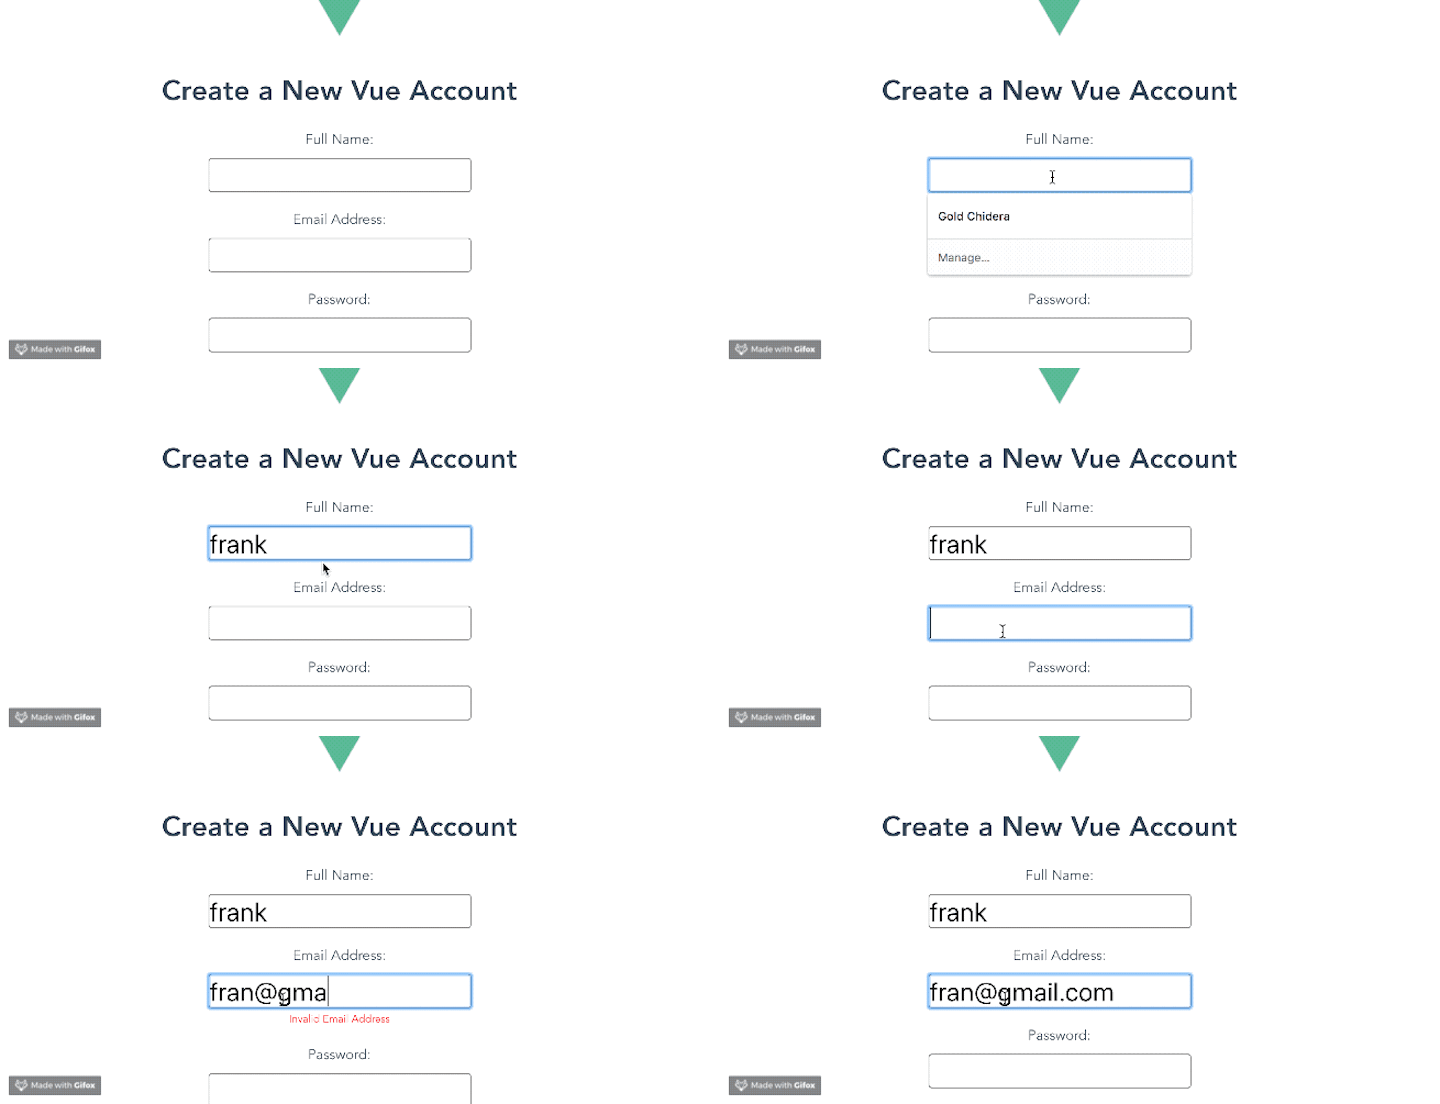
For the email input, we only want users to enter valid email addresses, like [email protected]. Fortunately, there are JavaScript functions that can check for a valid email address. We’ll use the watch option to trigger the function for checking the input. Replace your template section with the code block below:
<template>
  <div id="visa">
    <h1>Create a New Vue Account</h1>
    <form>
      <label for="full name">Full Name:</label>
      <input type="text" v-model="name" required>
      <br>
      <label for="email">Email Address:</label>
      <input type="text" v-model="email" required> <br>
      <span v-if="msg.email">{{msg.email}}</span>
<label for="password">Password:</label>
      <input type="text" v-model="password" required><br>
      <span v-if="msg.password">{{msg.password}}</span>
      <br>
      <label for="twitter">Twitter Handle:</label>
      <input type="text" v-model="twitter" required>

    </form>
</div>
</template>
We first added the span element, which will contain the prompts we’ll create later, and then added the msg array to store the values as the user types.
Copy the following code block into the script section:
<script>
export default {
  name: 'Test',
  data(){
    return {
      name: '',
      password: '',
      email: '',
      msg: [],
      twitter: ''
    }
  },
  watch: {
    email(value){
      // binding this to the data value in the email input
      this.email = value;
      this.validateEmail(value);
    }
  },
  methods:{
    validateEmail(value){
      if (/^\w+([\.-]?\w+)*@\w+([\.-]?\w+)*(\.\w{2,3})+$/.test(value))
  {
    this.msg['email'] = '';
  } else{
    this.msg['email'] = 'Invalid Email Address';
  }
    }
  }
}
</script>
In the code above, we created a watcher for the email and bound it to the email data. As changes occur in the data, the watcher can execute the validateEmail function, which we wrote inside the methods.
Run the application in the development server. It should behave like this:

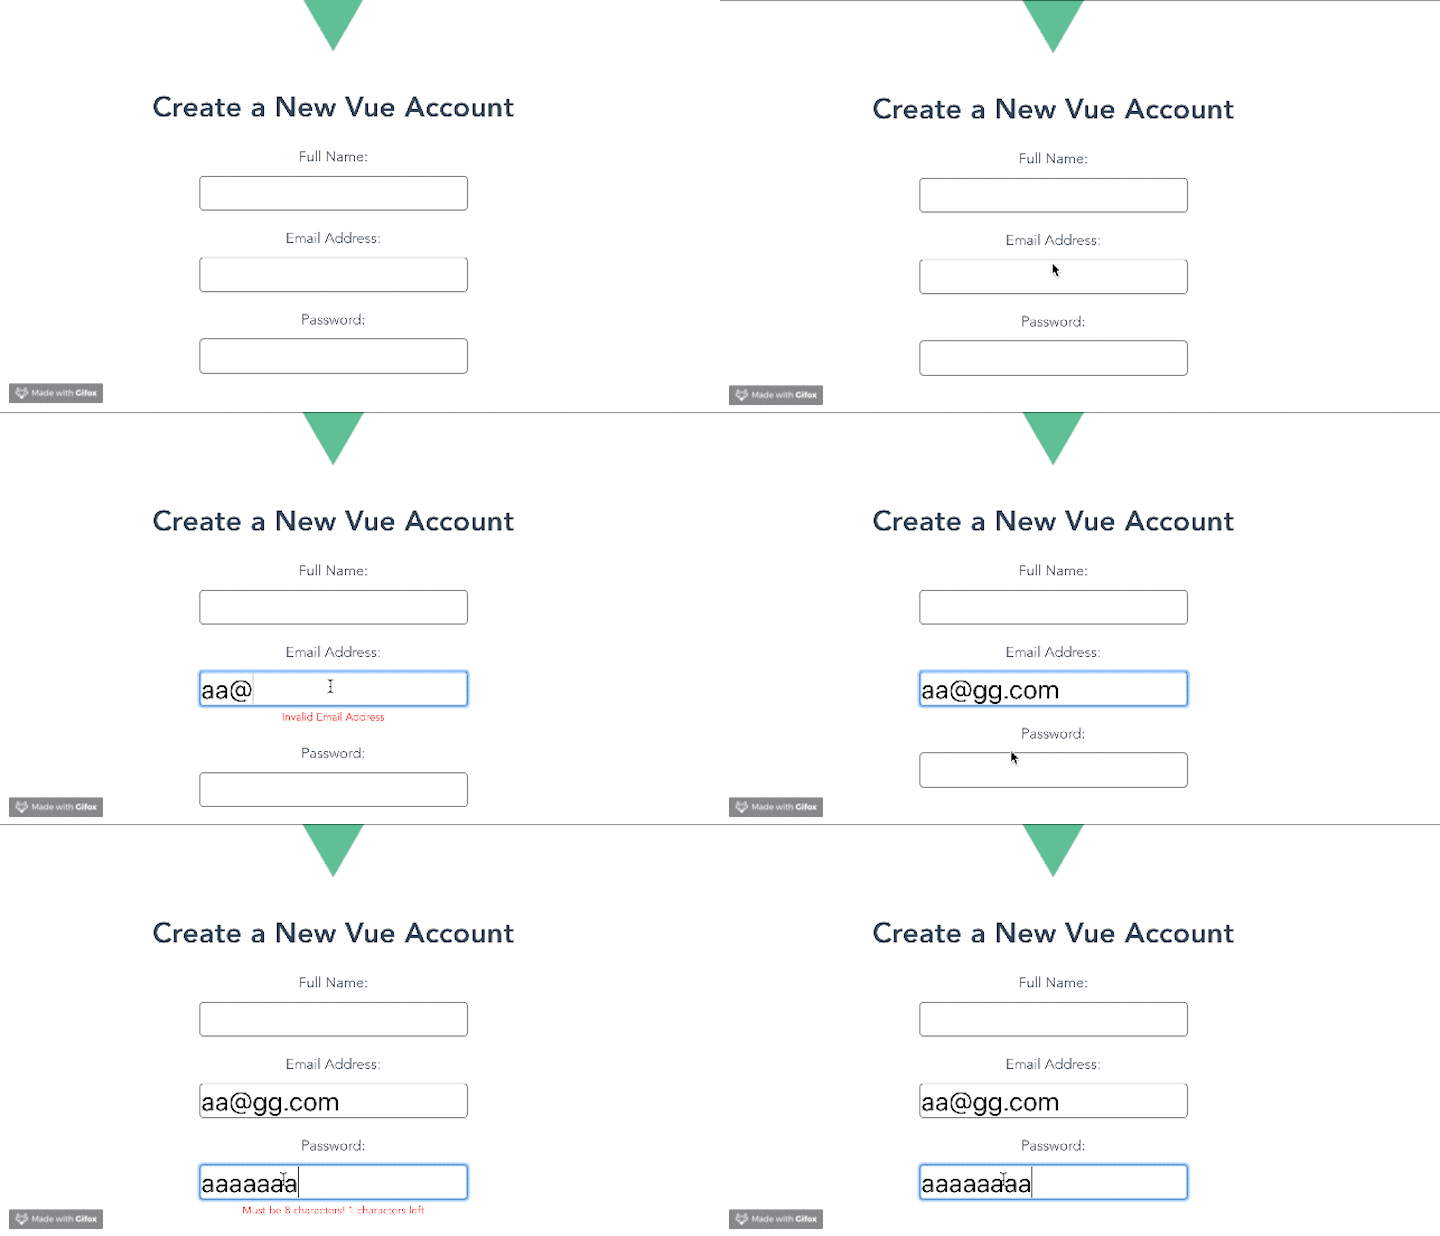
We want to validate that the password is at least eight characters long. If it contains fewer than eight characters, we’ll prompt the user to make it eight.
Replace the script section of the test.vue component with the code block below:
<script>
export default {
  name: 'Test',
  data(){
    return {
      name: '',
      password: '',
      email: '',
      msg: [],
      twitter: ''
    }
  },
  watch: {
    email(value){
      // binding this to the data value in the email input
      this.email = value;
      this.validateEmail(value);
    },
    password(value){
      this.password = value;
      this.validatePassword(value);
    }
  },
  methods:{
    validateEmail(value){
      if (/^\w+([\.-]?\w+)*@\w+([\.-]?\w+)*(\.\w{2,3})+$/.test(value))
  {
    this.msg['email'] = '';
  } else{
    this.msg['email'] = 'Invalid Email Address';
  }
    },
    validatePassword(value){
      let difference = 8 - value.length;
      if (value.length<8) {
        this.msg['password'] = 'Must be 8 characters! '+ difference + ' characters left' ;
      } else {
         this.msg['password'] = '';
      }
    }
  }
}
</script>
Save the changes in your IDE and run the application again. It should behave like this:

Now, let’s add a submit button! Our button will have the following properties:
disabled array. If any are true, the submit button should be disabledDon’t forget to add the event handler on the form tag. See the updated component below:
<template>
  <div id="visa">
    <h1>Create a New Vue Account</h1>
    <form @submit.prevent="handleSubmission">
      <label for="full name">Full Name:</label>
      <input type="text" v-model="name" required>
      <br>
      <label for="email">Email Address:</label>
      <input type="text" v-model="email" required> <br>
      <span v-if="msg.email">{{msg.email}}</span>
<label for="password">Password:</label>
      <input type="text" v-model="password" required><br>
      <span v-if="msg.password">{{msg.password}}</span>
      <br>
      <label for="twitter">Twitter Handle:</label>
      <input type="text" v-model="twitter" required>
      <input type="submit" :disabled="!disabled.every(i => i === false)" />
    </form>
</div>
</template>

<script>
export default {
  name: 'Test',
  data(){
    return {
      name: '',
      password: '',
      email: '',
      msg: [],
      twitter: '',
      disabled: [true, true]
    }
  },
  watch: {
    email(value){
      // binding this to the data value in the email input
      // this.email = value;
      this.validateEmail(value);
    },
    password(value){
      // this.password = value;
      this.validatePassword(value);
    }
  },
  methods:{
    validateEmail(value){
      if (/^\w+([\.-]?\w+)*@\w+([\.-]?\w+)*(\.\w{2,3})+$/.test(value))
  {
    this.msg['email'] = '';
    this.disabled = [false, this.disabled[1]]
  } else{
    this.msg['email'] = 'Invalid Email Address';
    this.disabled = [true, this.disabled[1]]
  }
    },
    validatePassword(value){
      let difference = 8 - value.length;
      if (value.length<8) {
        this.msg['password'] = 'Must be 8 characters! '+ difference + ' characters left' ;
        this.disabled = [this.disabled[1], true]
      } else {
         this.msg['password'] = '';
         this.disabled = [this.disabled[1], false]
      }
    },
    handleSubmission(){
      alert(`Email: ${this.email} Password: ${this.password}`)
    }
  }
}
</script>
Now, you know how to use the watch option to perform form validation in Vue. Validation is crucial when building forms, improving the quality of the information provided by users. We covered a simple example that provided validation for the email and password fields for a new account, ensuring a valid email address and adequate password length, but you can use the information in this tutorial as a base for more complex form validation.
Debugging Vue.js applications can be difficult, especially when users experience issues that are difficult to reproduce. If you’re interested in monitoring and tracking Vue mutations and actions for all of your users in production, try LogRocket.

LogRocket lets you replay user sessions, eliminating guesswork by showing exactly what users experienced. It captures console logs, errors, network requests, and pixel-perfect DOM recordings — compatible with all frameworks.
With Galileo AI, you can instantly identify and explain user struggles with automated monitoring of your entire product experience.
Modernize how you debug your Vue apps — start monitoring for free.

@container scroll-state: Replace JS scroll listeners nowCSS @container scroll-state lets you build sticky headers, snapping carousels, and scroll indicators without JavaScript. Here’s how to replace scroll listeners with clean, declarative state queries.

Explore 10 Web APIs that replace common JavaScript libraries and reduce npm dependencies, bundle size, and performance overhead.

Russ Miles, a software development expert and educator, joins the show to unpack why “developer productivity” platforms so often disappoint.

Discover what’s new in The Replay, LogRocket’s newsletter for dev and engineering leaders, in the February 18th issue.
Would you be interested in joining LogRocket's developer community?
Join LogRocket’s Content Advisory Board. You’ll help inform the type of content we create and get access to exclusive meetups, social accreditation, and swag.
Sign up now
5 Replies to "Vue form input validation using watchers"
Pretty misleading article title. Why is there no validateEmail function that actually validates the user input
No this falls way short of covering the bases for validation. What happens if you don’t give the textbox focus? Your model relies on a user actually touching the textbox. Also why show your validation errors before a user has a chance to enter the text?
Wouldn’t this create a loop.. your setting the email value with v-model=”email” then the watcher gets triggered in which you are updating this.email again… which triggers the watcher again and again and again and again etc..
There is no submit button, once you add that, even if your fields are empty the button event is triggered and all your validation is useless.
Dear All, i want to validate ‘Email’ and ‘ConfirmEmail’ using Vuelidate2.0 , can someone please help me with this.