
There are a plethora of cross-platform app development frameworks that allow you to code an app once and run it on multiple platforms like Android, iOS, and even on a desktop. You may have heard of popular frameworks like Ionic, Xamarin, and React Native. Another framework that is relatively new on the scene is Flutter.
In this article, you will learn a bit about Flutter, with a particular focus on web support, which recently became available as a technical preview in version 1.9. You will add web support to an existing Flutter app and run it on a Node.js server alongside a simple API.
The Replay is a weekly newsletter for dev and engineering leaders.
Delivered once a week, it's your curated guide to the most important conversations around frontend dev, emerging AI tools, and the state of modern software.
Flutter is one of Google’s solutions to cross-platform development. While it is fairly new on the scene, its feature set makes it an instant competitor in this space.
It compiles your app down to native code that runs on iOS or Android, resulting in incredible end-user performance and frame rates. It supports stateful hot reloading during development, meaning you can make changes to your code and watch them get applied on your emulator or physical device with no need to restart your app or lose your app state.
Flutter’s primary focus has been iOS and Android. With the 1.9 release, web support has been added as a technical preview. It is still in its early days, and it may not be production-ready just yet, but it is certainly exciting and promising. Minimal changes are required to take an existing Flutter app and compile it into an HTML, CSS, and JS bundle, as you will soon see.
Flutter web apps can run on any web server. So why would you want to host your Flutter web app on a Node.js server? Well, to be honest, for many of the same reasons that you’d choose Node.js for your other web apps and APIs: it is incredibly good at servicing large volumes of simple requests, you can code your front end and back end in JavaScript, and so on.
You might already have a Node.js API that serves data to your Flutter iOS or Android apps. Compiling your Flutter app as a web app and hosting it on your existing Node.js server might be a logical extension to your current solution, with no need to add additional hosting costs to the equation.
It’s time to dive into the code and see Flutter web in action. In order to follow along with the example, you will need the following tools:
Flutter has fantastic developer documentation. If this is your first time developing a Flutter app, follow the “Get started” guide to get all your tools set up.
You will have the opportunity to choose which editor you want to develop in. The examples and instructions in this article are based on Visual Studio Code, but you should still be able to follow along if you choose to use Android Studio instead.
A Node.js 12 server is required to run the web version of the Flutter weather app as well as the back-end weather API.
In order to demonstrate how to add web support to an existing Flutter app, we will start with a simple weather app that has been tested on Android 10 (API level 29).
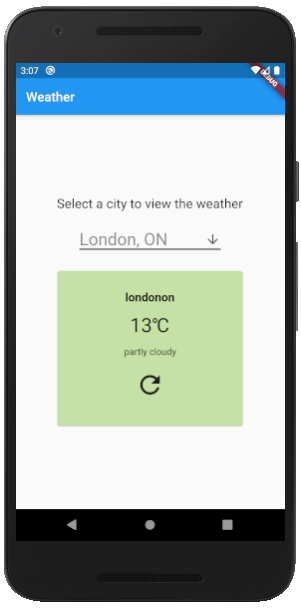
The weather app allows the user to view the current weather for a predefined list of cities. Weather data is retrieved from a back-end server running on Node.js.
Clone the source code for the weather app and server from GitHub:
Tip: The
weather-app-nodejs-serverrepository has aflutter-web-supportbranch that contains the completed version of the app copied to the server with Flutter web support enabled.
It is best to clone both repositories beside each other in the same parent folder. The contents of the weather_app_flutter repository will be built and copied to a folder within the weather-app-nodejs-server repository.
Open the weather_app_flutter repository in your editor. Let’s take a closer look at the main.dart file. It contains the scaffolding and widgets that make up the app’s user interface. The Home widget class has a fetchWeatherData function that calls the back-end weather API to retrieve data and update the widget’s state:
  fetchWeatherData({String location}) async {
    var url = WEATHER_API_URL + location;
    final response = await http.get(url);
    if (response.statusCode == 200) {
      var jsonResponse = convert.jsonDecode(response.body);
      setState(() {
        this._weatherData = WeatherData(
          jsonResponse\['weather'\]['location'],
          jsonResponse\['weather'\]['temperature'],
          jsonResponse\['weather'\]['weatherDescription'],
        );
        this._apiError = null;
      });
    } else {
      setState(() {
        this._apiError =
            'Unable to retrieve weather data from API (HTTP ${response.statusCode})';
      });
    }
  }
The fetchWeatherData function uses Dart’s http package to connect to the server over HTTP. There are other Dart packages that you could use, but this is the officially recommended package if you plan on adding web support to your Flutter app.
Also make note of the WEATHER_API_URL constant. Update the value of this constant before running the app so that it can connect to the API running on your local Node.js server. The URL must contain your machine’s hostname. A localhost URL will not be accessible to the Android emulator or physical device.
Open up the weather-app-nodejs-server repository in your editor.
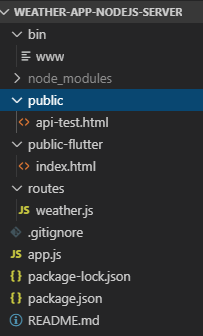
There are a few important files and folders to review:
public/api-test.html file can be used to quickly test that your server is working as expected after startup (e.g., http://localhost:3000/api-test.html)routes/weather.js file contains a simple GET API that accepts a path parameter and returns weather data (e.g., http://localhost:3000/api/weather/londonon)public-flutter folder is where you will copy the compiled web version of the weather app. The Node.js server is set up to serve files from this directory to the root context (e.g., http://localhost:3000)Since web support is still a technical preview, you need the latest in-development version of Flutter, also referred to as the master channel. In the root folder of the weather_app_flutter repository, run the following commands:
flutter channel master
flutter upgrade
Tip: You may encounter an “Unknown operating system. Cannot install Dart SDK.” error on Windows when running Flutter commands in a bash shell in Visual Studio Code. Try running the commands in a normal Windows command shell.
The upgrade process may take a few minutes. Next, you will need to enable web support in your Flutter installation so that it is available to this and other apps you develop on this workstation:
flutter config --enable-web
flutter devices
Once web support is enabled, you will see a new Chrome device in the device list. Restart Visual Studio Code after running these commands to refresh the device list menu if you don’t see Chrome in that list yet.
To add web support to the weather app, you need to run this command in the top-level folder of the weather_flutter_app repository:
flutter create .
The create command will make a few modifications to the app, which you can see in this commit. The most notable change is the addition of a web subfolder that contains an index.html:

Start the Node.js server by running this command in the root of the weather-app-nodejs-server repository:
npm start
Select Chrome from the device list in Visual Studio Code and then start the debugging. Alternatively, you can run the following flutter command:
flutter run -d chrome
The first time you start the app in Chrome may take a little longer while Flutter downloads additional dependencies on the fly. Chrome will eventually open, and you will see the weather app running in the browser. Some of the styling will be slightly different than what you saw on the emulator or physical device.
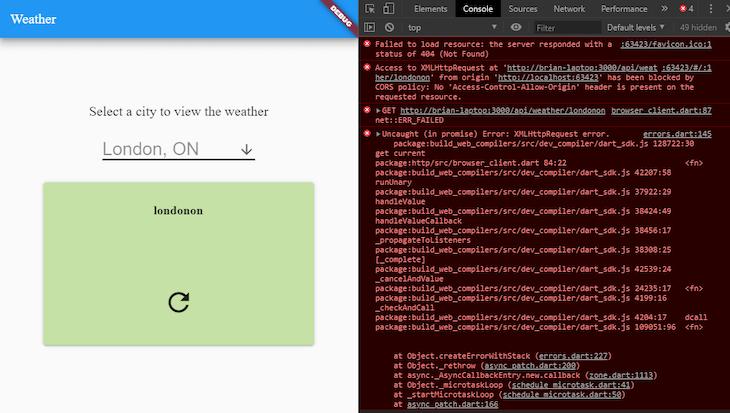
At this point, you will notice that the app is not displaying any data from the weather API. If you open Chrome DevTools, you will see a cross-origin resource sharing error.
The browser is not allowing the request to be made from the Flutter web server to the Node.js server since they are running on different ports. You could solve this problem by enabling cross-origin resource sharing on the server or installing a Chrome plugin to disable CORS.
We are going to ignore the error for now since in the next step we will run the pre-compiled Flutter web code directly on the Node.js server, thus eliminating the cross-origin requests altogether.
Try making a change to some of the code in the main.dart file and let Flutter recompile your app. You will notice that your changes do not immediately appear in the browser. This is because Flutter web does not yet support hot stateful reloading. Hopefully support for this awesome capability will come soon.
Tip: A detailed explanation of each of the Flutter commands in this section is available on flutter.dev.
Now that you can run the weather app in the browser using Flutter, the next step is to build and copy it to the Node.js server to run alongside the API.
To build a Flutter web app bundle, run this command:
flutter build web
The build command will produce the build/web folder containing all the static files that make up the weather app.
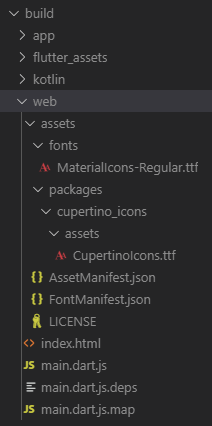
Copy the contents of weather_app_flutter/build/web to weather-app-nodejs-server/public-flutter. If your Node.js server in is still running, stop it and restart it to pick up the new files.
Access your Node.js server in the browser at http://localhost:3000 to see your app running on Node.js. This time, your app will display weather data retrieved from the weather API without the cross-origin resource sharing error.
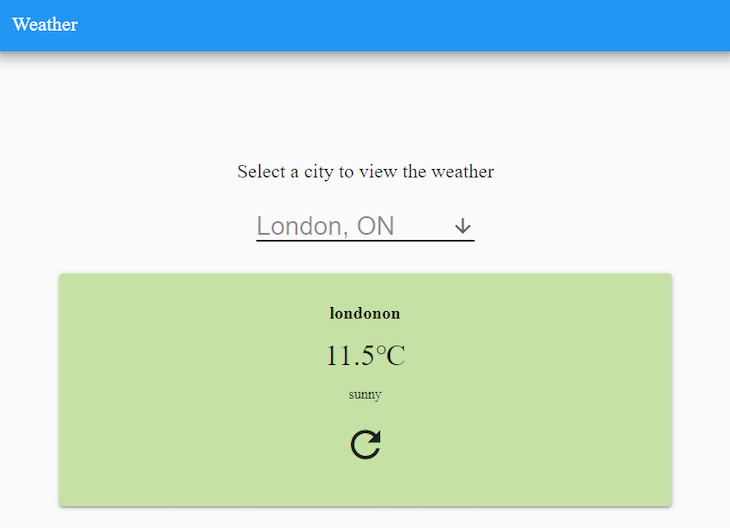
It is incredible how simple it was to take an existing Flutter app and compile it into a web app ready to be deployed to a web server. The user interface rendered in the browser looks nearly identical to the user interface in Android.
Tread lightly if you are considering Flutter as your cross-platform app framework solely because of its web support. The Flutter team is very clear that web support is missing features, has known performance issues, and is not quite ready for production yet.
One thing is for sure: the future of Flutter for web looks promising. You can read more about the Flutter web support and Project Hummingbird here.
 Monitor failed and slow network requests in production
Deploying a Node-based web app or website is the easy part. Making sure your Node instance continues to serve resources to your app is where things get tougher. If you’re interested in ensuring requests to the backend or third-party services are successful, try LogRocket.

LogRocket lets you replay user sessions, eliminating guesswork around why bugs happen by showing exactly what users experienced. It captures console logs, errors, network requests, and pixel-perfect DOM recordings — compatible with all frameworks.
LogRocket's Galileo AI watches sessions for you, instantly identifying and explaining user struggles with automated monitoring of your entire product experience.
LogRocket instruments your app to record baseline performance timings such as page load time, time to first byte, slow network requests, and also logs Redux, NgRx, and Vuex actions/state. Start monitoring for free.

React Server Components and the Next.js App Router enable streaming and smaller client bundles, but only when used correctly. This article explores six common mistakes that block streaming, bloat hydration, and create stale UI in production.

Gil Fink (SparXis CEO) joins PodRocket to break down today’s most common web rendering patterns: SSR, CSR, static rednering, and islands/resumability.

@container scroll-state: Replace JS scroll listeners nowCSS @container scroll-state lets you build sticky headers, snapping carousels, and scroll indicators without JavaScript. Here’s how to replace scroll listeners with clean, declarative state queries.

Explore 10 Web APIs that replace common JavaScript libraries and reduce npm dependencies, bundle size, and performance overhead.
Hey there, want to help make our blog better?
Join LogRocket’s Content Advisory Board. You’ll help inform the type of content we create and get access to exclusive meetups, social accreditation, and swag.
Sign up now
6 Replies to "Running a Flutter web app and API on Node.js"
Why not run it on Dart Server ? 😉
That’s definitely a good option. I think it comes down to your preference, what your hosting provider supports and your system architecture. At the end of the day, your Flutter web app is no longer a Dart application, its a web application. Deploying to Node.js opens the doors to much wider ecosystem of server-side packages that you can combine with your Flutter web app to do whatever you need to do.
Great introductory article to Flutter! I’m Currently starting development of a couple of mobile apps on Android Studio but have been very interested in the possibility of going cross-platform and had never heard of Fultter before so this has been of tremendous help. Thanks and keep them coming!
Bonsoir Brian de Sousa je me demandais si on utilisait seulement node js pour le back-end de notre application flutter web pour le côté Android && iOS on utilise et encore node pour gérer les requêtes vers les serveurs ?
HI Brian, nice sharing. I am also trying to run my flutter web application on nodejs, it was handy. but I am facing one problem, where I use setPathUrlStrategy (with url_strategy) to remove # from url, it was working fine at localhost, but when I deploy to production server, it doesn’t recognize the other pages when I manually type in the path , I believe this is something to do with url rewrite rules, do you know how to fix that?
for example when I navigate to wwwexample.com, it goes to my initial page http://www.myexample.com/home , but when I enter http://www.example.com/registration , it shows “Cannot GET /registration”.
The cross-origin issue makes debugging some aspects of web a problem, so you might be BUILDing a lot just to test this :S… Instead of copying, you can instead do app.use(express.static(‘Full_Path_To\\build\\web’));