Developing a large-scale application is no easy feat. It usually involves multiple modules working together coherently and is often written by different developers. So, when issues pop up in development, a single person has to go through an app flow created by multiple developers to identify the root cause. Misidentifying what went wrong or adding temporary fixes can break other parts of the code and lead to more issues in the long run.

If you want to speed-run creating an app, you may use these in your code:
print('reached here');

// Some code

print('now here');

// Some other code

print('method called');
The print() or debugPrint() statements are convenient ways to log errors to the console or to check where the code is. Initially, having a few print statements around the app isn’t cause for concern. However, it isn’t a sustainable way to build an app in the long run.
One great way to ensure all modules and functionalities of your project run smoothly is to use logging. A well-defined logging system can help reduce headaches when building apps and provide concise information to the user and developer while the app runs.
This article will explore using the Logger package to create easily interpreted Flutter logs, consider log levels, and cover how to use Crashlytics to get ongoing logs.
Jump ahead:
The Replay is a weekly newsletter for dev and engineering leaders.
Delivered once a week, it's your curated guide to the most important conversations around frontend dev, emerging AI tools, and the state of modern software.
Before we discuss the best practices for logging in Flutter, let’s look at the logs themselves.
Logs with uneven structures and messaging make it difficult to decipher the contents. For example, HTTP requests can contain several parameters or have significant results that need to be inspected. Doing this can be difficult and time-consuming when the logs are not structured well.
Let’s think about what you need to build an app. To start, you must ensure all calls to the server are successfully going through. Later, you’ll need to check that certain parts of the UI build appropriately, and you’ll need verbose information about the database.
Logging systems with even structures and messaging will save you from ruining your weekend when you monitor for significant errors and fix them. Logging systems must suit the developer’s needs rather than be uniformly set.
Now, let’s look at logging levels.
Flutter projects can have many logs, including networks, databases, and errors. Often, developers only need a moderate amount of logs and can safely ignore the more verbose ones. However, you may need to inspect the more detailed events if things aren’t working.
When an app is released, you may only need to record errors and other important events. Having levels in each log is essential for recording these errors because the levels assign the importance or type to each log.
You may find log types such as verbose, warning, and error, which filter out unnecessary logs. Now that we understand the importance of a solid logging system and log levels of logs are set, let’s look at adding them to an app.
Here, we will discuss the basic rules of adding logs to a project. By following these best practices, you can better understand your app’s flow and tackle any unexpected issues more quickly than an app written without a coherent logging system.
Logging too much information is overwhelming when trying to solve an error, while having too little information does not provide enough to work with to address errors. As with any error, errors can be traced down to the foundation of Flutter itself. If the entire stack track is provided to the developer, it becomes like a needle in a haystack rather than helpful information. To avoid this, log appropriate information to determine the root cause of the error in developer code without extending the same chain down to the base Dart errors.
Several systems work in unison when an app runs, including the UI, network calls, databases, and more. With so many systems working simultaneously, it’s easy to overlook covering critical events. These missing logs obscure the inner workings of processes and the causes of errors. To save yourself the headache, make sure that all events are covered.
Logs are often used instead of tests to ensure certain parts of the code are reached. While having a log in those parts of the code isn’t always a bad idea, avoiding the test can be harmful.
Each logged event needs to be inspected for its importance, so assign one level for each type of event. For example, you can set all network calls as verbose. This allows developers to separate logs effectively to prevent dealing with many of them at a higher log level.
When in development, you’ll need to inspect more logs than in production – so don’t log unnecessary information when in production. The production app will likely run on many more devices than the debug app. Logging all events from these app runs will add unnecessary costs to operations; hence, production logging is usually limited to warnings and errors.
Now that the best practices are set, let’s look at a package that can implement the various aspects of logging for us.
While creating different components for logging in-house is possible, it’s time-consuming and offers little benefit since logging systems across apps are rarely customized or differ. There are several logging packages, such as FLogs, loggy, and simple_logger.
In this article, we’ll explore the Logger package. It is one of the most popular Flutter logging solutions because it has out-of-the-box support for logging and creates concisely formatted logs. You can find the entire GitHub repository here.
To start logging, create a Logger class instance using the log() method.
Next, supply a level and a message with the command below:
var logger = Logger();

logger.log(Level.verbose, "Demo log");
You can supply an error and a stackTrace associated with a particular log:
class StringStackTrace implements StackTrace {

 final String _stackTrace;

 const StringStackTrace(this._stackTrace);

 String toString() => _stackTrace;

}

var logger = Logger();

logger.log(Level.verbose, "Demo log", "An error", StringStackTrace("Your stacktrace here"));
The error can be any object other than a String. Therefore, you can supply your error along with the log, as shown below:
var error = Error();

var logger = Logger();

logger.log(Level.verbose, "Demo log", error, error.stackTrace);
In the example, we can pass the error and the stackTrace of the error while logging. This allows the user to quickly extract more details from the log and tackle errors.
Logger class to log levelsNow that we’ve created our basic logs, it’s time to log levels. Luckily, Logger has several levels that you can use to log events, as shown below:
enum Level {
 verbose,
 debug,
 info,
 warning,
 error,
 wtf,
 nothing,
}
To log without having to describe levels every time, Logger comes with multiple methods to log at various levels:
var logger = Logger();

logger.log(Level.verbose, "Demo log", error, error.stackTrace);

//OR

logger.v("Demo log", error, error.stackTrace);

// SIMILARLY

logger.w("Demo log", error, error.stackTrace);

logger.i("Demo log", error, error.stackTrace);

// AND MORE...
Log filters help determine which events should be logged and which should not. This is useful when deciding what kinds of logs need to be shown in release mode.
To create a LogFilter, extend the LogFilter class, and implement shouldLog(). Next, pass in the filter when instantiating Logger:
class DemoFilter extends LogFilter {
 @override
 bool shouldLog(LogEvent event) {

   if(event.level == Level.error || event.level == Level.warning) {
     return true;
   }

   return false;
 }
}

var logger = Logger(filter: DemoFilter());

logger.w("This will be accepted", error, error.stackTrace);

logger.v("This will not", error, error.stackTrace);
The LogFilter lets you decide if the received event should be logged or ignored. For example, you can have different filters depending on the severity level of the log.
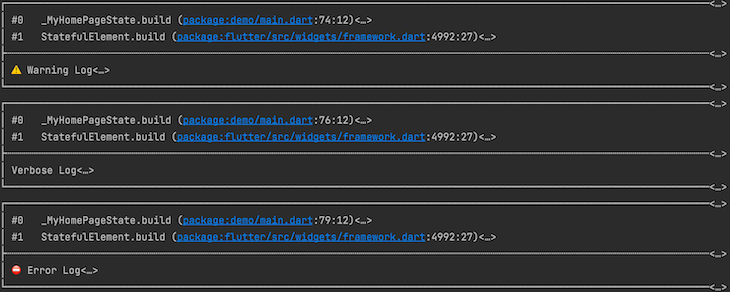
The Logger package supports printing well-structured and aesthetically pleasing logs. By default, they are printed in a standard way with a stackTrace and a message similar to this:

However, you can use the in-built PrettyPrinter class to add more flair to your logs using the command below:
var logger = Logger(
 printer: PrettyPrinter(),
);
To make your printer, you can extend the LogPrinter using this:
class DemoPrinter extends LogPrinter {
 @override
 List<String> log(LogEvent event) {
   switch(event.level) {
     case Level.verbose:
       break;
     case Level.debug:
       break;
     case Level.info:
       break;
     case Level.warning:
       break;
     case Level.error:
       break;
     case Level.wtf:
       break;
     case Level.nothing:
       break;
   }
 }
}
You can now print messages in your customized format for every log level.
The Firebase’s Crashlytics service allows developers to analyze crashes and peculiar events in the app. Although crashes are extreme events, Crashlytics also supports sending custom logs in the app to the Firebase Crashlytics console. This helps Crashlytics become a general-purpose logging tool rather than just one that helps when something goes wrong in the app.
To start, add Firebase Crashlytics to your app using these steps:
firebase_crashlytics dependencyRun this command to add the dependency to your project:
flutter pub add firebase_crashlytics
Add these lines to your android/build.gradle file:
dependencies {
 // ...
 classpath 'com.google.firebase:firebase-crashlytics-gradle:2.7.1'
}
Additionally, add these to android/app/build.gradle:
android {
 // ... your android config
}


dependencies {
 // ... your dependencies
}


// This must appear at the bottom of the file
apply plugin: 'com.google.firebase.crashlytics'
To get more information on the Crashlytics integration, find the docs here.
To record an error in your app, use the recordError() method that Crashlytics offers:
FirebaseCrashlytics.instance.recordError(
 error,
 stackTrace,
 reason: 'Your error reason',
 fatal: true
);
If there isn’t an error, and you want to see a log, use the log() method:
FirebaseCrashlytics.instance.log("Your log event");
Additionally, there are Flutter-specific error functions, such as recordFlutterError():
FirebaseCrashlytics.instance.recordFlutterError(
 FlutterErrorDetails(
   exception: YourException(),
   stack: stackTrace,
 ),
 fatal: false,
);
The exception value has a type of Object, so this value can be anything you want to pass along.
This article discussed the best practices for logging in a Flutter project. We also learned how to use a package to create easily interpreted logs, considered log levels, and covered how to use Crashlytics and similar tools to get ongoing logs.
While this was a summary of logging in Flutter, your implementation will probably be a little different every time, depending on the project you are developing.
Install LogRocket via npm or script tag. LogRocket.init() must be called client-side, not
server-side
$ npm i --save logrocket

// Code:

import LogRocket from 'logrocket';
LogRocket.init('app/id');
// Add to your HTML:

<script src="https://cdn.lr-ingest.com/LogRocket.min.js"></script>
<script>window.LogRocket && window.LogRocket.init('app/id');</script>

@container scroll-state: Replace JS scroll listeners nowCSS @container scroll-state lets you build sticky headers, snapping carousels, and scroll indicators without JavaScript. Here’s how to replace scroll listeners with clean, declarative state queries.

Explore 10 Web APIs that replace common JavaScript libraries and reduce npm dependencies, bundle size, and performance overhead.

Russ Miles, a software development expert and educator, joins the show to unpack why “developer productivity” platforms so often disappoint.

Discover what’s new in The Replay, LogRocket’s newsletter for dev and engineering leaders, in the February 18th issue.
Would you be interested in joining LogRocket's developer community?
Join LogRocket’s Content Advisory Board. You’ll help inform the type of content we create and get access to exclusive meetups, social accreditation, and swag.
Sign up now