
This article aims to leave you with an impression of where package managers are headed in the future to support developers’ needs — such as by enabling developers to manage large monorepo projects with adequate performance and good DX.
I’ve written in a previous article about the topic of dependency resolution strategies among npm, Yarn, and pnpm. While the focus in the previous article was on comparing core concepts and structures, this article will cover the advanced features of modern package managers, including monorepos, through workspaces.
The goal of this article is to convey how Yarn and pnpm have focused their efforts more closely on enabling developers to build monorepos through workspaces, and providing more advanced approaches to improve security and performance. We’ll cover the following things, comparing implementation options where applicable:
This article covers several package manager features. Therefore, I created two companion projects on GitHub to provide examples:
The Replay is a weekly newsletter for dev and engineering leaders.
Delivered once a week, it's your curated guide to the most important conversations around frontend dev, emerging AI tools, and the state of modern software.
When using the default configuration, pnpm and Yarn Berry do not use the same dependency resolution algorithms as npm and Yarn Classic, which involves flattening node_modules folders. These modern package managers try to part ways with traditional approaches to process and store dependencies.
The reason for this is that innovative resolution approaches are required to cope with the requirements of modern software projects, which increasingly make use of large amounts of dependencies. Traditional strategies have reached their limits in terms of performance and disk-space efficiency.
node_modules approachThe traditional dependency resolution strategy to flatten node_modules folders leads to several different issues:

The root problem of this flat node_modules layout is a concept called hoisting, which was introduced by npm in v3. This same dependency resolution algorithm was also used by Yarn Classic in the beginning.
Simply put, hoisting flattens the node_modules folder in such a way that every dependency, even the dependencies of dependencies, ends up on the root level of node_modules. The reason for lifting everything to one folder level is to reduce the redundancy that nesting causes. The following image shows how this works:
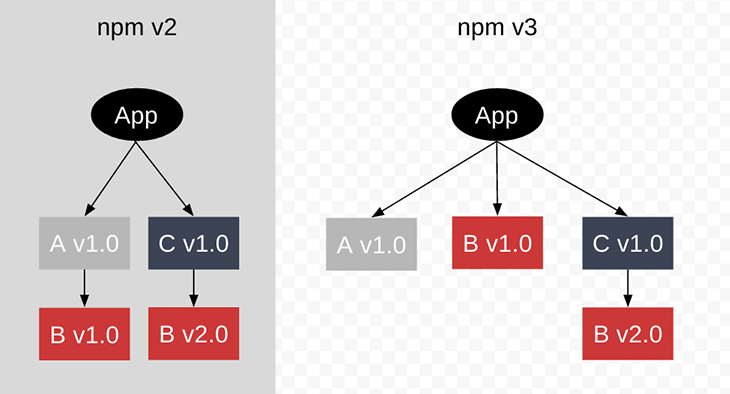
Hoisting can lead to serious and difficult-to-detect errors, especially in large projects. Jonathan Creamer gives a detailed view of what can go wrong in a monorepo project where the hoisting algorithm fails and causes production errors. In such situations, hoisting can lead to phantom dependencies and doppelgangers.
Yarn Berry tried to ditch node_modules completely, using a Plug’n’Play approach. You can read about Yarn Berry’s motivation to get rid of node_modules, but the reasons are similar to pnpm’s.
PnP is a new and innovative installation strategy for Node, developed in contrast to the established (and sole) Common,js require workflow that tackles many of its inefficiencies. In contrast to the traditional way, Yarn Berry turns the responsibility around on who finds the packages.
Previously, Node had to find your packages within the node_modules folders. Yarn Berry in PnP mode already has all of the information it needs at hand and, instead, tells Node where to find them. This reduces package installation time drastically.
Yarn Berry achieves this by generating a .pnp.cjs file instead of a nested node_modules folder. It contains lookup tables to inform Node about dependency locations. As one of the benefits, Yarn Berry can make sure that it share only the locations of packages that you have defined in one of your package.json files, which improves security and reduces errors — you no longer have to worry about doppelgangers, or phantom dependencies, or other kinds of illegal access.
The primary benefits, though, are faster installation speeds; we’re only processing one file, our .pnp.cjs file, so we have fewer I/O operations. Startup times can also be improved because the Node resolution algorithm has to do less work.
But if there is no node_modules folder, where are packages stored? Every package is stored as a zip file inside of a .yarn/cache/ folder. This works because Yarn Berry monkey-patches Node’s file system API in such a way that requests for dependencies inside of node_modules need to be resolved from the contents of the zip archives inside of the cache instead. These zip archives take up less disk space than the node_modules folder.
PnP is the default mode of Yarn Berry, but you can also explicitly enable it within .yarnrc.yml.
# .yarnrc.yml
# alternatively, remove the next two lines, PnP strict is the default
nodeLinker: "pnp"
pnpMode: "strict"
A typical PnP project structure looks like the below. There are no node_modules folders; the dependencies are stored in zip files in .yarn/cache/.
.
├── .yarn/
│   ├── cache/
│   ├── releases/
│   │   └── yarn-3.1.1.cjs
│   ├── sdk/
│   └── unplugged/
├── .pnp.cjs
├── .pnp.loader.mjs
├── .yarnrc.yml
├── package.json
└── yarn.lock
To debug issues with dependencies, you need additional tool support (e.g., VS Code extension) since you have to “look inside” of zip files. At the time of writing, you have to perform manual steps by adding editor SDK support because such functionality is not inbuilt. The following command adds support for VS Code:
$ yarn dlx @yarnpkg/sdks vscode
The SDK CLI analyzes your root package.json for supported technologies and generates configuration files that gets stored in .yarn/sdk/.
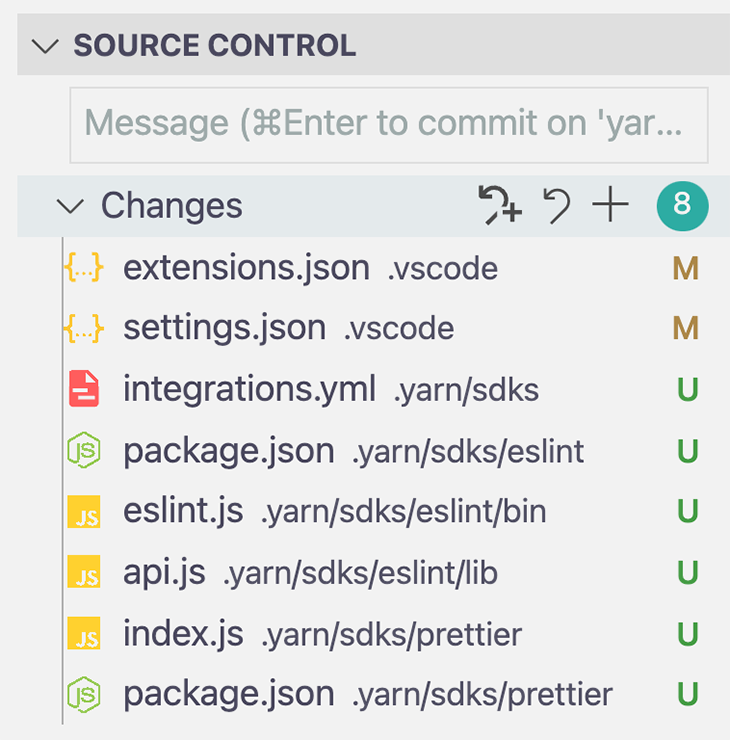
In the case of our demo project, it detects ESLint and Prettier. Check out the Git branch yarn-berry-pnp to see an example of PnP and SDK support.
A good thing about PnP is that you can put the .pnp.cjs file and the .yarn/cache/ folder under version control because of their justifiable file sizes. What you get from this is a zero-install strategy. If your teammate pulls your code from Git, which may take a bit longer using this strategy, all packages and lookup tables will be at hand, and no installation step is required before you start the application. Take a look at a short demo video showing zero-install in action.
You can see how the .gitignore file looks kind of like the Yarn Berry PnP zero-install branch. If you add, update, or remove dependencies, you have to run yarn install, of course, to update yarn.lock, .pnp.cjs, and the .yarn/cache/ folders.
PnP is restrictive and might not work with some incompatible packages (e.g., React Native). Additionally, migrating to PnP might not be a smooth path; thus, Yarn Berry provides a loose mode. You can activate it in .yarnrc.yml by setting the nodeLinker property accordingly.
# .yarnrc.yml
nodeLinker: "pnp"
pnpMode: "loose"
Loose mode is a compromise between PnP strict mode and the traditional node_modules dependency resolving mechanism. The difference is that Yarn Berry only warns about unsafe dependency access, instead of aborting with errors.
Under the hood, Yarn Berry performs the traditional hoisting algorithm and uses it as a fallback for every unspecified dependency. This is still considered unsafe by Yarn Berry’s standards, but might save some time — you’ll be more able to analyze the warnings you receive, fix their root issues, and return to PnP strict again quickly, if needed.
You might want to switch to Yarn Berry because Yarn Classic is considered legacy, and though it benefits from some improvements, it sticks to the traditional node_modules install mode with the node-modules nodeLinker.
# .yarnrc.yml
nodeLinker: "node-modules"
With this, the good ol’ node_modules folder gets generated again.
The Yarn Berry team was also inspired by pnpm’s content-addressable storage strategy, which we’ll discuss below, and added a mode with the same name. It is similar to its archetype and aims to store dependencies only once, on your hard drive.
# .yarnrc.yml
nodeLinker: "pnpm"
Feel free to test the different modes by checking out the corresponding Git branches of my demo project:
node_modules and nodeLinkernodeLinkernode_modules strategypnpm stores dependencies in a nested node_modules folder, like npm, but provides better performance and disk-space efficiency because of its implementation of content-addressable storage. You can read more about it in my previous article on package managers.
Since the end of 2020, pnpm v5.9 also supports PnP and even refers to it as Yarn’s Plug’n’Play. The documentation on this feature is sparse; pnpm’s lead developer refers to Yarn Berry’s docs.
The pnpm PnP branch shows how to use this mode. You have to activate PnP mode in .npmrc.
# .npmrc
node-linker=pnp
symlink=false
After running pnpm i, the project structure looks like this.
.
├── node_modules/
│   ├── .bin/
│   └── .pnpm/
├── .npmrc
├── .pnp.cjs
├── package.json
└── pnpm-lock.yaml
pnpm and Yarn Berry consider hoisting to be a bad practice. As already mentioned, many projects in the JavaScript ecosystem have based their hoisting implementations on the one used by npm and earlier versions of Yarn. This section highlights a few issues that come with the no-hoisting approach.
With the pnpm demo branch, I had an issue running a binary, ntl. It was not working because of pnpm’s non-flat node_modules layout, which led me to a discussion with the lead developer of pnpm about a similar issue and pointed me to the solution to hoist ntl.
# .npmrc
hoist-pattern[]=*ntl*
With the Yarn Berry PnP approach, you’ll most likely run into similar situations. During development of the PnP demo branch, I got this error on startup.
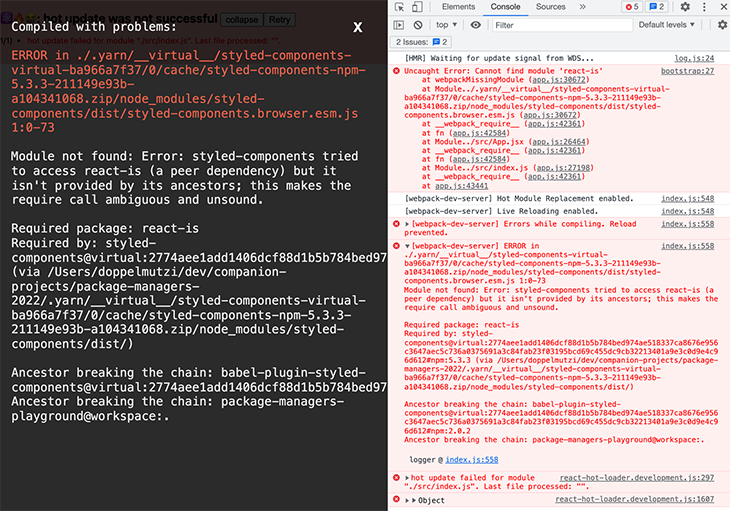
In the stack trace, I found that a package named react-is was not found at runtime. The error message on the left side of the above screenshot indicates that this has to do with the styled-components package I specified in my package.json. It seems that styled-components does not list all of its dependencies in its package.json.
There is a typical solution for such a PnP problem: the packageExtensions property. Updating .yarnrc.yml and running an additional yarn install to install the missing dependency fixes the problem:
# .yarnrc.yml
packageExtensions:
  "styled-components@*":
    dependencies:
      react-is: "*"
As described above, you can also switch to a less restrictive Yarn Berry approach if it’s ok to give up PnP’s security benefits in your project.
pnpm PnP works similar to the Yarn Berry variant, and as such, you have to cope with its stricter nature, too. You have to specify missing dependencies in the package.json, as you can see in the pnpm PnP branch.
// package.json
{
  "name": "package-manager-playground",
  "version": "1.0.0",
  "packageManager": "[email protected]",
  "pnpm": {
    "packageExtensions": {
      "styled-components": {
        "dependencies": {
          "react-is": "*"
        }
      },
      "autoprefixer": {
        "dependencies": {
          "postcss": "*"
        }
      }
    }
  },
  // ...
}
Working on multiple projects might require different versions of Node or your package manager. For example, my React Native project uses Yarn Classic, but for my React project, I want to make use of a more recent version of Yarn Berry.
A package manager should make it easy to switch between versions. You should also have mechanisms in place that allow you to enforce certain versions of a package manager — ideally automatically. This reduces bugs caused by using different package manager versions. As you’ll see in a minute, Yarn Berry is currently the sole package manager that offers a feature to automatically switch to a particular version.
The easiest way to switch a Node version that comes with a bundled version of npm is by using nvm. Then, you can also update npm itself to the most recent version. Here are some examples.
    $ nvm use 17.40
    $ npm -v # 8.1.2
    $ nvm install-latest-npm
    $ npm -v # 8.3.2
pnpm provides its own tool for managing Node versions: the recently-added pnpm env command. It serves as an alternative to tools like Volta or the aforementioned nvm. You can switch Node versions and then install particular pnpm versions, either with the help of npm or Corepack. Here is an example that leverages Corepack:
$ pnpm env use --global lts
$ node -v # 16.13.2
$ pnpm -v # 6.24.2
$ corepack prepare [email protected] --activate
$ pnpm -v # 6.25.1
A powerful Yarn Berry feature, especially for professional teams, is to bundle a particular Yarn Berry version with your project. When executed in the root of your project, the command yarn set version adds the downloaded version to .yarn/releases/ and updates .yarnrc.yml to set the current release with the yarnPath property.
# .yarnrc.yml
yarnPath: .yarn/releases/yarn-3.1.1.cjs
With this setup, your locally installed yarn binary defers the execution to the binary version located at yarnPath. If you commit this configuration, along with the .yarn/releases folder, all teammates will automatically use the same version of the yarn binary. This leads to deterministic dependency installation runs on all systems — no more “runs on my machine” problems.
The following demo shows how this version is automatically used after checking out the code from Git.
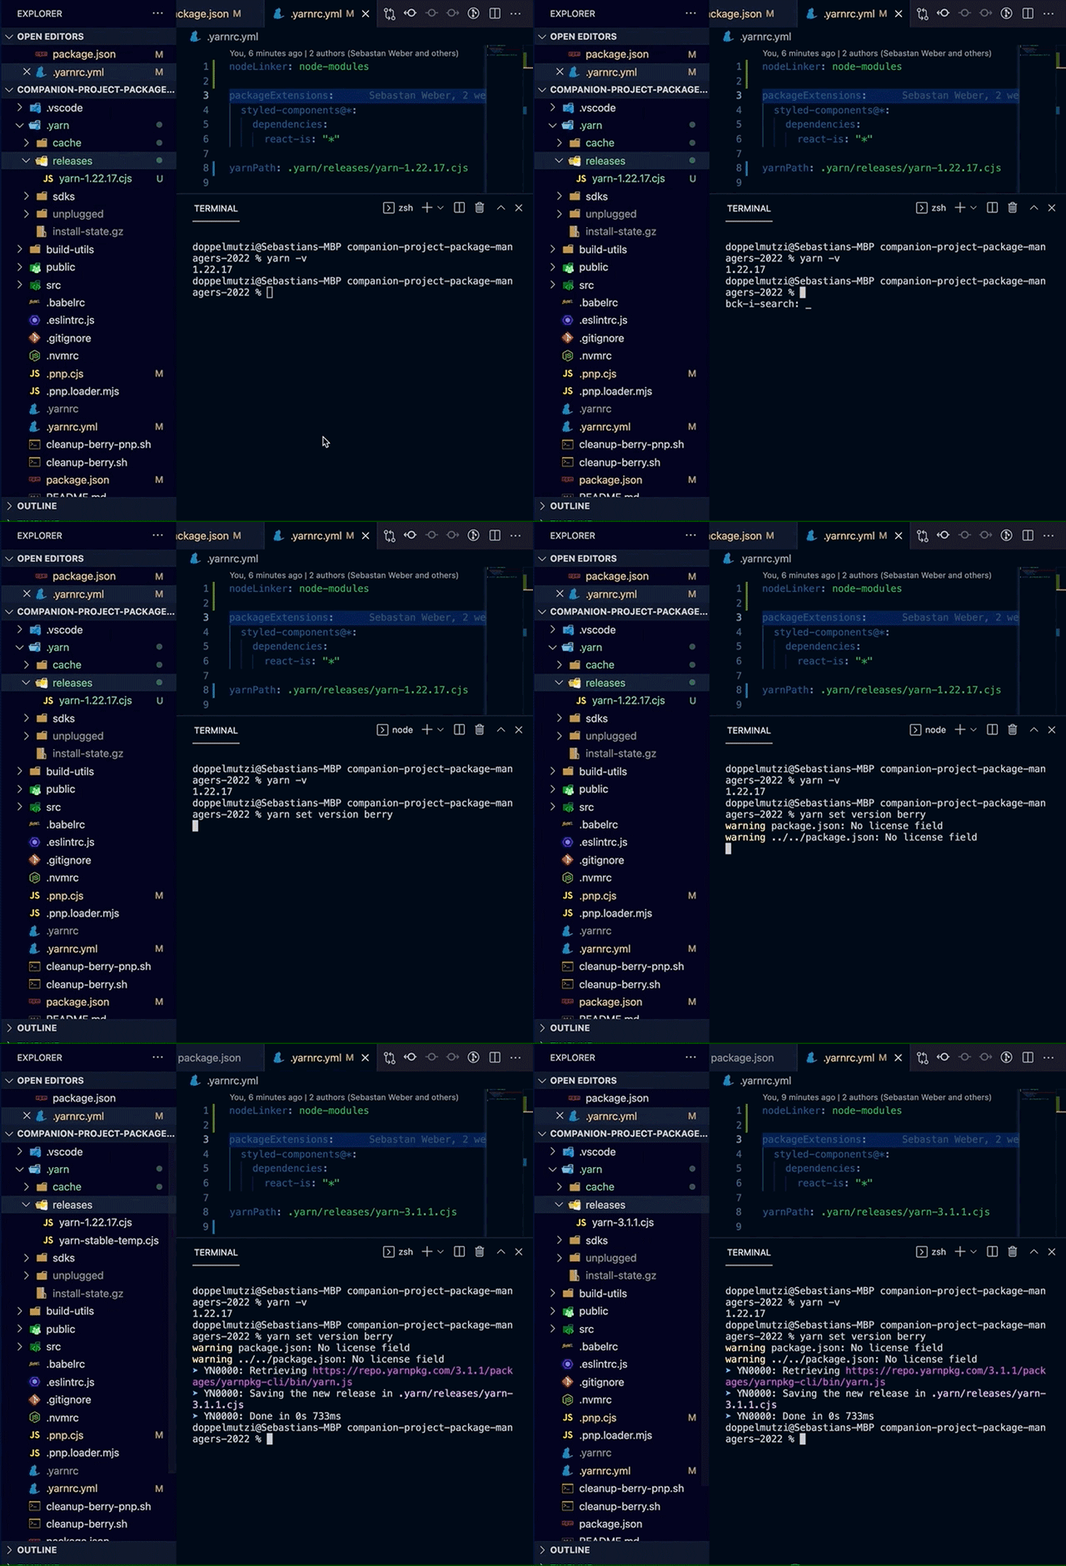
yarn set version in actionIf you use Corepack, the command also adds the installed yarn binary version to the packageManager property in your package.json file.
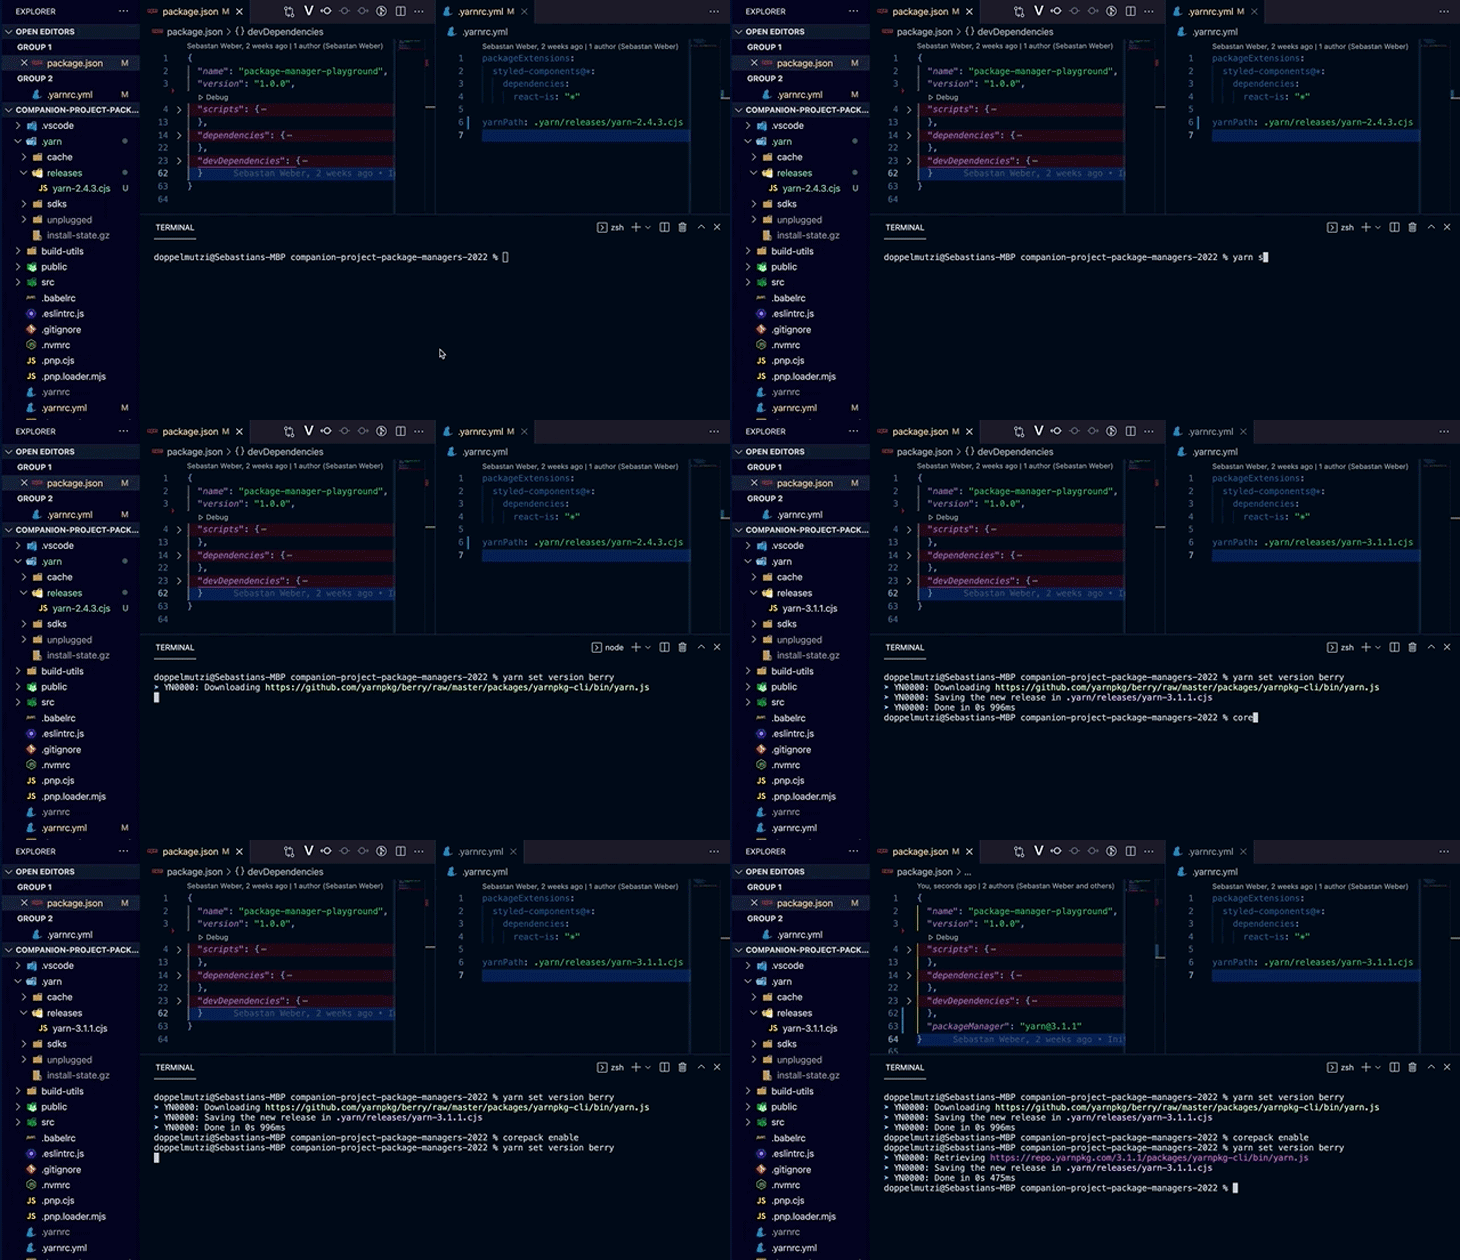
packageManager property is added to our package.json fileThis can be used as an additional “layer” on top of the yarnPath config to make sure that your fellow developers use the right package manager.

Corepack is still a brand-new technology and every developer has to opt in to use it. Thus, it cannot be reliably ensured that all developers use the same package manager with the same version.
Overall, Yarn Berry’s yarn set version is a robust method of enforcing the correct yarn binary version across your team. This mechanism is superior to other package managers’s mechanisms.
This section focuses on the additional features of the installation workflow that are especially useful in CI/CD contexts. Many development projects require efficient strategies to reduce the processing time of pipeline runs, such as caching strategies.
npm ci is a similar command to npm install, but a package-lock.json file must exist. It works by throwing away your node_modules and recreating it from scratch.
ci stands for “continuous integration” and is meant to be used in CI/CD environments. By running $ npm ci, a preexisting package-lock.json will not be updated, but the node_modules folder will be deleted and recreated. In contrast to npm install, this approach usually leads to speed improvements and more reliable pipeline runs because the exact same dependency versions defined in package-lock.json are pushed to version control by a developer.
In addition, npm installs packages to a local cache to increase the speed of reinstalling them. This allows for offline installs because of offline package resolving, e.g., using a command like $ npm i --prefer-offline if you have either no internet connection or a shaky one. If you want to clean the cache, you can use $ npm cache clean.
There is no Yarn Berry counterpart to npm ci to install dependencies in a CI/CD context, but you can do similar things with yarn install --frozen-lockfile.
Yarn Berry has an advanced offline cache feature. It caches every package as a single zip file in your .yarn/cache/ folder. The location of the default cache folder can be changed with the cacheFolder property.
# .yarnrc.yml
cacheFolder: "./berry-cache"
You can clean the cache with the following commands.
# manual clean is optional
$ yarn cache clean
# global mirror needs to be cleaned manually
$ yarn cache clean --mirror
By default, Yarn Berry creates a cache folder for every project. If you want to share the cache with multiple projects, you can use a global cache instead by using the enableGlobalCache property. Every project with this same setting shares the global cache.
# .yarnrc.yml
enableGlobalCache: true
Without an internet connection, packages are installed from the store. You can also explicitly tell pnpm to retrieve all packages from the store with $ pnpm i --offline. If one or more packages are not part of the store, you get an error.
There is no command like npm ci, but according to its maintainers, pnpm works well in a CI/CD context.
Every package manager works out-of-the-box with the public npm registry. In a company context with shared libraries, you’ll most likely want to reuse packages without publishing them publicly. That’s where private registries come into play.
The following config is part of the .npmrc file located in the project’s root folder. It indicates how to access a private GitLab registry.
# .npmrc
@doppelmutzi:registry=https://gitlab.doppelmutzi.com/api/v4/projects/<project-id>/packages/npm/
The sensitive data goes into the .npmrc file located outside of the project.
# ~/.npmrc
//gitlab.doppelmutzi.com/api/v4/projects/123/packages/npm/:
    npmAlwaysAuth: true
    npmAuthToken: "<my-token>"
pnpm uses the same configuration mechanism as npm, so you can store your configuration in a .npmrc file. Configuring a private registry works the same way as with npm.
Configuring private registries is similar to npm, but the syntax differs because settings are stored in a YAML file.
# .yarnrc.yml
npmScopes:
  doppelmutzi:
    npmRegistryServer: 'https://gitlab.doppelmutzi.com/api/v4/projects/123/packages/npm/'
Again, your auth token should be stored outside of your project.
# ~/.yarnrc.yml
npmRegistries:
  //gitlab.doppelmutzi.com/api/v4/projects/123/packages/npm/:
    npmAlwaysAuth: true
    npmAuthToken: "<my-token>"
A monorepo is a Git repository that houses multiple projects. Google has managed most of its projects in a monorepo for quite some time. Some benefits include:
Modern package managers support monorepos through a feature called workspaces. In such projects, every workspace constitutes a sub-project and contains a package.json that defines its own dependency tree. The concepts behind each implementation are quite similar for all representatives: the CLI simplifies the dependency management of the monorepo, and package managers can even take care of shared dependencies between workspaces to improve the efficiency of their file system storage.
But there are differences in the details, and thus we’ll take a look at the workspaces feature for every package manager.
npm added a workspaces feature in v7, released in October 2020. Setting a workspaces project up requires only a few steps and a package.json in your root folder that contains a workspaces property telling npm where to find your workspaces.
// root package.json
// ...
"workspaces": [
  "workspaces/a",
  "workspaces/b",
  "packages/*"
],
// ...
This example shows that you can explicitly list all packages (workspaces/a, workspaces/b) or you can use a glob (packages/*). Every package or workspace, respectively, needs its own package.json.
You can also automate these steps. Inside of the root folder, just run the following command to create a workspace along with the required configuration:
$ npm init -w ./packages/a-workspace
This creates the folder a-workspace within the packages folder. In addition, a workspaces property within package.json of the root folder is either created or updated to contain a-workspace.
When you run npm i in the root folder, all dependencies of all packages are installed. This is the folder structure of the npm demo branch after you run install. In this example, there are three workspaces located in the packages folder. The src folder holds the source of a React app that uses the workspaces by referencing them in the root package.json.
.
├── node_modules/
│   ├── @doppelmutzi/
│   │   └── eslint-config/ # sym-link to packages/eslint-config
│   │   └── hooks/ # sym-link to packages/hooks
│   │   └── server/ # sym-link to packages/server
│   ├── # other (shared) dependencies
├── packages/
│   ├── eslint-config/
│   │   └── package.json
│   ├── hooks/
│   │   └── package.json
│   ├── server/
│   │   └── package.json
├── src/
├── package-lock.json
└── package.json
As described above, npm hoists all dependencies to a flat node_modules folder. In a workspaces project, this node_modules folder would be located in the root folder.
But in this example, all workspaces (@doppelmutzi/eslint-config, @doppelmutzi/hooks, @doppelmutzi/server) are stored in node_modules/@doppelmutzi/ as symlinks to the source folders (packages/).
What happens with shared third-party libraries? Let’s consider that package.json and hooks/package.json specify the same React dependency (17.0.2). The result looks like this:
.
├── node_modules/
│   ├── # other (shared) dependencies
│   ├── react/ # 17.0.2
├── packages/
│   ├── eslint-config/
│   │   └── package.json
│   ├── hooks/
│   │   └── package.json
│   ├── server/
│   │   └── package.json
├── package-lock.json
└── package.json
What happens if we add [email protected] to the server package?
.
├── node_modules/
│   ├── # other (shared) dependencies
│   ├── react/ # 17.0.2
├── packages/
│   ├── eslint-config/
│   │   └── package.json
│   ├── hooks/
│   │   └── package.json
│   ├── server/
│   │   ├── node_modules/
│   │   │   └── react/ # 17.0.1
│   │   └── package.json
├── package-lock.json
└── package.json
This demonstrates how different dependency versions are stored. There is still only one package-lock.json file in the root folder.
npm v7 also introduced the flags --workspaces (alias -ws) and --workspace (alias -w) that can be used with many CLI commands. Let’s take a look at some examples.
// package.json of root folder
"scripts": {
  // ...
  "start-server": "npm run serve -w @doppelmutzi/server",
  "publish-eslint-config": "npm publish --workspace @doppelmutzi/eslint-config",
  "lint-packages": "npm run lint -ws --if-present",
  "lint-packages:parallel": "npm run lint -w @doppelmutzi/hooks & npm run lint -w @doppelmutzi/server"
}
The start-server script shows how to run a script within a package from the workspaces root folder:
npm run <script> -w <package-name>
package-name refers to the name property of the package’s package.json file. The script publish-eslint-config demonstrates how to run an npm command in another package that is not explicitly defined in the package’s package.json file (i.e., an inbuilt command). lint-packages is an example of how to run a script in all packages. Please note the --is-present flag that prevents an error if a package does not specify the lint script.
In contrast to Yarn Berry, npm does not support parallel script execution with the -ws flag. lint-packages:parallel shows a workaround for achieving this by specifying every single package.
You can also install dependencies for a package with the -w flag or for all packages with the -ws flag:
$ npm i http-server -w @doppelmutzi/server
$ npm i ntl -ws
One major advantage of monorepos is to use shared libs. As an example, the React demo app uses all workspaces by specifying the dependencies in its package.json.
// package.json
"dependencies": {
    "@doppelmutzi/eslint-config": "file:./packages/eslint-config",
    "@doppelmutzi/hooks": "file:./packages/hooks",
    "@doppelmutzi/server": "file:./packages/server",
    // ...
}
A Yarn Berry workspaces project can be initialized with yarn init -w. It creates a packages folder, a .gitignore, and a package.json. The package.json contains the workspaces config that points to the created packages folder. As an example, with mkdir yarn-demo; cd yarn-demo; yarn init -w; the following package.json is generated.
{
  "name": "yarn-demo",
  "packageManager": "[email protected]",
  "private": true,
  "workspaces": [
    "packages/*"
  ]
}
This root-level package.json has to be private and have a workspaces array specifying where workspaces are located. You can specify workspaces with the use of globs (e.g., packages/*) or explicitly (e.g., packages/hooks).
Let’s take a look at what a typical project structure looks like after you run the yarn command in the root folder of the demo project branch. Every workspace is located in the packages folder and houses a package.json.
.
├── .yarn/
│   ├── cache/
│   ├── plugins/
│   ├── releases/
│   ├── sdk/
│   └── unplugged/
├── packages/
│   ├── eslint-config/
│   │   └── package.json
│   ├── hooks/
│   │   └── package.json
│   ├── server/
│   │   └── package.json
├── .pnp.cjs
├── .pnp.loader.mjs
├── .yarnrc.yml
├── package.json
└── yarn.lock
The interesting aspect is that there is only one yarn.lock file on the root level. In addition, all dependencies including those of the workspaces are stored in one .pnp.cjs file and one .yarn/cache/ folder, also located at the root level.
A workspace is a folder containing a package.json with no special requirements. As you’ll see next, plugins to improve the workspaces workflow are stored in .yarn/plugins/.
Yarn Berry provides a CLI command, yarn workspace, to run commands in the context of a workspace. As an example, from the root level you can add a dev dependency to the Hooks workspace:
$ yarn workspace @doppelmutzi/hooks add -D @babel/runtime
After you install the workspace-tools plugin, you can make use of the yarn workspace foreach command that allows you to run a script in multiple workspaces.
$ yarn plugin import workspace-tools
$ yarn workspaces foreach -p run lint
The above foreach command runs the lint script on every workspace with a script with this name. The -p flag, short for --parallel, runs all scripts in parallel.
A useful feature of the yarn run command is that you can execute scripts containing a colon (:) from every folder of your workspaces project. Consider a script with the name root:name in the root package.json that prints out the package name.
// root package.json
{
  // ...
  "scripts": {
    "root:name": "cat package.json | grep name"
  }
}
No matter which folder yarn root:name is executed, it executes the script with the same name of the root folder. This feature can be used to define some “global” scripts.
If you want to prevent a package resolving from a remote registry from one of your workspaces, you have to use the workspace resolution protocol. Instead of using semver values within the properties of your dev dependencies or dependencies package.json files, you have to use the following:
"dependencies": {
    "@doppelmutzi/eslint-config": "workspace:*"
}
This tells Yarn Berry that the package @doppelmutzi/eslint-config should be resolved from a local workspace living in the packages folder. Yarn Berry scans all package.json files for a name property with the value of @doppelmutzi/eslint-config.
Yarn Berry also supports cloning workspaces from any project via Git protocol.
"dependencies": {
    "@doppelmutzi/eslint-config": "[email protected]:doppelmutzi/companion-project-mono-repo-2022.git#workspace=@doppelmutzi/eslint-config"
}
In this example, I directly retrieve the workspace @doppelmutzi/eslint-config from the specified Git repository that constitutes a Yarn Berry workspaces project.
Constraints are a low-level mechanism to write workspace rules that have to be met. It’s kinda like ESLint for package.json; for example, every workspace must include a license field in its package.json.
For JavaScript developers, it might be unusual to define these constraints because you write them with the logic programming language Prolog. You have to provide a constraints.pro file in the root folder of the project.
% Ensure all workspaces are using packageManager field with version 3.2.0
gen_enforced_field(WorkspaceCwd, 'packageManager', '[email protected]').
The simple example makes sure that all workspaces have a packageManager field that enforces Yarn Berry v3.2.0 as package manager. As part of a CI/CD workflow, you can run $ yarn constraints and break the pipeline if constraints are not met.

pnpm has offered workspaces support right from the beginning. You need a mandatory pnpm-workspace.yaml file in the project’s root folder to use this feature.
# pnpm-workspace.yaml
packages:
  - 'packages/**'
This example configuration tells pnpm that all workspaces are located inside of the packages folder. Running pnpm i in the root folder installs the dependencies defined in the root package.json, as well as all specified dependencies in the workspaces’ package.json files. The following folder structure of the demo project’s pnpm Git branch is the result of the installation process.
.
├── node_modules/
│   ├── # dependencies defined in package.json
├── packages/
│   ├── eslint-config/
│   │   └── package.json # no dependencies defined
│   ├── hooks/
│   │   ├── node_modules/ # dependencies defined in hooks/package.json
│   │   └── package.json
│   ├── server/
│   │   ├── node_modules/ # dependencies defined in server/package.json
│   │   └── package.json
├── package.json
├── pnpm-lock.yaml
└── pnpm-workspace.yaml
As you can see, there is only one lock file (pnpm-lock.yaml) but multiple node_modules folders. In contrast to npm workspaces, pnpm creates a node_modules folder in every workspace, whenever there are dependencies specified in the workspace’s package.json.
To compare the situation with the React dependency with npm workspaces — as described in the previous section — [email protected] is installed in the root folder’s node_modules as well as the hooks workspace because this dependency is specified in both package.json files.
In contrast to npm, the node_modules folder are non-flat. As described above, due to the content-addressable storage approach these dependencies are installed physically only once on the hard drive in the central store.
The root package.json reveals that multiple useful flags exist and can be used in the context of workspaces.
{
  // ...
  "start-server": "pnpm serve --filter @doppelmutzi/server",
  "publish-eslint-config": "pnpm publish -F @doppelmutzi/eslint*",
  "lint-packages": "pnpm lint -r --parallel",
}
The filter flag (--filter or -F) restricts a command to one or more workspaces. The start-server script demonstrates how to run a script on one particular workspace (@doppelmutzi/server). You can also use a pattern (*) to match workspaces, as shown with the publish-eslint-config script.
With the recursive flag (--recursive or -r), you can run a command recursively on all workspaces. The lint-packages script shows an example with the run command that runs the lint script on all workspaces.
In contrast to npm, pnpm ignores every workspace that does not provide such a script. With the parallel flag, the script is executed concurrently.
pnpm supports a workspace protocol (workspace:) similar to Yarn Berry’s to use workspaces as dependencies in your monorepo. Using this protocol prevents pnpm from resolving local workspace dependencies from a remote registry. The extract from the root package.json demonstrates how to use this protocol.
// package.json
{
  // ...
  dependencies: {
    "@doppelmutzi/eslint-config": "workspace:1.0.2",
    "@doppelmutzi/hooks": "workspace:*",
    "@doppelmutzi/server": "workspace:./packages/server",
  // ...
  }
}
Using workspace: tells pnpm that you want to install dependencies that constitute local workspaces. "@doppelmutzi/eslint-config": "workspace:1.0.2" installs the local workspace @doppelmutzi/eslint-config because the version in its package.json is 1.0.2. **If you try to install another version, the installation process fails.

Most likely, you’ll want to use the current state of a workspace as it exists in your workspaces project. Therefore, you can use workspace:* as demonstrated with the dependency @doppelmutzi/hooks. @doppelmutzi/server shows that you can also reference a workspace with a relative path. It has the same effect as workspace:*.
Similar to Yarn Berry, it is also possible to reference workspaces from a remote monorepo with pnpm add.
The following tables compare a curated set of different CLI commands available in npm, Yarn Berry, and pnpm in the context of workspaces. This is by no means a complete list, but constitutes a cheat sheet. The following tables completes the commands from my last article with workspace-related examples.
This table covers dependency management commands to install or update all dependencies specified in package.json, or multiple dependencies by specifying them in the commands. All commands can be executed in the context of one or more workspaces. and all commands are executed from the root folder of the workspaces project.
| Action | npm | Yarn Berry | pnpm |
|---|---|---|---|
| install deps of all workspaces |
|
|
|
| install deps of single workspace |
|
|
|
| Add root-level dependencies |
|
|
|
| Add dependencies to workspace |
|
|
|
| Add workspace dependency to workspace |
|
|
|
| update all dependencies of workspace |
|
|
|
| update dependency of workspace |
|
|
|
| Remove dependencies from workspace |
|
|
|
This table shows commands to run scripts in one or many workspaces.
| Action | npm | Yarn Berry | pnpm |
|---|---|---|---|
| run script on a workspace |
|
|
|
| run script in multiple workspaces |
|
|
|
| run script in all workspaces sequentially |
|
|
|
| run script in all workspaces sequentially if available |
|
|
|
| run script in all workspaces in parallel |
|
|
|
This table covers useful inbuilt commands. If there is no official command, often a third-party command can be used to achieve similar things, via an npm package or Yarn Berry plugin.
| npm | Yarn Berry | pnpm | |
|---|---|---|---|
| init workspaces project |
|
|
|
| init workspace |
|
|
|
| list workspaces |
|
|
|
| Check workspace constraints |
|
|
|
Frontend projects are getting more complex; more and more dependencies are required to build them. The installation process, especially for monorepos, is time-intensive and partly error-prone. The current state of package managers has addressed many problems, but there is still space for improvements.
tnpm, for example, is an enterprise service from Alibaba that seems to have raised the bar for package managers in the closed enterprise environment. Their dependency resolution strategy reduces HTTP requests, in comparison to the above described package managers.
In addition, tnpm’s dependency graph is generated on the server, in connection with a multi-level caching strategy. Currently, this is hard to achieve with a non-enterprise solution like npm, pnpm, or Yarn, but it certainly sets the bar for what is possible.
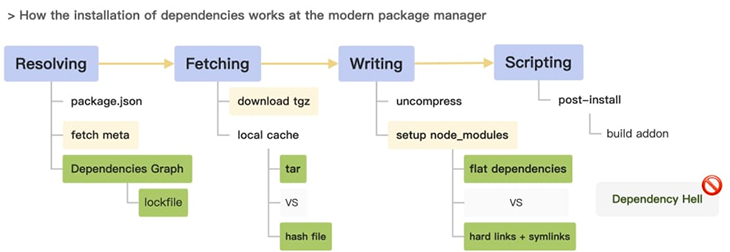
The public package managers are still independently researching ways to improve performance and address known pain points (e.g., inefficient dependency storage, which we discussed here). Even npm is working on an “isolated mode” that will create symlinked node_modules, inspired by pnpm. With this change, npm has referred to its current, long-time resolution strategy as “hoisted mode”.
pnpm is also conducting research with FUSE to provide an alternative to Yarn Berry’s PnP mode, which seems promising (and probably also explains why you can find almost no information about pnpm PnP online at this time).
Ultimately, you can’t give higher praise for how well the package managers work together in terms of inspiring each other and sharing knowledge. You can see this in many places, such as the comments section of this article on tnpm.
It seems that there will be multiple package managers around in the future. They may not want to have equal feature sets and concepts to better address the myriad problems different users face.
On the one hand, this is wonderful because it means there will be options from which to choose the optimal workflow for a project. There is also nothing preventing us from using different package managers in a team setting for different projects, since they are based on similar concepts.
On the other hand, it is getting more and more difficult for library vendors to support all of these package managers and their respective differences. As an example, in my current project I cannot use Yarn Berry because a set tool does not support its lock file format. Whether or not support for these differences will be overcome remains to be seen.
Install LogRocket via npm or script tag. LogRocket.init() must be called client-side, not
server-side
$ npm i --save logrocket

// Code:

import LogRocket from 'logrocket';
LogRocket.init('app/id');
// Add to your HTML:

<script src="https://cdn.lr-ingest.com/LogRocket.min.js"></script>
<script>window.LogRocket && window.LogRocket.init('app/id');</script>

Explore how the Universal Commerce Protocol (UCP) allows AI agents to connect with merchants, handle checkout sessions, and securely process payments in real-world e-commerce flows.

React Server Components and the Next.js App Router enable streaming and smaller client bundles, but only when used correctly. This article explores six common mistakes that block streaming, bloat hydration, and create stale UI in production.

Gil Fink (SparXis CEO) joins PodRocket to break down today’s most common web rendering patterns: SSR, CSR, static rednering, and islands/resumability.

@container scroll-state: Replace JS scroll listeners nowCSS @container scroll-state lets you build sticky headers, snapping carousels, and scroll indicators without JavaScript. Here’s how to replace scroll listeners with clean, declarative state queries.
Would you be interested in joining LogRocket's developer community?
Join LogRocket’s Content Advisory Board. You’ll help inform the type of content we create and get access to exclusive meetups, social accreditation, and swag.
Sign up now
2 Replies to "Advanced package manager features for npm, Yarn, and pnpm"
Such a thorough study of all concepts, examples and toolings for monorepo 🫡
Tks!
One suggestion to `run script in multiple workspaces`: `yarn workspaces foreach –include/exclude “pattern”` do run script in workspaces specified by the pattern
Hi Nate, thanks a lot for your nifty tip. This is really useful to run scripts only for specific workspaces without specifying the names.