One feature that greatly improves the user experience is the ability to send emails; you can use emails to perform authentication, send notifications, and more.

Like in most server-side languages, you can find most of the packages you’ll need to build common types of applications in Go’s standard library. Go’s ecosystem is also rich in third-party packages, making development a breeze.
The smtp package is a part of the Go standard library’s net package. The net package provides functionality that enables interacting with networks in general, and the smtp package provides functionality for interacting with the Simple Mail Transfer Protocol, as specified in the RFC 5321 spec.
In this article, we’ll cover sending emails in Go with the smtp package, as well as a third-party package called jordan-wright/email. Let’s get started!
Jump ahead
The Replay is a weekly newsletter for dev and engineering leaders.
Delivered once a week, it's your curated guide to the most important conversations around frontend dev, emerging AI tools, and the state of modern software.
smtp package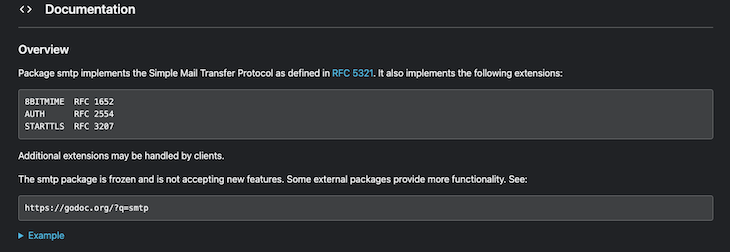
The smtp package is built into the Go standard library, so we don’t have to install anything new to get started sending emails with it.
Let’s start off by importing the following packages into your Go file:
import (
        "crypto/tls"

        "fmt"

        "log"

        "net/smtp"
)
We’ll use the tls package to authenticate the email, the fmt package to print to the console, the log package for logging, and the smtp package to actually send the email.
Next, we’ll declare the variables that will hold the email’s content. You’ll need your email address, your email password, the recipient’s email address, the host addresses and ports, and finally, the content of the email’s subject and body:
       emailApPassword := "your app emailApPassword"

        yourMail := "your email"

        recipient := "any email whatsoever"

        hostAddress := "smtp.mail.yahoo.com"

        hostPort := "465"

        mailSubject := "Hey, I'm Just Checking On You."

        mailBody := "Hope you're doing okay! How are you doing today. "

        fullServerAddress := hostAddress + ":" + hostPort
After declaring your variables, we’ll create a map variable to combine all the data:
headerMap := make(map[string]string)

        headerMap["From"] = yourMail

        headerMap["To"] = recipient

        headerMap["Subject"] = mailSubject

        mailMessage := ""

        for k, v := range headerMap {

                mailMessage += fmt.Sprintf("%s: %s\\r", k, v)

        }

        mailMessage += "\\r" + mailBody
The headerMap variable is the map that contains the email’s data and includes the three main fields for the email, from, to , subject, and body. The for-loop traverses the map and forms the content of the message with the mailBody variable.
Once you’ve created the email, the next step is authentication. You can use the PlainAuth method from the smtp package to authenticate the email with your email address, password, and host address.
You’ll also need to set up the tls configuration with the tls package and dial a connection for the email. After that, you’ll set up a client instance for the email before authenticating the client instance:
authenticate := smtp.PlainAuth("", yourMail, emailApPassword, hostAddress)

        tlsConfigurations := &tls.Config{

                InsecureSkipVerify: true,

                ServerName: hostAddress,
        }

        conn, err := tls.Dial("tcp", fullServerAddress, tlsConfigurations)

        if err != nil {

                log.Panic(err)

        }

newClient, err := smtp.NewClient(conn, hostAddress)

        if err != nil {

                log.Panic(err)

        }

        // Auth

        if err = newClient.Auth(authenticate); err != nil {

                log.Panic(err)

        }

        // To && From

        if err = newClient.Mail(yourMail); err != nil {

                log.Panic(err)

        }

        if err = newClient.Rcpt(headerMap["To"]); err != nil {

                log.Panic(err)

        }
The authenticate variable is the authentication instance, and the tlsConfigurations variable holds the configurations for the email. You’ve created a connection with the Dial method of the tls package that took the server address and configurations. The newClient variable is the email client instance that you’ll use to write the email to the client.
Finally, to send the email, we’ll write the message to the connection with the client instance. Start by creating a writer instance with the Data method of your client instance.
If doing so doesn’t cause an error, write the email to the client with the Write method of the writer instance, then close the connection with the Close method. Finally, close the client connection with the Quit method of the client instance:
       // Data

        writer, err := newClient.Data()

        if err != nil {

                log.Panic(err)

        }

        _, err = writer.Write([]byte(mailMessage))

        if err != nil {

                log.Panic(err)

        }

        err = writer.Close()

        if err != nil {

                log.Panic(err)

        }

        err = newClient.Quit()

        if err != nil {

                        fmt.Println("THERE WAS AN ERROR")

        }

        fmt.Println("Successful, the mail was sent!")

}
At this point, you’ve successfully sent an email with the smtp package!
email package
The email package is a Go-based, flexible, and robust email library designed to be easier to use than the smtp package. The email package also offers the following additional features:
From, To, Bcc, and Cc fields[[email protected]](mailto:[email protected]) and the First Last <[[email protected]](mailto:[email protected])> format are validRun the following command in the terminal of your working directory to add the email package to your project’s dependencies:
go get github.com/jordan-wright/email
After installing the email package, import the following packages in your Go file to start sending emails:
import (
        "fmt"
        "github.com/jordan-wright/email"
        "net/smtp"
)
You’ll use the smtp package to authenticate the email and the fmt package to print to the console. Next, we’ll declare variables for the content of the email. You’ll need to declare variables to hold your password, email, host address, and host port:
       emailApPassword := "your app emailApPassword"

        yourMail := "your email"

        hostAddress := "smtp.mail.yahoo.com"

        hostPort := "465"
You can create an email struct instance with the NewEmail method of the email package as follows:
emailInstance := email.NewEmail()
After declaring a variable for the email instance, fill in its required fields with the following values:
       emailInstance.From = "your mail here"
        emailInstance.To = []string{"list of recipients"}
        emailInstance.Bcc = []string{"list of bcc"}
        emailInstance.Cc = []string{"list of cc"}
        emailInstance.Subject = "The Email subject"
        emailInstance.Text = []byte("Body of your email")
Now, you can send your email with the Send method of your email instance. The Send method takes in the host address, the concatenated port, and the auth instance from the smtp package:
        err := emailInstance.Send(fmt.Sprintf("%s:%s", hostAddress, hostPort), smtp.PlainAuth("", yourMail, emailApPassword, hostAddress))
        if err != nil {
                fmt.Println("There was an error sending the mail")
        }
If the email didn’t send successfully, the Send method returns an error that you can handle depending on your use-case.
smtp or email: Which should you use?The table below compares the key merits of both packages:
| Metric | smtp |
email |
|---|---|---|
| Ease of use | Moderately easy to use | Very easy to use |
| Installation | None required | Required, but installation is simple |
| Popularity | Imported by 6k Go packages | 2.2k stars on GitHub at the time of writing |
| Support | Complete, ongoing support from the Go team | Maintained by open source developers on GitHub |
If keeping your application build compact is critical, or you want to build your own custom email tool, the smtp package is your best bet. But, if you want to send emails in your application as quickly and easily as possible, the email package will likely be a better fit for you.
In this article, we’ve learned how to send emails in Go using the built-in smtp package as well as a third-party email package. Sending emails is a great way to keep in touch with your app users, and knowing how to send emails programmatically is always a useful skill. I hope you enjoyed this article. Happy coding!
Install LogRocket via npm or script tag. LogRocket.init() must be called client-side, not
server-side
$ npm i --save logrocket

// Code:

import LogRocket from 'logrocket';
LogRocket.init('app/id');
// Add to your HTML:

<script src="https://cdn.lr-ingest.com/LogRocket.min.js"></script>
<script>window.LogRocket && window.LogRocket.init('app/id');</script>

Learn how inline props break React.memo, trigger unnecessary re-renders, and hurt React performance — plus how to fix them.

This article showcases a curated list of open source mobile applications for Flutter that will make your development learning journey faster.

Discover what’s new in The Replay, LogRocket’s newsletter for dev and engineering leaders, in the April 1st issue.
This post walks through a complete six-step image optimization strategy for React apps, demonstrating how the right combination of compression, CDN delivery, modern formats, and caching can slash LCP from 8.8 seconds to just 1.22 seconds.
Hey there, want to help make our blog better?
Join LogRocket’s Content Advisory Board. You’ll help inform the type of content we create and get access to exclusive meetups, social accreditation, and swag.
Sign up now
