Caching is a powerful tool—until it starts working against you. Over-caching has long plagued developers working with the App Router in Next.js, turning a performance enhancer into a silent UX killer. Since its debut in v13, Next.js’s aggressive default caching has led to stale data, mismatches with backend sources, and frustratingly inconsistent behavior.

Next.js 15 introduces Dynamic IO caching, a more flexible and granular way to control what gets cached and when. It strikes a balance between performance and freshness without forcing devs to choose between full caching and no caching at all.
In this guide, we’ll break down the problems caused by over-caching in earlier versions of Next.js and show how Dynamic IO makes cache control smarter, simpler, and more intuitive.
The Replay is a weekly newsletter for dev and engineering leaders.
Delivered once a week, it's your curated guide to the most important conversations around frontend dev, emerging AI tools, and the state of modern software.
Unlike traditional caching (which is more manual and often tied to server response headers or external caches like Redis or Varnish), Next.js uses a caching paradigm that integrates directly into the framework’s architecture. That means caching is handled automatically and extends across the entire request–response lifecycle.
Next.js caching doesn’t rely on a single mechanism. Instead, it layers multiple strategies, including data caching, request memoization, and router caching. This multi-layered approach is highly effective: it reduces redundant data fetching, speeds up page loads, and eases the load on your backend.
However, this layered system also introduces some challenges. Funny enough, it can actually work too well. In many cases, Next.js ends up over-caching the application, ignoring dynamic changes and serving stale data. And because of the program’s multilayered design, it’s often difficult to identify exactly where the caching issue originates.
Say we have a simple application that makes an asynchronous request to an API and fetches data that changes with every request, like so:
import Image from "next/image";

const apiKey = "...";

async function fetchImage() {
  const req = await fetch(
    `https://api.unsplash.com/photos/random?client_id=${apiKey}`
  );
  const res = await req.json();
  return {
    imageURL: res.urls.full,
  };
}

export default async function Home() {
  const { imageURL } = await fetchImage();

  return (
    <div className="...">
      <main className="...">
        <div className="...">
          <Image
            className="dark:invert"
            src={imageURL}
            alt="Next.js logo"
            width={300}
            height={200}
            priority
          />
        </div>
      </main>
    </div>
  );
}
This code fetches and displays a random image from the Unsplash API on every request.

By default, Next.js will cache this page, even though it’s fetching dynamic content. While the image changes on every might reload as shown in the example above, that doesn’t necessarily mean the route isn’t being cached. In fact, we can confirm that the route is being cached by inspecting the Next.js dev overlay.
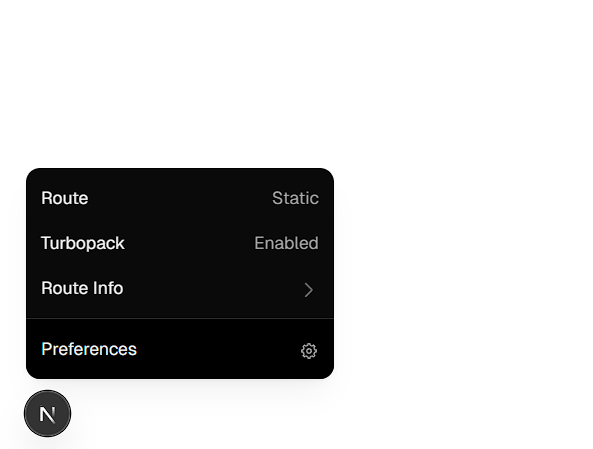
The label “static” indicates that the page is being cached and will be statically generated.
We can also observe the caching behavior by building the application. Once built, the page will be rendered as a fully static asset that serves the same content on every request unless caching is manually disabled or bypassed.

The image now loads instantly, but that’s the problem. Instead of revalidating, the app serves stale content from the cache, including the initially fetched image. What should be dynamic is effectively frozen.
Fortunately, Next.js provides ways to opt out of this default caching behavior. One option is to add cache: 'no-store' to the fetch call, which ensures the data is always fetched dynamically. Alternatively, you can use the experimental noStore() function to opt out of data caching on a per-component or per-function basis.
async function fetchImage() {
  const req = await fetch(
    `https://api.unsplash.com/photos/random?client_id=${apiKey}`,
    {
      cache: "no-store",
    }
  );
  const res = await req.json();
  return {
    imageURL: res.urls.full,
  };
}

...
In theory, this should make the page dynamic and resolve the stale data issue, as shown below:

However, this isn’t always the case. Any of the other caching layers we discussed might still be active and prevent the opt-out measure from working as expected.
Dynamic IO is an experimental feature in Next.js 15 that flips the default caching model on its head. Instead of automatically caching all async operations in the App Router, Dynamic IO opts you out of caching by default. You now choose what to cache, not what to exclude.
This change gives developers fine-grained control over data freshness without needing to constantly work around the framework’s defaults. As of now, Dynamic IO is only available in the Next.js canary release, so you’ll need to upgrade to access it.
npm install next@canary
Once that’s done, enable Dynamic IO by adding the dynamicIO experimental flag to your next.config.ts file and setting it to true:
import type { NextConfig } from 'next'

const nextConfig: NextConfig = {
  experimental: {
    dynamicIO: true,
  },
}

export default nextConfig
Once Dynamic IO is enabled, it automatically detects asynchronous operations, such as data fetching or any use of async/await, and marks the page as dynamic. For example, in our previous code where fetchImage() is used, Dynamic IO will treat that page as dynamic by default.
async function fetchImage() {
  const req = await fetch(
    `https://api.unsplash.com/photos/random?client_id=${apiKey}`
  );
  const res = await req.json();
  return {
    imageURL: res.urls.full,
  };
}
In essence, using dynamic data in a route automatically disables static rendering. Features like request memoization, which normally cache fetch() calls in the App Router, are bypassed. As a result, fetch() behaves as it would in a fully dynamic environment, returning fresh data without any caching layer.
Once Dynamic IO is enabled and the project is rebuilt, the application treats the page as dynamic. You’ll receive live data at runtime rather than stale, pre-rendered content.
When Dynamic IO is active, any asynchronous code that isn’t explicitly cached—especially code accessing params or dynamic route segments—must be wrapped in a <Suspense> boundary with a fallback. This ensures that the page can handle async behavior during rendering without breaking or stalling the UI.
import Image from "next/image";
import { Suspense } from "react";

const apiKey = "...";

async function fetchImage() {
  const req = await fetch(
    `https://api.unsplash.com/photos/random?client_id=${apiKey}`
  );
  const res = await req.json();
  return {
    imageURL: res.urls.full,
  };
}

async function SuspendedImageComponent() {
  const { imageURL } = await fetchImage();
  return (
    <>
      <Image
        className="dark:invert"
        src={imageURL}
        alt="Next.js logo"
        width={300}
        height={200}
        priority
      />
    </>
  );
}

export default async function Home() {
  return (
    <div className="...">
      <main className="...">
        <div className="...">
          <Suspense fallback={<p>Loading image...</p>}>
            <SuspendedImageComponent />
          </Suspense>
        </div>
      </main>
    </div>
  );
}
To handle this correctly, we created a separate component called <SuspendedImageComponent /> to encapsulate the dynamic image-fetching logic. This allows us to wrap it in a Suspense boundary, as seen in the code above.
Failing to do this will result in a runtime error, like this:
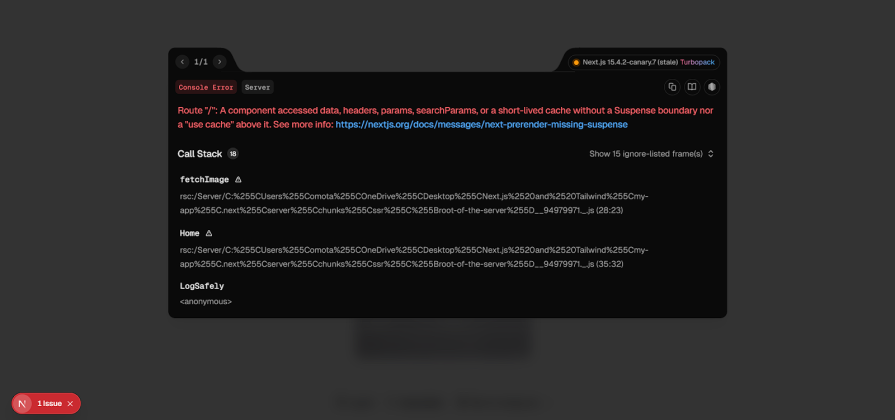
This setup allows Next.js to serve static content immediately and stream dynamic content in as it resolves, improving both load performance and data freshness.
As discussed earlier, caching plays a critical role in performance and scalability. Dynamic IO doesn’t remove caching. Instead, it introduces a more deliberate, incremental model. You may want to cache expensive operations or avoid redundant network requests, while still allowing other data to remain dynamic. To support this, Next.js offers tools that let you opt into caching where it makes sense.
The 'use cache' directive works similarly to 'use client' and 'use server', but instead of determining runtime location, it controls caching behavior. Placing 'use cache' at the top of a file enables caching for the entire module:
"use cache";

import Image from "next/image";
import { Suspense } from "react";

async function fetchImage() {
   ...
}

async function SuspendedImageComponent() {
  ...
  return (
    <>
        ...
    </>
  );
}


export default async function Home() {
  return (
    <div >
        ...
    </div>
  );
}
A common use case for the use cache directive is to improve performance for components that execute heavy asynchronous operations. When a dynamic component blocks rendering due to expensive logic, caching it ensures that the operation doesn’t rerun on every re-render.
Instead of caching the entire app, you can take a hybrid approach by applying use cache to only the components or pages that benefit from it. This lets you optimize key areas for speed while preserving dynamic behavior where needed.
Not every async operation, however, is blocking or requires fresh data with every request. In those cases, caching the entire file may be overkill. Fortunately, Next.js also allows use cache to be applied within individual async functions.
In our blocking component example, suppose the heavy asynchronous operation is encapsulated like this:
async function heavyOperation(): Promise<string> {
  // Simulating heavy async operation
  return new Promise((resolve) => {
    setTimeout(() => {
      resolve('Heavy result calculated and cached');
    }, 3000);
  });
}
Instead of caching the entire component, you can apply the use cache directive directly within the function to cache just the result of that specific operation:
async function heavyOperation(): Promise<string> {
  “Use cache”
  // Simulating heavy async operation
  return new Promise((resolve) => {
    setTimeout(() => {
      resolve('Heavy result calculated and cached');
    }, 3000);
  });
}
This setup allows Next.js to cache and reuse the result of heavyOperation() across calls, avoiding repeated execution until the data is explicitly revalidated.
use cache with cacheTagThe cacheTag() function provides a way to label cached entries for targeted revalidation. By assigning a string-based tag to a function or file, you can selectively purge its cache without affecting other data in the application.
Our random image example is a good candidate for using cacheTag(). Let’s say we want to invalidate the fetchImage() function on demand. We start by importing cacheTag() and assigning a tag like this:
async function fetchImage() {
  "use cache";
  cacheTag("unsplash-image");

  const req = await fetch(
    `https://api.unsplash.com/photos/random?client_id=${apiKey}`
  );
  const res = await req.json();
  return {
    imageURL: res.urls.full,
  };
}
Now we can trigger revalidation of the fetchImage() function by calling the revalidateTag() function and passing in the cache tag string associated with the function we want to revalidate.
…
import { unstable_cacheTag as cacheTag, revalidateTag } from "next/cache";

async function revalidateData() {
  "use server";
  revalidateTag("unsplash-image");
}

...

export default async function Home() {
  return (
    <div className="...">
      <main className="...">
        <div className="...">
          <Suspense fallback={<p>Loading image...</p>}>
            <SuspendedImageComponent />
          </Suspense>
          <form action={revalidateData}>
            <button className=”...” type="submit">Revalidate</button>
          </form>
        </div>
      </main>
    </div>
  );
}
In this example, we trigger revalidateTag() using a form action instead of a button with an onClick handler. Since revalidateTag() is a server-only function, it can’t be invoked directly from client-side event handlers without extra setup. Using a form submission keeps the logic server-compatible and easier to reason about.
After rebuilding the project, return to the browser. Initially, the cached image will be displayed. Once you click the Revalidate button and refresh the page, a new image should load, confirming that the cache was successfully invalidated.

The cacheTag() function gives you granular control over caching in your application. But what if you don’t want this manual approach and you want it done automatically at your own set time?
Time-based revalidation with cacheLife
Much like the cacheTag() function, the cacheLife() function allows you to control revalidation of cached functions or files, but with a different approach. Traditionally, when working with caching in Next.js, the only control you have is over the server-side revalidation period, which determines how often the cache is refreshed on the server.
However, with the new cacheLife() function, you also gain control over the client-side caching behavior, specifically, the stale time. This represents how long a piece of cached data is considered fresh before it’s automatically discarded.
To use cacheLife(), simply import it and invoke it within the function or component you want to cache, like so:
import { unstable_cacheTag as cacheLife} from "next/cache";
async function fetchImage() {
“use cache”;
cacheLife(“hours”);
const req = await fetch(
`https://api.unsplash.com/photos/random?client_id=${apiKey}`
);
const res = await req.json();
return {
imageURL: res.urls.full,
};
}
The “hours” string argument passed to the cacheLife() function in the example above is one of several built-in cache profiles that determine how long cached data remains valid before expiring.
Here are some of the available cache profiles:
"``seconds``": Ideal for rapidly changing content that requires near real-time updates."``minutes``": Best suited for content that updates frequently within an hour."``hours``": Suitable for content that updates daily, but can be slightly staleIf no cache profile is specified, cacheLife() will use the default profile provided by Next.js. For a complete list of available cache profiles and their behaviors, refer to the official Next.js documentation.
What makes the cacheLife() function especially powerful is its support for custom cache profiles, which lets you fine-tune caching behavior based on your content’s update frequency and how long data should remain valid before being refreshed.
Cache profiles are objects that contain three key properties:
stale: How long the client should cache a value without checking the serverrevalidate: The frequency in which the cache should refresh.expire: The maximum duration for which a value can remain stale before switching to dynamic fetching.To create a custom cache frequency, you need to define it within the cacheLife option in your next.config.ts and provide the highlighted properties above with a reusable name:
const nextConfig: NextConfig = {
  experimental: {
    dynamicIO: true,
  },
  cacheLife: {
    imageCache: {
      stale: 60 * 60 * 24 * 5, // (Client) Serve stale cache for 2 days
      revalidate: 60 * 60 * 24, // (Server) Refresh daily
      expire: 60 * 60 * 24 * 5, // (Server) Max lifetime: 5 days
    },
  },
};

export default nextConfig;
The custom cacheLife profile in the example above will cache for 5 days, check for updates daily, and expire the cache after 5 days.
Once defined, this custom cache profile can be referenced anywhere in your application. So instead of using a built-in profile like “hours”, as we did in the previous example, you can simply use the custom “imageCache” profile like this:
import { unstable_cacheTag as cacheLife} from "next/cache";

...

async function fetchImage() {
  "use cache";
  cacheLife("imageCache");

  const req = await fetch(
    `https://api.unsplash.com/photos/random?client_id=${apiKey}`
  );
  const res = await req.json();
  return {
    imageURL: res.urls.full,
  };
}

...
Alternatively, if you’re struggling to come up with a meaningful name for your cache profile, you can simply override one of Next.js’s built-in profiles with your own custom configuration.
For example, naming our custom profile imageCache works, but it’s not particularly intuitive. In contrast, a built-in name like “hours” or “days” is more self-explanatory and easier to understand at a glance. Since our custom configuration is better suited to multi-day caching, overriding the “days” profile would make more sense.
To do this, just replace the reusable name of your custom profile with “days” in the cacheLife configuration inside next.config.ts. This will override the default “days” values with your custom settings.
const nextConfig: NextConfig = {
  experimental: {
    dynamicIO: true,
  },
  cacheLife: {
    days: {
      stale: 60 * 60 * 24 * 5, // (Client) Serve stale cache for 2 days
      revalidate: 60 * 60 * 24, // (Server) Refresh daily
      expire: 60 * 60 * 24 * 5, // (Server) Max lifetime: 5 days
    },
  },
};

export default nextConfig;
Additional configuration options are available for defining custom cacheLife profiles. For a full breakdown of advanced use cases and supported parameters, consult the official documentation.

By default, the entire dashboard would be cached, even though many of its components are dynamic. While components such as the revenue chart and user metrics don’t require real-time updates and can be cached, others (like analytics cards and recent activities) need to fetch fresh data on every request to display up-to-date information.
As you know, enabling Dynamic IO would resolve the over-caching issue by making the entire page dynamic. However, this introduces a new concern: performance. Making every component fetch data on every request can negatively impact performance and significantly increase server costs. This is where selective caching becomes essential.
Since the user metrics and revenue chart don’t always require fresh data, we can use the cacheLife function to cache their data-fetching logic so that they only re-fetch data after a specified interval.
async function getRevenueData() {
  "use cache"
  cacheLife("minutes")

  // API call
  ...
  return [
      ...
  ]
}
The user profile and sidebar components can be permanently cached, as their content rarely changes. In contrast, the system notifications component can be cached using tags, allowing it to be selectively revalidated when updates occur.
async function getSystemNotifications() {
  "use cache"
  cacheTag("system-alerts")

  // API call
    ...
  return [
    {
      ...
  ]
}
The analytics cards and recent activities components, however, should remain dynamic, as they require fresh data on every request to display live activity feeds and real-time metrics. This selective approach allows us to strike a balance between data freshness and performance, even in highly complex applications.
Dynamic IO marks a meaningful evolution in how caching is handled in Next.js. By shifting control back to the developer, it addresses long-standing pain points around over-caching while enabling more intentional, performance-driven workflows.
With tools like use cache, cacheTag(), and cacheLife(), Next.js now supports a truly incremental caching model that scales from individual functions to full components without sacrificing flexibility. While still experimental, Dynamic IO shows clear potential to become the default caching strategy in modern, data-intensive applications built with Next.js.
As the framework continues to evolve, mastering these features early can give teams a performance edge and a cleaner, more predictable approach to dynamic content at scale.
Debugging Next applications can be difficult, especially when users experience issues that are difficult to reproduce. If you’re interested in monitoring and tracking state, automatically surfacing JavaScript errors, and tracking slow network requests and component load time, try LogRocket.
LogRocket captures console logs, errors, network requests, and pixel-perfect DOM recordings from user sessions and lets you replay them as users saw it, eliminating guesswork around why bugs happen — compatible with all frameworks.
LogRocket's Galileo AI watches sessions for you, instantly identifying and explaining user struggles with automated monitoring of your entire product experience.
The LogRocket Redux middleware package adds an extra layer of visibility into your user sessions. LogRocket logs all actions and state from your Redux stores.


Modernize how you debug your Next.js apps — start monitoring for free.

AI-generated tests can speed up React testing, but they also create hidden risks. Here’s what broke in a real app.re

Why the future of DX might come from the web platform itself, not more tools or frameworks.

A hands-on test of Claude Code Review across real PRs, breaking down what it flagged, what slipped through, and how the pipeline actually performs in practice.

CSS art once made frontend feel playful and accessible. Here’s why it faded as the web became more practical and prestige-driven.
Hey there, want to help make our blog better?
Join LogRocket’s Content Advisory Board. You’ll help inform the type of content we create and get access to exclusive meetups, social accreditation, and swag.
Sign up now

