In an era governed by the aesthetic value of your product, images are crucial to communicating your product’s distinctiveness and uniqueness. Images help communicate the ideas, solutions, and identities of the products we build.

As developers, we must have the best tools to achieve these qualities — and that’s what the React Native Image component empowers us to do. In this article, we’ll dive into the basics of the React Native Image component, discuss the types and props available, and cover its limitations and alternatives.
The Replay is a weekly newsletter for dev and engineering leaders.
Delivered once a week, it's your curated guide to the most important conversations around frontend dev, emerging AI tools, and the state of modern software.
Before we dive into the details of the image component, let’s review the various types of images we have for mobile applications, and specifically, the image types the React Native Image component expects.
The React Native Image component provides some properties you can use to configure the component and display the images according to your team’s business or technical needs. There are quite a few of them, but we’ll focus on the basic ones for now.
sourceThis is the main property that tells the component about the image you want to load. You can use either a local or remote file here, and basically, just pass the URI of the image to load it. If you need to specify the image’s width and height dimensions, you can also pass multiple URIs through it and leave it to the device to select the best one for use.
source will also accept a cache property that tells the component how to cache network images, but this only works for iOS.
defaultSourceThis prop is useful when your component expects to load a network image. A default image can be specified, which will load until the network image becomes available.
resizeModeThis prop controls how images are adjusted when their dimensions don’t fit the size of the frame. The available values are:
cover: scales the width and height of the image to be equal to or greater than the size of the viewcontain: the opposite of the cover property, contain scales the width and height of the image to be equal to or lesser than the size of the viewstretch: scales the width and height independently of each otherrepeat: repeats the image to cover the view until it’s filledcenter: centers the image in the view along both dimensionsstyle: used for styling the image componentIf you’re interested, you can browse other props in the React Native documentation.
CSS is typically the language used to add background images, but React Native provides an ImageBackground component that makes similar functionality available in web applications. The ImageBackground component also accepts the same props that the Image component accepts.
Now that we’ve gotten past the theory, let’s get our hands dirty with a demo. To get started, you’ll want to use this React Native environment setup. For this tutorial, I am following the Expo installation and setup instructions.
If you’d like to follow along, you can clone this repository and checkout to the startup branch. The final code is in the main branch.
First, let’s add a background image to the app. For this demo, I added an image named “static-image” in the src/assets directory. We’ll use it to demonstrate how React Native loads static images.
Open App.js and add the following code:
import { StatusBar } from "expo-status-bar";
import React from "react";
import { StyleSheet, Text, View, ImageBackground } from "react-native";

const staticImage = require("./src/assets/static-image.png");
export default function App() {
 return (
   <View style={styles.container}>
     <ImageBackground source={staticImage} style={styles.ImageBackground}>
       <StatusBar style="auto" />
       {/* TODO: something goes here  */}
     </ImageBackground>
   </View>
 );
}

const styles = StyleSheet.create({
 container: {
   flex: 1,
   backgroundColor: "#fff",
   alignItems: "center",
   justifyContent: "center",
 },
 ImageBackground: {
   flex: 1,
   resizeMode: "cover",
   width: "100%",
   alignItems: "center",
 },

});
As you can see, we imported the ImageComponent and then stored the location of the static image in a variable named staticImage. The CommonJS syntax is used to tell the metro server when to load the image in the application bundle. The require statements tell the metro server to include the image in the bundle.
We then wrap all of the children components in the ImageBackground component and specify the styling. To ensure our style translates, the image should cover the entire view — specified where we wrote “100 percent width” — and all children should be justified and center-aligned.
Next, import the image array contained in the images file in src. Also import the ScrollView, Image, and ActivityIndicator components from React Native.
Add this statement to your App.js function before the return statement, like so:
const [loading, setLoading] = React.useState(false);
This is used to store the loading state of each image. We’ll use this later for displaying a loading component.
Then, replace the to-do section with this code:
<ScrollView
         style={styles.ImageContainer}
         contentContainerStyle={{
           flexDirection: "row",
           flexWrap: "wrap",
           justifyContent: "center",
         }}
         horizontal={false}
       >
         {IMAGES.map((image, i) => {
           return (
             <View
               style={{
                 padding: 5,
               }}
               key={i}
             >
               <Image
                 source={{ uri: image }}
                 style={[
                   styles.Image,
                   {
                     width: i % 2 === 1 ? 150 : 95,
                     height: i % 2 === 1 ? 150 : 95,
                   },
                 ]}
                 resizeMode="center"
                 onLoadStart={() => setLoading(true)}
                 onLoadEnd={() => setLoading(false)}
               />
               {loading && <ActivityIndicator color="green" size="large" />}
             </View>
           );
         })}
       </ScrollView>
The image array contains a large number of images that would exceed the current viewport of the screen, so we’ll use the ScrollView component instead of a normal View to ensure users can scroll to other sections of the application within their viewport. The styling tells the ScrollView component to wrap all images so they stack nicely below each other, and to display the images in a row rather than the default column.
The image array is looped and I pass the image contained in the array to the uri key available in the source prop. I also apply different widths and heights, depending on whether the image’s index is odd or even. The resizeMode set tells the image component to center the images along both dimensions in the view.
Lastly, I apply styles and get the image loading state using the onLoadStart and onLoadEnd props of the image component.
Finally, I use the loading state of the image to render an ActivityIndicator component that will display when the image is loading.
Add these styles to the style object:
ImageContainer: {
   marginHorizontal: 16,
   marginTop: 30,
   width: "100%",
 },
 Image: {
   shadowColor: "black",
   shadowOffset: {
     width: -10,
     height: 9,
   },
   shadowOpacity: 0.5,
   shadowRadius: 2,
   elevation:5
 },
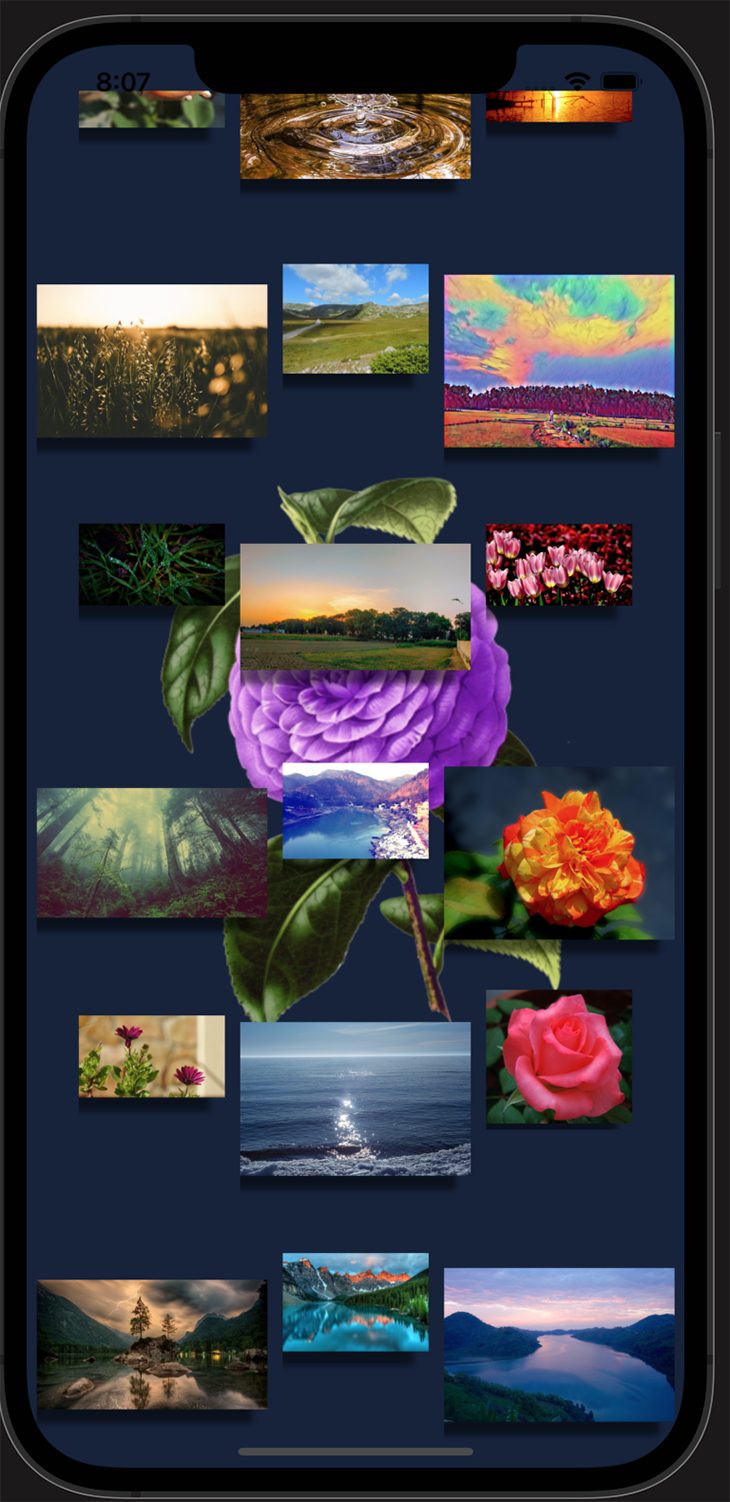
Then, apply elevation and shadow styling to give the images a drop shadow look. The elevation style will be used on Android, while the shadow properties will be used by iOS. Here’s a look at our final product:
While the React Native Image component comes equipped with some amazing capabilities, there are still a few limitations you may encounter when working with it.
As of the publication of this article, React Native Image doesn’t support the progressive image loading feature. To achieve this, you’d need an external image package or to build one yourself.
The Image component only supports the following image formats:
If your project needs to grow beyond these supported formats, this will not be the right component for you.
We’ve learned about the amazing capabilities of the React Native Image component, particularly how it enables us to communicate with our users visually. There are so many things we could achieve with this component — you could even build another advanced image component to address some of the limitations we discussed! So, young padawans, I leave you armed with all you need to shape the galaxy.
If you get stuck, have any questions or corrections, or you’d just like to get in touch, do not hesitate to reach me on Twitter. May the force be with you!

LogRocket's Galileo AI watches sessions for you and and surfaces the technical and usability issues holding back your React Native apps.
LogRocket also helps you increase conversion rates and product usage by showing you exactly how users are interacting with your app. LogRocket's product analytics features surface the reasons why users don't complete a particular flow or don't adopt a new feature.
Start proactively monitoring your React Native apps — try LogRocket for free.

useEffect breaks AI streaming responses in ReactSee why useEffect breaks AI streaming in React, and how moving stream state outside React fixes flicker and stale updates.

A real-world debugging session using Claude to solve a tricky Next.js UI bug, exploring how AI helps, where it struggles, and what actually fixed the issue.

CSS wasn’t built for dynamic UIs. Pretext flips the model by measuring text before rendering, enabling accurate layouts, faster performance, and better control in React apps.

Why do real-time frontends break at scale? Learn how event-driven patterns reduce drift, race conditions, and inconsistent UI state.
Hey there, want to help make our blog better?
Join LogRocket’s Content Advisory Board. You’ll help inform the type of content we create and get access to exclusive meetups, social accreditation, and swag.
Sign up now

