The world has never been more distributed — physically or virtually. Thanks to the internet, businesses can now reach users across the globe. To support this reach, infrastructure must scale accordingly. Multi-region setups help reduce latency and increase reliability by distributing resources closer to users.
In this article, you’ll learn how to set up a multi-region web application using AWS. We’ll walk through a high-level example of deploying a frontend and a small backend REST API distributed across the US and Europe.
You’ll serve the app through two subdomains. There’s us.mysuperwebsite.com for users in the Americas and eu.mysuperwebsite.com for European users. We’ll use us-east-1 and eu-central-1 as our AWS regions.
To begin, your frontend code needs to be compiled, built, and stored on a server. In AWS, the best service for storing static files is S3. AWS Simple Storage Service, or S3, is a hosting service for objects and files. It uses the concept of buckets, a container for your objects, to store your website. Inside your bucket, you can put all your compiled HTML, CSS, and JS files.
An S3 bucket even comes with a URL, so once you have created your bucket and uploaded your file, you can access your website to see if it looks good. An AWS bucket is by default private, but you can make it public by disabling Block all public access in the Block Public Access settings for this bucket section of the form.
For this article, however, you don’t need to, as it will be accessible through your domain.
In a multi-region infrastructure, you will need two buckets to store your application. Unfortunately, S3 buckets are not global resources, so you need a bucket for us-east-1 and another for eu-central-1.
Steps:
To make your frontend accessible to the public, use CloudFront, AWS’s CDN service. It caches content and improves load times.
To support a multi-region infrastructure, separate CloudFront distributions in each region pointing to the correct S3 bucket are necessary.
When creating your CloudFront distribution, specify the origin as the S3 bucket you created.
Finally, you set up your DNS configuration for each URL to point to the correct CloudFront distribution with Route 53. This service provides you with Domain Name System (DNS), domain name registration, and more.
Inside Route 53, you can register your domain name. You can also transfer your domain name. Depending on your needs, the process won’t be the same, so here is the documentation detailing each process.
To support our multi-region infrastructure, you will use a routing policy called geolocation. This policy allows you to route the traffic to the correct resources based on the origin of their DNS queries.
This means that European users requesting the EU subdomain would be served the content of your frontend hosted on the EU S3 bucket and cached by the EU Cloudfront.
By setting up a fallback, you can also specify that if it is down, thanks to health checks, you can redirect to the US version. If you prefer to improve performance, you can use latency-based routing. As the name suggests, it redirects users to the region with the least latency rather than the geographical location.
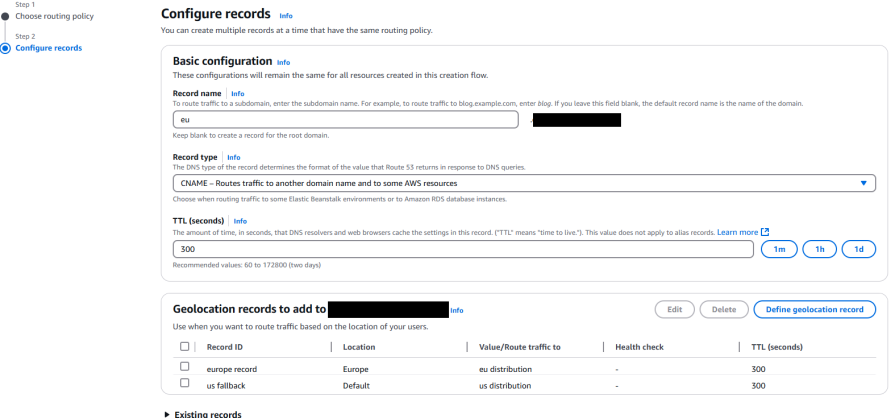
In Route 53, you will need a hosted zone for your domain (i.e., mysuperwebsite.com). In AWS, a hosted zone is a container for all your DNS records for this domain. Inside this hosted zone, you can create two CNAME records (one for the EU and one for the US) and define the distribution it points to, including the fallback.
For Route 53 to handle the fallback when the main region is down, don’t forget to set up a health check that will ping your website to make sure it is still up and running.
For example, for the EU, it would look like — eu.mysuperwebsite.com (CNAME record):
Here is an example to create the CNAME record:
By this point, you should have your DNS set up for each region that is linked to your CloudFront distribution, pointing to the correct S3 bucket.
For your backend, use AWS Lambda with API Gateway.
Lambda functions let you run code without managing servers. Concretely, when your frontend makes a call to your backend, i.e., through your API, a Lambda will be spun up to execute the code inside the function.
Lambdas are great for web applications, provided that your function doesn’t take more than 15 minutes. For runtime longer than 15 minutes, if you still want a serverless architecture, you can split up your logic with AWS Step Functions. Lambdas are region-specific resources and must be duplicated to support a multi-region architecture.
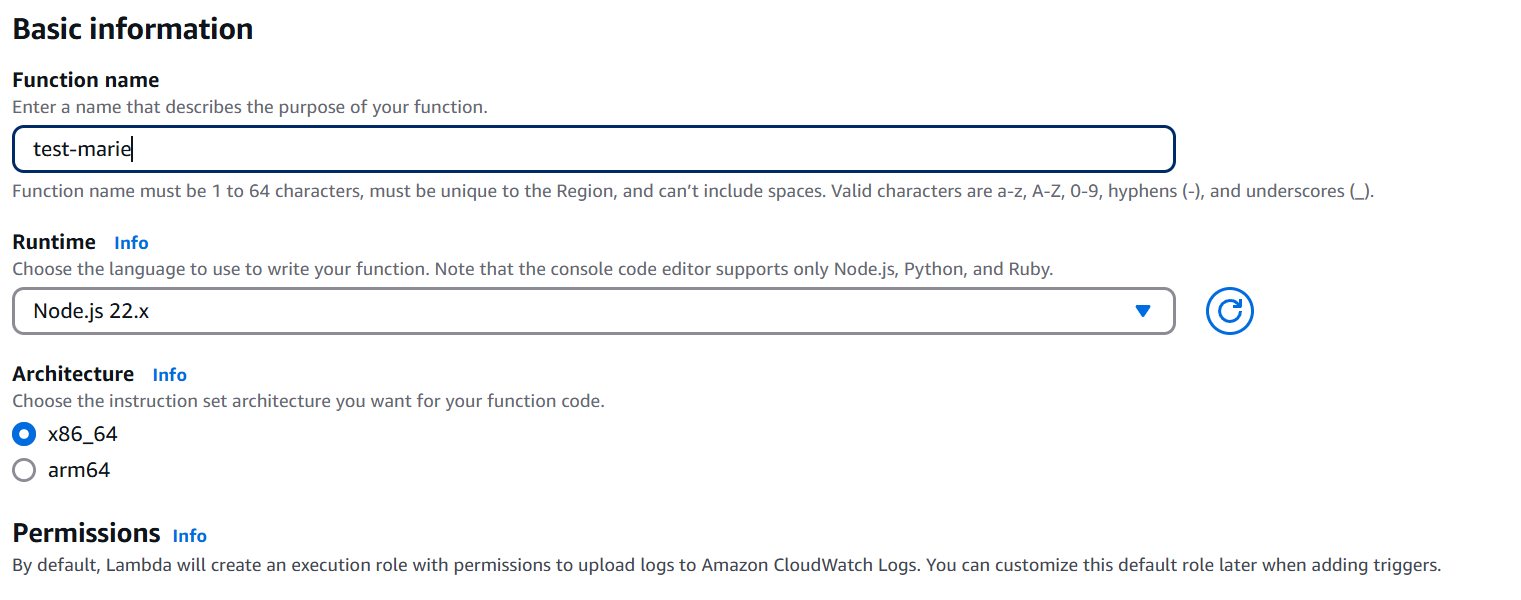
Thankfully, creating a Lambda function is straightforward. Click on Create Function and fill out the form to create your Lambda:
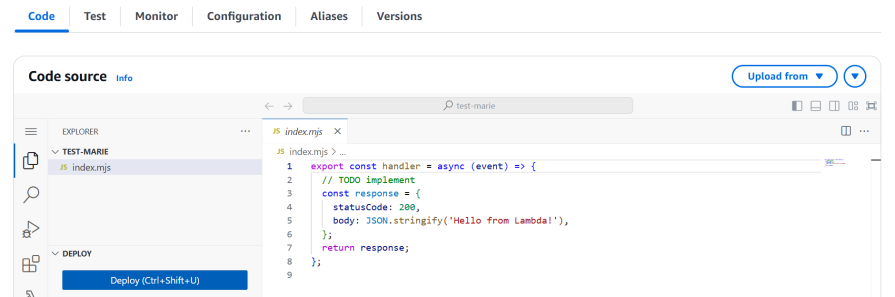
Once created, you will be taken to your Lambda details page to upload and edit your code:
You can also test your Lambda to make sure your function is working as intended. You can see your Lambda’s execution thanks to the CloudWatch logs. Go to Monitor and click on View CloudWatch Logs. This will bring you to a page with all the log groups. Logs are grouped by timestamps.
CloudWatch logs are also region-specific, so if you don’t find a group corresponding to the timestamp you are looking for, make sure you are in the right region.
Finally, to make your lambda accessible to the internet, you will need an API Gateway. This AWS service allows you to create a REST API with endpoints callable with an HTTP request. API Gateway is also region-specific, which means you will have different URLs and, more specifically, API Keys.
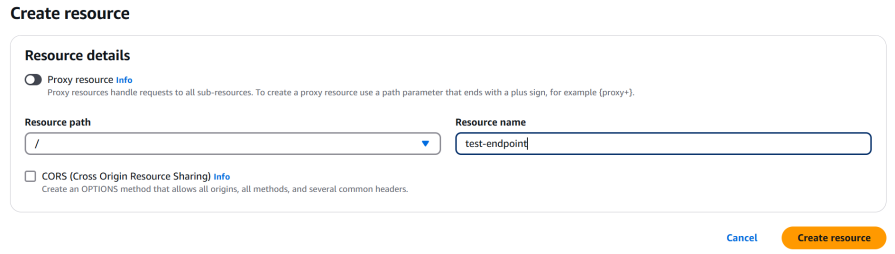
Create an API Gateway by giving it a name. Once done, you can create API endpoints called resources inside your gateway:
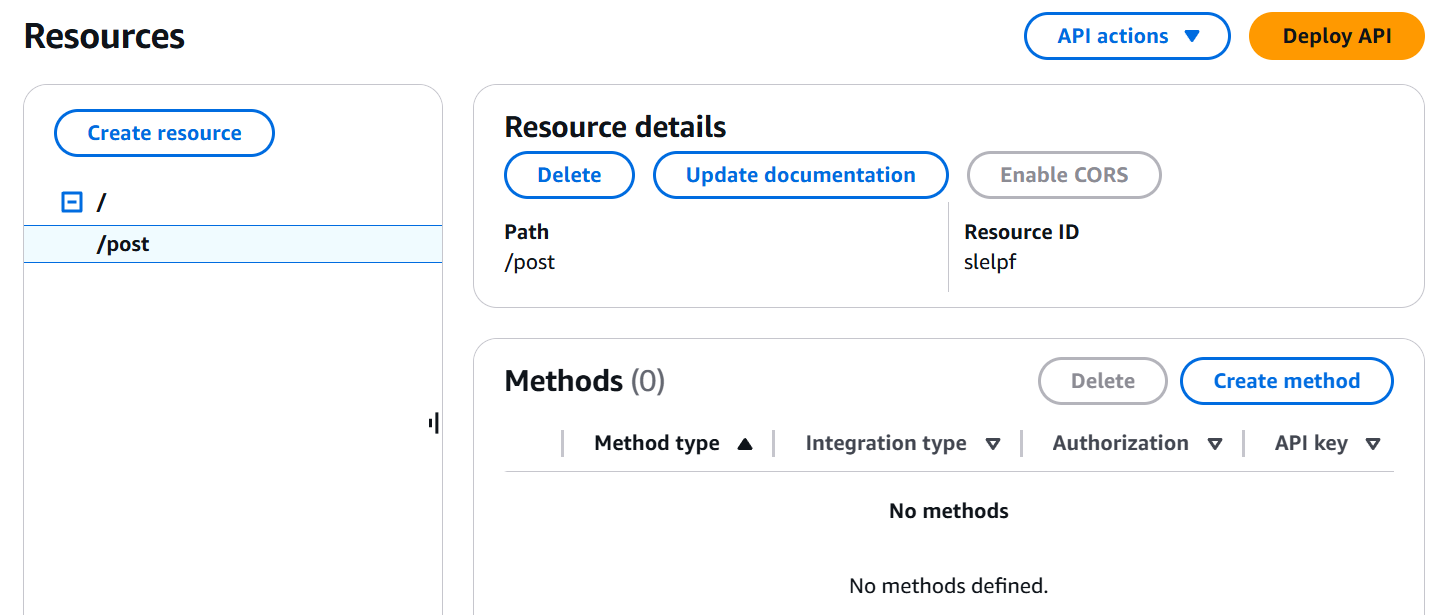
Once the resource has been created, it will appear in your list. You can then click on it and start creating methods (i.e., GET, POST, …):
Click on Create method, and in this form, you can fill out the form and specify the lambda function you created previously.
When done, you can head to API Settings and grab the Default endpoint, aka the URL from which your REST API is accessible. Use a tool like Postman to test whether your API works correctly.
As an option, you can go a step further and add some protection for your REST API with an API Key. In AWS, API keys are typically attached to usage plans. These plans allow you to set quotas and throttles to prevent DDoS attacks or users abusing your API, which would result in extra costs for you. Here is the documentation detailing usage plans and API Keys.
Once your lambdas and API Gateways are created, you can go into your frontend and change the configuration to make sure it hits the correct region.
For clarity, I suggest splitting your .env file by region. Meaning, you will have a .env.us-east-1 and a .env.eu-central-1 with their specific configurations:
REACT_APP_CURRENT_REGION=<region>
REACT_APP_API_URL=<api_gateway_url>
REACT_APP_API_KEY=<api_gateway_api_key>
Then, in your build process, grab the correct env file depending on the region being built so that when your JS is compiled, it uses the correct API_URL.
In this article, every step you read was done manually. However, AWS developed a software development framework called Cloud Development Kit, or CDK. This framework allows you to create and manage cloud resources through code.
You can integrate your CDK code with your pipeline and automate your cloud deployment process. This framework is helpful in multi-region deployment, as the larger your infrastructure grows, the harder it will be to maintain manually.
Automating your infrastructure maintenance reduces potential human errors and helps with consistency.
You now understand how to create a multi-region web application with AWS. By combining S3, CloudFront, and Route 53 for the frontend, and Lambda and API Gateway for the backend, you can:
Multi-region setups are essential for global businesses. With the optional use of CDK, managing this complexity becomes much more scalable and maintainable.

Learn how to use Skybridge, an open-source React framework, to build and deploy cross-platform AI apps and interactive UI widgets for ChatGPT, Claude, and MCP clients from a single codebase.

Learn how to set up Meilisearch, index documents, and build keyword, semantic, and hybrid search with AI-powered retrieval.

Compare pnpm and npm across security defaults, disk usage, dependency strictness, and workspace policy to decide which package manager fits your project.

I migrated 20 production-style components from Tailwind to StyleX. Here’s what the data showed about LOC, CSS bundle size, build time, and type safety.
Would you be interested in joining LogRocket's developer community?
Join LogRocket’s Content Advisory Board. You’ll help inform the type of content we create and get access to exclusive meetups, social accreditation, and swag.
Sign up now

