The Replay is a weekly newsletter for dev and engineering leaders.
Delivered once a week, it's your curated guide to the most important conversations around frontend dev, emerging AI tools, and the state of modern software.
Understanding how mouse input works is one of the most fundamental tools in every Unity developer’s skill set. Not only is the mouse used for interacting with 2D UI elements, such as buttons, sliders and checkboxes, it’s also very common to use it to interact with 3D game objects inside the game scene, or, for example, to display an informative UI tooltip next to the mouse cursor.

We also often need to do a coordinate system conversion in which we convert the mouse position into a world space position — essentially, converting a 2D screen coordinate into a 3D coordinate somewhere inside the game scene. By doing this, we can use the resulting 3D coordinate to select or highlight game objects in the 3D space, or instantiate some nice dust particles when the player clicks on a terrain to provide some nice juicy feedback.
In this article, we’ll take a look at three different ways for using mouse movement as an input in Unity. We’ll start by looking at the legacy input system and then familiarize ourselves with the new input system and input actions. We’ll be focusing only on the solutions provided by Unity and won’t cover any third-party plugins.
Here’s what we’ll cover by section:
Let’s now jump into Unity and see how we can start detecting the mouse input.
When we create a new Unity project, the legacy input module is enabled by default. We can access the module from UnityEngine.Input; for reading the current mouse position, we can call Input.mousePosition.
When reading the mouse position in Unity, we deal with pixel coordinates (often referred to as screen points or screen space positions). The pixel coordinates of the bottom left corner of the application window are 0,0 and the coordinates of the top-right corner are the same as the pixel dimensions of the window. To get the pixel dimensions of the active window, we can use Screen.width and Screen.Height.
private void Update()
{
Vector3 mousePosition = Input.mousePosition
}
Calling Input.mousePosition returns us the current position as Vector3. Note that the z component of the returned value is always 0.
If the application is running in windowed mode, we can tell whether the cursor is outside the screen boundary if the x or y of the position is either smaller than zero, or greater than the dimensions of the active window.
To detect the mouse button states we can use Input.GetMouseButton, Input.GetMouseButtonDown and Input.GetMouseButtonUp. We have to provide a mouse button value as an argument for the method. In the legacy input module, the value of the left mouse button is 0, right button is 1, and the middle button is 2.
private void Update()
{
// Check if the user is holding down the left mouse button on this frame.
if (Input.GetMouseButton(0))
{
}
// Check if the user pressed the right mouse button down on this frame.
if (Input.GetMouseButtonDown(1))
{
}
// Check if the user released the middle mouse button on this frame.
if (Input.GetMouseButtonUp(2))
{
}
}
Besides mouse button presses, we can also read the state of the mouse’s scroll wheel by using Input.mouseScrollDelta. This gives us the current mouse’s scroll wheel state on the current frame. The returned value is a type of Vector2, where the y component represents the scroll direction. A positive is value up, and a negative is down; the x component is always 0.
private void Update()

{

// Check if the user is scrolling the mouse wheel up.

if (Input.mouseScrollDelta.y > 0)

{

}

}
You can learn more about the legacy input module from Unity’s own documentation.
The input system, often referred to as “the new input system”, is Unity’s more recent approach to input handling. Compared to the legacy input module, it offers a more modern way for configuring, reading, and debugging inputs.
To start using the new input system, we first need to install it using Unity’s package manager. You can find it from the Unity Registry under the name “Input System”.
During the installation, Unity will ask whether you want to disable the legacy input module APIs and enable the backends for the new input system. After enabling the new backends, Unity will restart.
It’s possible to have both the legacy input module and the new input system active at the same time by going to the project settings and setting the active input handling to Both. This is especially useful when converting an existing project to use the new input system.
Reading the mouse position using the new input system has a slightly different syntax, but it’s still as straightforward as using the legacy input module. The biggest difference is that the returned value is a Vector2. We can read the current position as follows:
private void Update()
{
Vector2 mousePosition = Mouse.current.position.ReadValue();
}
The syntax for reading the mouse button states has changed as well.
private void Update()
{
// Check if the user is holding down the left mouse button on this frame.
if (Mouse.current.leftButton.isPressed)
{
}
// Check if the user pressed the right mouse button down on this frame.
if (Mouse.current.rightButton.wasPressedThisFrame)
{
}
// Check if the user released the middle mouse button on this frame.
if (Mouse.current.middleButton.wasReleasedThisFrame)
{
}
}
private void Update()
{
// Check if the user is scrolling the mouse wheel up.
if (Mouse.current.scroll.ReadValue().y > 0)
{
}
}
Reading the input directly from the device is quick and convenient, but this approach can become a cause of headaches, especially if we want to add in support for multiple input devices, such as for touch, a pen or stylus, or anything else that would act as a pointer and could potentially replace the mouse.
So, instead of directly accessing the device, we can use input actions. With input actions, we can bind multiple input devices to a single action, for example a “click” action could be invoked by both a mouse click and a gamepad button press.
The input action definitions are contained within action maps, which are inside an input action asset. Let’s take a look at how we can create the input action asset and then read the mouse input using input actions.
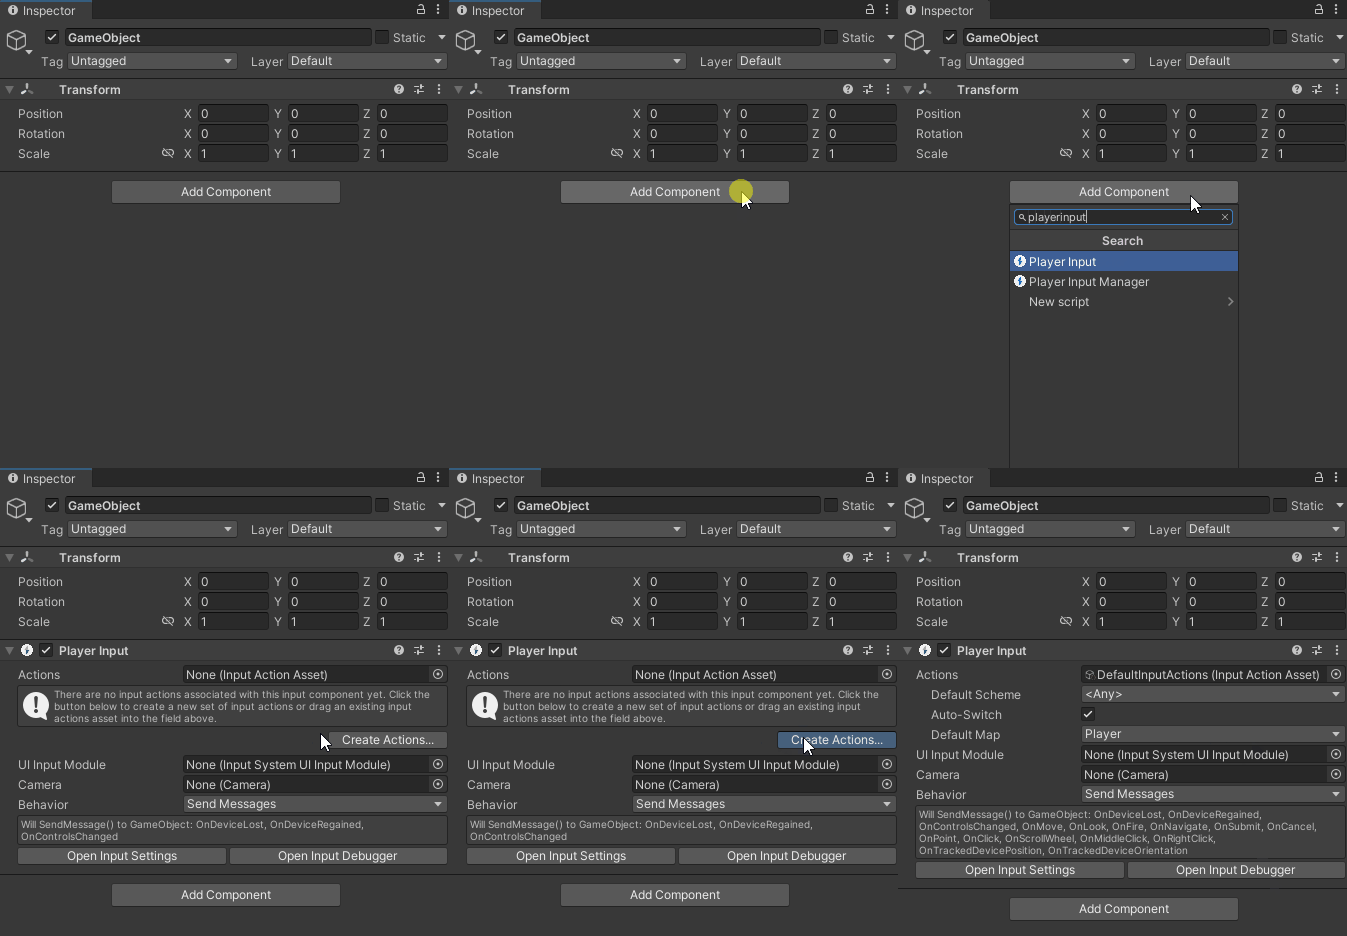
To begin, let’s create a new game object and add a PlayerInput component to it. Now, with the game object selected, click the Create Actions… button on the PlayerInput component.

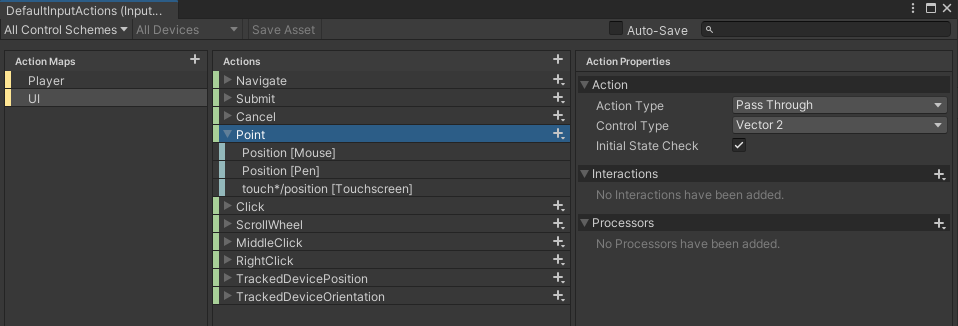
Doing this will create a new input action asset with some useful presets. The presets contain two action maps, Player and UI, and these maps contain a few basic input actions. The mouse inputs can be accessed through the UI action map. For the following example, we’ll be using the Point input action for reading mouse position.
You can also create an empty input actions asset by right-clicking the project folder and selecting Create/Input Actions. For the remainder of this article, we’ll stick with the presets, since they provide us with some very useful examples.

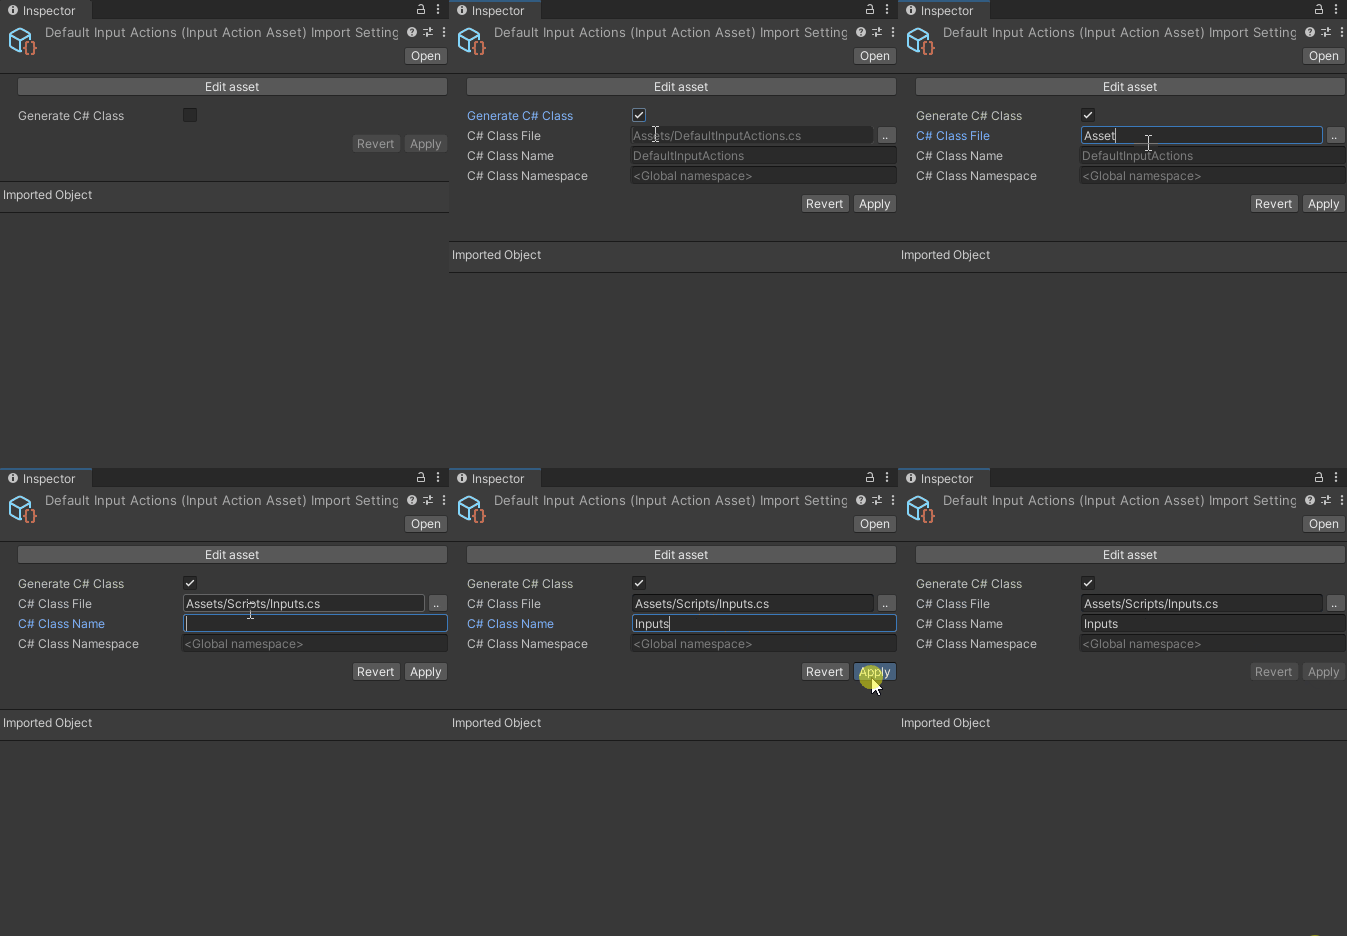
Before we jump into the code, let’s select the newly created input action asset in Unity’s project view and check the Generate C# Class checkbox. Click Apply. Doing this will generate a C# class that contains the contents of our input actions asset (the action maps and all of our input actions).
Code generation provides us a quick way to easily access the input actions directly from our IDE with fully working code completion. You can change the generated class name, its namespace, and the file path to your liking. For the following example, I named my class Inputs.

Now, let’s see an example of how we can read the mouse position using an input action. Create a class called MouseInput and attach it to a new game object. Then add in the following:
public class MouseInput : MonoBehavior
{
private Inputs _inputs;
private void Start()
{
_inputs = new Inputs();
_inputs.UI.Enable();
}
private void Update()
{
var mousePosition = _inputs.UI.Point.ReadValue<Vector2>();
}
}
Let’s go through what’s happening in our MouseInput class. In the Start method, we create a new instance of the Inputs class. Next, to be able to read the mouse position value from the Point input action, we’ll need to enable the action map to which it belongs.
The Point input action belongs to the UI action map, so we’ll call UI.Enable() to enable it. Now we can use _inputs.UI.Point.ReadValue<Vector2>() to read the mouse position from the update loop.
The presets also provide us input actions for detecting the mouse button states.
private void Update()
{
// Check if the user is holding down the left mouse button on this frame.
if (_inputs.UI.Click.IsPressed())
{
}
// Check if the user pressed the right mouse button down on this frame.
if (_inputs.UI.RightClick.WasPressedThisFrame())
{
}
// Check if the user released the middle mouse button on this frame.
if (_inputs.UI.MiddleClick.WasReleasedThisFrame())
{
}
}
private void Update()
{
// Check if the user is scrolling the mouse wheel up.
if (_inputs.UI.ScrollWheel.ReadValue<Vector2>().y > 0)
{
}
}
To learn more about the new input system, you can refer to Unity’s own documentation.
Whether it’s the input system, the rendering pipeline, or the networking solution, newcomers to Unity’s ecosystem can be overwhelmed by the multitude of available solutions. Choosing the right approach for your project is not always straightforward, and changing a core system at a later stage of development can be very costly for your team.
When it comes to input, the legacy input module is still a valid approach for many projects, but the current version of the new input system, v1.3.0, offers far better APIs and debugging tools, not to mention the input action system. What it still lacks is the amount of content created by Unity community members, like tutorials and useful forum posts, but the available information is growing all the time.
If your goal is to include support for many different input devices, it would make more sense to use the new input system, as this is supported out-of-the-box by its input actions. For less complex projects, especially the ones targeting only mobile and PC with mouse and touch input, it’s perfectly fine to stick with the legacy input module.
Install LogRocket via npm or script tag. LogRocket.init() must be called client-side, not
server-side
$ npm i --save logrocket

// Code:

import LogRocket from 'logrocket';
LogRocket.init('app/id');
// Add to your HTML:

<script src="https://cdn.lr-ingest.com/LogRocket.min.js"></script>
<script>window.LogRocket && window.LogRocket.init('app/id');</script>

Broken npm packages often fail due to small packaging mistakes. This guide shows how to use Publint to validate exports, entry points, and module formats before publishing.

Discover what’s new in The Replay, LogRocket’s newsletter for dev and engineering leaders, in the February 11th issue.

Cut React LCP from 28s to ~1s with a four-phase framework covering bundle analysis, React optimizations, SSR, and asset/image tuning.

Rich Harris (creator of Svelte) joined PodRocket this week to unpack his Performance Now talk, Fine Grained Everything.
Would you be interested in joining LogRocket's developer community?
Join LogRocket’s Content Advisory Board. You’ll help inform the type of content we create and get access to exclusive meetups, social accreditation, and swag.
Sign up now