Laravel Livewire is a full-stack Laravel framework for building dynamic interfaces. In the not-so-distant past, to build an app with Laravel, you either had to:

But now, we have a third option: Livewire. I’d have loved to go in depth on pros and cons of options 1 and 2 above, but that has already been done justice in this well-written post here.
In this article, we will be diving deep into Livewire and seeing how it can be applied in real-world applications.
We will build a simple blogging app with the following features:
The Replay is a weekly newsletter for dev and engineering leaders.
Delivered once a week, it's your curated guide to the most important conversations around frontend dev, emerging AI tools, and the state of modern software.
This tutorial assumes you are fairly experienced with Laravel (note that this tutorial uses Laravel 7.x). No prior experience with Livewire is required — I think that’s why we’re here anyways.
Of course, to begin, we have to have our development environment set up. First, create a new Laravel app:
composer create-project --prefer-dist laravel/laravel:^7.0 blog-wire
Then install the Livewire package with composer:
composer require livewire/livewire
Create a new database and add your database credentials to the .env file. And that’s all we need to get started “Livewiring”!
Before we begin, it’s good to have an idea how Livewire does its thing. To put it summarily:
As you can see, it’s like having your frontend and backend in one place, with no need to repeat logic.
To get Livewire working on a page, you need to include the Livewire styles and scripts on each page that need them. Usually, these would go into your base template. You’d do that using @livewireStyles and @livewireScripts:
//app.blade.php
<!DOCTYPE html>
<html lang="en">
<head>
    <meta charset="UTF-8">
    <meta name="viewport" content="width=device-width, initial-scale=1.0">
    <meta http-equiv="X-UA-Compatible" content="ie=edge">
    <title>@yield('title')</title>
    @livewireStyles
</head>
<body>
    @yield('content')
    @livewireScripts
</body>
</html>
Livewire does all of its goodness around its components. Livewire components are quite similar to typical Laravel Blade class-based components. Let’s take a quick look at the two.
You’d create a Laravel Blade component by running the following command:
php artisan make:component Alert
This will create a new Alert.php class file and place it in the App\Views\Components folder. Then, a corresponding view template is created and placed in resources/views/components. To display the component, you can then use this Blade syntax: <x-alert/>.
You can further explore Laravel Blade components in the documentation.
To create a Livewire component, run the following command:
php artisan make:livewire Alert
The command will also create two new files: app\Http\Livewire\Alert.php and a view template resources/views/livewire/alert.php.
You can render a Livewire component using either <livewire:alert /> or @livewire('alert').
As you can see, the commands look quite similar. The only major difference is that with Livewire components, there’s a real-time sync (no page refresh required) between the component class and its view template. We will see how this works shortly.
Public properties on your component classes are made available to the component template view. It doesn’t stop there — the value of the property is synchronized in real time to the view, such that when you update the value of the property in the view, it is automatically updated in the component class.
//App\Http\Livewire\Alert.php
<?php
class Alert extends Component{
  public $message = "Our alert message";
}

// livewire/alert.blade.php
<div>
  <input wire:model="message">
  <br/>
  {{ $message }}
</div>
To bind a component property to an html input element, you’d use the following sytax:
wire:model="property name"
By typing into the input box, you will see the value of $message updating in real time. This is very similar to the concept of data binding in frameworks like Vue.js, React, and Angular. Learn more about Livewire properties here.
Just as you can bind data in the view template to public properties of components, you can also map client-side events to methods in your components. For example, you can respond to click events, keyup and keydown events, etc. using methods defined in your component class.
Let’s look at an example:
<?php

use Livewire\Component;
class PostAlert extends Component{
  public $liked = true;
  public function render(){
    return view('livewire.post-alert');
  }

  public function toggleLike(){
    $this->liked = !$this->liked;
  }
}


// livewire/post-alert.blade.php
<div>
    <h4>Seeing livewire action in action 😜</h4>
    <button class="btn btn-primary" wire:click="toggleLike()">
        Like
    </button>
    @if ($liked)
        <i class="fa fa-heart text-danger h4"></i>
    @else
        <i class="fa fa-heart text-secondary h4"></i>
    @endif
</div>
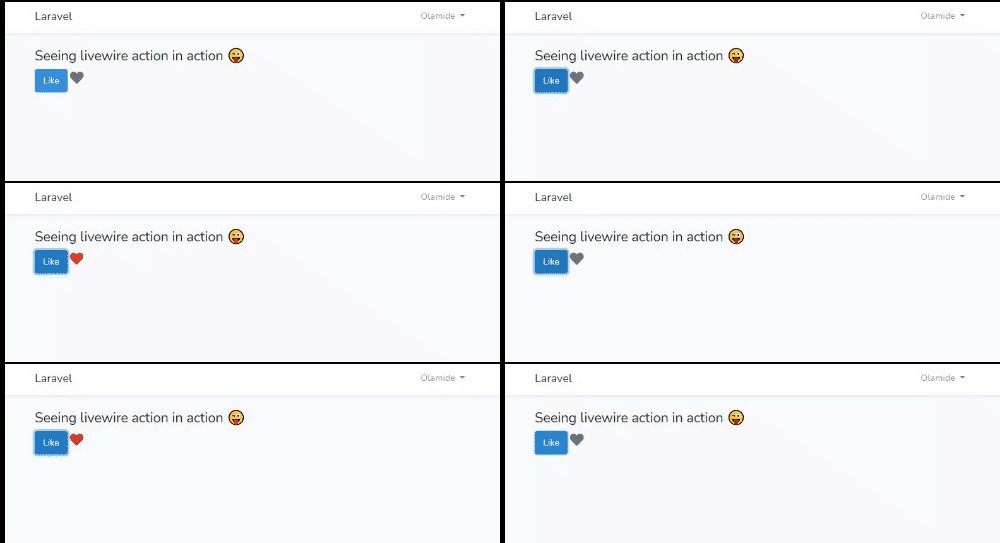
In the component class above, we created a method toggleLike() that toggles the value of the liked property to its opposite Boolean value. In the template view, we have a button and a heart icon that is either colored red or gray based on the value of the liked property.
We used the wire:click=[action name] syntax to bind the toggleLike method to the click event.

A lot Livewire’s use cases revolve around properties and actions, and as such, they are very important to understand. These concepts can be applied to things like create form, edit form, delete form, etc. Read more about Livewire actions here.
Livewire makes data validation seamless. To validate data coming from a form template view, you’d write a $rules property that contains your validation rules, just as you would in Laravel. Thereafter, you call the $this→validate() in the method doing the validation.
Let’s look at a form for creating a blog post:
...
class CreatePost extends Component
{
    public $title, $body;
    public $success;
    protected $rules = [
        'title' => 'required|string|max:220',
        'body' => 'required'
    ];

    public function render()
    {
        return view('livewire.create-post')
            ->extends('layouts.app')
            ->section('content');
    }
    public function create(){
        $this->validate();
        Post::create([
            'title' => $this->title,
            'slug' => Str::slug($this->title),
            'body' => $this->body,
            'author_id' => auth()->id()
        ]);

        $this->success = true;
    }
}


// livewire/create-post
<div class="container">
    @if ($success)
        <div class="alert alert-success">
            Post has been created successfully
        </div>
    @endif
    <form wire:submit.prevent="create">
        <div class="form-group">
            <label for="Post title">Post title</label>
            <input wire:model="title" type="text" name="title" id="title" class="form-control" placeholder="Title of the post">
            @error('title') <span class="error">{{ $message }}</span> @enderror
        </div>
        <div class="form-group">
            <label for="Post body">Post Body</label>
            <textarea name="body" id="body" placeholder="Body of post here..." wire:model="body" class="form-control"></textarea>
            @error('body') <span class="error">{{ $message }}</span> @enderror
        </div>
        <div>
            <button class="btn btn-primary" type="submit">Publish</button>
        </div>
    </form>
</div>
In the form code above, when the user submits the post, and it doesn’t pass the validation, the validation errors are displayed, all without a page refresh.
Enough said — let’s get to action. You can follow along in the GitHub repo as we build our demo app.
Since we want signed-in users to be able to manage their own posts, they have to create an account first. We’ll use Laravel’s built-in authentication system for this.
First, install the laravel/ui composer package:
composer require laravel/ui
Then run php artisan ui vue --auth to scaffold the entire authentication system, followed by php artisan migrate to do your DB migrations.
N.B., most of the things we used to do with controllers will now be done using Livewire components.
Let’s go on to create the model needed for our blog posts app, App\Post:
<?php
namespace App;
use Illuminate\Database\Eloquent\Model;
use Illuminate\Database\Eloquent\SoftDeletes;
class Post extends Model
{
    use SoftDeletes;

    protected $guarded = [];
    public function author(){
        return $this->belongsTo(User::class, 'author_id', 'id');
    }
}
Now we’ll create our migration file,
php artisan make:migration create_posts_table--table=posts:
Schema::create('posts', function (Blueprint $table) {
            $table->id();
            $table->string('title');
            $table->string('slug')->unique();
            $table->longText('body');
            $table->integer('author_id');
            $table->timestamps();
            $table->softDeletes();
});
We will be creating a component for each blog action we want, i.e., create post, edit post, list posts, and view post. Let’s go ahead and create the components:
php artisan make:livewire CreatePostphp artisan make:livewire EditPostphp artisan make:livewire ListPostphp artisan make:livewire HomePostphp artisan make:livewire ReadPostWe can render a Livewire component directly from routes like this:
Route::get('/posts/create', [\App\Http\Livewire\CreatePost::class, '__invoke'])->middleware('auth');
Instead of calling controller actions, we will be routing to the Livewire components, as shown above. Let’s now add all the routes we’ll need in web.php:
Route::get('/', function () {
    return view('index');
});
Auth::routes();
Route::get('/post/{slug}', [\App\Http\Livewire\ReadPost::class, '__invoke']);
Route::get('/home', 'HomeController@index')->name('home');
Route::get('/posts/create', [\App\Http\Livewire\CreatePost::class, '__invoke'])->middleware('auth');
Route::get('/posts/{id}/edit', [\App\Http\Livewire\EditPost::class, '__invoke'])->middleware('auth');
The component to render the list of articles will look like this:
//ListPost.php
<?php
namespace App\Http\Livewire;
use Livewire\Component;
class ListPost extends Component
{
    public function render()
    {
        $posts = \App\Post::latest()->paginate(20);
        return view('livewire.list-post', ['posts' => $posts])
            ->extends('layouts.app')
            ->section('content');
    }
}


//livewire/list-post.blade.php
<div>
    <h4>My Posts <a href="{{ url('posts/create') }}" class="btn btn-primary"><i class="fa fa-plus"></i> Add new</a></h4>
    <ul class="list-group list-group-flush">
        @forelse ($posts as $post)
            <li class="list-group-item">

                <div class="float-right">
                    <a href='{{ url("posts/{$post->id}/edit") }}' class="btn btn-primary"><i class="fa fa-edit"></i> Edit</a>
                </div>
                <div>
                    <h5>{{ $post->title }}</h5>
                    <p>{!! substr(strip_tags($post->body), 0, 200) !!}</p>
                    <small class="text-muted">Published {{ $post->created_at }}</small>
                </div>

            </li>
        @empty
            <li>You have not written any posts yet, write one now</li>
        @endforelse

    </ul>
</div>
Then, to create a post, we will use this:
//CreatePost.php
<?php
namespace App\Http\Livewire;
use App\Post;
use Livewire\Component;
use Illuminate\Support\Str;
class CreatePost extends Component
{
    public $title, $body;
    public $success;
    protected $rules = [
        'title' => 'required|string|max:220',
        'body' => 'required'
    ];

    public function render()
    {
        return view('livewire.create-post')
            ->extends('layouts.app')
            ->section('content');
    }
    public function create(){
        $this->validate();
        Post::create([
            'title' => $this->title,
            'slug' => Str::slug($this->title),
            'body' => $this->body,
            'author_id' => auth()->id()
        ]);

        $this->success = true;
    }
}
In the above component, we create public variables to hold the title and body content of a blog post, as well as a success variable to indicate whether post creation is successful.
In the render() method, Livewire allows us to specify the layout file to use in rendering the component and the section where we want it displayed via the extends() and section() methods, respectively.
Now the template view looks like this:
<div class="container">
@if ($success)
<div>
<div class="alert alert-success">
Post has been created successfully. <a href="{{ url('/home') }}">View all posts</a>
</div>
</div>
@endif
<form wire:submit.prevent="create">
<div class="form-group">
<label for="Post title">Post title</label>
<input wire:model="title" type="text" name="title" id="title" class="form-control" placeholder="Title of the post">
@error('title') <span class="error">{{ $message }}</span> @enderror
</div>
<div class="form-group">
<label for="Post body">Post Body</label>
<textarea name="body" id="body" placeholder="Body of post here..." wire:model="body" class="form-control"></textarea>
@error('body') <span class="error">{{ $message }}</span> @enderror
</div>
<div>
<button class="btn btn-primary" type="submit">Publish</button>
</div>
</form>
</div>
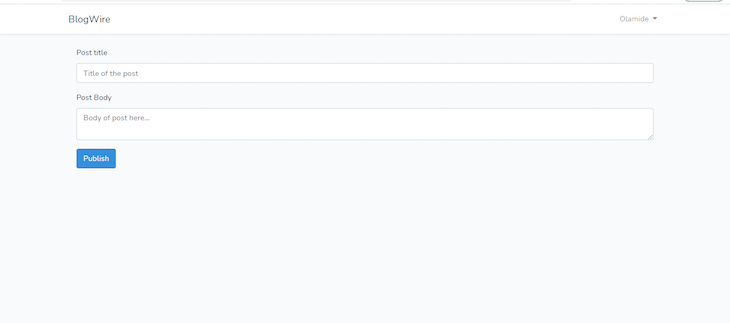
If you navigate your browser to /posts/create, you should see the creation form displayed:

This is a fairly basic example of how Livewire can be applied in the real world.
Livewire bridges the gap between backend and frontend. You get the benefit of real-time interactivity without having to write a lot of JavaScript by yourself. If you’ve used Vue.js before, it is very easy to see Livewire’s benefits.
Livewire isn’t a great choice for apps that are heavily demanding on the client side. But in situations where you want a server-rendered app with a sprinkle of reactivity, Livewire will serve you well.
Again, the app we built in this tutorial can be found on GitHub.
Install LogRocket via npm or script tag. LogRocket.init() must be called client-side, not
server-side
$ npm i --save logrocket

// Code:

import LogRocket from 'logrocket';
LogRocket.init('app/id');
// Add to your HTML:

<script src="https://cdn.lr-ingest.com/LogRocket.min.js"></script>
<script>window.LogRocket && window.LogRocket.init('app/id');</script>

React Server Components and the Next.js App Router enable streaming and smaller client bundles, but only when used correctly. This article explores six common mistakes that block streaming, bloat hydration, and create stale UI in production.

Gil Fink (SparXis CEO) joins PodRocket to break down today’s most common web rendering patterns: SSR, CSR, static rednering, and islands/resumability.

@container scroll-state: Replace JS scroll listeners nowCSS @container scroll-state lets you build sticky headers, snapping carousels, and scroll indicators without JavaScript. Here’s how to replace scroll listeners with clean, declarative state queries.

Explore 10 Web APIs that replace common JavaScript libraries and reduce npm dependencies, bundle size, and performance overhead.
Would you be interested in joining LogRocket's developer community?
Join LogRocket’s Content Advisory Board. You’ll help inform the type of content we create and get access to exclusive meetups, social accreditation, and swag.
Sign up now
One Reply to "Deep dive into Laravel Livewire"
Hi there.
Github repository is empty. I want to learn what you are wroted there. Please, help.