When building a modern application in today’s development environment, one needs to take into account things like performance, memory leaks, speed of rendering, and more.

Data binding is an advanced topic that enables developers to prevent slow rendering in Android applications. Some advantages of using data binding include preventing memory leaks or nullPointerException, reducing findByViewId calls, and creating declarative layouts, among other things.
In this tutorial, we‘ll cover the following:
findViewById methodTo follow along with this article, you’ll need the following:
The Replay is a weekly newsletter for dev and engineering leaders.
Delivered once a week, it's your curated guide to the most important conversations around frontend dev, emerging AI tools, and the state of modern software.
Data binding is an advanced approach adopted in Android application development to access views in a type safe and null safe approach. It is a process that involves coupling two data sources together and synchronizing them, and it helps eliminate the need for DOM manipulation in your application.
Data binding can be simple or complex depending on the number of data elements involved. According to Microsoft, a simple data binding can bind a single data element, while a complex data binding binds multiple data elements. With data binding, a change made to one element in a data set automatically updates the rest of the data set.
Data binding helps to simplify the representation of data in the elements of a webpage without the need for a complicated programming process. Data binding is usually employed in application development to link an application’s UI and the data it displays. In this context, there is a datasource, a data provider, and other data sets, which are the data consumer.
There are several types of data binding. For example, in one-way binding, the changes made to the data provider is passed on to data consumers but not vice-versa. It only permits one directional change. On the other hand, in one-way-to-source binding, the changes made to data consumer are passed on to the data source, but not vice-versa.
In two-way binding, the changes made to the data consumer or data provider can be adopted by the entire system and automatically update the data set. Finally, in one-time binding, the changes made to the data provider are not automatically reflected on the data consumer. This procedure is mainly adopted for static data or when only a snapshot of data is needed.
Next, we‘ll cover how to set up an environment to enable data binding in an Android application.
First, we‘ll have to set up our development environment to be able to work with the data binding library. To do so, you can go ahead and configure your app by enabling the data binding build option in your build.gradle file, as shown in the code snippet below:
android{
      ...
      buildFeatures{
       dataBinding true
    }
}
Android Studio offers great support for many of the editable features of data binding code, like XML code completion, syntax highlighting, and language syntax error notifications. You can click on this repo for some data binding code samples:

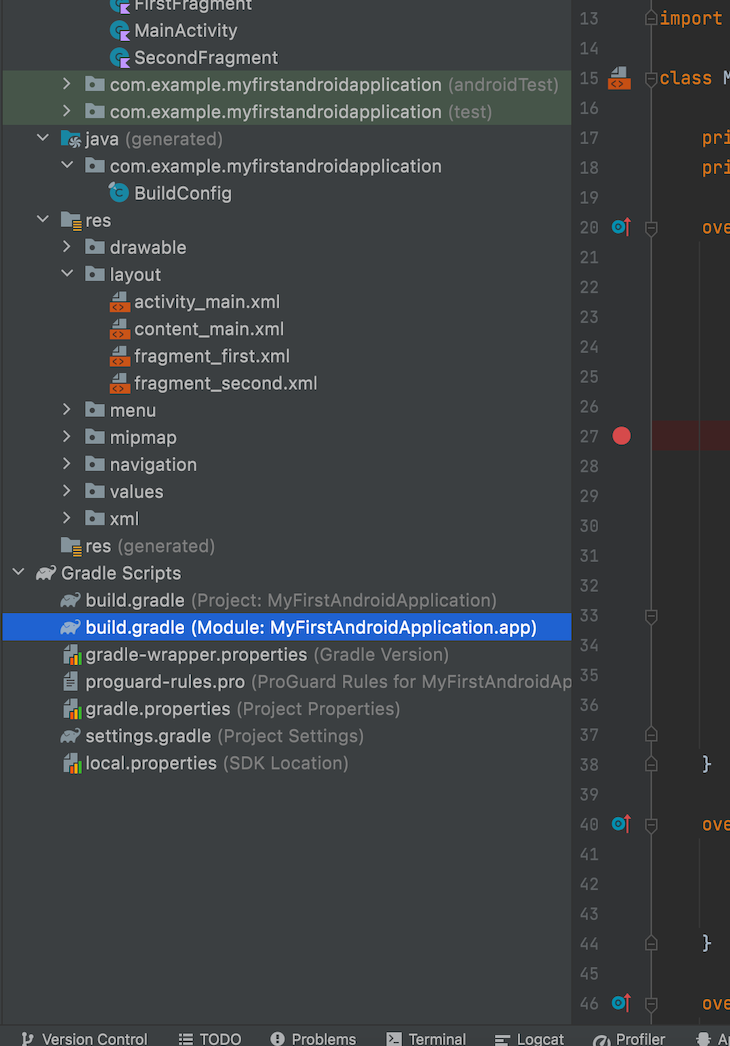
To enable data binding, we navigate to the Gradle Scripts section of Android Studio IDE and click on build.gradle, which is inside the app module. We can enable dataBinding inside it using the code snippet below:
plugins {
    id 'com.android.application'
    id 'org.jetbrains.kotlin.android'
}

android {
    compileSdk 32

    defaultConfig {
        applicationId "com.example.myfirstandroidapplication"
        minSdk 21
        targetSdk 32
        versionCode 1
        versionName "1.0"

        testInstrumentationRunner "androidx.test.runner.AndroidJUnitRunner"
    }

    buildTypes {
        release {
            minifyEnabled false
            proguardFiles getDefaultProguardFile('proguard-android-optimize.txt'), 'proguard-rules.pro'
        }
    }
    compileOptions {
        sourceCompatibility JavaVersion.VERSION_1_8
        targetCompatibility JavaVersion.VERSION_1_8
    }
    kotlinOptions {
        jvmTarget = '1.8'
    }
    buildFeatures {
        dataBinding true
    }
}

dependencies {

    implementation 'androidx.core:core-ktx:1.7.0'
    implementation 'androidx.appcompat:appcompat:1.3.0'
    implementation 'com.google.android.material:material:1.5.0-alpha04'
    implementation 'androidx.constraintlayout:constraintlayout:2.0.4'
    implementation 'androidx.navigation:navigation-fragment-ktx:2.3.5'
    implementation 'androidx.navigation:navigation-ui-ktx:2.3.5'
    testImplementation 'junit:junit:4.13.2'
    androidTestImplementation 'androidx.test.ext:junit:1.1.3'
    androidTestImplementation 'androidx.test.espresso:espresso-core:3.4.0'
}
We may also decide to use the command below:
dataBinding {
   enabled = true
}
The data binding approach is more efficient than view binding, which involves traversing through the view hierarchy to find the view after it has been created or recreated at runtime. For a large view hierarchy, this could take a long time, potentially slowing down the user’s view and affecting the UX poorly.
To fix this, data binding allows the layout to connect to an activity or fragment at compile time. This compiler generates a helper class called a binding class. We’ll discuss this further in the next section.
The data binding helper class comes in handy for large Android projects with large layouts. The helper class enables us to access the view without any extra overhead. In the next section, we’ll demonstrate the required steps to add data binding to the PersonalInfo class in an Android application.
findByViewId methodEarlier in Android’s lifetime, developers had to go through a very costly operation known as viewBinding, which involves traversing the view hierarchy, resulting in development time challenges.
The idea behind data binding is to create objects that bind two distant pieces of information together at compile time to make them available at runtime, so you don’t have to search for them. This object is created by the compiler and is called the binding object.
Data binding seeks to eliminate the findViewById code snippet, like we have below:
findViewById(R.id.age).apply {
text = viewModel.age
}
A more efficient approach is to use dataBinding, like in the code snippet below:
dataBinding {
  enabled = true
}
After dataBinding has been enabled in an application’s build.gradle file, like in the previous section, we can implement dataBinding.
First, be sure to wrap all views in the activity_main.xml and namespace declarations into a <layout> tag. Then, create a binding object in the main activity using the following code snippet:
private lateinit var binding: ActivityMainBinding
Next, use the DataBindingUtil to set the content view in onCreate:
binding = DataBindingUtil.setContentView(this, R.layout.activity_main)
Replace all calls to findViewById with binding object:
binding.doneButton.setOnClickListener
Create a data class for the set of data you intend to display. We‘ll create a class titled PersonalInfo:
data class PersonalInfo(var name: String = "", var age: String = "")
Next, we can add a <data> block to activity_main.xml. Add the data block inside the layout tag before the view tag. Inside the data block, add a variable for the PersonalInfo class:
<data>
<!-- Declare a variable by specifying a name and a data type. -->
<!-- Use fully qualified name for the type. -->
<variable
    name="PersonalInfo"
    type="com.example.myfirstandroidapplication.aboutme.PersonalInfo" />
</data>
In name_text, age_edit and age_text, replace the references to string text resources with references to the variables, for example:
android:text="@={PersonalInfo.name}"
In MainActivity, create an instance of PersonalInfo:
Instance of PersonalInfo data class.
private val PersonalInfo: PersonalInfo = PersonalInfo("Elena Allison")
Set binding.personalInfo to onCreate():
binding.personalInfo = personalInfo
In addAge, you can set the value of age in the binding object, which is personaInfo, by calling invalidateAll(). The data should show in your views as follows:
personalInfo?.age = ageEdit.text.toString()
// Invalidate all binding expressions and request a new rebind to refresh UI
invalidateAll()
The ClickHandler helps to ensure that the code in the onButtonClick() method runs whenever the button is triggered or clicked by the user. The code snippet below shows you how to enable the click listener in an Android application:
public interface ClickHandler {
    public void onButtonClick(View v);
}
Next, we‘ll configure our Layout XML with the following code snippet:
<?xml version="1.0" encoding="utf-8"?>
<layout xmlns:android="http://schemas.android.com/apk/res/android">

    <data>
        <variable
            name="handler"
            type="com.example.ClickHandler"/>
    </data>

    <RelativeLayout
        android:layout_width="match_parent"
        android:layout_height="match_parent">

        <Button
            android:layout_width="wrap_content"
            android:layout_height="wrap_content"
            android:text="click me"
            android:onClick="@{handler.onButtonClick}"/>
    </RelativeLayout>
</layout>
After configuring our layout XML, we can go ahead and implement the ClickHandler interface on our MainActivity class using the code snippet below:
public class MainActivity extends Activity implements ClickHandler {

    private ActivityMainBinding binding;
    @Override
    protected void onCreate(Bundle savedInstanceState) {
        super.onCreate(savedInstanceState);
        binding = DataBindingUtil.setContentView(this,R.layout.activity_main);
        binding.setHandler(this);
    }

    @Override
    public void onButtonClick(View v) {
        Toast.makeText(context,"Button clicked",Toast.LENGTH_LONG).show();
    }
}
In this tutorial, we outlined the steps to prevent slow rendering in Android application development through data binding. We started by defining what data binding means and how it helps Android developers to reduce writing boilerplate codes.
As an Android developer, adopting the steps outlined in this article can help to improve performance and user experience in your next Android project. I hope you enjoyed this article, and happy coding!
LogRocket is an Android monitoring solution that helps you reproduce issues instantly, prioritize bugs, and understand performance in your Android apps.
LogRocket's Galileo AI watches sessions for you, instantly identifying and explaining user struggles with automated monitoring of your entire product experience.
LogRocket also helps you increase conversion rates and product usage by showing you exactly how users are interacting with your app. LogRocket's product analytics features surface the reasons why users don't complete a particular flow or don't adopt a new feature.

Start proactively monitoring your Android apps — try LogRocket for free.

Russ Miles, a software development expert and educator, joins the show to unpack why “developer productivity” platforms so often disappoint.

Discover what’s new in The Replay, LogRocket’s newsletter for dev and engineering leaders, in the February 18th issue.

Learn how to recreate Claude Skills–style workflows in GitHub Copilot using custom instruction files and smarter context management.

Claude Code is deceptively capable. Point it at a codebase, describe what you need, and it’ll autonomously navigate files, write […]
Would you be interested in joining LogRocket's developer community?
Join LogRocket’s Content Advisory Board. You’ll help inform the type of content we create and get access to exclusive meetups, social accreditation, and swag.
Sign up now