Over the years, haptic actuators have been included in electronics such as gaming controllers and mobile devices to add a tactile element to their user experience using motion and vibrations.

For example, tactile experiences have been used on mobile devices to complement either audio or visual feedback during activities such as an incoming call, alert, or message.
With the increased development of third-party applications, various mobile operating systems have made the API for their actuators openly available. For example, the UIFeedbackGenerator class is available for iOS developers to create haptic feedback in applications via the Apple Taptic Engine.
As a mobile application developer building with React Native, have you ever wondered how to add haptic feedback to improve the experience of your application?
This tutorial will cover the subject of haptic feedback, its benefits for applications, and how to implement haptic feedback within a React Native application. We will cover:
react-native-haptic-feedback to implement haptics without ExpoThe Replay is a weekly newsletter for dev and engineering leaders.
Delivered once a week, it's your curated guide to the most important conversations around frontend dev, emerging AI tools, and the state of modern software.
To follow along with this article’s hands-on tutorial about adding haptic feedback to a React Native application, you will need to have the following;
Let’s get started.
The concept of haptics has to do with the sense of touch. From a technological context, it is an umbrella term that comprises both haptic feedback and haptic technology.
Haptic technology refers to devices with the ability to stimulate the user’s sense of touch by applying vibration or motion. With haptic technology, haptic feedback is created and felt by the end user through their body’s natural tactile system.
Haptic feedback has a direct impact on user experience, among other areas. Developers use haptic feedback to complement interfaces shown from actions such as a successful login or cart checkout, and this creates an immersive experience for the end user.
Outside of mobile devices, haptic feedback has many benefits and use cases in various industries.
For example, in automobiles, haptic feedback is used in infotainment systems to reduce distractions while driving. Developers of virtual reality applications also apply haptics to recreate the solid feel of virtual objects through the use of ultrasonic speakers.
Let’s proceed to the hands-on section of this tutorial.
In the following sections, we will add haptics to an Expo-managed React Native application using the expo-haptics package. We will also consider how to create haptic feedback using the react-native-haptic-feedback package for applications without Expo.
The React Native application that we will develop in this tutorial is for playing the legendary ancient Egyptian game of tic-tac-toe. Adding support for haptics will enhance the gaming experience by informing the gamer when there is a win, loss, or tie event, and even when a tile within the board is pressed.
Expo is an open source platform for creating cross-platform React Native applications that run on mobile devices and the web. To reduce development time, Expo provides several packages that implement several device APIs.
For haptics, Expo provides the expo-haptics package to allow developers to use the iOS Taptic Engine and Android Vibrator system.
Note that the expo-haptics package does not support React Native applications for the web. Additionally, on iOS, there are a few conditions where the Taptic Engine will be unusable. One of these conditions is when the device has Low Power Mode enabled.
The expo-haptics package has three asynchronous methods for generating haptic feedback:
selectionAsync — for indicating a selection changeimpactAsync — for indicating a new element within the user interface
notificationAsync — for notifying the user about the outcome of a task, event, or actionThe impactAsync and notificationAsync methods accept the ImpactFeedbackStyle and NotificationFeedbackType enums, respectively, to specify the intensity of the feedback to generate.
As we build out the game within the next sections, we will use the selectionAsync()method to generate haptic feedback when a tile within the board is clicked. We will also use the notificationAsync() method when an event happens within the game.
The focus of this article is on implementing haptic feedback within a React Native application. Therefore, while we will cover the steps needed to set up the application, we won’t dive into the code itself in too much detail until we reach our section on haptics.
Using your computer terminal or command prompt, execute the npx command below to create an expo application named tic-tac-toe-haptics via the Expo CLI:
npx create-expo-app tic-tac-toe-haptics
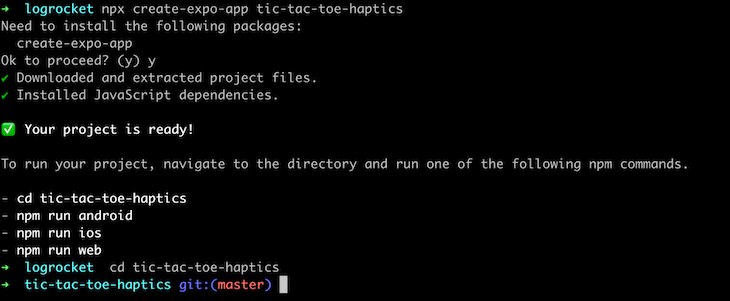
After running the command, you should see the following:
With the boilerplate application generated, the next step is to install the dependencies needed for navigating between multiple screens and using the Haptics API.
Execute the two commands below to move into the tic-tac-toe-haptics directory and install six additional packages into the application:
# change directory
cd tic-tac-toe-haptics

# install dependencies
yarn add @react-navigation/native  @react-navigation/native-stack react-native-safe-area-context expo-haptics

npx expo install react-native-screens react-native-safe-area-context
Using your code editor, open the App.js file and replace the boilerplate content with the code block below. The code below contains the navigation stack for a Home and Game screen within the application:
import { NavigationContainer } from '@react-navigation/native';
import Home from './src/screens/Home';
import { createNativeStackNavigator } from '@react-navigation/native-stack';
import Game from './src/screens/Game';
import { SafeAreaProvider } from 'react-native-safe-area-context';

export default function App() {
 const Stack = createNativeStackNavigator();

 return (
   <SafeAreaProvider>
     <NavigationContainer>
       <Stack.Navigator>
       <Stack.Screen options={{ headerShown: false }} name="Home" component={Home} />
       <Stack.Screen options={{ headerShown: false }} name="Game" component={Game} />
       </Stack.Navigator>
     </NavigationContainer>
   </SafeAreaProvider>
 );
}
The code block above uses two components that do not exist within the application. Let’s proceed to create them.
Create another directory named src within the tic-tac-toe-haptics directory. The src directory will store new files and directories for the screens within the application.
Within the src directory, create a file named utils.js and add the code below into the file to store the extra components, functions, and variables that will be used within the tic-tac-toe game, including the toast notifications displayed for ongoing, won, lost, and tied games:
import { GameScreenStyles as styles  } from './styles'
import { View, Text, TouchableWithoutFeedback } from 'react-native'

const GAME_WINNING_COMBINATIONS = [
   [0, 1, 2],
   [3, 4, 5],
   [6, 7, 8],
   [0, 3, 6],
   [1, 4, 7],
   [2, 5, 8],
   [0, 4, 8],
   [2, 4, 6]
]

const guessNumber = () => Math.floor(Math.random() * 9)

export const findUniqueRandomNumber = (exisitingArr) => {
   let rand = guessNumber();

   for (let i = 0; i < exisitingArr.length; i++) {
       if (exisitingArr[rand]) {
           rand = guessNumber()
       } else {
           return rand
       }
   }
}

export const getWinner = (existingArray) => {
   for (let i = 0; i <= 7; i++) {
       const winCombination = GAME_WINNING_COMBINATIONS[i];

       let a = existingArray[winCombination[0]];
       let b = existingArray[winCombination[1]];
       let c = existingArray[winCombination[2]];

       if (a === b && b === c) {
           return { winningPlayer: a, matchingTiles: [winCombination[0], winCombination[1], winCombination[2]] }
       }
   }
}

export const Toast = ({ eventType }) => (
   <View style={{ alignItems: 'center' }} >
       <View style={[styles.toastContainer, { backgroundColor: eventType === "LOSS" ? "red" : "#5CB85C" }]} >
           {
               eventType === "ONGOING" &&
               <Text style={{ color: "white" }} > Match is ON! </Text>
           }
           {
               eventType === "WIN" &&
               <Text style={{ color: "white" }} > You have WON this round! </Text>
           }
           {
               eventType === "LOSS" &&
               <Text style={{ color: "white" }} > You have been DEFEATED!  </Text>
           }
           {
               eventType === "TIE" &&
               <Text style={{ color: "white" }} > It's a TIE </Text>
           }
       </View>
   </View>
)

export const GameTile = ({ item, handlePress, matchedTile }) => (
   <TouchableWithoutFeedback
       onPress={() => handlePress()}
   >
       <View
           style={[styles.tile, { backgroundColor: matchedTile ? "#5CB85C" : "transparent" }]}
       >
           <Text style={[styles.text, { fontSize: 27 }]} > {item}  </Text>
       </View>
   </TouchableWithoutFeedback>
)
Next, create a styles.js file and add the content of the code block below to create the styles used by components within the application:
import { Dimensions, StyleSheet } from 'react-native'
const { height, width } = Dimensions.get("screen")

export const GameScreenStyles = StyleSheet.create({
   toastContainer: {
       position: "absolute",
       width: 200,
       textAlign: 'center',
       borderBottomLeftRadius: 10,
       borderBottomRightRadius: 10,
       height: 40,
       alignItems: 'center',
       justifyContent: 'center',
   },
   center: {
       height: height - 150,
       alignItems: "center",
       justifyContent: 'center'
   },
   text: {
       textTransform: "uppercase",
       textAlign: "center",
       fontSize: 18
   },
   button: {
       height: 45,
       backgroundColor: "#201238",
       width: width - 50,
       borderRadius: 5,
       justifyContent: "center"
   },
   buttonText: {
       textTransform: "uppercase",
       textAlign: "center",
       color: "#fff"
   },
   tileContainer: {
       height: 300,
       flexWrap: "wrap",

   },
   tile: {
       flex: 1,
       flexGrow: 1,
       flexBasis: 100,
       borderColor: "red",
       borderWidth: 1,
       justifyContent: 'center',
       height: 80,
       width: 80
   }
})


export const HomeScreenStyles = StyleSheet.create({
   underline: {
       height: 5,
       width: 45,
       backgroundColor: "#D8D8D8"
   },
   center: {
       alignItems: "center",
   },
   row: {
       flexDirection: "row",
       justifyContent: "space-between",
       width: width / 2,
   },
   container: {
       height,
       flex: 1,
       justifyContent: 'space-between'
   },
   text: {
       textTransform: "uppercase",
       textAlign: "center",
       fontSize: 18
   },
   button: {
       height: 45,
       backgroundColor: "#201238",
       width: width - 50,
       borderRadius: 5,
       justifyContent: "center"
   },
   buttonText: {
       textTransform: "uppercase",
       textAlign: "center",
       color: "#fff"
   },
})
Within the src directory, create a screens directory to store the files for the Home and Game screens.
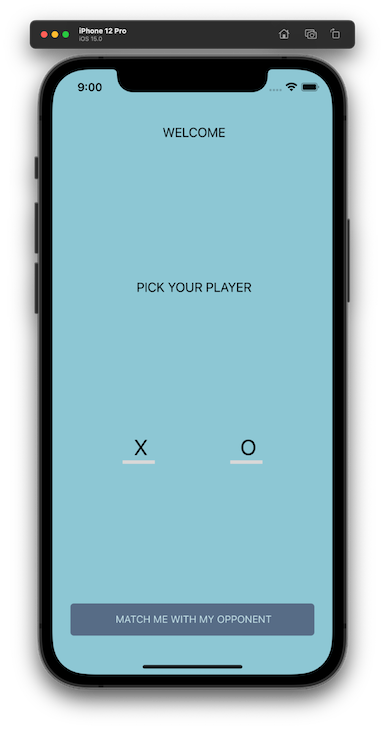
Within the screens directory, create a Home.js file and add the content of the code block below into the file. At the home screen, a user is expected to select either X or O to use for their moves within the tic-tac-toe board:
import React, { useState } from 'react'
import { View, Text, TouchableOpacity } from 'react-native'
import { SafeAreaView } from 'react-native-safe-area-context'
import { HomeScreenStyles as styles } from '../styles'
import * as Haptics from 'expo-haptics';

const gamePlayers = ["X", "O"]

const Home = ({ navigation }) => {
   const [selectedPlayer, selectPlayer] = useState(null)

   return (
       <SafeAreaView style={{ flex: 1, backgroundColor: "#8DC7D4" }}>
           <View style={styles.container}>
               <Text style={[styles.text, { marginTop: 30 }]} > Welcome </Text>
               <Text style={styles.text} > Pick Your Player </Text>

               <View style={[styles.center]} >
                   <View style={styles.row}>
                       {
                           gamePlayers.map((player, idx) => (
                               <TouchableOpacity key={idx} onPress={() => selectPlayer(player)} >
                                   <Text style={[styles.text, { fontSize: 30 }]} > {player} </Text>

                                   <View
                                       style={
                                           [styles.underline, { backgroundColor: selectedPlayer === player ? "green" : "#D8D8D8" }]
                                       }
                                   />
                               </TouchableOpacity>
                           ))
                       }
                   </View>
               </View>

               <View style={[styles.center, { marginBottom: 20 }]}>
                   <TouchableOpacity
                       onPress={() => {
                           if (selectedPlayer) {
                               navigation.navigate("Game", { selectedPlayer })

                               return
                           }
                           Haptics.notificationAsync(Haptics.NotificationFeedbackType.Warning)
                       }}
                       style={[styles.button, { opacity: !selectedPlayer && 0.5 }]}
                   >
                       <Text style={styles.buttonText}> Match me with my opponent </Text>
                   </TouchableOpacity>
               </View>
           </View>
       </SafeAreaView>
   )
}

export default Home
The image below shows what the Home screen should look like when you run the application using an emulator or your mobile device directly:
Next, create a second file named Game.js within the src/screens directory for the Game screen. Add the contents of the code block below into the Game.js file to create the parent component for the Game screen:
import React, { useState } from 'react'
import { View, Text, TouchableWithoutFeedback, Button } from 'react-native'
import { SafeAreaView } from 'react-native-safe-area-context'
import { GameScreenStyles as styles  } from '../styles'
import * as Haptics from 'expo-haptics';
import { getWinner, findUniqueRandomNumber, Toast, GameTile  } from '../utils'
const Game = ({ route }) => {
   const player = route?.params?.selectedPlayer

   const [gameTiles, setGameTile] = useState(Array(9).fill(null))
   const [gameStatus, setGameStatus] = useState('ONGOING')
   const [matchedTiles, setMatchedTiles] = useState([])
   const [isGameDisabled, disableGame] = useState(false)

   const handleTileClick = (position) => {
       Haptics.selectionAsync()

       if (!gameTiles[position] && !isGameDisabled) {
           let tilesCopy = [...gameTiles]

           if (!tilesCopy.includes(null)) {
               setGameStatus("TIE")
               disableGame(true)
               return
           }

           // user move
           tilesCopy[position] = player

           // Simulating computer move
           setTimeout(() => {
            tilesCopy[findUniqueRandomNumber(tilesCopy)] = player === "X" ? "O" : "X"
               const gameResult = getWinner(tilesCopy)

               if (gameResult?.winningPlayer) {
                   disableGame(true)
                   setMatchedTiles(gameResult?.matchingTiles)

                   if (gameResult?.winningPlayer === player) {
                       setGameStatus("WIN")
                       Haptics.notificationAsync(Haptics.NotificationFeedbackType.Success)
                   } else {
                       setGameStatus("LOSS")
                       Haptics.notificationAsync(Haptics.NotificationFeedbackType.Error)
                   }
               }

               setGameTile(tilesCopy)
           }, 500)
       } else if (!gameTiles.includes(null)) {
           setGameStatus("TIE")
           disableGame(true)

           Haptics.notificationAsync(Haptics.NotificationFeedbackType.Warning)
       }
   }

   const resetGameState = () => {
       setGameTile(new Array(9).fill(null))
       disableGame(false)
       setMatchedTiles([])
       setGameStatus("ONGOING")

       Haptics.notificationAsync(
           Haptics.NotificationFeedbackType.Success
       )
   }

   return (
       <SafeAreaView style={{ flex: 1, backgroundColor: "#8DC7D4" }} >
           <View>
               <Toast eventType={gameStatus} />

               <View style={styles.center} >
                   <View style={[styles.tileContainer,]} >
                       {
                           gameTiles.map((item, idx) =>
                               <GameTile
                                   key={idx}
                                   item={item}
                                   handlePress={() => {
                                       handleTileClick(idx)
                                   }}
                                   matchedTile={matchedTiles.includes(idx)}
                               />
                           )
                       }
                   </View>
               </View>

               <Button title="RESET GAME" onPress={(() => resetGameState())} />
           </View>
       </SafeAreaView>
   )
}

export default Game
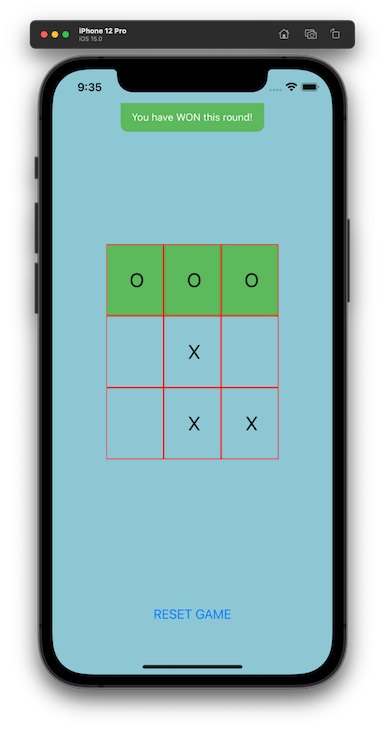
The Game screen above uses the value of the gameStatus local state to control the elements displayed on the game screen and it is modified based on the outcome of a match.
While changing the gameStatus state, the Toast component from the src/utils.js file will be displayed with relevant text. The notificationAsync method will be executed to generate haptic feedback that complements the toast. You can see three variations of this in the code above:
Haptics.notificationAsync(Haptics.NotificationFeedbackType.Success)Haptics.notificationAsync(Haptics.NotificationFeedbackType.Error)Haptics.notificationAsync(Haptics.NotificationFeedbackType.Warning)Let’s see how each of these would look in the frontend.
For a winning outcome, the notificationAsync method will be executed with a Success feedback type to complement the displayed Toast in notifying the user that the game has been won:
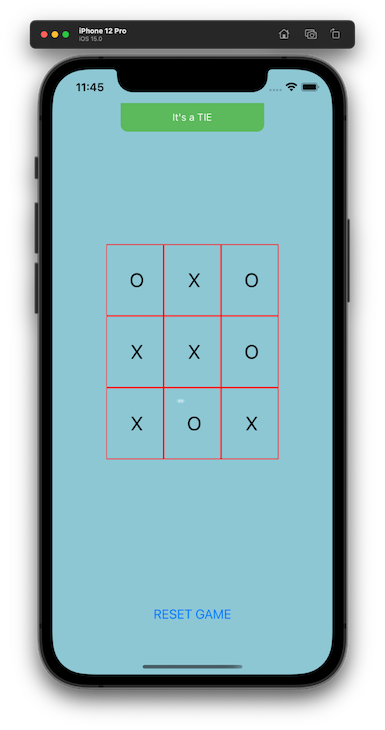
For a tie, the toast will be displayed and the notificationAsync method will also be executed with an Error type with mild intensity:
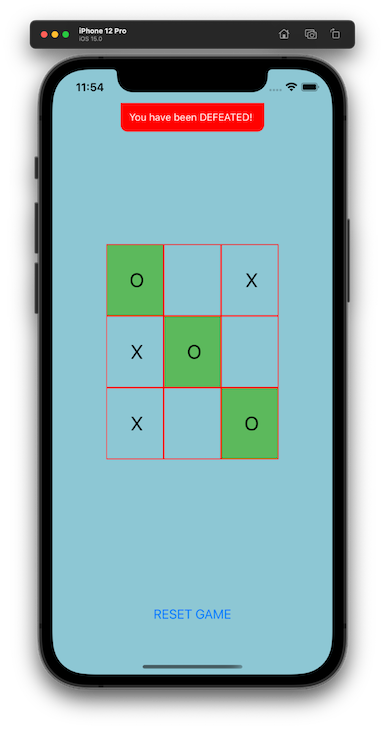
In the event of the user losing a match, the game will display the toast with a red background and execute the notificationAsync method with a Warning type to notify the user of the loss:
react-native-haptic-feedback to implement haptics without ExpoFor developers who are building React Native applications without using Expo, the react-native-haptic-feedback package is a more flexible community package for adding haptics to your application.
Unlike expo-haptics, you need to link the react-native-haptic-feedback package either automatically using the react-native link command or manually by modifying the relevant files.
When using the react-native-haptic-feedback package, you have access to a trigger() method with several notification types. These are similar to those that we used in our hands-on tutorial, so you can implement them by following the steps outined above. You can also specify options for iOS and Android platforms.
See the full list of what’s available on Github.
This tutorial focused on explaining haptic feedback and how to use it within React Native applications. When adding haptic feedback to a real-world application to be used by a wide audience, there are other considerations to keep in mind.
For example, Apple’s documentation on haptic feedback recommends making clear to the user why they are experiencing haptic feedback. It is best to create haptic feedback that complements the current interface displayed as the result of an event.
Depending on your application design, you might also deem it fit to play an audio tone when the haptic feedback is released to improve the user experience.
There should be an option for users to enable or disable haptic feedback within your application. Based on their present circumstances, a user might find haptic feedback annoying and want to disable it.
For the tic-tac-toe game within this tutorial, there was no option to disable the haptic feedback. However, you can refactor the application to have a toggle switch where users toggle haptic feedback on and off.
Although it is possible to modify haptic patterns, it is recommended that you stick to the system’s haptic patterns. Users are familiar with the haptic patterns used by their devices and they are able to subconsciously interpret what the haptic feedback signifies based on its pattern.
I hope you found this tutorial useful. If you have any further questions, let me know in the comments.

LogRocket's Galileo AI watches sessions for you and and surfaces the technical and usability issues holding back your React Native apps.
LogRocket also helps you increase conversion rates and product usage by showing you exactly how users are interacting with your app. LogRocket's product analytics features surface the reasons why users don't complete a particular flow or don't adopt a new feature.
Start proactively monitoring your React Native apps — try LogRocket for free.

A step-by-step guide to building your first MCP server using Node.js, covering core concepts, tool design, and upgrading from file storage to MySQL.

Using security headers in your Next.js apps is a highly effective way to secure websites from common security threats.

A deep dive into May 2026’s AI model and tool rankings. We break down performance, usability, pricing, and real-world capabilities across 50+ features to help you pick the right tools for your development workflow.
A practical guide to Agent Browser CLI. Learn how AI agents navigate, snapshot, and interact with web pages using stable references, enabling efficient automation and exploratory testing.
Would you be interested in joining LogRocket's developer community?
Join LogRocket’s Content Advisory Board. You’ll help inform the type of content we create and get access to exclusive meetups, social accreditation, and swag.
Sign up now

