Redux has been, by far, the leader in state management for React apps. With more than 53K stars on GitHub, it is mature, robust, and highly supported by its community.

Recoil is the Facebook team’s new bet to address the same issue. After working a bit with Recoil, one of the main feelings I had is this (not-so-weird) sensation of being in the React world entirely. The learning curve is lower than Redux and other similar libs, perhaps because of its simple nature.
Recoil is based on atoms and selectors. In short, the atoms are the global units that store the state’s values, while the selectors are “getters” that retrieve computed values from the global store.
Our focus, however, is not to explain the lib in detail. You can read that here — and you should.
Our goal is to explore some of Recoil’s main features in practice. For this, let’s create a fully functional CRUD of products with React, create-react-app, react-bootstrap (to facilitate with the design and stuff), and Recoil for state management.
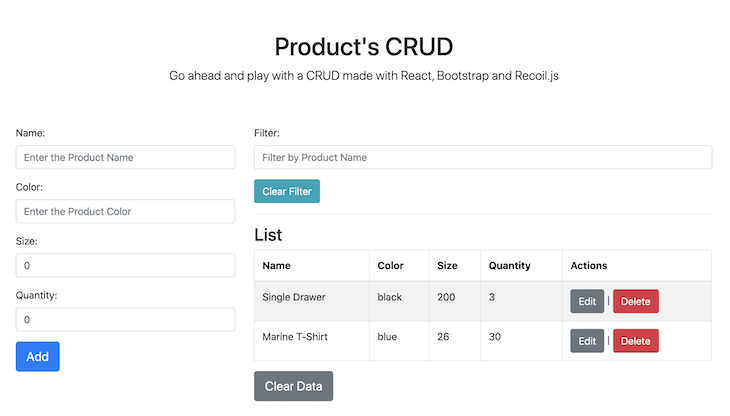
At the end of the article, this would be our CRUD app:
So, let’s get straight to it.
First of all, you should check if you already have Node installed. For this tutorial, we’ll be making use of Yarn commands (optional), so it’d be good to have it installed, too. We’ll also be using VS Code as the IDE for this example.
Enter into a folder of your choice via command line and run:
npx create-react-app recoil-products-crud
cd recoil-products-crud
Follow the default options until the end. Now, let’s install the required dependencies. For this, run the following:
yarn add recoil bootstrap react-bootstrap uuid
The uuid module will help us to generate random IDs for our product’s list.
Since Bootstrap will be responsible for the design of our page elements, let’s add its CSS import to the index.js file, along with the rest of the initial Recoil settings:
import React from "react";
import ReactDOM from "react-dom";
import App from "./App";
import { RecoilRoot } from "recoil";
import * as serviceWorker from "./serviceWorker";

import "bootstrap/dist/css/bootstrap.min.css";

ReactDOM.render(
    <React.StrictMode>
        <RecoilRoot>
            <App />
        </RecoilRoot>
    </React.StrictMode>,
    document.getElementById("root")
);

serviceWorker.unregister();
The React App must always be wrapped by the RecoilRoot tags in order to enable Recoil features.
The final structure of the project looks like this (make sure to reproduce it in yours):
recoil-products-crud
|----- src
        |----- components
      |----- AddProduct.js
      |----- ListProducts.js
      |----- FilterProduct.js
      |----- modals
          |----- EditModal.js
          |----- DeleteModal.js
        |----- store
      |----- atom.js
      |----- index.js
      |----- selector.js
|----- index.js
|----- App.js
|----- serviceWorker.js
Our app will be provided with the four default CRUD operations, plus the ability to filter the results by the product’s name. This will allow us to explore a bit the selector features.
Because of this, we’ll need two different atoms: one to store the original list of registered products, and another to save the state of the filtered list after the filtering action takes place.
Let’s start, then, with the atom.js code:
import { atom } from "recoil";

export const products = atom({
  key: "products",
  default: [],
});

export const filterProductsValue = atom({
  key: "filterProductsValue",
  default: "",
});
Very simple so far. We just created the two needed atoms, each with a unique key and default values (all empty for now).
Next, move on to the selector.js contents:
import { selector } from "recoil";
import { products, filterProductsValue } from ".";

export const filterProducts = selector({
  key: "filterProducts",
  get: ({ get }) => {
    const productsState = get(products);
    const filterProductsValueState = get(filterProductsValue);

    if (filterProductsValueState.length) {
      return productsState.filter(
        (item) => item.name.includes(filterProductsValueState.trim()) && item
      );
    }
    return products;
  },
});
Here, we’re importing the selector function from Recoil. Note that the selectors also need a unique key; they work as searchers of the state’s values. The get value receives the filtering code, which, in our case, will first recover the list of products and the typed filter text and, finally, perform the searching within the former list.
For as many different searching needs you have, as many new selectors may be created. If your selector’s code becomes too big, you should consider organizing them in different categorized JavaScript files.
Let’s finish this part with the code for the index.js:
export { products, filterProductsValue } from "./atom";
export { filterProducts } from "./selector";
Here, we’re just unifying the atoms and selectors in a single place. Whenever you need them, just import the store.
Our Recoil code won’t work alone without the React components, obviously. So, let’s move on to their construction. We’ll do this from the lower components (modals) to the higher ones.
The example will have two modals: one for the product’s editing and the other for its deletion. Here is the code for the DeleteModal.js file:
import React from "react";
import { Button, Modal } from "react-bootstrap";
import { useRecoilState } from "recoil";

import { products } from "../../store";

const DeleteModal = (props) => {
  const { show, id, handleClose } = props;

  const [productList, setProductList] = useRecoilState(products);
  const product = productList.length
    ? productList.find((item) => item.id === id)
    : null;
  const index = productList.findIndex((item) => item === product);

  const deleteProduct = () => {
    setProductList(removeProduct(productList, index));
    handleClose();
  };

  return (
    <>
      {product ? (
        <Modal show={show} onHide={handleClose}>
          <Modal.Header closeButton>
            <Modal.Title>Delete the Product</Modal.Title>
          </Modal.Header>
          <Modal.Body>Are you sure?</Modal.Body>
          <Modal.Footer>
            <Button variant="secondary" onClick={() => handleClose()}>
              Close
            </Button>
            <Button variant="primary" onClick={() => deleteProduct()}>
              Yes, Do it.
            </Button>
          </Modal.Footer>
        </Modal>
      ) : (
        ""
      )}
    </>
  );
};

function removeProduct(products, i) {
  return [...products.slice(0, i), ...products.slice(i + 1)];
}

export default DeleteModal;
This modal receives two attributes as props: the Boolean to determine whether the modal should show up and the id of the user selected for editing.
Notice the use of the useRecoilState function. It is the equivalent of React’s useState, retrieving the state’s list of products and its setter function, respectively.
After that, we’re looping the list of products to find the product according to the ID received in the props, as well as its index in the same array. Those values will be helpful to the other functions.
The deleteProduct function simply substitutes in the Recoil state the updated list returned by the removeProduct function. That one, in turn, eliminates from the array the corresponding product given the index passed as a param.
Make sure to always close the modal after its objective has been accomplished via the handleClose function.
Now, on to the second modal, the EditModal.js:
import React, { useState } from "react";
import { Button, Form, Modal } from "react-bootstrap";
import { useRecoilState } from "recoil";
import { products } from "../../store";

const EditModal = (props) => {
  const { show, id, handleClose } = props;

  const [productList, setProductList] = useRecoilState(products);
  const product = productList.length
    ? productList.find((item) => item.id === id)
    : null;
  const index = productList.findIndex((item) => item === product);

  const [name, setName] = useState("");
  const [color, setColor] = useState("");
  const [size, setSize] = useState(0.0);
  const [quantity, setQuantity] = useState(0);

  const onChangeName = (e) => {
    setName(e.target.value);
  };

  const onChangeColor = (e) => {
    setColor(e.target.value);
  };

  const onChangeSize = (e) => {
    setSize(e.target.value);
  };

  const onChangeQuantity = (e) => {
    setQuantity(e.target.value);
  };

  const updateProduct = () => {
    const newList = replaceProduct(productList, index, {
      ...product,
      name: name,
      color: color,
      size: size,
      quantity: quantity,
    });

    setProductList(newList);
    handleClose();
  };

  return (
    <>
      {product ? (
        <Modal show={show} onHide={handleClose}>
          <Modal.Header closeButton>
            <Modal.Title>Edit the Product</Modal.Title>
          </Modal.Header>
          <Modal.Body>
            <Form>
              <Form.Group controlId="name">
                <Form.Label>Name</Form.Label>
                <Form.Control
                  type="text"
                  placeholder="Enter the Product Name"
                  defaultValue={product.name}
                  onChange={(e) => onChangeName(e)}
                />
              </Form.Group>

              <Form.Group controlId="color">
                <Form.Label>Color</Form.Label>
                <Form.Control
                  type="text"
                  placeholder="Enter the Product Color"
                  defaultValue={product.color}
                  onChange={(e) => onChangeColor(e)}
                />
              </Form.Group>

              <Form.Group controlId="size">
                <Form.Label>Size</Form.Label>
                <Form.Control
                  type="number"
                  placeholder="Enter the Product Size"
                  defaultValue={product.size}
                  onChange={(e) => onChangeSize(e)}
                />
              </Form.Group>

              <Form.Group controlId="quantity">
                <Form.Label>Quantity</Form.Label>
                <Form.Control
                  type="number"
                  placeholder="Enter the Product Quantity"
                  defaultValue={product.quantity}
                  onChange={(e) => onChangeQuantity(e)}
                />
              </Form.Group>
            </Form>
          </Modal.Body>
          <Modal.Footer>
            <Button variant="secondary" onClick={() => handleClose()}>
              Close
            </Button>
            <Button variant="primary" onClick={() => updateProduct()}>
              Save Changes
            </Button>
          </Modal.Footer>
        </Modal>
      ) : (
        ""
      )}
    </>
  );
};

function replaceProduct(products, i, newVal) {
  return [...products.slice(0, i), newVal, ...products.slice(i + 1)];
}

export default EditModal;
Most of its content relates to the form composition. There are four fields in our form, and each one of them must have a local state representation (via Hooks) as constants. This way, we can manipulate their values before sending them to the Recoil state.
Each field must also have its corresponding onChangeXX function, which will take care of refreshing their values according to what the user types in. Note that we’re also referring to the same product’s list, index, and setter function, just like we did in the other modal.
The updateProduct function acts by producing the new list (with the updated values the user input in the modal fields) and setting it to the Recoil state. For this task, it is making use of the helper function replaceProduct, at the end of the listing.
The listing column in our app will be responsible for displaying the modals that, in turn, will be triggered by each of the corresponding action buttons.
This is the content for the ListProduct.js file:
import React, { useState } from "react";
import { Table, Button } from "react-bootstrap";

import { useRecoilValue, useResetRecoilState } from "recoil";
import { filterProducts, filterProductsValue, products } from "../store";
import EditModal from "./modals/EditModal";
import DeleteModal from "./modals/DeleteModal";

const ListProducts = () => {
  const productsState = useRecoilValue(filterProducts);
  const resetList = useResetRecoilState(products);
  const resetfilterProductsValue = useResetRecoilState(filterProductsValue);

  // Modals
  const [showEdit, setShowEdit] = useState(false);
  const [showDelete, setShowDelete] = useState(false);
  const [userId4Actions, setUserId4Actions] = useState(0);

  const handleEditClose = () => setShowEdit(false);
  const handleEditShow = () => setShowEdit(true);

  const handleDeleteClose = () => setShowDelete(false);
  const handleDeleteShow = () => setShowDelete(true);

  const resetAtoms = () => {
    resetList();
    resetfilterProductsValue();
  };

  const editProduct = (id) => {
    handleEditShow();
    setUserId4Actions(id);
  };

  const deleteProduct = (id) => {
    handleDeleteShow();
    setUserId4Actions(id);
  };

  return (
    <>
      <h3>List</h3>

      <Table striped bordered hover responsive>
        <thead>
          <tr>
            <th>Name</th>
            <th>Color</th>
            <th>Size</th>
            <th>Quantity</th>
            <th>Actions</th>
          </tr>
        </thead>
        <tbody>
          {!productsState.length ? (
            <tr>
              <td colSpan="5" style={{ textAlign: "center" }}>
                No products here.
              </td>
            </tr>
          ) : (
            productsState.map((item, index) => (
              <tr key={item.id}>
                <td>{item.name}</td>
                <td>{item.color}</td>
                <td>{item.size}</td>
                <td>{item.quantity}</td>
                <td colSpan="2">
                  <Button
                    variant="secondary"
                    onClick={() => editProduct(item.id)}
                  >
                    Edit
                  </Button>{" "}
                  {" | "}
                  <Button
                    variant="danger"
                    onClick={() => deleteProduct(item.id)}
                  >
                    Delete
                  </Button>
                </td>
              </tr>
            ))
          )}
        </tbody>
      </Table>

      <Button variant="secondary" size="lg" onClick={() => resetAtoms()}>
        Clear Data
      </Button>

      <EditModal
        show={showEdit}
        id={userId4Actions}
        handleClose={handleEditClose}
      />

      <DeleteModal
        show={showDelete}
        id={userId4Actions}
        handleClose={handleDeleteClose}
      />
    </>
  );
};

export default ListProducts;
The main goal here is to exhibit the list of products in a Bootstrap table. Note that here we’re recovering the list of products from the Recoil state in a different manner, through the useRecoilValue function. It returns only the current value in the store without a setter. The other two right below are used to reset the state’s values.
Following, we have the auxiliary constants for the modals exhibiting and hiding. We’ll manage this functionally here in the listing code, passing the respective values via props.
Then, we have three main functions:
resetAtoms – as the name suggests, they make use of the Recoil reset functions to reset the list and the searching text both to their initial valueseditProduct – toggles the editing modal and sets the current user’s ID to the local statedeleteProduct – toggles the deleting modal and sets the current user’s ID to the local stateWithin the render function, note that we’re also checking for the existence of the product’s list in order to display the correct message otherwise.
Now’s time to implement the AddProduct component, which will feed the list with product values from the form.
These are the contents for the AddProduct.js file:
import React, { useState } from "react";
import { Button, Form } from "react-bootstrap";

import { useSetRecoilState } from "recoil";
import { v4 as uuid4 } from "uuid";
import { products } from "../store";

const AddProduct = () => {
  const [name, setName] = useState("");
  const [color, setColor] = useState("");
  const [size, setSize] = useState(0.0);
  const [quantity, setQuantity] = useState(0);
  const setProducts = useSetRecoilState(products);

  const onChangeName = (e) => {
    setName(e.target.value);
  };

  const onChangeColor = (e) => {
    setColor(e.target.value);
  };

  const onChangeSize = (e) => {
    setSize(e.target.value);
  };

  const onChangeQuantity = (e) => {
    setQuantity(e.target.value);
  };

  const addProduct = () => {
    setProducts((oldList) => [
      ...oldList,
      {
        id: uuid4(),
        name: name,
        color: color,
        size: size,
        quantity: quantity,
      },
    ]);

    resetForm();
  };

  const resetForm = () => {
    setName("");
    setColor("");
    setSize(0.0);
    setQuantity(0);
  };

  return (
    <Form>
      <Form.Group controlId="name">
        <Form.Label>Name:</Form.Label>
        <Form.Control
          type="text"
          value={name}
          placeholder="Enter the Product Name"
          onChange={(e) => onChangeName(e)}
        />
      </Form.Group>

      <Form.Group controlId="color">
        <Form.Label>Color:</Form.Label>
        <Form.Control
          type="text"
          value={color}
          placeholder="Enter the Product Color"
          onChange={(e) => onChangeColor(e)}
        />
      </Form.Group>

      <Form.Group controlId="size">
        <Form.Label>Size:</Form.Label>
        <Form.Control
          type="number"
          value={size}
          placeholder="Enter the Product Size"
          onChange={(e) => onChangeSize(e)}
        />
      </Form.Group>

      <Form.Group controlId="quantity">
        <Form.Label>Quantity:</Form.Label>
        <Form.Control
          type="number"
          value={quantity}
          placeholder="Enter the Product Quantity"
          onChange={(e) => onChangeQuantity(e)}
        />
      </Form.Group>

      <Button variant="primary" size="lg" onClick={() => addProduct()}>
        Add
      </Button>
    </Form>
  );
};

export default AddProduct;
The creation form is very similar to the editing modal since the same fields take place here, too. We have the same onChange functions, as well as the local state attributes.
The function addProduct adds a new product, sets the updated array to the Recoil state, and resets the form.
Up to this point, with the knowledge from the previous components, there’s not much to add here.
The filter component is very simple, too. It’s composed of a single text field to collect the filter text and a button to clear it. The filtering will be performed under any change to the field rather than a common button click.
This is the FilterProducts.js file:
import React from "react";
import { useRecoilState } from "recoil";

import { filterProductsValue } from "../store";
import { Form, Button } from "react-bootstrap";

const FilterProducts = () => {
  const [filterProductsState, filterProducts] = useRecoilState(
    filterProductsValue
  );

  const filter = (event) => {
    const { value } = event.target;
    filterProducts(value);
  };

  const clearFilter = () => filterProducts("");

  return (
    <Form>
      <Form.Group controlId="name">
        <Form.Label>Filter:</Form.Label>
        <Form.Control
          type="text"
          placeholder="Filter by Product Name"
          value={filterProductsState}
          onChange={(e) => filter(e)}
        />
      </Form.Group>

      <Button variant="info" onClick={() => clearFilter()}>
        Clear Filter
      </Button>
    </Form>
  );
};

export default FilterProducts;
Finally, we just need to organize the components within the App.js file, the root of the app.
Place the following code into it:
import React from "react";
import Container from "react-bootstrap/Container";
import { Row, Col } from "react-bootstrap";

import AddProduct from "./components/AddProduct";
import FilterProducts from "./components/FilterProducts";
import ListProducts from "./components/ListProducts";

function App() {
  return (
    <Container className="p-3">
      <div className="py-5 text-center">
        <h1>Product's CRUD</h1>
        <p className="lead">
          Go ahead and play with a CRUD made with React, Bootstrap and Recoil.js
        </p>
      </div>
      <Row>
        <Col>
          <AddProduct />
        </Col>
        <Col className="col-8">
          <FilterProducts />
          <hr />
          <ListProducts />
        </Col>
      </Row>
    </Container>
  );
}

export default App;
Nothing special here, just usual React code. Feel free to play around with the disposition of the components, just be aware of how each one is going to fit to the screen based on the react-bootstrap CSS classes.
That’s it — it’s your time now to try the example out. Just run the usual npm start and check the example working in the browser.
Again, this sniff of React within the Recoil code is a great plus to the lib, especially if you’re already working with React Hooks.
As a matter of fact, don’t forget to check the official docs out. They will lead you not only now, but after every major release to understand how the library is doing, as well as how you could benefit from it the most.
You can find the code for this example here in my GitHub.
Install LogRocket via npm or script tag. LogRocket.init() must be called client-side, not
server-side
$ npm i --save logrocket

// Code:

import LogRocket from 'logrocket';
LogRocket.init('app/id');
// Add to your HTML:

<script src="https://cdn.lr-ingest.com/LogRocket.min.js"></script>
<script>window.LogRocket && window.LogRocket.init('app/id');</script>
Hey there, want to help make our blog better?
Join LogRocket’s Content Advisory Board. You’ll help inform the type of content we create and get access to exclusive meetups, social accreditation, and swag.
Sign up now
A breakdown of the wrapper and container CSS classes, how they’re used in real-world code, and when it makes sense to use one over the other.

This guide walks you through creating a web UI for an AI agent that browses, clicks, and extracts info from websites powered by Stagehand and Gemini.

This guide explores how to use Anthropic’s Claude 4 models, including Opus 4 and Sonnet 4, to build AI-powered applications.

Which AI frontend dev tool reigns supreme in July 2025? Check out our power rankings and use our interactive comparison tool to find out.


One Reply to "Creating your first CRUD with Facebook’s Recoil"
This was a great introduction to Recoil. I’m still partial to Redux especially with the react-redux hooks but this is good stuff.