Editor’s note: This post was last updated by Emmanuel John on 26 January 2024 to discuss securing the API and provide solutions to two common issues developers may encounter while developing APIs. A section was also added to cover potential next steps for developers. This article was previously updated on 6 June 2022 to reflect updates to the pgAdmin client.
Working with APIs to facilitate communication between software systems is crucial for modern web developers. In this tutorial, we’ll create a CRUD RESTful API in a Node.js environment that runs on an Express server and uses a PostgreSQL database.
We’ll also walk through connecting an Express server with PostgreSQL using node-postgres. Our API will be able to handle the HTTP request methods that correspond to the PostgreSQL database from which the API gets its data. You’ll also learn how to install PostgreSQL and work with it through the CLI.
Our goal is to allow CRUD operations — GET, POST, PUT, and DELETE — on the API, which will run the corresponding database commands. To do so, we’ll set up a route for each endpoint and a function for each query.
To follow along with this tutorial, you‘ll need:
The complete code for the tutorial is available in this GitHub repo. Let’s get started!
Representational State Transfer (REST) defines a set of standards for web services.
An API is an interface that software programs use to communicate with each other. Therefore, a RESTful API is an API that conforms to the REST architectural style and constraints.
REST systems are stateless, scalable, cacheable, and have a uniform interface.
When building an API, you want your model to provide four basic functionalities. It should be able to create, read, update, and delete resources. This set of essential operations is commonly referred to as CRUD.
RESTful APIs most commonly utilize HTTP requests. Four of the most common HTTP methods in a REST environment are GET, POST, PUT, and DELETE, which are the methods by which a developer can create a CRUD system:
Create: Use the HTTP POST method to create a resource in a REST environmentRead: Use the GET method to read a resource, retrieving data without altering itUpdate: Use the PUT method to update a resourceDelete: Use the DELETE method to remove a resource from the systemAccording to the official Express documentation, Express is a fast, unopinionated, minimalist web framework for Node.js. Express is one of the most popular frameworks for Node.js. In fact, each E in the MERN, MEVN, and MEAN stacks stands for Express.
Although Express is minimalist, it’s also very flexible. This supports the development of various Express middlewares that you can use to address almost any task or problem imaginable.
PostgreSQL, commonly referred to as Postgres, is a free and open source relational database management system. You might be familiar with a few other similar database systems, like MySQL, Microsoft SQL Server, or MariaDB, which compete with PostgreSQL.
PostgreSQL is a robust relational database that has been around since 1997. It’s available on all major operating systems — Linux, Windows, and macOS. Since PostgreSQL is known for stability, extensibility, and standards compliance, it’s a popular choice for developers and companies.
It’s also possible to create a Node.js RESTful CRUD API using Sequelize. Sequelize is a promise-based Node.js ORM for Postgres, MySQL, MariaDB, SQLite, and Microsoft SQL Server.
For more on how to use Sequelize in a Node.js REST API, check out the video tutorial below:
Building an API in Node.js with Express and Sequelize ORM
ITP 405 – Spring 2019
node-postgres, or pg, is a nonblocking PostgreSQL client for Node.js. Essentially, node-postgres is a collection of Node.js modules for interfacing with a PostgreSQL database.
node-postgres supports many features, including callbacks, promises, async/await, connection pooling, prepared statements, cursors, rich type parsing, and C/C++ bindings.
We’ll begin this tutorial by installing PostgreSQL, creating a new user, creating a database, and initializing a table with a schema and some data.
If you’re using Windows, download a Windows installer of PostgreSQL.
If you’re using a Mac, this tutorial assumes you have Homebrew installed on your computer as a package manager for installing new programs. If you don’t, simply click on the link and follow the instructions.
Open up the terminal and install postgresql with brew:
brew install postgresql
You may see instructions on the web reading brew install postgres instead of PostgreSQL. Both options will install PostgreSQL on your computer.
After the installation is complete, we’ll want to get postgresql up and running, which we can do with services start:
brew services start postgresql
==> Successfully started `postgresql` (label: homebrew.mxcl.postgresql)
If at any point you want to stop the postgresql service, you can run brew services stop postgresql.
With PostgreSQL installed, let’s next connect to the postgres command line where we can run SQL commands.
psql is the PostgreSQL interactive terminal. Running psql will connect you to a PostgreSQL host. Running psql --help will give you more information about the available options for connecting with psql:
-h or --host=HOSTNAME: The database server host or socket directory; the default is local socket-p or --port=PORT: The database server port; the default is 5432-U or --username=USERNAME: The database username; the default is your_username-w or --no-password: Never prompt for password-W or --password: Force password prompt, which should happen automaticallyWe’ll connect to the default postgres database with the default login information and no option flags:
psql postgres
You’ll see that we’ve entered into a new connection. We’re now inside psql in the postgres database. The prompt ends with a # to denote that we’re logged in as the superuser, or root:
postgres=#
Commands within psql start with a backslash \. To test our first command, we can check what database, user, and port we’ve connected to using the \conninfo command:
postgres=# \conninfo
You are connected to database "postgres" as user "your_username" via socket in "/tmp" at port "5432".
The reference table below includes a few common commands that we’ll use throughout this tutorial:
\q: Exit psql connection\c: Connect to a new database\dt: List all tables\du: List all roles\list: List databasesLet’s create a new database and user so we’re not using the default accounts, which have superuser privileges.
First, we’ll create a role called me and give it a password of password. A role can function as a user or a group. In this case, we’ll use it as a user:
postgres=# CREATE ROLE me WITH LOGIN PASSWORD 'password';
We want me to be able to create a database:
postgres=# ALTER ROLE me CREATEDB;
You can run \du to list all roles and users:
me          | Create DB                           | {}
postgres    | Superuser, Create role, Create DB   | {}
Now, we want to create a database from the me user. Exit from the default session with \q for quit:
postgres=# \q
We’re back in our computer’s default terminal connection. Now, we’ll connect postgres with me:
psql -d postgres -U me
Instead of postgres=#, our prompt now shows postgres=> , meaning we’re no longer logged in as a superuser.
We can create a database with the SQL command as follows:
postgres=> CREATE DATABASE api;
Use the \list command to see the available databases:
Name    |    Owner    | Encoding |   Collate   |    Ctype    |
api     | me          | UTF8     | en_US.UTF-8 | en_US.UTF-8 |
Let’s connect to the new api database with me using the \c connect command:
postgres=> \c api
You are now connected to database "api" as user "me".
api=>
Our prompt now shows that we’re connected to api.
Finally, in the psql command prompt, we’ll create a table called users with three fields, two VARCHAR types, and an auto-incrementing PRIMARY KEY ID:
api=>
CREATE TABLE users (
  ID SERIAL PRIMARY KEY,
  name VARCHAR(30),
  email VARCHAR(30)
);
Make sure not to use the backtick ` character when creating and working with tables in PostgreSQL. While backticks are allowed in MySQL, they’re not valid in PostgreSQL. Also, ensure that you do not have a trailing comma in the CREATE TABLE command.
Let’s add some data to work with by adding two entries to users:
INSERT INTO users (name, email)
  VALUES ('Jerry', '[email protected]'), ('George', '[email protected]');
Let’s make sure that the information above was correctly added by getting all entries in users:
api=> SELECT * FROM users;
id |  name  |       email
----+--------+--------------------
  1 | Jerry  | [email protected]
  2 | George | [email protected]
Now, we have a user, database, table, and some data. We can begin building our Node.js RESTful API to connect to this data, stored in a PostgreSQL database.
At this point, we’re finished with all of our PostgreSQL tasks, and we can begin setting up our Node.js app and Express server.
To set up a Node.js app and Express server, first create a directory for the project to live in:
mkdir node-api-postgres
cd node-api-postgres
You can either run npm init -y to create a package.json file, or copy the code below into a package.json file:
{
  "name": "node-api-postgres",
  "version": "1.0.0",
  "description": "RESTful API with Node.js, Express, and PostgreSQL",
  "main": "index.js",
  "license": "MIT"
}
We’ll want to install Express for the server and node-postgres to connect to PostgreSQL:
npm i express pg
Now, we have our dependencies loaded into node_modules and package.json.
Create an index.js file, which we’ll use as the entry point for our server. At the top, we’ll require the express module, the built-in body-parser middleware, and we’ll set our app and port variables:
const express = require('express')
const bodyParser = require('body-parser')
const app = express()
const port = 3000

app.use(bodyParser.json())
app.use(
  bodyParser.urlencoded({
    extended: true,
  })
)
We’ll tell a route to look for a GET request on the root / URL and return some JSON:
app.get('/', (request, response) => {
  response.json({ info: 'Node.js, Express, and Postgres API' })
})
Now, set the app to listen on the port you set:
app.listen(port, () => {
  console.log(`App running on port ${port}.`)
})
From the command line, we can start the server by hitting index.js:
node index.js
App running on port 3000.
Go to http://localhost:3000 in the URL bar of your browser, and you’ll see the JSON we set earlier:
{
  info: "Node.js, Express, and Postgres API"
}
The Express server is running now, but it’s only sending some static JSON data that we created. The next step is to connect to PostgreSQL from Node.js to be able to make dynamic queries.
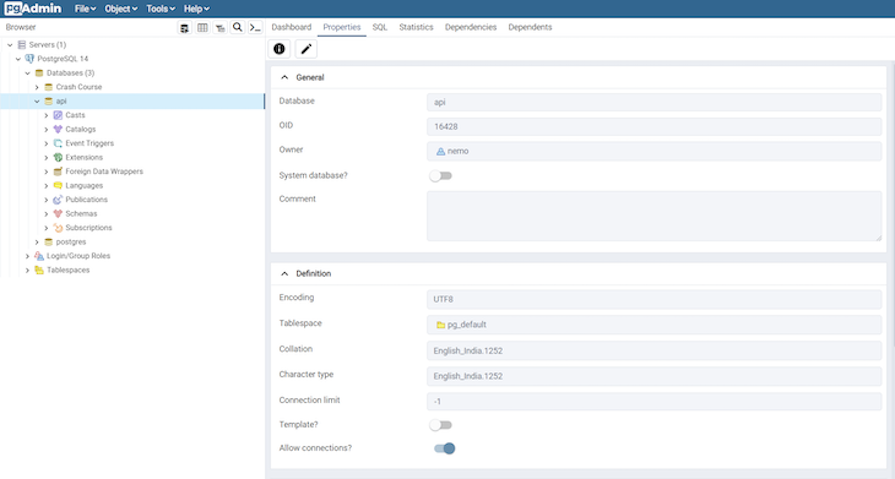
A popular client for accessing Postgres databases is the pgAdmin client. The pgAdmin application is available for various platforms. If you want to have a graphical user interface for your Postgres databases, you can go to the download page and download the necessary package.
Creating and querying your database using pgAdmin is simple. You need to click on the Object option available on the top menu, select Create, and choose Database to create a new connection. All the databases are available on the side menu. You can query or run SQL queries efficiently by selecting the proper database:
We’ll use the node-postgres module to create a pool of connections. Therefore, we don’t have to open and close a client each time we make a query.
A popular option for production pooling would be to use [pgBouncer](https://pgbouncer.github.io/), a lightweight connection pooler for PostgreSQL.
const Pool = require('pg').Pool
const pool = new Pool({
  user: 'me',
  host: 'localhost',
  database: 'api',
  password: 'password',
  port: 5432,
})
In a production environment, you would want to put your configuration details in a separate file with restrictive permissions so that it is not accessible from version control. But, for the simplicity of this tutorial, we’ll keep it in the same file as the queries.
The aim of this tutorial is to allow CRUD operations — GET, POST, PUT, and DELETE — on the API, which will run the corresponding database commands. To do so, we’ll set up a route for each endpoint and a function corresponding to each query.
We’ll create six functions for six routes, as shown below. First, create all the functions for each route. Then, export the functions so they’re accessible:
GET: / | displayHome()GET: /users | getUsers()GET: /users/:id | getUserById()POST: /users | createUser()PUT: /users/:id | updateUser()DELETE: /users/:id | deleteUser()In index.js, we made an app.get() for the root endpoint with a function in it. Now, in queries.js, we’ll create endpoints that will display all users, display a single user, create a new user, update an existing user, and delete a user.
GET all usersOur first endpoint will be a GET request. We can put the raw SQL that will touch the api database inside the pool.query(). We’ll SELECT all users and order by ID.
const getUsers = (request, response) => {
  pool.query('SELECT * FROM users ORDER BY id ASC', (error, results) => {
    if (error) {
      throw error
    }
    response.status(200).json(results.rows)
  })
}
GET a single user by IDFor our /users/:id request, we’ll get the custom id parameter by the URL and use a WHERE clause to display the result.
In the SQL query, we’re looking for id=$1. In this instance, $1 is a numbered placeholder that PostgreSQL uses natively instead of the ? placeholder that you may recognize from other variations of SQL:
const getUserById = (request, response) => {
  const id = parseInt(request.params.id)

  pool.query('SELECT * FROM users WHERE id = $1', [id], (error, results) => {
    if (error) {
      throw error
    }
    response.status(200).json(results.rows)
  })
}
POST a new userThe API will take a GET and POST request to the /users endpoint. In the POST request, we’ll add a new user. In this function, we’re extracting the name and email properties from the request body and inserting the values with INSERT:
const createUser = (request, response) => {
  const { name, email } = request.body

  pool.query('INSERT INTO users (name, email) VALUES ($1, $2) RETURNING *', [name, email], (error, results) => {
    if (error) {
      throw error
    }
    response.status(201).send(`User added with ID: ${results.rows[0].id}`)
  })
}
PUT updated data in an existing userThe /users/:id endpoint will also take two HTTP requests, the GET we created for getUserById and a PUT to modify an existing user. For this query, we’ll combine what we learned in GET and POST to use the UPDATE clause.
It’s worth noting that PUT is idempotent, meaning the exact same call can be made over and over and will produce the same result. PUT is different than POST, in which the exact same call repeated will continuously make new users with the same data:
const updateUser = (request, response) => {
  const id = parseInt(request.params.id)
  const { name, email } = request.body

  pool.query(
    'UPDATE users SET name = $1, email = $2 WHERE id = $3',
    [name, email, id],
    (error, results) => {
      if (error) {
        throw error
      }
      response.status(200).send(`User modified with ID: ${id}`)
    }
  )
}
DELETE a userFinally, we’ll use the DELETE clause on /users/:id to delete a specific user by ID. This call is very similar to our getUserById() function:
const deleteUser = (request, response) => {
  const id = parseInt(request.params.id)

  pool.query('DELETE FROM users WHERE id = $1', [id], (error, results) => {
    if (error) {
      throw error
    }
    response.status(200).send(`User deleted with ID: ${id}`)
  })
}
To access these functions from index.js, we’ll need to export them. We can do so with module.exports, creating an object of functions. Since we’re using the ES6 syntax, we can write getUsers instead of getUsers:getUsers and so on:
module.exports = {
  getUsers,
  getUserById,
  createUser,
  updateUser,
  deleteUser,
}
Our complete queries.js file is below:
const Pool = require('pg').Pool
const pool = new Pool({
  user: 'me',
  host: 'localhost',
  database: 'api',
  password: 'password',
  port: 5432,
})
const getUsers = (request, response) => {
  pool.query('SELECT * FROM users ORDER BY id ASC', (error, results) => {
    if (error) {
      throw error
    }
    response.status(200).json(results.rows)
  })
}

const getUserById = (request, response) => {
  const id = parseInt(request.params.id)

  pool.query('SELECT * FROM users WHERE id = $1', [id], (error, results) => {
    if (error) {
      throw error
    }
    response.status(200).json(results.rows)
  })
}

const createUser = (request, response) => {
  const { name, email } = request.body

  pool.query('INSERT INTO users (name, email) VALUES ($1, $2)', [name, email], (error, results) => {
    if (error) {
      throw error
    }
    response.status(201).send(`User added with ID: ${results.insertId}`)
  })
}

const updateUser = (request, response) => {
  const id = parseInt(request.params.id)
  const { name, email } = request.body

  pool.query(
    'UPDATE users SET name = $1, email = $2 WHERE id = $3',
    [name, email, id],
    (error, results) => {
      if (error) {
        throw error
      }
      response.status(200).send(`User modified with ID: ${id}`)
    }
  )
}

const deleteUser = (request, response) => {
  const id = parseInt(request.params.id)

  pool.query('DELETE FROM users WHERE id = $1', [id], (error, results) => {
    if (error) {
      throw error
    }
    response.status(200).send(`User deleted with ID: ${id}`)
  })
}

module.exports = {
  getUsers,
  getUserById,
  createUser,
  updateUser,
  deleteUser,
}
Now that we have all of our queries, we need to pull them into the index.js file and make endpoint routes for all the query functions we created.
To get all the exported functions from queries.js, we’ll require the file and assign it to a variable:
const db = require('./queries')
Now, for each endpoint, we’ll set the HTTP request method, the endpoint URL path, and the relevant function:
app.get('/users', db.getUsers)
app.get('/users/:id', db.getUserById)
app.post('/users', db.createUser)
app.put('/users/:id', db.updateUser)
app.delete('/users/:id', db.deleteUser)
Below is our complete index.js file, the entry point of the API server:
const express = require('express')
const bodyParser = require('body-parser')
const app = express()
const db = require('./queries')
const port = 3000

app.use(bodyParser.json())
app.use(
  bodyParser.urlencoded({
    extended: true,
  })
)

app.get('/', (request, response) => {
  response.json({ info: 'Node.js, Express, and Postgres API' })
})

app.get('/users', db.getUsers)
app.get('/users/:id', db.getUserById)
app.post('/users', db.createUser)
app.put('/users/:id', db.updateUser)
app.delete('/users/:id', db.deleteUser)

app.listen(port, () => {
  console.log(`App running on port ${port}.`)
})
With just these two files, we have a server, database, and our API all set up. You can start up the server by hitting index.js again:
node index.js
App running on port 3000.
Now, if you go to http://localhost:3000/users or http://localhost:3000/users/1, you’ll see the JSON response of the two GET requests.
To test our POST, PUT, and DELETE requests, we can use a tool like Postman or a VS Code extension like Thunder Client to send the HTTP requests. You can also use curl, a command-line tool that is already available on your terminal.
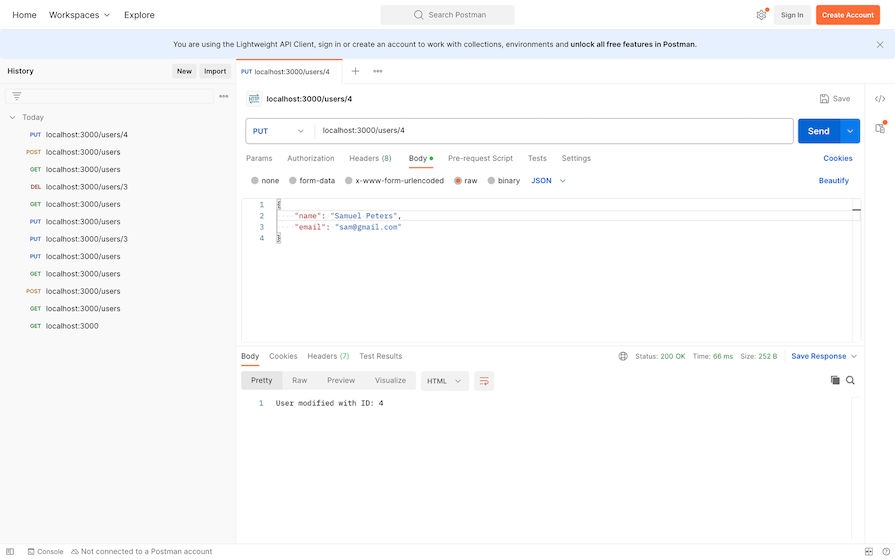
Using a tool like Postman or Thunder Client makes it simple to query endpoints with different HTTP methods. Simply enter your URL, choose the specific HTTP method, insert the JSON value if the endpoint is a PUT or POST route, and hit Send:
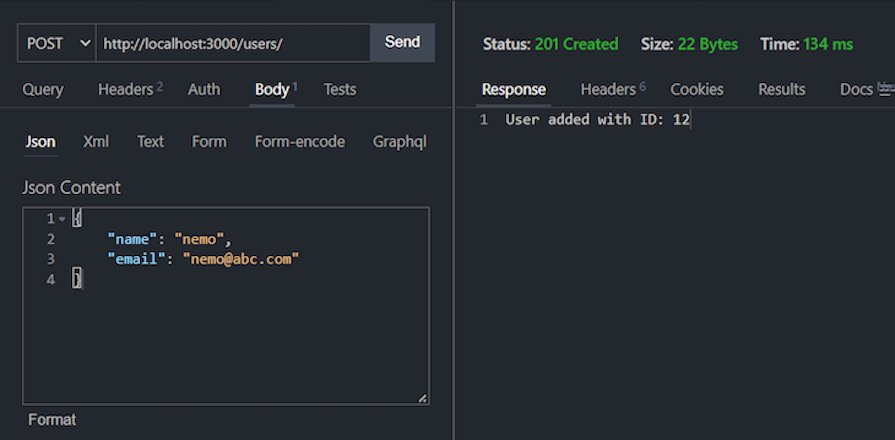
The example above shows sending a POST request to the specified route. The POST option suggests that it is a POST request. The URL beside the method is the API endpoint, and the JSON content is the data to be sent to the endpoint. You can hit the different routes similarly.
Here’s an example of sending a POST request to the specified route to create a new user using Postman:
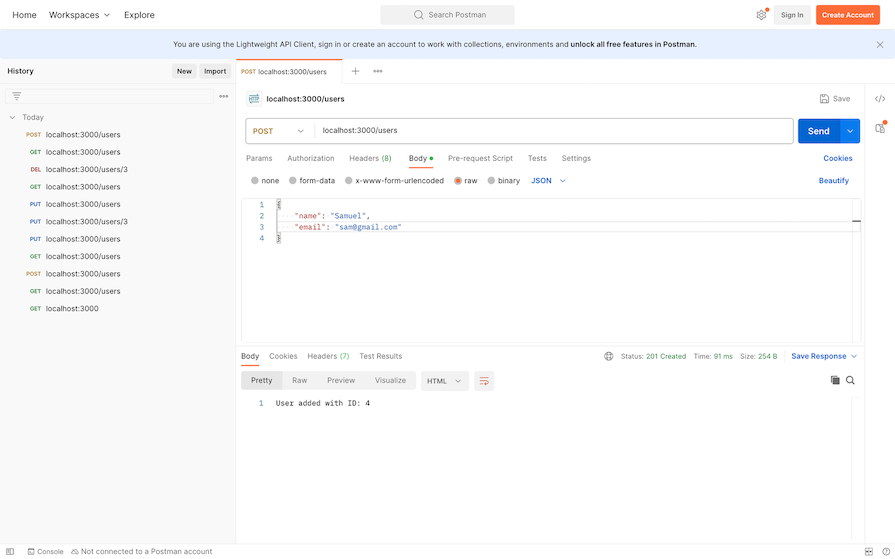
Here’s an example of sending a PUT request to the specified route to modify a user by its ID:
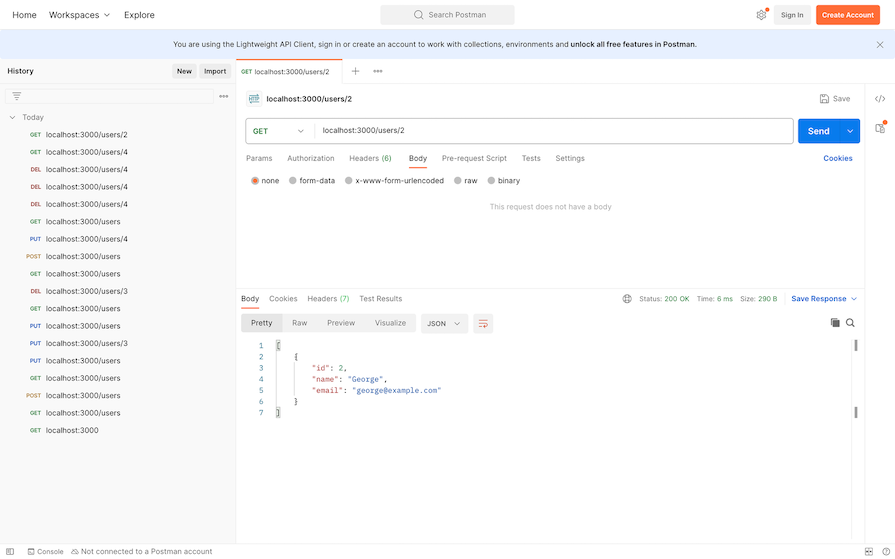
Here’s an example of sending a GET request to the specified route to retrieve a user by its ID:
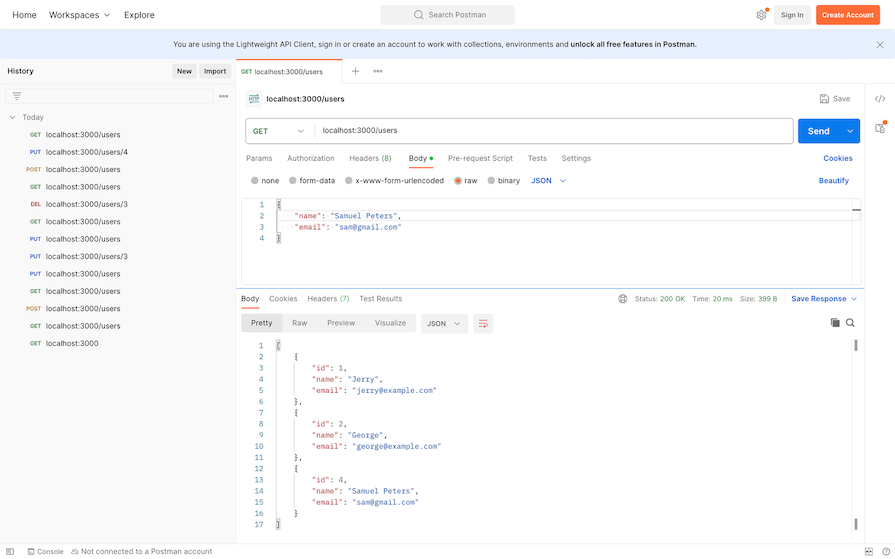
Here’s an example of sending a GET request to the specified route to retrieve all users:
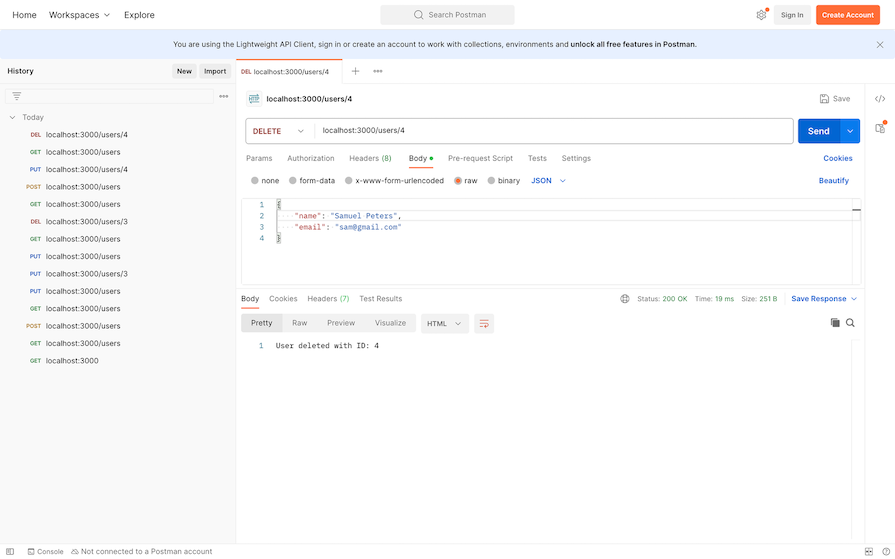
Finally, here’s an example of sending a DELETE request to the specified route to delete a user by its ID:
Developing APIs can come with various challenges. Let’s go over the solutions to two common issues encountered during API development: CORS issues and unhandled errors due to middleware order.
Browser security policies can block requests from different origins. To address this issue, use the cors middleware in Express to handle cross-origin resource sharing (CORS).
Run the following command to install cors:
npm install cors
To use it, do the following:
var express = require('express')
var cors = require('cors')
var app = express()

app.use(cors())
This will enable CORS for all origins.
Middleware order can affect error handling, leading to unhandled errors. To address this issue, place error-handling middleware at the end of your middleware stack and use next(err) to pass errors to the error-handling middleware:
app.use((req, res, next) => {
    const error = new Error('Something went wrong');
    next(error);
});
// Error-handling Middleware
app.use((err, req, res, next) => {
    console.error('Error:', err.message);
    res.status(500).send('Internal Server Error');
});
When it comes to securing APIs, we need to implement various mechanisms to ensure the confidentiality, and integrity of the application and its data. Let’s go over a few of these mechanisms now.
You can implement strong authentication mechanisms, such as JSON Web Tokens (JWT) or OAuth, to verify the identity of clients. Ensure that only authenticated and authorized users can access certain routes — in our case, the POST, PUT, and DELETE methods.
I will recommend the Passport middleware for Node.js, which makes it easy to implement authentication and authorization. Here’s an example of how to use Passport:
const passport = require('passport');
const LocalStrategy = require('passport-local').Strategy;

passport.use(new LocalStrategy(
    function(username, password, done) {
        // Verify username and password
        // Call done(null, user) if authentication is successful
    }
));
It’s important to enforce proper access controls to restrict access to specific routes or resources based on the user’s role or permissions. For example, you can check if the user making a request has admin privileges before allowing or denying them permission to proceed with the request:
function isAdmin(req, res, next) {
    if (req.user && req.user.role === 'admin') {
        return next();
    } else {
        return res.status(403).json({ message: 'Permission denied' });
    }
}
You can apply the isAdmin middleware defined above to any protected routes, thus restricting access to those routes.
Validate and sanitize user inputs to prevent SQL injection, XSS, and other security vulnerabilities. For example:
const { body, validationResult } = require('express-validator');

app.post('/users', [
    // add validation rules
], (req, res) => {
    const errors = validationResult(req);
    if (!errors.isEmpty()) {
        return res.status(422).json({ errors: errors.array() });
    }
    // Process the request
});
The code above allows you to specify validation rules for POST requests to the /users endpoint. If the validation fails, it sends a response with the validation errors. If the incoming data is correct and safe, it proceeds with processing the request.
You can use the Helmet middleware to set various HTTP headers for enhanced security:
const helmet = require('helmet');
app.use(helmet());
Configuring HTTP headers with Helmet helps protect your app from security issues like XSS attacks, CSP vulnerabilities, and more.
You can build on this tutorial by implementing the following suggestions:
docker-compose.yml file for managing multiple containers, such as the Node.js app and PostgreSQL database. This will make your Node.js application easier to deploy and set up on other machinesWhile actually implementing these next steps is beyond the scope of this tutorial, you can use these ideas to apply what we’ve discussed to a real use case.
You should now have a functioning API server that runs on Node.js and is hooked up to an active PostgreSQL database.
In this tutorial, we learned how to install and set up PostgreSQL in the command line, create users, databases, and tables, and run SQL commands. We also learned how to create an Express server that can handle multiple HTTP methods and use the pg module to connect to PostgreSQL from Node.js.
With this knowledge, you should be able to build on this API and utilize it for your own personal or professional development projects.
Would you be interested in joining LogRocket's developer community?
Join LogRocket’s Content Advisory Board. You’ll help inform the type of content we create and get access to exclusive meetups, social accreditation, and swag.
Sign up now
A breakdown of the wrapper and container CSS classes, how they’re used in real-world code, and when it makes sense to use one over the other.

This guide walks you through creating a web UI for an AI agent that browses, clicks, and extracts info from websites powered by Stagehand and Gemini.

This guide explores how to use Anthropic’s Claude 4 models, including Opus 4 and Sonnet 4, to build AI-powered applications.

Which AI frontend dev tool reigns supreme in July 2025? Check out our power rankings and use our interactive comparison tool to find out.
82 Replies to "CRUD REST API with Node.js, Express, and PostgreSQL"
Can you make a tutorial of user registration using react native with the PostgreSQL and inserting the data with the button onPress function , what i mean is a restful api with node.js using react native with the PostgreSQL and just add new user into database….
Thanks
Thanks for this tutorial. I was getting an error like “Cannot GET /users” and the resolution was to stop and start node index.js – in case anyone else gets stuck on that
I don’t really know why this brilliant tutorial doesn’t have many likes or comments. It’s perfect for a Node newbie looking to intercept the postgres world to build apis. Thanks very much!!
This is going to be a wonderful blog in no time.
This was incredible. Thank you so much. I’ve been having so many issues connecting to postgres that I thought it was going to take me forever to connect locally as well.
Note to anybody who might have permission issues connecting with your created user, you might have to grant read access instead of just creating a database: https://dba.stackexchange.com/questions/36870/permission-denied-in-postgres
just change myuser and paste the rest into postgres
for read access
GRANT ALL PRIVILEGES ON ALL TABLES IN SCHEMA public TO myuser;
for inserting data
GRANT ALL PRIVILEGES ON ALL SEQUENCES IN SCHEMA public TO myuser;
I was just about to leave the same comment here about the “me” user’s permissions! Thanks for sharing.
absolutely nice starting guide for me, theres a bit mistype in your create user response, just change to “results” and you good to go, anyway thanks… your starting guide helps me understand node works
This is a fantastic tutorial. Very well explained and thought out.
Real good
Great tutorial. Just a note, some of the Github examples are blank
Awesome! To the point, and actually got it working within a couple of hours.Thanks!
Thanks for the tutorial, this was really helpful getting me started on making a backend for my apps 🙂
I had only one issue, the setup with the bodyParser middleware (`app.use()` lines) was preventing my browser from connecting to Express. The server would start via CLI fine, but I was getting “waiting for localhost” when trying to hit the server from Firefox & Chrome. Starting Express in debug mode didn’t show anything indicative.. But after removing those lines, the rest of the tutorial worked fine! I’m going to investigate what the bodyParser component is meant for because it’s likely I’m skipping something important 😅
Awesome tutorial. Real help for beginners. With your step by step approach you explained everything so clearly. Thanks!
Hello there !
I got through the whole tutorial (which is really clear and great, thanks for that !), and I guess this is going to be a pretty stupid question (fairly new to Node/Express/APIs), but I’m on Windows, and the curls commands to POST and UPDATE don’t work, only the DELETE one those.
When I try, it returns an error :
“Cannot destructure property `name` of undefined or null;”
In any case thanks again for this tutorial 🙂 !
Hope you use Postman now
Where is this field (${results.INSERTID}) coming from? I am not seeing this field in the results object.
@ryan this means that you are trying to access name from a variable which is undefined
request.body is undefined and you are trying to get the name data which will throw this error
Thanks. Good tutorial. How may I add a data validation?
This was really straight forward and helpful, thanks 🙂
Thanks for this article. Helped a novice like me to start on Nodejs and PostGres. As token of thanks…was getting undefined for results.insertId for insert POST api. I replaced that by response.status(201).send(`User added with ID: ${results.rows[0].id}`) to get the last inserted id.
Amazing tutorial! Thank you so much
I solved this issue by adding the bodyParser.json() middelware in the app.post as follows:
app.post(‘/users’, bodyParser.json(), db.createUser);
One of the best tutorials I have ever seen on the internet world! Great job~
I like this tutorials. It was straight to the point, integrating basic concepts of node and postgresql. I wish more tutorials and/or videos where this straight forward, without trivial distractions.
It is best tutorial. thank you.
but, can you tell me how to access the four methods(GET, POST, PUT, and DELETE) in angular JS?
Great Beginner Guide on Postgres and Express. Thank you!
What a life saver! I wish many will copy your style of tutorials. I went through a number of frustrating ones until I found yours.Thanks.
Best one.. Thank you! 🙂
some of the code format like the put request is not working.
Fantastic walk-thru. Kudos!
where do you enter the mkdir node-api-postgres? I tried on my windows command prompt but when i got to npm i express pg, it says “‘npm’ is not recognized as an internal or external command, operable program or batch file”. Could you be more specific please cos I know it did not work on psql terminal so I’m not sure where to run this successfully
You’ve got NodeJS (nodejs.org) installed? NPM comes along with that.
thankyou very much for this wonderful blog!
keep helps us
Code repo:
https://github.com/karaagacylmaz/BasicNodeApi
This tutorial helps me a lot in my Web development learning. Thanks.
I have a use case that needs a response for multiple Ids. Something like:
‘SELECT * FROM users WHERE id IN $1’, [ListOfID].
The ListOfID comes from a Multiple HTML Select Options.
Thank you very much for a suggestion.
This was very helpful. One thing to mention, we’re missing the RETURNING clause for the add user query, which means we always get an empty results.rows array back. I used this query:
INSERT INTO users (name, email) VALUES ($1, $2) RETURNING id
and was able to get the id using: results.rows[0].id
The insert route doesn’t work anymore under Postgres 12.
It should be something like this:
pool.query(‘INSERT INTO users (name, email) VALUES ($1, $2) RETURNING id’, [name, email], (error, results) => {
if (error) {
throw error
}
response.status(201).send(`User added with ID: ${results.rows[0].id}`)
})
The main difference being the `RETURNING id` which returns the ID of the row that was inserted, and `results.rows[0].id` to return that id.
Great tutorial ! Thanks – helped me get going quickly with Postgres as well – and I too had to do what Thomas above me said to get the returning id – much appreciated!
Great article, but i found some issue in queries.js file, in post request, in callback function there’s “results” in parameter and in response the function is returning “result”.
Such a great tutorial, I learned lots of things from that, just one thing is that results should be result in callback function, i also needed to add ssl:true in connection string cause i got ssl require error.
Thanks for such a good basic tutorial
Folks who still have troubles with POST request and “result.insertId” / “results.rows[0].id” issue – you have to do one simple change: in the end of pool.query add “RETURNING *”, so the full query will look like this:
‘INSERT INTO users (name, email) VALUES ($1, $2) RETURNING *’
P.S. Perfect writing, thanks a lot!
i have user bodyParser.json() but still when i am doing console.log(request.body) in app.post(‘/users’, bodyParser.json(), db.createUser); getting empty result
Hi, has anyone experimented problems with the middleware part that checks for the presence of the parameter (request.params.id)? The error looks like it is not present so the information fetch is not happening. Greeitngs
Tania, I appreciate your step by step work through. Very helpful for my development using Postgresql. Nodejs and express configuration Kind regards
Tania,
very good tutorial. Nice explanation .Thank you so much 🙂
Fantastic Tutorial !!! So easy to understand and execute the same. Thanks a ton.
nice and tidy, thanks a lot
Like the rest of the crowd here I would like to thank you for this clean and easy-to-follow tutorial.
It works like magic! Thank you.
same with me, except i also had to add ‘RETURNING id’ in my SQL query at the end. so my final createUser function that finally works looks like this:
“`
const createUser = (request, response) => {
const { name, email } = request.body
pool.query(‘INSERT INTO users (name, email) VALUES ($1, $2) RETURNING id’, [name, email], (error, results) => {
if (error) {
throw error
}
response.status(201).send(`User added with ID: ${results.rows[0].id}\n`);
});
};
“`
thanks for awesome tutorial tutorial