How useful is an API without documentation?
I could argue that it isn’t really useful, as it could be a pain for your coworkers to collaborate with you without proper documentation.
But most developers do not like writing documentation because it doesn’t really prevent their code from working. However, it’s one of the most important best practices to use when developing an API.
The good news is that if you decide to build your API with Flask, you can leverage the power of Connexion to develop your API and write the documentation at the same time because it forces you to write your documentation using OpenAPI specification, then maps your endpoint to your Python functions.
Connexion allows you to describe your REST API in detail, and you are practically guaranteed that it will work as you have specified.
To specify a Flask API route, you’ll have to use the @app.route decorator as shown below:
@app.route("/")
def hello_world():
    return "<p>Hello, World!</p>"
But with Connexion, you will write normal functions without the decorator and then map your function to the docs directly in a yaml file using the operationId:
paths:
  /hello_world:
    post:
      operationId: hello_world
So, let’s dig in.
Setting up a Flask application is pretty straightforward. We need to install the required dependencies and set them up appropriately to work with Flask.
Let’s install them using pip.
pip install Flask marshmallow-sqlalchemy marshmallow flask-marshmallow "connexion[swagger-ui]"
In this tutorial, we’ll build a basic shipment API that allows us to create a shipment, view available shipments, and update shipments.
Let’s create the model for our API. We’ll use Flask-SQLAlchemy to create and manage our database model.
Our model.py will look like this:
from flask_sqlalchemy import SQLAlchemy
db = SQLAlchemy()

class Shipment(db.Model):
    """
    Shipment Model
    """
    id = db.Column(db.Integer, primary_key=True)
    destination = db.Column(db.String(80))
    source = db.Column(db.String(120))
    current_location = db.Column(db.String(120))
    status = db.Column(db.String(120))
    item = db.Column(db.String(120))
    description = db.Column(db.String(120))
    tracking_number = db.Column(db.String(120), nullable=True)
    arrival = db.Column(db.String(120))
    def __repr__(self):
        return '<Shipment %r>' % self.item

    def __init__(self, description, source, current_location, status, item, tracking_number, arrival, destination):

        self.description =  description
        self.destination =  destination
        self.source = source
        self.current_location = current_location
        self.status = status
        self.item = item
        self.tracking_number = tracking_number
        self.arrival = arrival
Next, we’ll create the database schema with Marshmallow, a Python ORM that simplifies the process of converting complex data types such as objects to and from Python native data types.
Here’s the code for schema.py:
from flask_marshmallow import Marshmallow
ma = Marshmallow()
class ShipmentSchema(ma.Schema):
    """
    Schema
    """
    class Meta:
        fields = (
        'id',
        'item',
        'description',
        'status',
        'tracking_number',
        'current_location',
        'source',
        'destination',
        'description',
        'arrival'
        )
The database model fields should match what we have in the schema.
Next, set up a configuration file, where we’ll set up the basic application requirement. We’ll plug in a SQLite database and set up Connexion with Flask.
Here’s what config.py looks like:
import connexion
import os

basedir = os.path.abspath(os.path.dirname(__file__))
application = connexion.FlaskApp(__name__)
application.add_API("swagger.yaml")
app = application.app
app.config['SQLALCHEMY_DATABASE_URI'] = 'sqlite:////' + os.path.join(basedir, 'db.sqlite')
Generally, when you set up a Flask app, you’ll initialize Flask, like so:
from flask import Flask
app = Flask(__name__)
However, because we are going to use Connexion, which will extend Flask’s features, we’ll do this differently. Let’s use Connexion to initialize Flask:
application = connexion.FlaskApp(__name__)
Next, we’ll add the API documentation yaml file, which will contain the entire route for our application.
application.add_API("swagger.yaml")
If you have your yaml file in a different directory, you can specify the exact directory by adding specification_dir='directory_name/' to theFlask Connexion instance:
application = connexion.FlaskApp(__name__, specification_dir='directory_name/')
To access the Flask app directly, we’ll reference it from the Connexion Flask instance:
app = application.app
Note that if we weren’t using Connexion, we’d just use application directly instead of application.app.
Finally, we’ll add the database configuration and set the path for our database file because we are using SQLite as our database.
app.config['SQLALCHEMY_DATABASE_URI'] = 'sqlite:////' + os.path.join(basedir, 'db.sqlite')
We now have Connexion up and running with Flask!
Now let’s create the tables. Open your shell and run the following code to create all the tables specified in our model definition:
from app import db
db.create_all()
Next, we’ll set up the main app entry point.
main.py
from app_config import app
from model import db
if __name__ == '__main__':
    db.init_app(app)
    app.run(debug=True)
Here, we’ll import the app, initialize the database, and run it. The app is now set up, so we just need to add the functions and routes.
.yaml fileLet’s start with creating the routes in the documentation. Begin by creating a swagger.yaml file in the app directory, the add the following OpenAPI specification:
swagger.yaml
openAPI: 3.0.0
servers:
  - description: Shipment Sample App
    url: http://localhost:5000/
info:
  description: This is a simple API
  version: "1.0.0"
  title: Simple shipment API
  contact:
    email: [email protected]
  license:
    name: Apache 2.0
    url: 'http://www.apache.org/licenses/LICENSE-2.0.html'
paths:
  /shipment/list:
    get:
      tags:
        - shipment
      summary: searches shipment
      operationId: view.get
      description: |
        By passing in the appropriate options, you can search for
        available shipment in the system
      responses:
        '200':
          description: search results matching criteria
          content:
            application/json:
              schema:
                type: array
                items:
                  $ref: '#/components/schemas/shipmentItem'
        '400':
          description: bad input parameter

  /shipment/create:
    post:
      tags:
        - shipment
      summary: adds a shipment item
      operationId: view.post
      description: Adds an item to the system
      responses:
        '201':
          description: item created
        '400':
          description: 'invalid input, object invalid'
        '409':
          description: an existing item already exists
      requestBody:
        content:
          application/json:
            schema:
              $ref: '#/components/schemas/shipmentItem'
        description: shipment item to add

  /shipment/update/{id}:
    put:
      operationId: view.put
      tags:
        - shipment
      summary: Update a Shipment in the people list
      description: Update a Shipment in the Shipments list
      parameters:
        - name: id
          in: path
          description: Shipment ID
          required: true
          schema:
            type: integer
            format: int64

      responses:
        200:
          description: Successfully updated a shipment in Shipments list
components:
  schemas:
    shipmentItem:
      type: object
      properties:
        item:
          type: string
        description:
          type: string
        status:
          type: string
        tracking_number:
          type: string
        current_location:
          type: string
        source:
          type: string
        destination":
          type: string
        arrival:
          type: string
Let’s take a look at the paths that we’ll match with our functions. The functions will be matched with the operationId, as shown in the sample code below.
view is the file that contains all the API functions. The get function is the target for this particular route, so we use view.get.
/shipment/list:
    get:
      tags:
        - shipment
      summary: searches shipment
      operationId: view.get
We’ll have to put the get function we are referencing in the view.py file. This function will search the database to get all the shipments.
Here’s what the view.py code looks like:
def get(id=None):
    """
    get Shipment
    """
    try:
        if id is None:
            shipment = Shipment.query.filter().all()
            shipment_schema =  ShipmentSchema(many=True)
            return shipment_schema.jsonify(shipment)
        else:
            shipment = Shipment.query.filter_by(id=id).first()
            shipment_schema = ShipmentSchema()
            return shipment_schema.jsonify(shipment)
    except Exception as e:
        jsonify({"error":"There was an error please contact the administrator"})
We’ll do the same for other functions and endpoints. You can clone the repository on GitHub to see the full code for other functions. It’s basically the same pattern.
To update the shipment, we’ll need to pass an ID in the URL parameter. So how do we do that?
Let’s use the function for the put request as an example:
def put(id): #note that the name of this function can be anything, like update_shipment
    """
    Update shipment
    """
    try:

        data = request.get_json()
        shipment = Shipment.query.filter_by(id=id).first()
        shipment = Shipment.query.filter_by(id=id)
        shipment.update(data)
        db.session.commit()

        return jsonify(data)
    except Exception as e:
        jsonify({"error":"There was an error please contact the administrator"})# Routes
The documentation will look like this. Notice that we are passing {id} in the route, as well as in the parameters object?
 /shipment/update/{id}:
    put:
      operationId: view.put
      tags:
        - shipment
      summary: Update a Shipment in the Shipments list
      description: Update a Shipment in the Shipments list
      parameters:
        - name: id
          in: path
          description: Shipment ID
          required: true
          schema:
            type: integer
            format: int64

      responses:
        200:
          description: Successfully updated a shipment in Shipments list
You can see that the route is expecting a parameter and that the parameter is defined in the parameters object as an ID.
You can now run your application with python main.py.
Once this is done, viola! Your API is ready, including the full documentation. By default, the API docs will be available in the route /ui.
Here is a screenshot of what we have created so far:
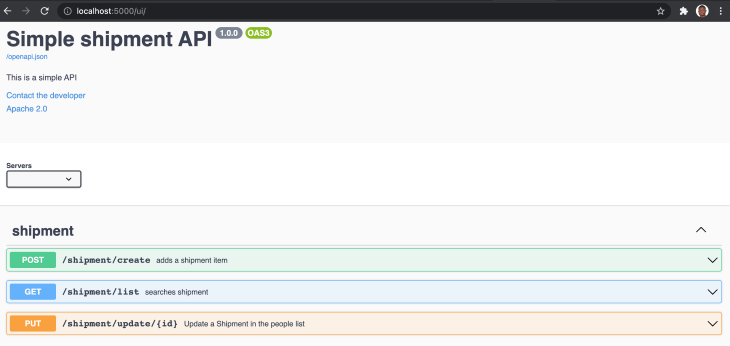
You can even interact with the API directly from the API docs. I also deployed the API here for testing. Feel free to play around with it.
You can check out the entire source code on GitHub.
Building APIs and the documentation alongside one another has not always been easy, but Connexion has since made it possible. It’s also easy to integrate into Flask without having to learn an entirely new framework. Happy hacking!
Install LogRocket via npm or script tag. LogRocket.init() must be called client-side, not
server-side
$ npm i --save logrocket

// Code:

import LogRocket from 'logrocket';
LogRocket.init('app/id');
// Add to your HTML:

<script src="https://cdn.lr-ingest.com/LogRocket.min.js"></script>
<script>window.LogRocket && window.LogRocket.init('app/id');</script>
Hey there, want to help make our blog better?
Join LogRocket’s Content Advisory Board. You’ll help inform the type of content we create and get access to exclusive meetups, social accreditation, and swag.
Sign up now
Get to know RxJS features, benefits, and more to help you understand what it is, how it works, and why you should use it.

Explore how to effectively break down a monolithic application into microservices using feature flags and Flagsmith.

Native dialog and popover elements have their own well-defined roles in modern-day frontend web development. Dialog elements are known to […]

LlamaIndex provides tools for ingesting, processing, and implementing complex query workflows that combine data access with LLM prompting.


