Node.js is a popular JavaScript framework with a strong, ever-growing community. Among the many things the ecosystem has to offer, LoopBack is an excellent framework for building APIs and microservices.

According to the official docs, “LoopBack is a highly extensible, open-source Node.js and TypeScript framework based on Express that enables you to quickly create APIs and microservices composed from backend systems such as databases and SOAP or REST services.”
Express.js — still the most popular Node.js framework — is fast, unopinionated, and minimalist, but it lacks most of the functionality that is common in a full-fledged web application framework. Since it’s unopinionated, you have to do a lot of decision-making, such as creating the structure that supports your backend and identifying the most appropriate package. You really need to know what you’re doing and where you’re going.
With LoopBack, your project has a predefined structure. You can define API endpoints and schemas using the OpenAPI standard. You can also integrate with databases, web services, and other platforms easily using connectors. LoopBack offers an built-in API explorer you can use to test endpoints.
For this tutorial, you’ll need to have Node.js (v8+) installed on your machine, as well as a text editor.
We’re going to build a book store application using LoopBack. Our app will implement basic CRUD operations, and we’ll demonstrate how to use LoopBack’s CLI and API explorer.
To bootstrap a LoopBack application, we’ll use the LoopBack CLI. Run the following command to install it.
npm i -g @loopback/cli
Now you have the LoopBack CLI tool on your machine. Next, create a new project with the CLI tool. Go to your project directory and run this command:
lb4 app
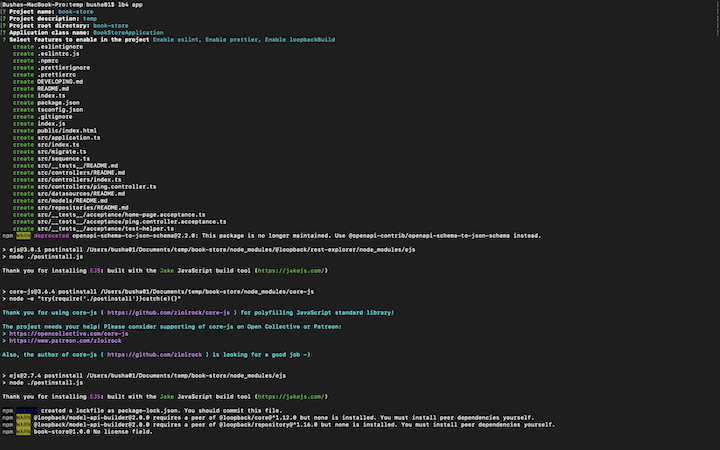
This is an interactive command that prompts you to answer a few questions to set up your new project. You’ll be required to enter a name for your app; we’ll call it book``-store. For a project description, you can enter A dynamic application with Loopback. When asked for the root directory and application class name, press enter to maintain the defaults. Finally, for features, enable Prettier, ESLint and loopBackBuild.
Here is how the process should go:

After the project is created, start the application by running the following commands.
# Move into the app directory
cd book-store

# Start application
npm start
You should see a message on your terminal with a URL to test out. When you open the URL, you should see a JSON displayed in your browser.
Since you’re building a simple book store, you want your app to be able to store and retrieve books from a data source. To achieve this, we need to build a model that describes your domain objects (the type of data).
LoopBack provides decorators — @model and @property — that make defining models extensible. You can use the @model decorator to configure the model settings (such as enable strict mode or hide a certain property) and the @property decorator to define model property characteristics (e.g., specify a property type as a string or boolean or set a property to be required).
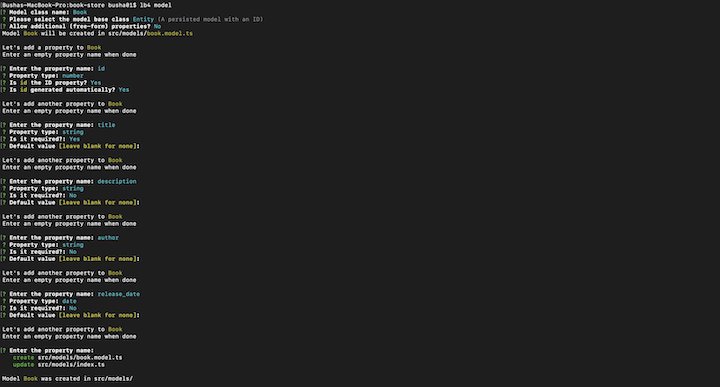
The next step is to create a book entity containing a list of properties — namely, id, title, description , author, and release_date. You can use LoopBack’s interactive command for creating models.
Run the following command in your app directory and answer the prompts to generate your book model.
lb4 model
You may need to stop your server from running if you’re using the same terminal window. On a Mac, you can use Ctrl+C to stop the server.
Here is how the process of creating a model should go:

For a model to be persisted in a database, the model must have an id property and inherit from Entity base class.
A datasource in LoopBack acts as an interface for connecting to various sources of data, such as a database, REST service, SOAP web service, or gRPC microservice, by providing the necessary configuration properties. In the previous section, you defined a model by the type of data it should accept. Here, you need to define how the data is stored.
In LoopBack, you should use the lb4 datasource command provided by the CLI to generate a datasource. When you run this command, you’ll be asked some questions. Below is a screenshot of responses you should provide.

Note: In the field for user and password, you can skip the values by just pressing enter since this is just a sample app.
In the screenshot above, the specified datasource connection is named db, and you selected MongoDB as the datasource connector. LoopBack provides other connection types you can also choose from, such as Redis, MySQL, PostgresSQL, and REST services.
Now that you have a model and a datasource, you need to create a repository to handle operations of the book model against the underlying datasource.
For a repository to perform CRUD operations, it needs to use the DefaultCrudRepository class, which binds the model with a datasource. Leverage the LoopBack CLI to create a repository for your app.
Inside the project folder, run this command:
lb4 repository
Your responses should look like this:

Now open the src/repositories/book.repository.ts file in your favorite editor, such as VSCode. Inside the file, replace it with this snippet:
// src/repositories/book.repository.ts

import {DefaultCrudRepository} from '@loopback/repository';
import {Book, BookRelations} from '../models';
import {DbDataSource} from '../datasources';
import {inject} from '@loopback/core';
export class BookRepository extends DefaultCrudRepository<
  Book,
  typeof Book.prototype.id,
  BookRelations
> {
  constructor(@inject('datasources.db') dataSource: DbDataSource) {
    super(Book, dataSource);
  }
  public findByTitle(title: string) {
    return this.findOne({where: {title}});
  }
  public findByAuthor(author: string) {
    return this.findOne({where: {author}});
  }
}
The BookRepository class extends the DefaultCrudRepository class. This makes it possible to handle basic crud operations like creating a new book. You can also add custom methods to the repository to perform more operations like findByTitle and findByAuthor.
So far you’ve implemented the model, datasource and repository, but where do you define the logic that handles requests for the application? In LoopBack, you do this in the Controller class. The controllers handle the request-response lifecycle for your app.
According to the official documentation, a controller “implements an application’s business logic and acts as a bridge between the HTTP/REST API and domain/database models.”
In LoopBack, you need to specify a basic response object for your routes — i.e., what your API response will look like if a request is made. This object is known as the API specification, and it can use the OpenAPI specification. If you look at the PingController in the application (located at src/controllers/ping.controller.ts), there is a PING_RESPONSE variable that serves as the API specification for the ping() method.
Each method on a controller is used to handle an incoming request from an HTTP/REST API endpoint, perform some logic, and return a response.
There are various ways to define a route to a controller method. You can define a route to the controller method in the main application constructor located in the src/application.ts file.
// ... in your application constructor
this.route('get', '/ping', PING_RESPONSE, PingController, 'ping');
Another way is to use decorators such as @get and @post to annotate a controller method with a route’s metadata.
// Map to `GET /ping`
@get('/ping', {
  responses: {
    '200': PING_RESPONSE,
  },
})
Decorators are simply functions that modify a class, property, method, or method parameter.
Now create a BookController class by running this command in your terminal:
lb4 controller
Here’s how the process should go:

If you open the book.controller.ts file located in src/controllers, you’ll see that the class handles most of the CRUD operations and interacts with the BookRepository class. In this class, the methods have their routes defined using decorators.
In the BookController class, you’ll find the create method that will handle the operation for creating a new book. You’ll see the BookRepository class, which interacts with the book model and app datasource to create a new book. Above this method, the route /books is defined using the @post decorator, which indicates a POST request, and the responses object, which is the response API specification.
Like any project, you should test your app to ensure that it’s working properly. Run your app with the following command.
npm start
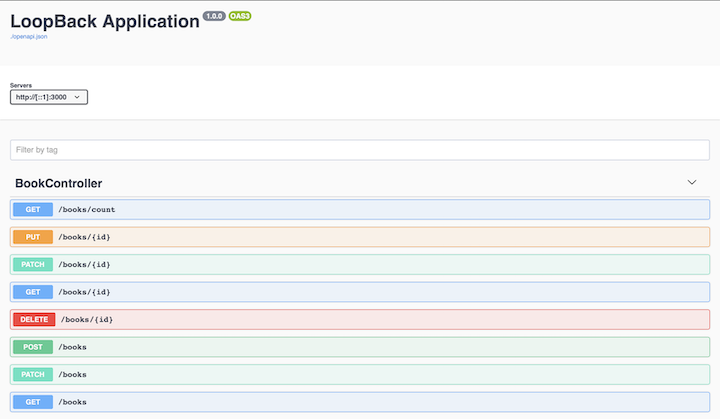
Open http://127.0.0.1:3000/explorer in your browser. You should see the API explorer showing all the defined endpoints for your BookController class.
You can test the newly added endpoints using the explorer interface. The screenshot below shows that a post request is made to the /books endpoint and is used to store a new book in your MongoDB datasource.

As you can see, LoopBack saves you a lot of manual work. Its CLI provides a wide range of commands that can do pretty much anything, from creating models, repositories and controllers, to configuring a datasource for the application.
LoopBack can be used in various scenarios, including CRUD operations (accessing databases) and integrating with other infrastructures and services. Lastly, it’s simple to get started using LoopBack because the learning curve is low. As a framework, LoopBack has a lot of potential to introduce myriad benefits to the Node.js community.
 Monitor failed and slow network requests in production
Deploying a Node-based web app or website is the easy part. Making sure your Node instance continues to serve resources to your app is where things get tougher. If you’re interested in ensuring requests to the backend or third-party services are successful, try LogRocket.

LogRocket lets you replay user sessions, eliminating guesswork around why bugs happen by showing exactly what users experienced. It captures console logs, errors, network requests, and pixel-perfect DOM recordings — compatible with all frameworks.
LogRocket's Galileo AI watches sessions for you, instantly identifying and explaining user struggles with automated monitoring of your entire product experience.
LogRocket instruments your app to record baseline performance timings such as page load time, time to first byte, slow network requests, and also logs Redux, NgRx, and Vuex actions/state. Start monitoring for free.
Would you be interested in joining LogRocket's developer community?
Join LogRocket’s Content Advisory Board. You’ll help inform the type of content we create and get access to exclusive meetups, social accreditation, and swag.
Sign up now
This guide explores how to use Anthropic’s Claude 4 models, including Opus 4 and Sonnet 4, to build AI-powered applications.

Which AI frontend dev tool reigns supreme in July 2025? Check out our power rankings and use our interactive comparison tool to find out.

Learn how OpenAPI can automate API client generation to save time, reduce bugs, and streamline how your frontend app talks to backend APIs.

Discover how the Interface Segregation Principle (ISP) keeps your code lean, modular, and maintainable using real-world analogies and practical examples.